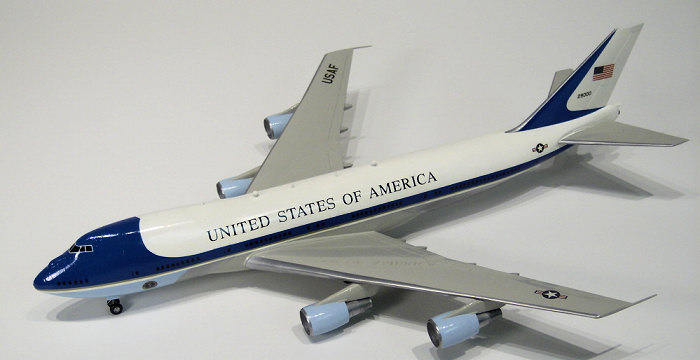
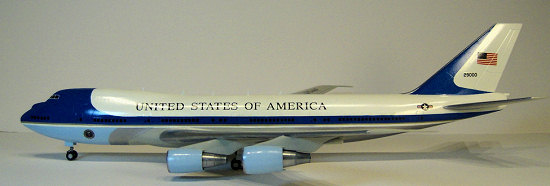
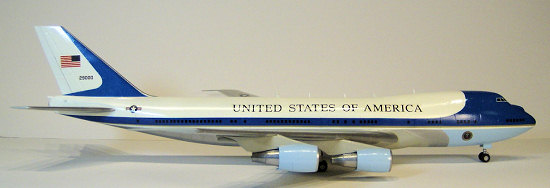
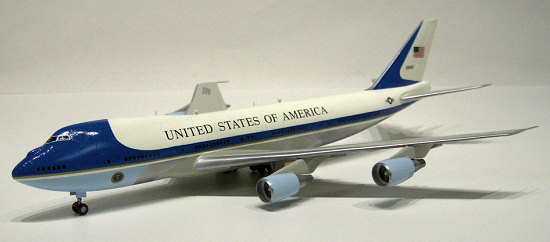
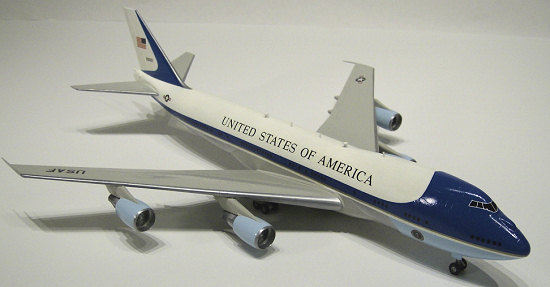
Hasegawa 1/200 VC-25A
| KIT #: | 10608 |
| PRICE: | $25.99 MSRP |
| DECALS: | One option; two serials |
| REVIEWER: | John Kauck |
| NOTES: | Presidential/VIP aircraft |
| HISTORY |
In 1990, the presidential air transport fleet took delivery of two Boeing 747-200B's, designated VC-25A, tail numbers 28000 and 29000. 28000 first carried President George H. Bush on Sept. 6, 1990, on a round trip from Washington, D.C to Kansas, then Florida, and back.
While aerial refueling capabilities and anti-aircraft missile countermeasures provide airborne security, the aircraft’s capabilities as an airborne military command center were enhanced following September 11, 2001, when President George W. Bush found he was not adequately able to monitor events and coordinate with officials on the ground. The planes’ communications centers now enable the President to coordinate with military and civilian authorities, hold video conferences, and monitor news coverage while in flight. The VC-25A is expected to continue to provide presidential travel well into the 21st century.
Specifications:
Length: 231 ft, 10 in (70.7 meters)
Wingspan: 195 ft, 8 in (59.6 meters)
Tail Height: 63 ft, 5 in (19.3 meters)
Engines: Four General Electric CF6-80C2B1 jet engines with 56,700 lbs of thrust each
Maximum Takeoff Weight: 833,000 pounds (374,850 kilograms)
Maximum Range: 7,800 miles (6,800 nautical) (12,550 kilometers)
Ceiling: 45,100 feet (13,746 meters))
Speed: 630 miles per hour (Mach 0.92)
| THE KIT |
This Hasegawa kit is a model of the presidential 747s. It contains the decals for both Tail No. 28000 and Tail No. 29000. I built 29000.
This is a nicely detailed kit, and a good rendition of the subject aircraft, although with no interior. The parts had almost no flash on the sprue and fit very well together, many almost perfectly. However, as is the case with most Hasegawa kits I’ve encountered, the decals were far too thin and transparent and didn’t nestle down smoothly around complex curves no matter how much Micro Sol setting solution I used. They also were so thin they showed the contrasting painted colors beneath them, precisely what they were intended to cover up! I ended up having to buy another kit to get a second set of decals to double them up. (Not the first time I’ve had to do this with a Hasegawa kit!)
I also
dislike the fact that the cabin windows are molded i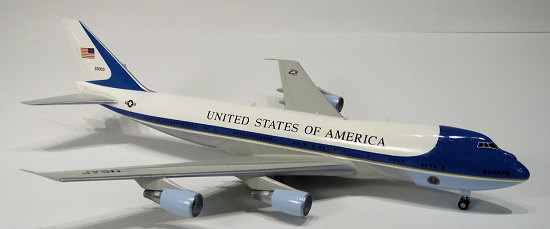 nto
the fuselage but no clear parts are provided for windows, leaving empty
openings. Yet there is a clear part for the cockpit windows…..? I would
prefer Hasegawa either provide the clear parts or mold the fuselage smooth and
represent the cabin windows with black decals. I filled the cabin window
openings and subsequently blacked out the cabin and cockpit windows. More on
this later.
nto
the fuselage but no clear parts are provided for windows, leaving empty
openings. Yet there is a clear part for the cockpit windows…..? I would
prefer Hasegawa either provide the clear parts or mold the fuselage smooth and
represent the cabin windows with black decals. I filled the cabin window
openings and subsequently blacked out the cabin and cockpit windows. More on
this later.
The instructions, like all Hasegawa instructions, are detailed and thorough, with ten assembly step diagrams, noting when and when not to glue, and indicating right next to the drawing what colors small parts or assemblies should be painted. They also provide a diagram of the parts sprues. A very good painting/decal diagram for the top, bottom and sides of the aircraft is provided as well. It is best to always check references for proper markings as painting/decal diagrams may have minor inaccuracies, though I found none with this one.
The kit has six parts sprues and a single clear part, the cockpit windshield. One sprue contains the right and left fuselage halves. Another with the left front and rear wing halves. Another with the opposite parts. A fourth with the engine/ mount halves and jet fan blades. The fifth contains the parts to construct the landing gear and gear doors, etc. The sixth is a clear sprue with a 2-piece display stand which I did not use. The kit also contains a small plastic bag containing metal detail parts including a radar dome for the nose and various antennae. And finally there are two metal weights provided to weight down the nose to sit on the tri-landing gear.
| CONSTRUCTION |
First I filled the cabin window openings in the fuselage halves with Squadron White Putty from the inside, then sanded them smooth from the outside. When everything looked good, I then glued an extra fishing weight in addition to the kit provided weighted ballast assembly into the nose cavity to ensure the plane would sit properly on its landing gear after completion. Next, the two fuselage halves went together very well and were clamped then bonded with a few touches of Zap CA super thin glue, letting capillary action do its thing. Next, the clear cockpit window piece was attached with a little super glue. It fit very well and no sanding was needed around it.
I also installed part #D1, the main gear wheel wells, into the fuselage so as to fully complete building the fuselage. Then I checked for any remaining gaps along the fuselage seams with my silver Sharpie pen. I spot filled any imperfections with thick or thin super glue as necessary and sanded smooth. I re-scribed any sanded down panel lines across the top and bottom of the fuselage with my #11 blade. I then added the metal radar dome piece to the nose and another metal detail piece to the tail, both with a toothpick placed droplet of thin super glue.
I use the Flex.i.File system to sand my models. I work thru the sticks down to the #3210 Polisher/Finisher file to get a nearly glass smooth finish. This is especially important if your model will have silver and/or metal finishes (which this one does) because silver/metal finishes reveal every imperfection. This is also why I check all my seams with a Metallic Silver Sharpie - it shows any little imperfections to be corrected.
 The front and rear wing
halves also fit well together, and were also tacked with thin Zap. After
sanding and smoothing each separately, I dry fit them to the wing roots and made
sure everything lined up properly. Again they fit almost perfectly. I attached
the front wings to the fuselage with drops of thick super glue in the receiving
holes, then subsequently while holding each wing at the proper angle I applied a
few touches of Zap CA super thin glue at the wing roots and let capillary action
draw it around the wing roots, to “lock” the wing in place. The rear wings I
left off, as the last step after applying decals, to make that task easier.
The front and rear wing
halves also fit well together, and were also tacked with thin Zap. After
sanding and smoothing each separately, I dry fit them to the wing roots and made
sure everything lined up properly. Again they fit almost perfectly. I attached
the front wings to the fuselage with drops of thick super glue in the receiving
holes, then subsequently while holding each wing at the proper angle I applied a
few touches of Zap CA super thin glue at the wing roots and let capillary action
draw it around the wing roots, to “lock” the wing in place. The rear wings I
left off, as the last step after applying decals, to make that task easier.
Like most kit jet engines, these were molded in two halves with the fan blades as a third piece to be set inside the two joined halves. On each engine, I went through a few iterations of dry fitting and sanding the fan blade piece them finally glued it to one of the engine halves, and then glued the two halves together. Making sure to get those inside seams smooth is crucial because the engines are so prominent on this aircraft. The inside sanding was done with progressively finer grit small rolled sandpaper sheets which I twisted back and forth inside the opening to get the interior of the engines smooth and make the seams disappear, spot checking along the way with my silver Sharpie.
I then attached the metal detail parts (I think they are anti-missile chaff dispensers..?) to the engine mounts as instructed. I left the engine exhausts off of the engines and the engines off the wings for painting separately.
On this kit, the engine/mounts are specific to each side of the plane, and to the inner or outer position on each wing, so make sure to keep track of which is which (mark them with the part number, etc. ) to ensure placement in the correct spot on each wing later.
Next, I cut and cleaned all the landing gear pieces, i.e., the tire/hubs, struts and gear doors. Then I dry fit them to each other and to the aircraft. When assured every thing will fit together properly, I left these pieces off the aircraft and wings for painting separately and attachment later.
Finally, the kit provides several antennae for the plane. The instructions also provide actual size templates for six fin-like antennae. I cut them from flat styrene stock and sanded to the proper size and thickness. I attached all the antennae with droplets of super glue during final assembly. (See my technique in the final assembly section below.)
| COLORS & MARKINGS |
This kit requires both metallics and colors. For the metallics, I used the Alclad ll metal painting system. For those not familiar, the Alclad system consists of a black primer coat, which dries as smooth as glass, over which the metallic carrier coats are sprayed. You can also spray the metallic carrier over high gloss paint finishes as well, which I did on this kit for the leading edge of the tail fin over the white gloss paint. While the primer requires at least 24 hours to cure, the subsequent metallic carrier coat(s) dries within a half hour and then may be masked and painted over if needed.
 For the colors, I used
enamels. The instructions only indicate basic general colors, e.g. White, Light
Gray, Silver, etc. I used Alclad II Polished Aluminum #105 instead of “silver”
on the lower fuselage and wing and tail leading edges. I added a few drops of
Testors Gloss Black #1149 to the Alclad (1 part black/4 parts Alclad) for the
“burnt iron” tips of the engine exhausts. I used Testors enamel #1145 Gloss
White on the fuselage top. I mixed Testors Gloss White #1145 and Blue #1108,
80% / 20 % as instructed, to come up with the “Sky Blue” for the lower front
fuselage and engine cowlings. I used Model Master enamel FS# 16440 Gloss Gull
Gray for the wings and lower fuselage center section. I used Flat Black #1149
for the tires. Finally, I used Testors Gloss Black #1147 over the filled-in
cabin windows so the black would show through the decal window openings as
blacked out windows. (Editor's Note: Xtracolor offers the VIP blues in their
line of paints)
For the colors, I used
enamels. The instructions only indicate basic general colors, e.g. White, Light
Gray, Silver, etc. I used Alclad II Polished Aluminum #105 instead of “silver”
on the lower fuselage and wing and tail leading edges. I added a few drops of
Testors Gloss Black #1149 to the Alclad (1 part black/4 parts Alclad) for the
“burnt iron” tips of the engine exhausts. I used Testors enamel #1145 Gloss
White on the fuselage top. I mixed Testors Gloss White #1145 and Blue #1108,
80% / 20 % as instructed, to come up with the “Sky Blue” for the lower front
fuselage and engine cowlings. I used Model Master enamel FS# 16440 Gloss Gull
Gray for the wings and lower fuselage center section. I used Flat Black #1149
for the tires. Finally, I used Testors Gloss Black #1147 over the filled-in
cabin windows so the black would show through the decal window openings as
blacked out windows. (Editor's Note: Xtracolor offers the VIP blues in their
line of paints)
[Caution: Learn from my mistake – I simply painted a black “stripe” down the sides over the filled-in windows. Unfortunately Hasegawa decals are so darn thin that when I placed the side blue stripe/window decal over them, the painted black line contrasted against the white painted background showed through these pitifully thin decals. Ggggrrrrrr! I had to buy another kit and double up this decal to correct the problem. If you decide to “black-out” the windows as I did, you should hand paint each window individually before placing the decal to avoid this problem.]
I almost always make actual size copies of the decal sheet. In this case, they particularly came in handy as templates to determine where to mask along the separation line between the white top and natural metal bottom of the fuselage. I cut out each entire decal copy and trimmed it right on the bottom edge of the stripe lines. I found that lining up the decal door portholes/handles over the scribed door detail on the model gave me the required alignment, and I taped them in place. I then slightly folded back the decal template and masked under the stripes. Afterward, I spot checked by holding my thumbnail at the bottom of the windows and folding back the template. I should always see masking tape to know I didn’t mask too high and that the decal will cover the line between white and metal/gray when I put them on.
The following is the order in which I primed, masked and painted the aircraft:
1. White Primer, then Gloss White Paint:
· Mask wings
· Spray entire fuselage and tail
·
Roof antennae
2. Alclad Primer:
· Mask upper fuselage as described above
· Spray bottom of fuselage
· Front wings; top & bottom
· Rear Wings Top and bottom
· Engines, inside and out
· Engine exhausts
· Landing gear
· Tire hubs
3. Alclad Polished Aluminum:
· Spray bottom of fuselage
· Front wings; leading edges and rear flaps; top & bottom
· Rear wings: leading edges top and bottom
· Masked then sprayed the tail fin leading edge (the carrier will work fine on the smooth gloss white surface)
· Engines, inside and out
· Engine exhausts
· Landing gear
· Tire hubs
· Front and rear gear door interiors
4. Sky Blue:
· Mask leading edges of engine cowlings
· Mask off front lower portion of fuselage
· Spray engine cowlings
·
Spray front lower portion of fuselage
5. Light Gray:
· Mask front wing leading edges top and bottom
· Mask rear wing leading edges top and bottom
· Mask off the engine cowlings leaving the engine mounts exposed
· Mask off top, front and rear portions of the fuselage leaving around the front wing root area and the center of the bottom of the fuselage and wings exposed.
· Spray the fuselage wing mount area around the front wings, the center of the bottom of the fuselage, and the front wings.
· Spray the rear wings
· Spray the engine mounts
·
Spray landing gear doors
6. Alclad Darkened Polished Aluminum (with Gloss Black):
· Mask off and spray tips of engine exhausts
·
Mask off and spray engine mount corners near
exhausts.
7. Flat Black:
·
Carefully brush the tires around the aluminum hubs
8. Gloss Black:
· Carefully hand-brush the cockpit and cabin windows (don’t do a “stripe” like I did!)
| FINAL CONSTRUCTION |
After everything was allowed to dry for at least 48 hours, I attached all the remaining parts and assemblies to the plane, except for the engines and rear wings, which I left off until after decaling to make that task easier.
 Attaching the landing gear,
struts, gear doors and antennae, with just a tiny drop of super glue is an
extremely delicate task. Precise placement of these often tiny parts without
unsightly gobs of glue is always difficult at the 1/144 and smaller scales. I
find the use of a “third hand” indispensable. Available at most hobby shops and
on-line, it is a small stand with a heavy iron base and one or more ball joint
mounted arms with alligator-type spring clamps to hold a part in any angle
required. I use them in combination with plastic hemostats (i.e., scissor
clamps,) so as not to scratch the part, to position and then hold these small
parts in place while the super glue dries, as using super glue accelerant will
mare the finish and maybe even dissolve surrounding paint.
Attaching the landing gear,
struts, gear doors and antennae, with just a tiny drop of super glue is an
extremely delicate task. Precise placement of these often tiny parts without
unsightly gobs of glue is always difficult at the 1/144 and smaller scales. I
find the use of a “third hand” indispensable. Available at most hobby shops and
on-line, it is a small stand with a heavy iron base and one or more ball joint
mounted arms with alligator-type spring clamps to hold a part in any angle
required. I use them in combination with plastic hemostats (i.e., scissor
clamps,) so as not to scratch the part, to position and then hold these small
parts in place while the super glue dries, as using super glue accelerant will
mare the finish and maybe even dissolve surrounding paint.
Again, to make it easier to put on the decals, I attached the engines and the rear wings after decals. The rear wings went on with a tiny drop of super glue in each of the receiving holes, placed with a toothpick, and then held in place a few moments. The four engine/mounts were attached to their specific position on each side of the plane and on the wing with tiny toothpick placed droplets of super glue in the receiving holes.
Markings/Decals:
Decal placement is challenging, and these thin Hasegawa decals made it even more difficult. There are six fuselage decals, three for each side. Half of the dark blue cockpit section extends down to include the window openings and gold and white separation stripes and back onto the forward half of the fuselage. The decals for the rear half of the fuselage stripe/window openings flare on the bottom at the ends to meet under the rear wings (the reason I left the rear wings off until after decals.) And there is a “United States of America” decal for each side.
The key to getting the proper alignment of the decals is to start with the front decals over the cockpit as the other fuselage decals will align to them. Even though I used plenty of red Micro Sol “for highly irregular surfaces” as these decals should conform completely around the cockpit, the radar dome, and the nose, I couldn’t get them to lay perfectly flat. These ridiculously poor quality decals wrinkled incessantly. (Actually, if I were to do this kit again, I’d mask and paint the dark blue section/stripe and use gold and white stripe stock decal between the upper and lower portions of the fuselage.)
I aligned the back half of the side stripe/window opening decals between the cockpit /forward half decals and rear door scribings working from front to back down the plane. I lined up the rear decal door window opening right over the scribed rear door lines in the model.
With these side decals in place, the cabin and cockpit windows appeared black as intended. But the paint separation line and the black painted stripe showed through these thin decals. I later bought another kit and doubled these fuselage decals, and luckily it fixed the problem. I also created the cockpit window frames from thin silver stripe decal.
I placed the blue tail section decals, flag decals, and tail number decals on each side of the tail fin. Using my dividers, I ensured the space between the top of the tail fin and the top of the flags was an equal to the space between the base of the tail fin and the bottom of the flags as per my references. This ensured both were in the same spot on each side. Then I used the dividers to make sure the tail numbers were the same height from the base of the tail fin on each side.
After the decals dried over night I attached the engines and the rear wings, and then gave the entire model a coat of Future to give it a gloss finish.
| CONCLUSIONS |
 Obviously I was disappointed
by this kit, specifically with the decals. While the parts fit and went
together exceptionally well, the extraordinarily poor quality of the decals and
the resulting frustration and rework they caused left me with a very negative
overall impression of this kit (as do most Hasegawa kits; I had the same problem
with the Blue Angels F/A-18 decals – had to lay down two sets!) I simply can’t
understand how Hasegawa can get their kit parts so right and their decals so
wrong.
Obviously I was disappointed
by this kit, specifically with the decals. While the parts fit and went
together exceptionally well, the extraordinarily poor quality of the decals and
the resulting frustration and rework they caused left me with a very negative
overall impression of this kit (as do most Hasegawa kits; I had the same problem
with the Blue Angels F/A-18 decals – had to lay down two sets!) I simply can’t
understand how Hasegawa can get their kit parts so right and their decals so
wrong.
Anyway, it’s a fairy easy kit to build, albeit with some slightly tricky requirements, i.e., filling the windows, masking, and painting. It should be a good challenge for a beginner and fine for the intermediate (me) to expert modeler. Learn from my experiences above and take them into consideration if you build this kit.
| REFERENCES |
· Planes of the Presidents: An Illustrated History of Air Force One; Bill Holder; Schiffer Military History Books, Atglen, PA, 2000
· Various/numerous web sites for reference photos, generated by search engine entries on each plane’s military designation, callsign, and/or nick name, i.e., “VC-25A” and/or “Air Force One” into Google Images and scroll through the results. Save the photos (right click on them and click “save photo as”) to your hard drive, then just zoom in on the area you want.
Happy Modeling!
January 2008
Copyright ModelingMadness.com
If you would like your product reviewed fairly and quickly, please contact the editor or see other details in the Note to Contributors.
Back to the Review Index Page 2020