Hasegawa 1/72 A-4E/F Skyhawk
| KIT #: | B 9 |
| PRICE: | NZ $18.00 |
| DECALS: | Two options |
| REVIEWER: | Sam Hall |
| NOTES: | Converted to A-4K. Microscale 72-437 used & Flying Kiwis roundels. |
| HISTORY |
As part of the modernisation and re-equipment of the Royal New Zealand Air Force (RNZAF) that began in the mid sixties, a replacement for the Canberra B(I)-12’s then in use as attack aircraft was required. A variety of aircraft were considered for the role including the F-4C, F-5, F-111, Mirage IIIO, A-7, F-104G and the A-4 Skyhawk. The RNZAF preference was the F-4C. To make a long story short, economics and political considerations resulted in the A-4 being selected. 14 (10 single seaters and 4 trainers) were delivered to New Zealand in 1970, equipping mainly 75 Squadron (previously operating DeHavilland Vampire FB-5’s), with some aircraft going to 14 Squadron (previously operating the Canberra) to be operated alongside Vampire T.11’s in a training role, both squadrons being based at RNZAF Ohakea in the North Island of New Zealand. After the Vampires were replaced by the BAC Strikemaster in 1972 all the A-4’s were assigned to 75 Squadron.
 The RNZAF A-4’s were designated
the ‘K’. They were essentially A-4F’s with modifications specific to the RNZAF.
The most obvious was the larger, squared off fin of the A-4M. Also fitted was a
braking parachute, as these A-4’s were to be exclusively land based. A VHF blade
aerial appeared on top of the hump, which was empty. The avionics normally
fitted in the space were not bought for the RNZAF. There may have been some
intention to do so at a later date but this never eventuated. In 1984 the Royal
Australian Navy fleet of 10 A-4G’s (also based on the A-4F) was purchased by the
RNZAF, allowing the re-formation of 2 Squadron to operate them.
The RNZAF A-4’s were designated
the ‘K’. They were essentially A-4F’s with modifications specific to the RNZAF.
The most obvious was the larger, squared off fin of the A-4M. Also fitted was a
braking parachute, as these A-4’s were to be exclusively land based. A VHF blade
aerial appeared on top of the hump, which was empty. The avionics normally
fitted in the space were not bought for the RNZAF. There may have been some
intention to do so at a later date but this never eventuated. In 1984 the Royal
Australian Navy fleet of 10 A-4G’s (also based on the A-4F) was purchased by the
RNZAF, allowing the re-formation of 2 Squadron to operate them.
The humps were removed in the late eighties as the collective A-4K/A-4G (the G’s didn’t have humps anyway) fleet was upgraded to ‘Kahu’ standard. This involved amongst other things the fitment of an APG-66 radar, installation of a ‘glass’ cockpit, HOTAS systems and HUD, and provision for the use of LGB’s AGM-65’s, and AIM-9L’s. In Kahu form the A-4K was a potent attack aircraft for the RNZAF through the nineties. Replacement by the F-16 was scheduled for mid 2000, but a change of government saw the F-16’s cancelled, and the Air Combat Wing (75, 14 and 2 Sqn’s) disbanded entirely in December 2001. At the time of writing the 17 surviving Kahus are in storage at RNZAF Woodbourne in the South Island, awaiting shipment to their new owners Advanced Training Services International (ATSI) in the USA. For four of the ex A-4G’s, this will be their fourth operator, having served with the USN (including Vietnam operations with VA-155 aboard USS Ranger) prior to sale to the RAN.
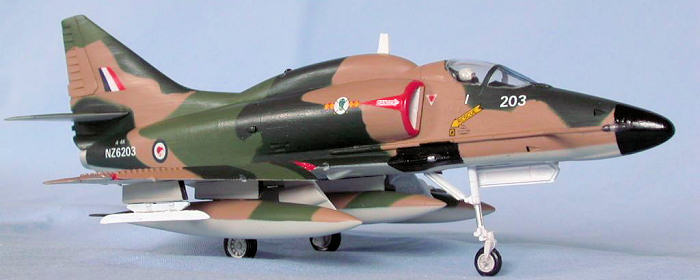
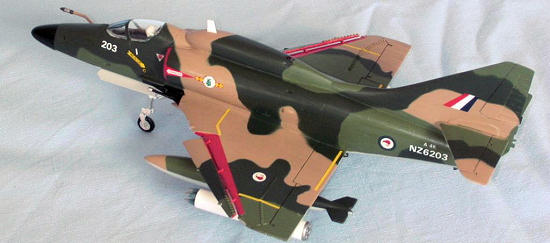
My model depicts NZ6203, one of the
original A-4K’s. They were delivered in the then current SEA TO.1.1.4 colour
scheme as used by the USAF in Vietnam. In the mid eighties the tan was replaced
by d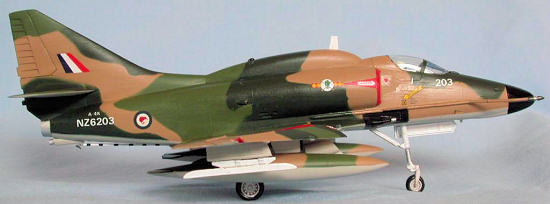 ark grey, the markings toned
down, and the camouflage wrapped around as the upgrade approached. In the late
nineties the scheme changed again to all-over dark green, with the markings
being further toned down. This was the final scheme for the RNZAF A-4, and it is
understood it will be retained along with the RNZAF unit markings by ATSI.
ark grey, the markings toned
down, and the camouflage wrapped around as the upgrade approached. In the late
nineties the scheme changed again to all-over dark green, with the markings
being further toned down. This was the final scheme for the RNZAF A-4, and it is
understood it will be retained along with the RNZAF unit markings by ATSI.
NZ6203 was destroyed in June 1996, in a crash near Ohakea after engine failure due to oil starvation, believed to be caused by fatigue failure of an oil feed pipe. The pilot ejected safely. The considerably shortened J-52 engine was recovered and is on display at the Ohakea Base museum. In addition, other recovered bits and pieces were sold as paperweights! Because of this I actually have a piece of this aircraft, a section of framework from the nose.
| THE KIT |
If you buy only one 1:72 A-4 this
year, don’t buy this one. I bought it for this build, well, I’m not really sure
why. I think I wanted a challenge. You get 70 pieces moulded in light grey
plastic, plus a clear canopy. There is a small amount of flash, and mould lines
are present on parts like the undercarriage. I understand this may be a FROG kit
originally, which would explain a lot of things. It is Matchbox level basic, but
without the trenches (actually the surface detail on the Matchbox A-4M is
superior in places). Detail where present is fine raised line. A lot of su rface
detail is not present. Shape is okay except for the nose forward of the cockpit,
which is too big and too round. Leading edge slats are moulded closed, airbrakes
are moulded separately. The main undercarriage bays have an attempt at ribbing,
but it is very inaccurate.
rface
detail is not present. Shape is okay except for the nose forward of the cockpit,
which is too big and too round. Leading edge slats are moulded closed, airbrakes
are moulded separately. The main undercarriage bays have an attempt at ribbing,
but it is very inaccurate.
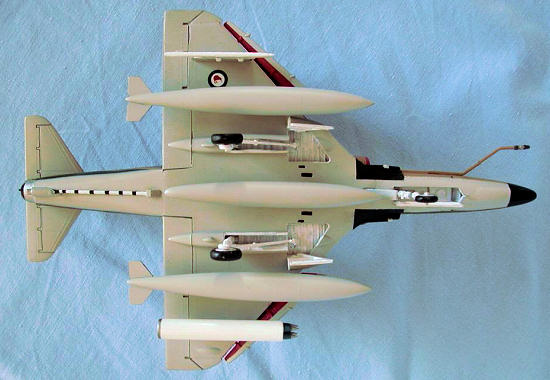
Weapons include a full set of twelve Mk82 and two Mk83 slicks. I think that is what they are, as they are a bit shapeless. You get one MER and two TER’s to hang them from. Shape on the racks is vague, and detail is non-existent. Two AGM-12B Bullpups are included; again they are on the fuzzy side of accurate. Two 300 gallon wing tanks and one possibly 150 gallon centreline tank (it’s hard to be sure; it is definitely smaller than the wing tanks, but doesn’t look small enough) are included and these aren’t terrible, even if the pylon is moulded on one half of the centreline tank. The other pylons have shape and depth problems. The hump is optional, even though both decal options are for humped A-4’s.
The hump shape is not quite right, in that it has a rounded cross section when viewed from ahead, instead of the slightly squared-off shape on the real aircraft. The cooling intake on the topside of the hump is also absent. A humpless A-4 can be built from the pieces provided in the kit. Both straight and cranked IFR probes are included. The detail on the straight one is very poor.
The decal sheet is colourful and comprehensive, although no stencils are included.
| CONSTRUCTION |
I started assembly with the wings. The wing is moulded in three pieces, a complete underside with port and starboard topside halves. Before putting these together I cut the leading edge slats from the topsides. I have seen pictures of A-4K’s on the ground with the slats closed, but to me an A-4 looks wrong that way. I cleaned up the wings and boxed the gap with .020” Evergreen plastic sheet cut to size. With the addition of 1/2 an ounce of lead fishing weights to the forward part of the wing centre section interior, the wing was finished for the time being and put aside.
 Moving to the fuselage,
construction began with the cockpit. This basic, a seat, stick and instrument
panel combining with a floorpan that includes the side consoles as well as the
nosewheel bay. I used the instrument decals provided and installed the pilot
figure to hide the lack of detail. Not much would be visible anyway due to the
size of the cockpit in this scale. The interior was painted Tamiya XF-54 dark
sea grey acrylic.
Moving to the fuselage,
construction began with the cockpit. This basic, a seat, stick and instrument
panel combining with a floorpan that includes the side consoles as well as the
nosewheel bay. I used the instrument decals provided and installed the pilot
figure to hide the lack of detail. Not much would be visible anyway due to the
size of the cockpit in this scale. The interior was painted Tamiya XF-54 dark
sea grey acrylic.
Before I assembled the fuselage I
had to modify the fin. The A-4K has a square tipped fin, not the curve of
earlier models. To achieve this I cut off the forward part of the fin tip
between the rudder and the uppermost panel line. This is made easier by the fin
being moulded in one piece with the left hand fuselage half. The resulting notch
was replaced by a piece of .040” plastic sheet cut to size, then sanded to blend
in. The top of the rudder was also flattened to eliminate the curve on this
piece, resulting in a square tipped tail. I glued the airbrakes shut, and then
had to fill the resulting huge gaps, as they are really designed to be assembled
in the open position, and don’t fit very well. I used the cranked refuelling
probe (A-4K’s were delivered with straight probes, then retrofitted with cranked
ones in the mid seventies), and inevitably broke it off three times during
finishing and painting. A braking parachute fairing was fashioned from the
unused forward fin fillet provided (the bit covered by the aft section of the
hump), with a piece of sprue ejector serving as the endcap. I wound up
scratchbuilding the arrestor hook assembly from the unused straight refuelling
probe and plastic card, after losing the original during assembly. I think my
hook is slightly more accurate shape wise, although I couldn’t duplicate some of
the curves required.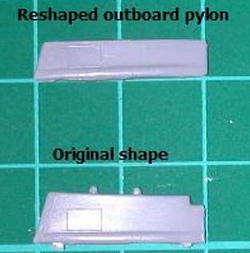
Fit was generally pretty good. The hump was moulded slightly asymmetrically, resulting in a gap along the left hand front where it meets the fuselage behind the cockpit. At the front of the wing there is a step where it meets the underside of the forward fuselage, and there is a gap where the rear of the wing meets the fuselage also. As the cannon are moulded integrally with the wings careful sanding is required. The nosewheel bay is only three sided, and does not extend as far aft as it should, meaning that once installed you can see into the fuselage both vertically and horizontally. I boxed this in with plastic sheet.
The canopy is a terrible fit, needing some careful filling and sanding to blend in around the rear. This is made more difficult by the canopy frame being moulded as part of the fuselage, which leaves no room for error when sanding. The outer wing pylons need re-shaping, as they are too deep and have a step not present on the real thing. I sawed the stepped portion off, but the proportions are still not quite right. The inboard pylons are also too deep.
| COLORS & MARKINGS |
For nostalgia reasons I went for a variant of the initial SEA scheme. The basic scheme was unchanged during its existence, the only variations being in the national insignia and the radome going from only the tip being black to the whole thing being black. As delivered the fin flash was straight, and the roundels being RAF style with a silver fern in the centre. This was soon replaced by a kiwi centred roundel, with the fin flash becoming swept sometime in the seventies.
I painted the model with Tamiya fine
surface primer, followed by Tamiya rattlecans for the camouflage (AS-13 Green,
AS-14 Olive Green, AS-15 Tan, and AS-16 Light Grey), using blu-tack rolls and
masking tape for the demarcations. Until I tried it, I hadn’t realised how
tricky a scheme it is to mask. Getting the blu-tack into the areas below the air
intakes was particularly difficult. I used a number of sources as a paint guide,
photos, the painting instructions for the 1:48 Hasegawa A-4K, and the guide from
the Gekko Graphics 1:48 A-4K sheet. The slat undersides and recesses, along with
the intake lips were brush painted with Xtracolour X103 ena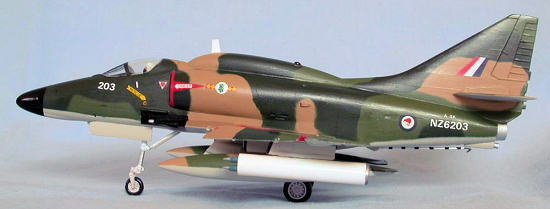 mel
insignia red. The undercarriage and bays were brush painted with Tamiya X-1
acrylic gloss white, with the tyres being done in Gunze Sangyo H77 tyre black,
and the radome Tamiya X-18 acrylic semi-gloss black. Tail pipe was Gunze H76
burnt iron on the inside and Tamiya X-11 chrome silver on the outside. The front
windscreen panel was tinted with Gunze H93 clear blue, with the anti collision
light on the hump getting H90 clear red. The area around the cannons was Tamiya
XF-1 flat black, with the gun barrels being semi-gloss black with chrome silver
muzzles. The IFR probe was picked out in Tamiya X-10 gun metal and X-56 metallic
grey.
mel
insignia red. The undercarriage and bays were brush painted with Tamiya X-1
acrylic gloss white, with the tyres being done in Gunze Sangyo H77 tyre black,
and the radome Tamiya X-18 acrylic semi-gloss black. Tail pipe was Gunze H76
burnt iron on the inside and Tamiya X-11 chrome silver on the outside. The front
windscreen panel was tinted with Gunze H93 clear blue, with the anti collision
light on the hump getting H90 clear red. The area around the cannons was Tamiya
XF-1 flat black, with the gun barrels being semi-gloss black with chrome silver
muzzles. The IFR probe was picked out in Tamiya X-10 gun metal and X-56 metallic
grey.
After painting the model was given a coat of Micro-gloss prior to decaling. As far as I know only one sheet for SEA schemed RNZAF A-4’s was ever produced in 1:72. This is Microscale 72-437. I’m not sure when it was first produced, but it is generally unavailable now. I was very fortunate to find a set on ‘Trademe’ (the New Zealand equivalent of Ebay), after searching for some time in model shops and on the internet. The sheet provides insignia and decals for four A-4K’s and two TA-4K’s, as well as Singaporean A-4 and TA-4S’s. Full stencilling is also provided. I junked the RNZAF roundels from the sheet as they are terrible. They were replaced with roundels from a ‘Flying Kiwis’ sheet. A-4K’s didn’t have much in the way of stencilling, so the stencils weren’t used either. All the other decals are fine, one or two being slightly out of register. The serials appear to be not quite proportioned correctly; they should take up slightly less horizontal space than they do. This is only a minor gripe though. The yellow walk guides on the wings came from a Hasegawa missile set. They are slightly overscale, but do the job. The explosive warning labels behind the cockpit are also surplus Hasegawa. This label did change in appearance and positioning over the years. The Microscale sheet has an early version, the ones I used are later. All the decals used went down beautifully with no silvering, and had no issues with Micro-sol or Micro-set.
Weathering was limited to a black wash for the control surface hinge lines and the wheels. The starboard wing got some unintentional weathering when a tiny amount of black paint got into the matt coat due to the brush not being as clean as I thought it was…
| FINAL CONSTRUCTION |
After decaling was concluded the
model was coated in Gunze Sangyo H20 flat clear for a matt finish, and all the
fiddly bits added. The load out was based on an RNZAF publicity photo from the
1970’s, with three tanks, a Fujimi Zuni pod on station one, and a Ron’s Resins
sidewinder rail on station 5. In the or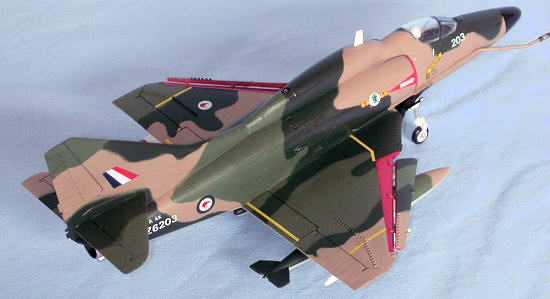 iginal
photo the centreline station was occupied by a Mk82 loaded MER. I have Fujimi
MER’s which are nice, but no worthwhile bombs, so I added the centreline tank
instead. I also don’t have any AIM-9G’s as per the photo so the missile rail
stayed empty. The IFR probe was reattached for the final time.
iginal
photo the centreline station was occupied by a Mk82 loaded MER. I have Fujimi
MER’s which are nice, but no worthwhile bombs, so I added the centreline tank
instead. I also don’t have any AIM-9G’s as per the photo so the missile rail
stayed empty. The IFR probe was reattached for the final time.
The undercarriage was attached minus the nosegear steering arm (part C45) which is moulded so badly (no shape, three sprue attachment points along its length…) I didn’t use it. The mainwheel doors have some nice moulded interior detail. The VHF aerial was cut from plastic sheet, using shape and dimensions scaled down from the 1:48 Hasegawa A-4K, then painted white and added to the model in place of the existing aerial. The slats were reattached using .015”x.030” Evergreen strip to simulate the runners (somewhat crudely, if I ever do this again slots for the slat rails will be cut in the leading edge to do it properly, as well as thinning the slats to appear more scale. This didn’t occur to me until after the model was finished for some reason). The spacing on the rails is not quite correct, due to their locations being translated from a Fujimi slat which is somewhat smaller.….
| CONCLUSIONS |
This is the first, and probably
last, Hasegawa 1:72 A-4 built by me. The detail just isn’t there, and the kit
has shape and accuracy issues, particularly around the nose. If I’d known just
how poor a kit it is I would not have picked it up (I had heard it was suspect,
but not as suspect as it is). Placed next to an Italeri A-4F the shape and size
problems are obvious. If you want a decent 1:72 A-4, try Fujimi, Italeri or ESCI.
Still, I am pretty happy with the final result, which was only intended to be a
quick out of the box build, but then became a sort of half accurised monster. To
fully ac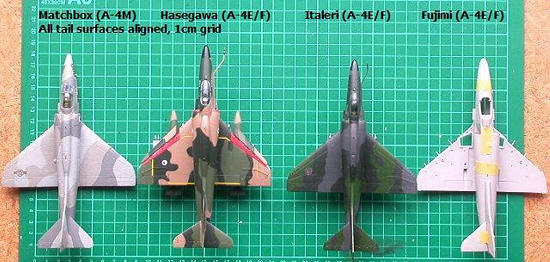 curise it would require
a bit more work, mainly on the wing undersurface as the K was configured
slightly differently around the wheel fairings. Also the rearward facing aerials
on the ‘sugar scoop’ above the tailpipe would need to be added. My intention
with this build was to keep it out of the box as much as possible. I’m planning
a few more K’s based on Fujimi kits which will be more accurate.
curise it would require
a bit more work, mainly on the wing undersurface as the K was configured
slightly differently around the wheel fairings. Also the rearward facing aerials
on the ‘sugar scoop’ above the tailpipe would need to be added. My intention
with this build was to keep it out of the box as much as possible. I’m planning
a few more K’s based on Fujimi kits which will be more accurate.
As I have examples of Italeri, Matchbox and Fujimi A-4’s, some direct comparisons could be done. As seen in the photo Hasegawa is noticeably longer than Italeri or Fujimi (Matchbox should be shorter anyway, being an A-4M. If anyone is wondering about the paint scheme on the M, it is pretending to be a Top Gun A-4F, this model being done when I was a lot younger!). Hasegawa is also taller than Italeri (Italeri’s square fin is too tall anyway), and has a visibly broader fin than the others. Tailplane span, shape and sweep also varies between the kits. Wingspan is fairly consistent. I have never been a measurer or rivet counter, so will produce no judgement as to which is the most accurate, apart from saying it is not likely to be Hasegawa.
Now if only Hasegawa can scale the 1:48 kit to 1:72….
| REFERENCES |
Gekko Graphics GG48-2 painting and marking guide
‘Topped Gun: Requiem for the Skyhawk’ by Ross Ewing
‘Douglas A-4 Skyhawk’ by Jim Winchester
Personal photos and resources.
Editor's note: Sam picked a kit that was originally produced by Hasegawa in the late 1960s. Not only it is from their 'era of crude', but most will agree that it is oversized. Something like 1/69th. While it can be built into a nice model, the efforts are greater than others on the market. Get the Fujimi kit if you can find one. You'll be glad you did.
August 2006
If you would like your product reviewed fairly and fairly quickly please contact the editor or see other details in the Note to Contributors.