Minicraft 1/48 T-41 Mescalero
| KIT #: | 11646 |
| PRICE: | $25.00 SRP |
| DECALS: | Two options |
| REVIEWER: | Pat Earing |
| NOTES: |
| HISTORY |
The Cessna 172 really needs no
introduction.
The aircraft was first introduced in 1955 and with little in the
way of changes over 43,000 have been produces to date.
The T-41 was the direct result of
cost savings.
In 1961, the Air Force began using the T-37 in an all jet
training program.
Unfortunately, this proved unsatisfactory as the demands
of the T-37 did not adequately ‘weed’ students from the program and
 costs were
excessive for both maintenance and training.
By 1965 the writing was on the wall and the Air Force
signed a contract with Cessna Aircraft Corporation for a pilot
training/screening aircraft designated as the T-41A.
The T-41 served in this capacity with the
costs were
excessive for both maintenance and training.
By 1965 the writing was on the wall and the Air Force
signed a contract with Cessna Aircraft Corporation for a pilot
training/screening aircraft designated as the T-41A.
The T-41 served in this capacity with the
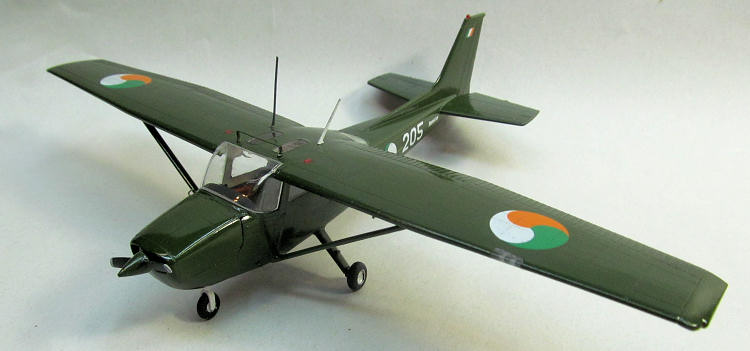
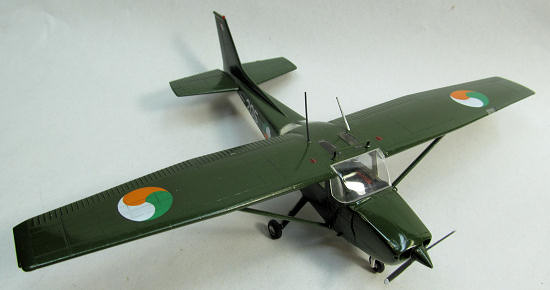
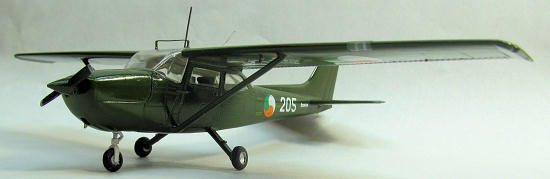
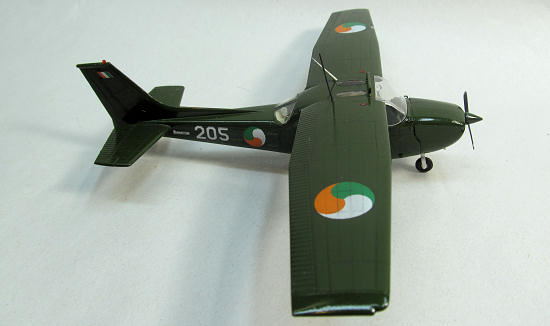
One of those users is the Irish Air Corps (IAC)
who began purchasing
Although used almost exclusively in the
training role, IAC Rockets did engage in reconnaissance patrols along the border
with
| THE KIT |
The Minicraft T-41
Mescalero kit comes in a sturdy, traditional style box with an appropriate
rendition of the aircraft in flight on the box top.
Inside, three sprues of white plastic are bagged in
clear plastic, with the clear sprue being individually bagged as well.
 Decals
and instructions are included.
The instructions are provided in booklet form and
include a brief history, parts location diagram, exploded view assembly diagram
and detailed painting and decaling instructions for both builder options.
Decals
and instructions are included.
The instructions are provided in booklet form and
include a brief history, parts location diagram, exploded view assembly diagram
and detailed painting and decaling instructions for both builder options.
Over all impressions upon opening the box are high. Looking inside, there is no visible flash, or short shots and the clear parts were intact and distortion free. The panel lines are recessed and very petite. The kit provides a full, although Spartan, representation of the Continental IO-360 engine including engine mount and fire wall. The only obvious disappointment are the provided landing gear wheels as they lack detail, look undersize and nothing like the real thing.
| CONSTRUCTION |
Construction of my C-172 began
with research.
For 2012 I have decided to model as many Irish Air Corps (IAC)
aircraft as possible, and the C-172, manufactured overseas as the Reims Rocket
was a staple of the IAC for many years.
As such I needed to find images and make notes regarding
the specific details that the IAC Rockets displayed.
Ultimately, I discovered via
images on line and from the few texts that I had access to that little was going
to need to be modified from the provided kit to model an IAC Reims Rocket.
Really, the most challenging component of the build was
going to be how to make it sit in a proper three wheel stance and not be a tail
dragger!
 Construction
began with the mixing of a custom interior color that I will call Cessna beige.
If you have spent any time in a Cessna product you will
know that the interiors, almost to a plane, consist of plastic in white and an
almost pinkish beige color.
I mixed mine using Model Master enamels in a 3 to 1
ratio of Radom Tan and Flat White and sprayed all of the interior parts,
fuselage and wing top bottom center section.
Once the paint dried, I realized that there were ejector
marks in very visible spots that needed attention, so I back tracked and
scrapped with a #10 blade to remove the worst offenders and repainted.
The seats I painted in a randomly chosen dark green from
my bench.
Seat belts were taken from my spares bin, painted and installed
on both the front and rear set of seats.
Pictures of the interior of IAC Rockets are hard to
find, but I did come across one that showed the door panels to be a similar
color as the seats with bright orange/red arm rests.
These I recreated by masking and painting the ‘door’
inner panels with the same color as the seats and creating armrests from scrap
plastic sanded to shape and painted with MM International Orange.
At this point I glued the seats to the floor, and began
detailing painting the instrument panel.
Construction
began with the mixing of a custom interior color that I will call Cessna beige.
If you have spent any time in a Cessna product you will
know that the interiors, almost to a plane, consist of plastic in white and an
almost pinkish beige color.
I mixed mine using Model Master enamels in a 3 to 1
ratio of Radom Tan and Flat White and sprayed all of the interior parts,
fuselage and wing top bottom center section.
Once the paint dried, I realized that there were ejector
marks in very visible spots that needed attention, so I back tracked and
scrapped with a #10 blade to remove the worst offenders and repainted.
The seats I painted in a randomly chosen dark green from
my bench.
Seat belts were taken from my spares bin, painted and installed
on both the front and rear set of seats.
Pictures of the interior of IAC Rockets are hard to
find, but I did come across one that showed the door panels to be a similar
color as the seats with bright orange/red arm rests.
These I recreated by masking and painting the ‘door’
inner panels with the same color as the seats and creating armrests from scrap
plastic sanded to shape and painted with MM International Orange.
At this point I glued the seats to the floor, and began
detailing painting the instrument panel.
Minicraft for reasons of strength
chose to mold an inner ‘framework’ to the top of the cockpit under the wing
center section.
After looking things over, I decided to remove this structure
back to the fuselage side walls as I think it makes the interior look more
realistic and it is very visible through the windscreen.
Again I touched up the paint and added shoulder straps
in their stored position onto the newly accessible panel above the doors using
spare brass harnesses.
Checking that the installed cockpit did not bind and
everything would close up okay I glued the door, quarter and back windows into
place (after a dip in Future floor wax) and joined the fuselage together using
Tenex.
At this point I masked the installed windows and turned my attention to
the wing assembly.
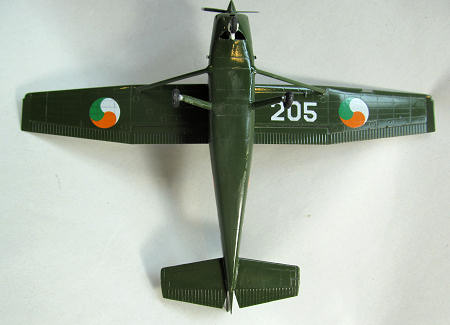 The wing top
section is all one piece with two oval window cut outs in the center section.
The two lower wing sections fit perfectly and were
attached with Tenex.
Minicraft does not include the option of a wing mounted
landing light, even though their box art represents a T-41 with the wing light.
Instead, Minicraft provides a single light option
centered in the cowling below the propeller as some C-172’s have.
The IAC aircraft that I wanted to represent all seem to
have had the wing lights, and as such I began searching for placement
dimensions.
Unfortunately, I was not able to find any measurements or even
any good images of a C-172 with this lighting system using on line searches.
Oh well, using the images I did have and
a best guess mentality I cut a 5/16 inch long by 1/8
inch deep gap into the leading edge of the left wing.
From images, it looks as if the light is about 2/3s of
the distance outboard, just past where the strut mounts into the wing and on my
model the light cover is centered 21/2 inches out from the fuselage.
Next I shaped some clear plastic from an old toothbrush
handle to the approximate size and drilled two small holes in the back to
represent lights and painted them with Floquil Bright Silver.
I do not know for sure if the system has two lights, but
my memory from years on the Jet West ramp in Reno, NV says there should be two.
After painting the edges with RAF Interior Green, I
installed the clear piece with CA glue and sanded to shape with progressively
finer grits of sandpaper; finishing with 1500 grit and a quick polish with some
old wood products I have laying around.
At this point I tried to install the clear parts
provided for the cabin overhead windows but found they would not sit flush with
the top of the wing.
Carefully removing the molded step allowed them to push
into the provided holes further and sit flush; however, the operative word here
is careful; as they are small and the clear plastic is very brittle.
Once satisfactorily installed I brushed two coats of
Tamiya Smoke on the bottom side-again not sure if this is the correct color, but
working from images and past practice with IAC aircraft it seems as safe bet.
Finally it was time to mount the wing and fuselage.
Overall the fit was great, but I did have to do some
trimming at the back to get the wing assembly to sit lower in relation to the
fuselage edge.
Once an acceptable fit was achieved I set the wing with more
Tenex.
The wing top
section is all one piece with two oval window cut outs in the center section.
The two lower wing sections fit perfectly and were
attached with Tenex.
Minicraft does not include the option of a wing mounted
landing light, even though their box art represents a T-41 with the wing light.
Instead, Minicraft provides a single light option
centered in the cowling below the propeller as some C-172’s have.
The IAC aircraft that I wanted to represent all seem to
have had the wing lights, and as such I began searching for placement
dimensions.
Unfortunately, I was not able to find any measurements or even
any good images of a C-172 with this lighting system using on line searches.
Oh well, using the images I did have and
a best guess mentality I cut a 5/16 inch long by 1/8
inch deep gap into the leading edge of the left wing.
From images, it looks as if the light is about 2/3s of
the distance outboard, just past where the strut mounts into the wing and on my
model the light cover is centered 21/2 inches out from the fuselage.
Next I shaped some clear plastic from an old toothbrush
handle to the approximate size and drilled two small holes in the back to
represent lights and painted them with Floquil Bright Silver.
I do not know for sure if the system has two lights, but
my memory from years on the Jet West ramp in Reno, NV says there should be two.
After painting the edges with RAF Interior Green, I
installed the clear piece with CA glue and sanded to shape with progressively
finer grits of sandpaper; finishing with 1500 grit and a quick polish with some
old wood products I have laying around.
At this point I tried to install the clear parts
provided for the cabin overhead windows but found they would not sit flush with
the top of the wing.
Carefully removing the molded step allowed them to push
into the provided holes further and sit flush; however, the operative word here
is careful; as they are small and the clear plastic is very brittle.
Once satisfactorily installed I brushed two coats of
Tamiya Smoke on the bottom side-again not sure if this is the correct color, but
working from images and past practice with IAC aircraft it seems as safe bet.
Finally it was time to mount the wing and fuselage.
Overall the fit was great, but I did have to do some
trimming at the back to get the wing assembly to sit lower in relation to the
fuselage edge.
Once an acceptable fit was achieved I set the wing with more
Tenex.
While the wing was setting up I
assembled the cowling sections.
Fit here was again excellent.
I filled the landing light hole with CA glue and sanded
to shape.
I also used some scrap plastic to box in the carburetor opening.
I painted the insides with MM RAF Interior Green.
Minicraft provides a full engine, engine mount and
firewall to which the nose gear mounts.
With all of this inside the cowling there is no room to
add weight to prevent to aircraft from sitting on its tail.
Thinking ahead about this issue, I
 sent these
parts to Terry Dean to have them cast in white metal.
However, at this point I did not have the metal parts
yet so I just tacked the cowling on and proceeded with the build.
sent these
parts to Terry Dean to have them cast in white metal.
However, at this point I did not have the metal parts
yet so I just tacked the cowling on and proceeded with the build.
Next I primed the cowling and fuselage seams with grey automotive primer. When dry I gave all the seams a once over with 400 grit sandpaper and rescribed the few lost panel lines. I then attached the tail surfaces, main landing gear legs, and wing struts. The fit was fantastic, and only required a small amount of clean-up sanding to be ready for paint. Final assembly included making steps and handles found on all 172’s on the fuselage cowling between the door and the engine cover. The steps I made from scrap etched brass; cutting, bending and setting place with CA glue and some fine copper wire handles. I also used a small brass ‘ring’ from some left over HO scale train stuff to create a tie-down ring under the tail. The IAC aircraft have a unique antenna on top of the cabin that I made from scraps of leftover brass and small discs punched from plastic card. Finally, I checked the fit of the main windscreen. Here I had to do some trimming of the lower ‘lip’ of the opening in order to get the clear part to set into the opening. Use caution as you ‘push’ the part into place as the clear plastic is VERY brittle and will crack. Further reshaping of the back edges was necessary, but in the end I achieved a perfect fit that did not even require glue.
| COLORS & MARKINGS |
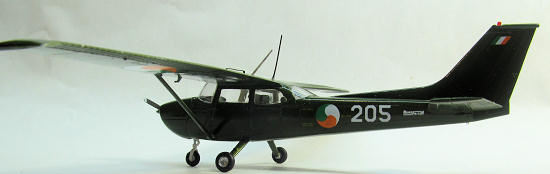
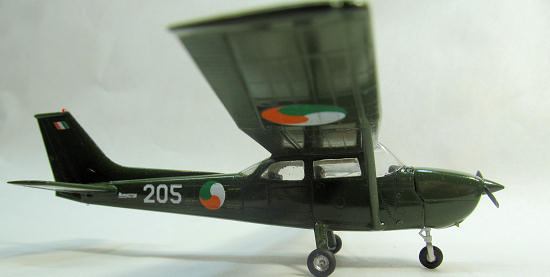
The IAC Reims Rockets were
painted in a shiny olive green.
This is a very uncommon sight, at least for me as 172’s
are seldom seen in drab military colors on a FBO ramp!
Max decals calls for FS 14079 as did one of my text
sources.
Unfortunately, this particular FS number is not available in the Model
Master Enamel line.
Instead I chose FS 34079 as a substitute.
Although not quite as dark as FS 14079, the color looks
right in 1/48 scale.
Making sure that all the glazings
were properly covered, I stuffed the main windscreen opening with tissue and
began painting.
Having used this particular color by Model Master before, I have
found it does not cover well. I usually reduce my enamels 1:1 with Model Master
Universal Thinner, although for this particular color I tend to mix the ration
closer to two parts paint to one of
 thinner.
Using my Iwata HP-TR1 I sprayed six light coats at 20
psi. Once satisfied with the coverage, and dry I over sprayed with Model Master
Glosscoat from a rattle can.
I have found that using rattle can clear is nearly
foolproof and tends to give a superior gloss than I have been able to attain
with an airbrush.
Not to mention that cleanup is a breeze!
thinner.
Using my Iwata HP-TR1 I sprayed six light coats at 20
psi. Once satisfied with the coverage, and dry I over sprayed with Model Master
Glosscoat from a rattle can.
I have found that using rattle can clear is nearly
foolproof and tends to give a superior gloss than I have been able to attain
with an airbrush.
Not to mention that cleanup is a breeze!
The decals came from Max decals
sheet 4820; Irish Air Corps Selection 1990-2010.
These decals are fantastic, and in the case of the
Rocket were very complete.
I used warm water for the initial soaking and set them
with a small amount of Micro-Sol.
Once dry I lightly wiped the model down with a damp
paper towel and a tack rag and set everything with a final application of
rattle-can clear gloss.
Unmasking was uneventful and I
began affixing the final bits awaiting the metal engine and firewall parts.
Up top I affixed one of the kit provided aerials painted
white and a leftover resin whip antenna.
The propeller required the mounting hole to be slightly
drilled out and I removed the molded key so I could position it to my liking.
The wheels…
Originally I had modified the kit wheels
 by drilling
the centers for some visual depth and adding train details for business;
however, they seem so visually under size once I attached them that I hit my
‘parts’ bag and began looking for suitable alternatives.
Unfortunately, I did not find any, so until some
aftermarket wheels show up they will suffice.
by drilling
the centers for some visual depth and adding train details for business;
however, they seem so visually under size once I attached them that I hit my
‘parts’ bag and began looking for suitable alternatives.
Unfortunately, I did not find any, so until some
aftermarket wheels show up they will suffice.
Shortly after the painting was
finished the replacement white metal parts arrived and construction proceeded to
a conclusion.
The firewall fit perfectly.
Terry cast only the firewall and engine for me, so I
attached the engine to the original plastic engine mount and using CA glue
attached the assembly to the firewall.
I painted the firewall and engine mount with RAF
interior green and did some slight contrasts to the engine as little can be seen
either through the cooling openings in front or the bottom opening.
The landing gear strut was painted white, with some
chrome for the exposed strut and the pre-painted wheel installed.
The leg attaches securely into small holes in the
firewall.
I now reattached the cowling and propeller and
set a finished IAC Rocket on the shelf.
| CONCLUSIONS |
What a wonderful little kit. After close scrutiny, I feel that there is something not quite right about the shape of the windscreen, and the wheels as included in the kit are a letdown; however, the Minicraft C-172 is a fun and pain-free build that I can highly recommend to modelers of all skill levels. Additionally, the Max decals are fabulous; working as expected, well researched and adding a unique twist to the 172 legacy. Terry Dean’s white metal additions also worked fantastic, and are the only real way to get this tail-sitter to cooperate and stand on three wheels without a prop.
| REFERENCES |
Maxwell, Joe and Patrick J.
Cummins
The Irish Air Corps: An
Illustrated Guide.
W &G Baird, Ireland.
2009
Wikipedia
Google Images
March 2012
Copyright ModelingMadness.com. All rights reserved. No reproduction in any form without express permission from the editor.
If you would like your product reviewed fairly and fairly quickly, please contact the editor or see other details in the Note to Contributors.