| KIT: | Hasegawa 1/48 F-15E Eagle (demonstrator) |
| KIT #: | P8 (07008) |
| PRICE: | $ Probably around $35-$40 |
| DECALS: | One option |
| REVIEWER: | Julien Dixon |
| NOTES: | Not really an F-15E. |
| HISTORY |
As I think all modelers know the original Hasegawa F-15E was not really an F-15E at all, it was the F-15E concept demonstrator a TF-15B 71-0291.
I don’t want to discuss the F-15A/C or E programme here, but really just concentrate on this airframe 71-0291. Aircraft 71-0291 was the second prototype TF-15B. This was chosen by McDonnell Douglas in the late 70’s to head its Strike Eagle Proposal in a privately funded venture with Hughes.
In the late 70’s the Air Force began studying possible Enhanced Tactical Fighter concepts to replace the F-111. The original Eagle had been intended to be a dual-role fighter and all early Eagles were (and still are) wired for air-to-ground, but lack the correct software.
Prior to this
0291 had lead a programme of sales by McDonnell Douglas appearing at Air shows
around the world and the markings of which ever Air Force the company was trying
to sell F-15’s to at the time. It is said that this round world tour covered
34,000 miles. This airframe was a good choice for its new role as it had already
been fitted with conformal fuel tanks. While they
 could not be jettisoned in
flight they were capable of being removed in 15 mins. It was also envisioned by
McDonnell Douglas to mount weapons on these tanks, although the demonstrator
only had one hard point per tank.
could not be jettisoned in
flight they were capable of being removed in 15 mins. It was also envisioned by
McDonnell Douglas to mount weapons on these tanks, although the demonstrator
only had one hard point per tank.
Now Vol 9 of World Airpower states that 291 first flew in the disguise of an F-15E during August 1981 while Vol 21 calls it to the 8th of July 1980. Either way I think around these dates they were trying various configurations for the Aircraft. I think the earlier date refers to the original concept when it can be seen carrying a full load of rockeyes but still in its Grey camo, and the later date refers to the role out of the aircraft we see in the Euro1 scheme.
This further development saw 291 fitted with a 30mm centreline gun pod (291 carried no internal 20mm), and a Pave Track pod. This was the same pod carried by some F-4E’s and the F-111. This proved the concept for target acquisition and Laser designation. The pod was eventually replaced in the production aircraft by the neater and less draggy LANTIRN system.
Ultimately despite many protests one of the best air-to-air fighters the F-15, was turned into one of the most capable strike/attack aircraft with out loosing its air combat prowess.
| THE KIT |
There is not a lot to really say about the kit. Apart from the fact it is not an F-15E the kit is up to Hasegawa’s usual standards. You get all the standard parts and sprues full of Rockeye cluster bombs as you can make it carrying a full load of these as it was shown in McDonnell Douglas publicity photos.
The following is from Tony Hodun’s kit tables on this very sight and explain many things about this kit “ “Strike” Eagles: These are based on the original two-seater kit. 07008 is not quite what it seems to be. The kit is based on 07011 F-15D, and includes early FAST packs (which don’t have production stub pylons), six correct F-15 MERs and a slew of Mk 20 Rockeye bombs. It has the large production speed brake of the F-15D, and some other differences, so it really doesn’t build an accurate F-15 Strike Eagle demonstrator or production F-15E Strike Eagle, even if it does fit well and look good when complete. And note that 07021 and 07022 are basically kit 07008 with featherless exhaust nozzles, photoetch, and LANTIRN pods added, so the same comments apply. Unfortunately, these kits will only accurately build an F-15D or DJ (one of the reasons I got into this kit table business!). “
| CONSTRUCTION |
 Now
I got this kit as part of a deal primarily aimed at getting my hands on a
Monogram A-6. I was going to sell it on, however on receiving the kit it had
already been started (yes we have all been there!). As I knew the kit was not a
proper F-15E it was just shelved to the stash.
Now
I got this kit as part of a deal primarily aimed at getting my hands on a
Monogram A-6. I was going to sell it on, however on receiving the kit it had
already been started (yes we have all been there!). As I knew the kit was not a
proper F-15E it was just shelved to the stash.
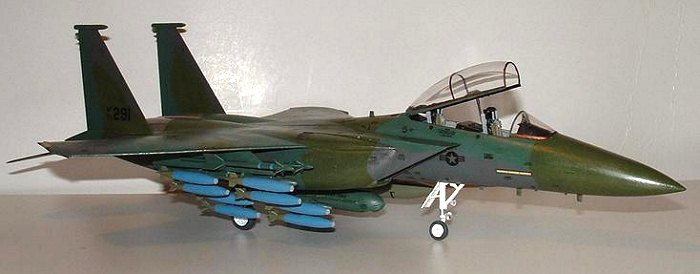
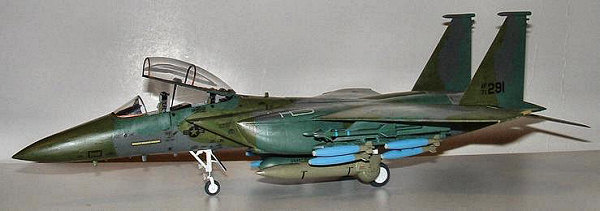
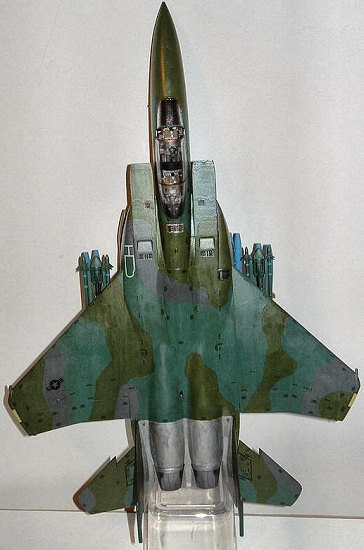
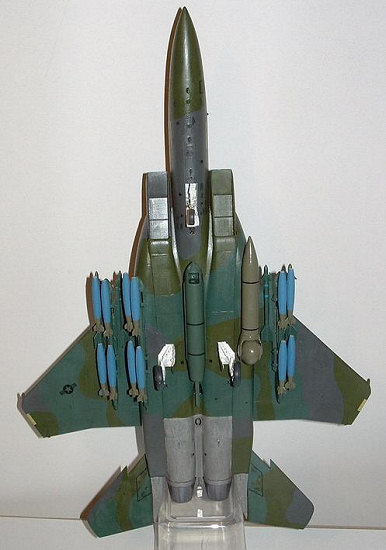
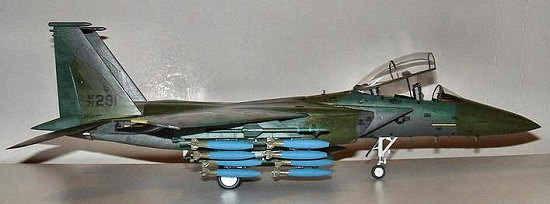
Later on when I was looking through World Air Power I saw a small picture of 291 in the Euro1 scheme in Vol 9, and then after further investigation a better picture in Vol 21. These pictures show the Aircraft with full loads of 500 LB practice bombs on the right CFT and both wing pylons. A Pave Track Pod is on the Left CFT, with a 30mm Gunpod on the centreline. Dummy Sidewinders were also carried on the Wing pylon missile rails.
I knew that I had a flightpath Pave Track Set, and the 30mm gunpod was one of those items in the Hasegawa Weapons Set C that I thought I would never use!
Now as I mentioned earlier they kit had arrived part started, the front fuselage was made with the cockpit in, but thanks fully not painted. In addition the wings and tails had been put together. Thankfully all this work was done by a fairly proficient builder so there were no problems.
The cockpit was fairly easy to paint in situ, I used light grey and black for the instruments. I was to learn later that over its testing career 0291 had many many changes of instruments and some of them were surrounded by an orange type sealant like that used on cars. This apparently squeezed out and onto the panels!
I then assembled the intakes and the main body (wings + tails) of the F-15 before attaching it to the nose section. At this point you need to fill the hole for the gun and the gun vents as 0291 did not have the internal cannon (I think I missed one set of vents!). Once the main body of the aircraft was done I noticed that there did not seem to be enough parts left in the box, an examination proved that I was missing quite a few parts from the landing gear and the gear doors. I put out a request for parts on MM and a gentleman called Tim Mansfield came to my aid, I am now glad to call Tim a friend.
Luckily for me (but unluckily for Tim) someone had sold him and F-15 kit which was actually missing the fuselage!!! So Tim was able to offer me the parts.
I was able to ask for Tim’s help on 2 further occasions when making this kit (once for a canopy as it turned out my F-15E actually had a C canopy in the box), I now refer to Tim as the AMARC of the Avon region J
 I decided that I
would do the canopy open and without crew so I purchased a pair of resin seats
made by Pavla, now I like there seats as they have quite a lot of detail but are
only £2, know they don’t have the horns at the top and no seat rails but I was
able to make the rails from strip and I cut the horns from the kit seats. When
painted they look very good. I did make an assumption here that later ACES II
seats had been retro fitted to this airframe. From looking at the available
pictures they sure looked like ACES II seats.
I decided that I
would do the canopy open and without crew so I purchased a pair of resin seats
made by Pavla, now I like there seats as they have quite a lot of detail but are
only £2, know they don’t have the horns at the top and no seat rails but I was
able to make the rails from strip and I cut the horns from the kit seats. When
painted they look very good. I did make an assumption here that later ACES II
seats had been retro fitted to this airframe. From looking at the available
pictures they sure looked like ACES II seats.
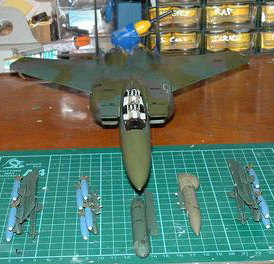
One of the main things with this kit is I seemed to spend more time building all the ordnance than the actual aircraft! The is the Gunpod, the Pave Track, 4 Sidewinders and 10 x 500Lb bombs to make up. The kit sidewinders were used and they make good copies of the dummy sidewinders used on the aircraft. The 30mm gunpod is the one from The Hasegawa Weapons Set C. It gave me a bit of satisfaction to use this as I am sure I am not the only one who hated Hasegawa for having to buy these sets, most of which we thought we would never use.
The Pave Track pod was from a company in the UK called flight path. They make mainly Photo etched sets & resin weapons which are of a very high quality. The pod has a resin body with the head and the part which rotates both made of white metal. This Pod is designed for the F-111 and so has a blunt nose. To make it into a carried Pod I added a nose made from the front of a drop tank from the Spares box. I painted this glossy Olive drab as it was shown in the pictures. Due to the weight of this Item it was attached with epoxy glue.
Finally the 10 500Lb bombs were a mixture of some from Hasegawa’s Weapons Set A and some from the spares box. As they were practice bombs I removed the fuses. The tail fins were painted glossy OD and for the main body I used Humbrol WWI blue which I find a good enough match for practice bomb blue. The completed hanging bits can be seen here before attaching to the kit.
| COLORS & MARKINGS |
Well it is a Euro1 scheme and I had all the colours in Xtracolor which is my preferred choice of paint. However I had got some Tamyia Rattle cans which I had good results with on a previous build so decided to try them out.
 I started of with the lighter Green
sprayed over a base coat of humbrol matt 30 green. Arhhhhhhhh!!!!!!!!!! This
caused patchy crazing of the paint. Now putting the Tamyia USN Blue over a base
coat of humbrol Matt blue had worked a treat, but this time a disaster.
I started of with the lighter Green
sprayed over a base coat of humbrol matt 30 green. Arhhhhhhhh!!!!!!!!!! This
caused patchy crazing of the paint. Now putting the Tamyia USN Blue over a base
coat of humbrol Matt blue had worked a treat, but this time a disaster.
After using Mr Muscle Oven Cleaner to remove the paint I went back to Xtracolor I had no problems with the paint but a few areas were not a smooth as I would have liked due to some residual problems with the Tamyia paint and the oven cleaner.
However in reality the finish on 0291 by the time it was in Euro1 was quite rough. Due to the fact that it had been repainted many many times, a crew chief informed me that the surface was like sandpaper in places!
Most of the decals used were those from the kit sheet (Spares again from Tim!), the main markings are fairly simple, however there are many stencils which seem to designed to send you over the edge into insanity!
| CONCLUSIONS |
The kit goes together in typical Hasegawa style with no real problems. It’s a pity that this kit was not a real F-15E, I am willing to bet many of these were sold to people who were then disappointed when they saw what was in the box. The kit I am told can be made into a D model with no problems however you would have to supply your own decals for this.
POSTSCRIPT
For those who might be interested (I know I was), in addition to the world wide sell-a-thon that 0291 went on, and the Strike Eagle Programme she also took part in a couple of other programmes. At one point McDonnell Douglas proposed an RF-15 version of the Eagle. This would have a new nose with cameras, a side looking radar, TV, and a multi-spectral scanner. This was mocked up on 0291 but not flown.
 After the RF-15
was rejected McDonnell Douglas as a private venture proposed Project Peak Eagle
in which a conformal centreline pod containing recon cameras, other imaging
equipment, and a data link was actually test flown. Again nothing came of this.
After the RF-15
was rejected McDonnell Douglas as a private venture proposed Project Peak Eagle
in which a conformal centreline pod containing recon cameras, other imaging
equipment, and a data link was actually test flown. Again nothing came of this.
Then there are reports of 0291 being used for a F-15 Wild Weasel demonstrator, with a APR-47 chin attached under the nose much like a F-4G. Pics of this would be great if anyone has any.
Finally, In the F-15E Strike Eagle Units in Combat book by Osprey, it says that 0291 was actually with the manufacturer until 1999 when it was retired. It is now at Warner-Robbins AFB as a battle-damage repair demonstrator. Not a great end for an airframe which more than served both the manufacturer and its country. Hopefully someone will realise what an important airframe this was to both the development of both the F-15A/C and the F-15E, and rescue it; but I don’t think this will happen.
This review as always sponsored by Visa & Mastercard the suppliers of my Stash!
August 2007
If you would like your product reviewed fairly and quickly by a site that has nearly 400,000 visitors a month, please contact me or see other details in the Note to Contributors.