| KIT #: | 07241 |
| PRICE: | $65.00 SRP |
| DECALS: | Two options |
| REVIEWER: | Nicholi Plesberg |
| NOTES: |
Aires ejection seat, Fine Molds pitot probes plus Sidewinders and
Falcons from Hasegawa weapon set C employed. |
| HISTORY |
As Saab
in the early seventies began to have some export success with the J35 Draken,
Saab at first made a deal with Denmark and not very long afterwards a deal with
Finland, it seemed to be the beginning of a new era of export possibilities for
the Swedish arms industry in general and for Saab in particular. However the
export version of the Draken was in fact so much of an improvement over the
original design that the Swedes began to investigate the possibility of
modifying some of their own Drakens to this standard! As the new JAS 39 Gripen
began to make development trouble in form of software and material issues it was
considered to extend the life of the venerable Draken by modifying those
airframes with the lowest flying hours to match the 35XD standard. However a
full conversion proved to be impractical as well as not cost effective, because
the main issue of strengthening the internal structure could just as easily be
achieved by reopening the production line and build new aircraft! That
 was of
course also unrealistic, so it was decided to do what was possible: the 64
selected J35F airframes were split into two; the front parts were returned to
Saab for modification and the rear parts overhauled by the FFV (the Swedish Air
Force maintenance unit).
was of
course also unrealistic, so it was decided to do what was possible: the 64
selected J35F airframes were split into two; the front parts were returned to
Saab for modification and the rear parts overhauled by the FFV (the Swedish Air
Force maintenance unit).
| THE KIT |
This kit
is the first release that Hasegawa did but with the slight alteration that
Danish decals were included (that was the main reason for me buying this kit).
Upon opening the box however I felt a bit disappointed because the so called
Danish “touch” was
 just an A4 sized zip lock bag with a decal placement guide
and a tiny decal sheet with just the essential markings. It seemed to me that it
could look like the Danish importer had “thrown” it in the box just for good
measure and hoping to sell more kits! And not to mention the “wrongness” of
this; the instrument panel wouldn’t be right and the drop tanks were too small
and wheel hub detail would also be wrong! In fact it could be a good base to
make a Hippie-Draken (Draken of the seventies as I call it!) with wheels up and
no external tanks mounted, before everything got WDNS, chaff/flare and RWR
modified!
just an A4 sized zip lock bag with a decal placement guide
and a tiny decal sheet with just the essential markings. It seemed to me that it
could look like the Danish importer had “thrown” it in the box just for good
measure and hoping to sell more kits! And not to mention the “wrongness” of
this; the instrument panel wouldn’t be right and the drop tanks were too small
and wheel hub detail would also be wrong! In fact it could be a good base to
make a Hippie-Draken (Draken of the seventies as I call it!) with wheels up and
no external tanks mounted, before everything got WDNS, chaff/flare and RWR
modified!
| CONSTRUCTION |
 The
construction of this kit was indeed very similar to my Danish build (they were
actually build in parallel with this one), so there is really no need to repeat
myself here other than I found out that it
was a good idea to have a kit to
“practice” on. An example: in step 4 were, among other things, the tail cone is
supposed to be glued together and then glued to the fuselage, I thought to
myself that the small intakes could be improved in appearance, but unfortunately
I had already glued the tail cone together, but
not to the fuselage when I came up
with that idea. Instead of fiddling around with separating the tail cone halves,
I simply took some new ones from one of the other kits at the time (as they also
contained sprue C) so no harm was really done here! Then it was a simple task of
modifying the intakes and paint their interiors before the cone halves were
glued together! The fit also turned up a bit better since the first attempt had
resulted in a slight misalignment meaning the whole lot should have attention
from filler while the second attempt turned out far better; only a slight amount
of filler was actually used. The small inlet in the base of the fin was also
modified before the fin halves were
glued together!
The
construction of this kit was indeed very similar to my Danish build (they were
actually build in parallel with this one), so there is really no need to repeat
myself here other than I found out that it
was a good idea to have a kit to
“practice” on. An example: in step 4 were, among other things, the tail cone is
supposed to be glued together and then glued to the fuselage, I thought to
myself that the small intakes could be improved in appearance, but unfortunately
I had already glued the tail cone together, but
not to the fuselage when I came up
with that idea. Instead of fiddling around with separating the tail cone halves,
I simply took some new ones from one of the other kits at the time (as they also
contained sprue C) so no harm was really done here! Then it was a simple task of
modifying the intakes and paint their interiors before the cone halves were
glued together! The fit also turned up a bit better since the first attempt had
resulted in a slight misalignment meaning the whole lot should have attention
from filler while the second attempt turned out far better; only a slight amount
of filler was actually used. The small inlet in the base of the fin was also
modified before the fin halves were
glued together!
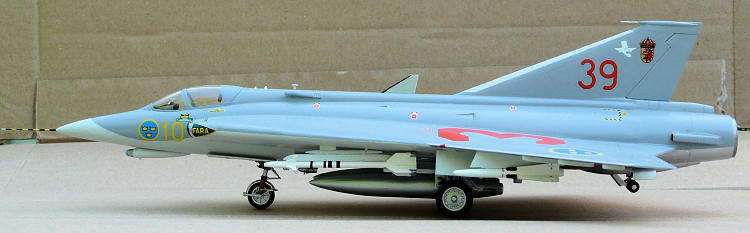
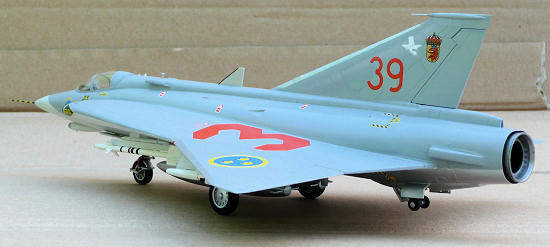
| COLORS & MARKINGS |
I
started to paint the bottom minus the fuselage aft of the RAT bay Humbrol 147
Light Grey (FS36495). Three layers were needed before the coverage was perfect.
After careful masking the topside was painted Humbrol 128 US Compass Grey
(FS26320) . This paint was apparently in better shape because two layers were
sufficient to make the coverage perfect. The last “main” color
 missing was the
bottom of the fuselage aft of the RAT bay and leading edges of fin as well as
the outer wing sections, which after careful masking (a bit tedious), was
painted Revell 90 Silver. Three times was needed as the trouble with this paint
is it dries too fast in my opinion. This result in, if you brush over the same
place for too long, the paint simply is peeled of by the brush (and believe me I
have tried it)! After a long and tedious painting process with masking and touch
up sessions, the whole surface was given a coat of Humbrol Gloss
missing was the
bottom of the fuselage aft of the RAT bay and leading edges of fin as well as
the outer wing sections, which after careful masking (a bit tedious), was
painted Revell 90 Silver. Three times was needed as the trouble with this paint
is it dries too fast in my opinion. This result in, if you brush over the same
place for too long, the paint simply is peeled of by the brush (and believe me I
have tried it)! After a long and tedious painting process with masking and touch
up sessions, the whole surface was given a coat of Humbrol Gloss
The
decals themselves were easy to apply so no real obstacles here with the
exception of the large numbers on the
op of the wings, which after had been secured turned out to be impossible to
soak up again because I discovered a slight alignment problem (but nothing
serious) so I left it as it was.
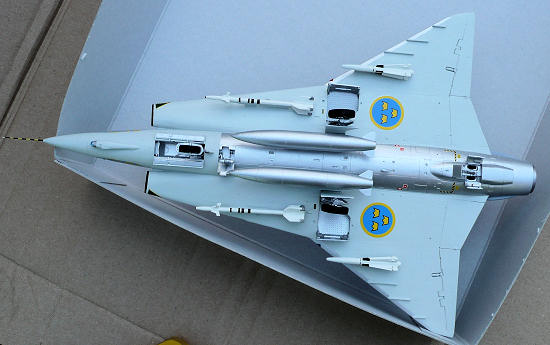
| FINAL CONSTRUCTION |
The
remaining parts were treated similar as in my Danish build with exceptions of
different colors used; for example both the seat and back cushions of the
ejection seat were painted Humbrol 155 Olive Drab (FS34087) and firing handles
red and the external tanks of course went Silver.
The Rb24J
Sidewinder missiles (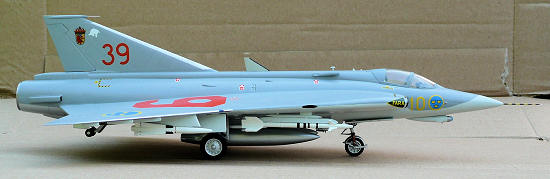 (and sometimes referred to as the “Super Falcon”) missile. As the weapon set
only included the
(and sometimes referred to as the “Super Falcon”) missile. As the weapon set
only included the
The last
things to be attached were the pitot probes and the stall indicator. The stall
indicator presented no problem but the two pitot probes needed special
attention.
 The short one, which is supposed to go
on the point end of the fin tip (part C2), needs a
The short one, which is supposed to go
on the point end of the fin tip (part C2), needs a
The nose
probe was painted instead of using the decal, but using it as a guide, I managed
to paint the probe so it would appear exactly as intended. I think it’s a bit
optimistic to use a decal in such a situation anyway.
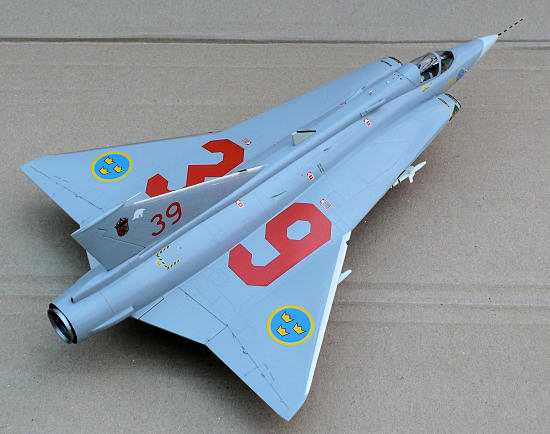
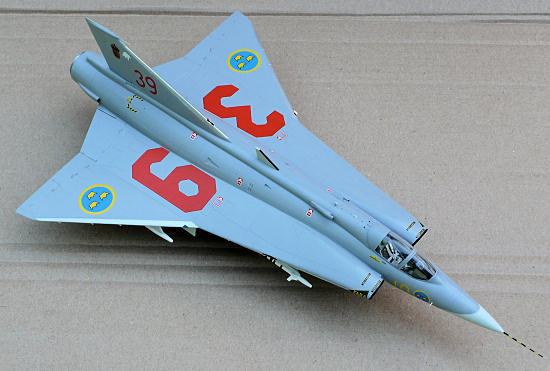
| CONCLUSIONS |
Despite
the fact that I used this as “practice” for my Danish build it turned out nicely
as I had expected and the addition of armament does bring it up a bit instead of
being “empty” under the wings if build straight from the box. However some
modeling experience is required to do
this kit as fit is far from perfect. Apart from that it was in fact a fun kit to
do and I think the photos speaks for themselves.
| REFERENCES |
The
aviation factfile:
Modern
military aircraft
September 2012
If you would like your product reviewed fairly and fairly quickly, please contact the editor or see other details in the Note to Contributors.