|
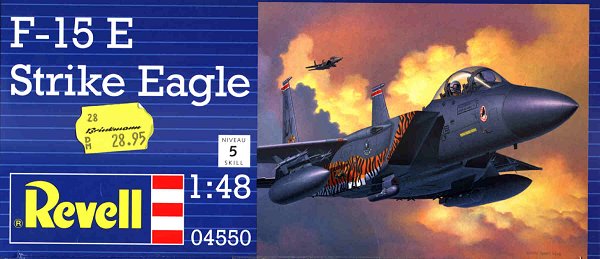
KIT: |
Revell 1/48 F-15E Strike Eagle |
|
KIT # |
4550 |
|
PRICE: |
$14.00 (in Germany) |
|
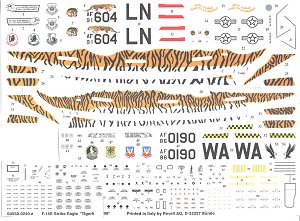
DECALS: |
See Review |
|
REVIEWER: |
|
|
NOTES: |
|
BACKGROUND |
Both your editor and Roger Jackson have already reviewed F-15 kits, Scott even did this special kit. Since its debut, opinions seem to have been almost unanimous in that it is a very accurate representation of this important aircraft at a very reasonable price. The lack of external stores (hey, there are even gaps in the sprues where the bombs should have been) is sad and forces you to spend extra money if you want to depict your F-15 fully combat loaded. My motivation in writing this review was to show you the different scheme in the Revell of Germany boxing.
|
THE KIT |
 Being anything else than an
expert, I built this kit just for fun. Meanwhile I´m able to – say - gather the
purpose and the looks of an external LANTIRN installation, but I´m still
innocent as to the more arcane questions of which aircraft was equipped with
which gizmos at what time and the like. Seems I still haven´t accepted I´m
beginning to become a jet modeler ...
Being anything else than an
expert, I built this kit just for fun. Meanwhile I´m able to – say - gather the
purpose and the looks of an external LANTIRN installation, but I´m still
innocent as to the more arcane questions of which aircraft was equipped with
which gizmos at what time and the like. Seems I still haven´t accepted I´m
beginning to become a jet modeler ...
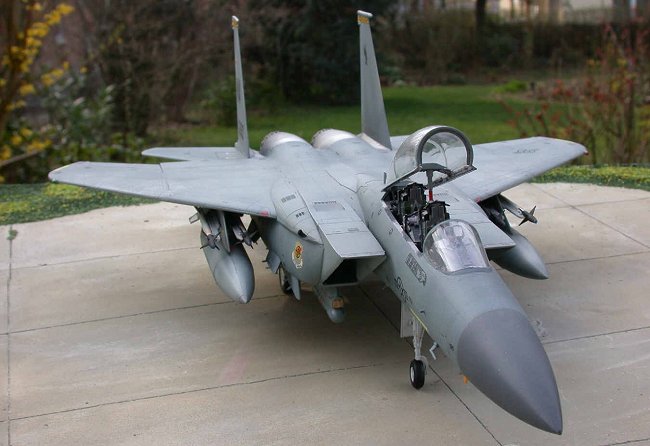
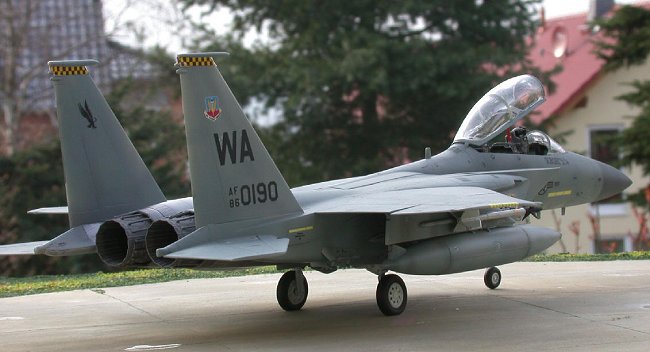
The kit decals represent two aircraft, one of the 494th TFS of the 48th TFW from RAF Lakenheath in Tigermeet markings, the other a very generic Eagle of the 57th Wing at Nellis AFB. I decided on the latter scheme, since I wanted my Eagle in workday clothes, so to speak.
|
CONSTRUCTION |
 The kit is well engineered and
leaves little room for the use of filler, although I had to use some wax around
the conformal fuel tanks and the intakes. I also had to do some sanding along
the fuselage seams, but nothing major. I violated the order of assembly by
leaving the front landing gear out until the end; it is meant to be installed
while building the front wheel well, and I feared I might break it off some time
during building. So I had to do some cutting and fitting to get the thing into
the whell well in the end. I´m not sure which is the better way, but I always
prefer an approach that avoids accidents caused by my ham-handedness. In that
respect, a modern jet has a lot to offer, especially those nasty little blade
antennas, conveniently located where you have to sand. But I managed to keep
these in situ.
The kit is well engineered and
leaves little room for the use of filler, although I had to use some wax around
the conformal fuel tanks and the intakes. I also had to do some sanding along
the fuselage seams, but nothing major. I violated the order of assembly by
leaving the front landing gear out until the end; it is meant to be installed
while building the front wheel well, and I feared I might break it off some time
during building. So I had to do some cutting and fitting to get the thing into
the whell well in the end. I´m not sure which is the better way, but I always
prefer an approach that avoids accidents caused by my ham-handedness. In that
respect, a modern jet has a lot to offer, especially those nasty little blade
antennas, conveniently located where you have to sand. But I managed to keep
these in situ.
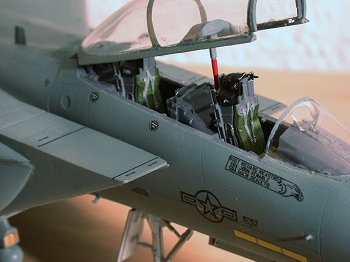
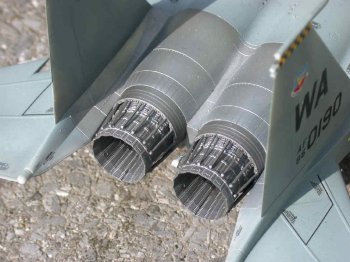
I spent some time working at the cockpit which is nicely detailed, although an expert might point out things I never realized, working in my preferred mode of BI = blissful ignorance. I had some trouble – as usual – with the clear parts, epsecially with attaching the separately molded bracing (I ended up using white glue), but all in all, construction was straightforward. The beautiful exhausts with all those fiddly actuator rods went together well, were spray painted with several shades of Testor´s metalizer and set aside.
|
PAINT & DECALS |
 Now
it was for the fun. After masking the cockpit and wheel wells, I pre-, post- and
in-between-shaded the monochrome scheme until I found I had done enough. The
radome was sprayed a darker shade of grey. BTW, in the pics, the plane looks
lighter than in reality.
Now
it was for the fun. After masking the cockpit and wheel wells, I pre-, post- and
in-between-shaded the monochrome scheme until I found I had done enough. The
radome was sprayed a darker shade of grey. BTW, in the pics, the plane looks
lighter than in reality.
Next came another of my most feared steps: Applying a gloss coat. I shot this plane with a least 14 very thin coats of future, until it really had a gloss. My horror was I might kill the detail, but suprisingly the fine recessed panel lines survived.
Then it was for decaling, a somewhat time consuming task given the amount of stenciling. I experienced silvering with some decals on the tail planes, in spite of future and the use of MicroSol, but the rest went on well, although you could hardly move them once they were on the kit. One larger decal didn´t survive and had to be repaired using material from the spares box. Sadly, there are no color callouts or decals for the external stores (such as there are). I had to make do with what I found in my spares box after looking at the references (I usually like what I find at www.fas.org)
Yet another few gloss coats and a number of flat coats, unevenly applied to retain a somewhat lively surface, completed the paint job.
Then it was on to complete the landing gear (great fit and stability) and the notorious fiddly bits. Upon removing the masking from the canopy I reealized there was overspray on the clear parts, so I had to polish quite a lot in the end.
|
CONCLUSIONS |
All in all, this was a fun project, and one that leaves you with a big chunk of model, and in my eyes, the F-15 is a very cool and beautiful plane. Highly recommended!
If you would like your product reviewed fairly and quickly by a site that has well over 100,000 visitors a month, please contact me or see other details in the Note to Contributors.