Academy 1/144 MiG-29 Fulcrum
| KIT #: | 4441 |
| PRICE: | AUD $3.00 |
| DECALS: | One option |
| REVIEWER: | George Oh |
| NOTES: |
Tweeked
for this dio. |
| HISTORY |
The MiG.29 (NATO
reporting name FULCRUM) is a Russian
fourth-generation
jet fighter aircraft designed by the
Mikoyan
design bureau.
It was developed along with the
Sukhoi Su-27 FLANKER in the 1970s to
counter new American fighters such as the
McDonnell Douglas F-15 Eagle, and the
General Dynamics F-16
 Fighting Falcon.
FULCRUMs entered service with the
Soviet Air Force in 1983.
It is still in service with the Soviet Union (as
well as many other nations) as one of the front-line
air superiority aircraft.
Even Soviet
pilots use (unofficially) the "Fulcrum" to discuss their mounts.
Fighting Falcon.
FULCRUMs entered service with the
Soviet Air Force in 1983.
It is still in service with the Soviet Union (as
well as many other nations) as one of the front-line
air superiority aircraft.
Even Soviet
pilots use (unofficially) the "Fulcrum" to discuss their mounts.
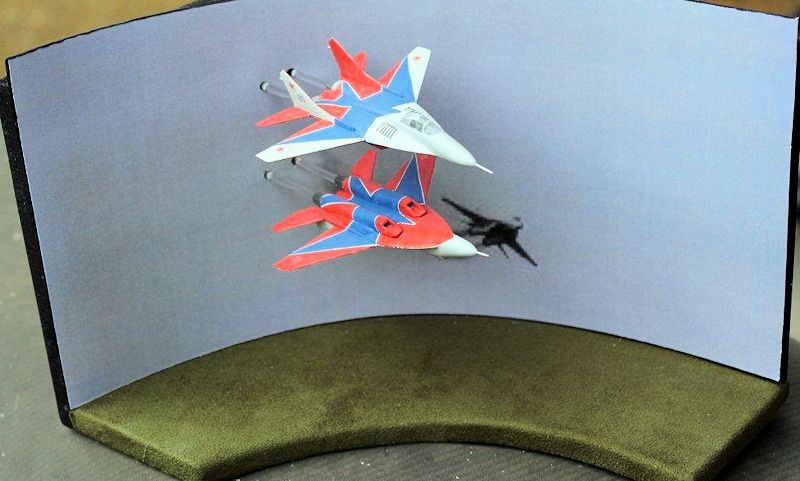
The USSR had (at least) two aerobatic / precision flying teams – the Russian Knights who flew FLANKERS, and the Swifts who flew FULCRUMS. I had an idea for a different diorama. And when I saw a roll of 0.4mm-wide tape in LHS, I realised that, with this stuff, I could execute my idea. Confidently, I began to gather the rest of the items to do it. It had to be done in 1/144-scale or else it’d be too big to display in my home, and I elected the FULCRUMS because they were available in the right scale, the livery looked easier, and it required fewer colours.
| THE KIT |
The kit is well moulded in light
grey plastic that is relatively free of mould seams or flash.
The fuselage is split horizontally and each wing,
tailplane and fin/rudder is a single piece.
While the weapon pylons may appear to be too thick,
this is par for the course for 144-scale.
There is a missile for each pylon, but I’d be
leaving them off (to make painting easier).
The weak point of this mould is that the lips of the
intakes curve inwards and produce an incredibly-thick look.
| CONSTRUCTION |
Both models were built together
and the cockpit was the starting-point.
As these’d be in-flight, I had to carve a pilot for
each, from pieces of sprue.
For the rest, I followed the instructions with only
a couple of
 deviations.
The kit’s thick fragile nose-spike was lopped-off,
and in-lieu, I positioned a dress-makers pin (the ones with a small plastic
ball on the blunt end) inside the fuselage before closing it.
In fact, there is more pin on the inside, than pokes
out, and the ball helps anchor and centre the pin.
The other was that I left-off the pylons and weapons
as befits this type of aircraft.
Unfortunately, further later research told me that
all of the Swift’s MiGs are fully combat-capable, so I should have fitted
the weapon pylons – Rats!!
Filler was needed at the wing roots and pylon holes,
but only the sides (below the tail fins) needed some scraping to smooth
things out.
I thinned the edges of the tail cans by drilling them out,
but I left them off till the rest of the model was complete.
Oddly enough for 144-scale, the undercarriage doors
fit quite snugly.
deviations.
The kit’s thick fragile nose-spike was lopped-off,
and in-lieu, I positioned a dress-makers pin (the ones with a small plastic
ball on the blunt end) inside the fuselage before closing it.
In fact, there is more pin on the inside, than pokes
out, and the ball helps anchor and centre the pin.
The other was that I left-off the pylons and weapons
as befits this type of aircraft.
Unfortunately, further later research told me that
all of the Swift’s MiGs are fully combat-capable, so I should have fitted
the weapon pylons – Rats!!
Filler was needed at the wing roots and pylon holes,
but only the sides (below the tail fins) needed some scraping to smooth
things out.
I thinned the edges of the tail cans by drilling them out,
but I left them off till the rest of the model was complete.
Oddly enough for 144-scale, the undercarriage doors
fit quite snugly.
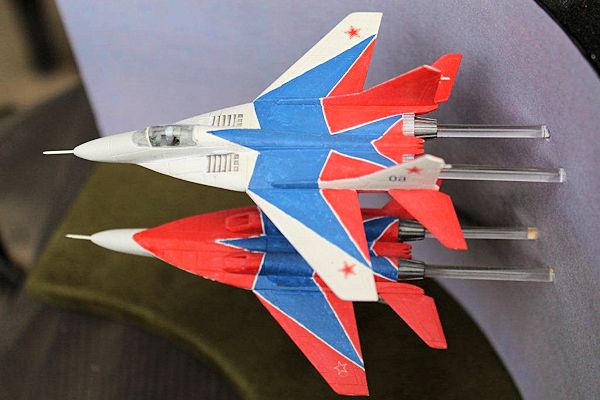
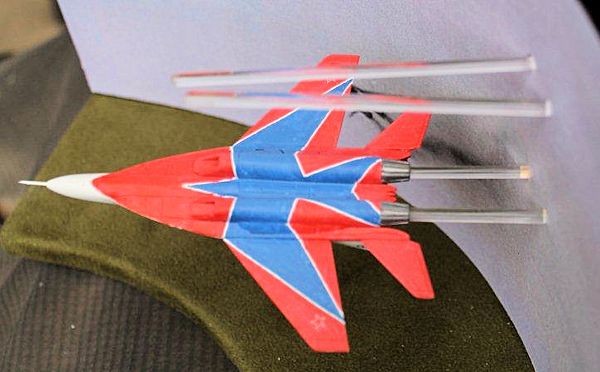
| COLORS & MARKINGS |
This was easy – once I’d
figured-out how to do it.
If fact, the whole process was keyed around that
roll of 0.4mm-wide tape.
First, my MiGs were sprayed with an overall coat of
Citadel Miniatures Chaos flat white, then carefully, the bird patterns were
laid-out with the narrow tape (easier said than done) from patterns obtained
by looking at photos on the internet.
A coat of future followed, to seal the tape.
The
small size made the job fiddley, but the straight lines made it possible.
Then, with a brush, I painted the birds and t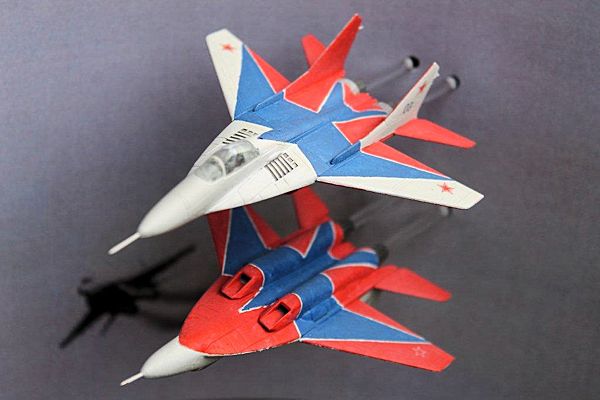 he
surrounds, being careful to keep to one side of the tape.
Citadel Miniatures blood red and Ultramarine blue
were my colours of choice.
Whip-off the tape, and the scheme was complete.
Another coat of Future prepared the way for the
decals.
The scheme isn’t 100% accurate because the outer surface of
the fins have a red tip above a white, then blue, lightning bolt stripe.
I was not disposed to replicate this four times, so
I left the outer fins white.
Only the louvers on the tops of the intakes received
a dark wash because - face it – these are (clean) display aircraft.
he
surrounds, being careful to keep to one side of the tape.
Citadel Miniatures blood red and Ultramarine blue
were my colours of choice.
Whip-off the tape, and the scheme was complete.
Another coat of Future prepared the way for the
decals.
The scheme isn’t 100% accurate because the outer surface of
the fins have a red tip above a white, then blue, lightning bolt stripe.
I was not disposed to replicate this four times, so
I left the outer fins white.
Only the louvers on the tops of the intakes received
a dark wash because - face it – these are (clean) display aircraft.
With two identical kits, I had two identical decal sheets, so I turned the fin-number (they’re supposed to be on the sides of the intakes) upside-down on the second aircraft to create a little interesting point from the different numbers. Can you see it? I didn’t use the stencilling because, while small, they were too over-sized. The rest was just red stars in the classic six positions. For a small sheet, the decals were quite crisp, and in register, thought the yellow of the stencilling was a little out.
A final cost of Future sealed the
decals onto the model, and a light coat of Gunze H 20 gave the models a
satin finish.
Strip the masking from the canopies, and the models
were completed.
| FINAL CONSTRUCTION |
My intention was to build a
3-sided, ½-box consisting of a left-side wall, back and floor.
It would support a curved back, and the wall would
support two pairs of clear acrylic rods which would support the models.
It took me a while to locate 3mm clear acrylic rod,
but when I did, it cost peanuts.
Getting the four rods spaced correctly and parallel
was childs play, thanks to a vertical drill.
But when the MiGs were slid down over them (two per
MiG) they seemed to be converging.
The problem here was that, inside the fuselage,
 the
rods mounted above the intakes - thus the axis of the MiG was different from
the orientation of the rods.
Despite a lot of work (and trial and error) to try
to get the pairs of rods to correctly lean AWAY from each-other so that the
aircraft look like they are flying parallel, I constantly failed.
In the end, I appealed to a modelling college who
owns a furniture repair business.
He examined my concept and set about correcting my
design.
the
rods mounted above the intakes - thus the axis of the MiG was different from
the orientation of the rods.
Despite a lot of work (and trial and error) to try
to get the pairs of rods to correctly lean AWAY from each-other so that the
aircraft look like they are flying parallel, I constantly failed.
In the end, I appealed to a modelling college who
owns a furniture repair business.
He examined my concept and set about correcting my
design.
His cure was to marginally-fatten the rods with sticky tape so that they firmly support the models in parallel. The rest was basic construction (for him) using bits of scrap. One innovation he added was to put a thick block of wood between the curved back and the wall, so that the rods would have a more-solid foundation. And while he made the drilling the holes for the rods look so easy, they do toe-in a bit, though it is unnoticeable when the models are in place on them. The back is a thin sheet of plastic supported top and bottom by cut-for-purpose backing boards. The picture for the back board is merely a down-load from the internet, with the holes for the mounting rods punched through it.
| CONCLUSIONS |
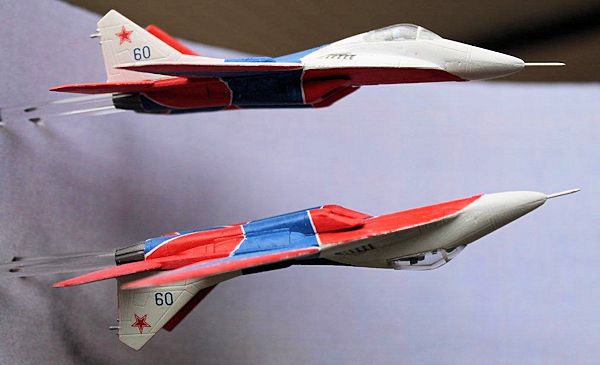
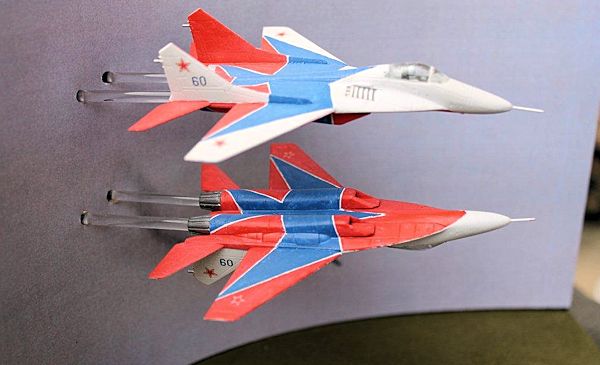
I opted for this belly-to-belly
formation as I feel that it is more dramatic because the pilots can’t see
each other (or the other plane), and the tilted orientation is a little more
dynamic than level flight.
This
 formation shows-off the bird patterns quite
nicely, though it does require that the viewer crane a little to see the
numbers.
This project unrolled exactly as I’d planned, which I find
personally gratifying.
The only real difficulty was the (for me) was the
construction of the base.
Many thanks, Patrick.
formation shows-off the bird patterns quite
nicely, though it does require that the viewer crane a little to see the
numbers.
This project unrolled exactly as I’d planned, which I find
personally gratifying.
The only real difficulty was the (for me) was the
construction of the base.
Many thanks, Patrick.
I dunno if these are the best
144-scale Fulcrums available, but they were available, and quite buildable –
even for a novice builder.
Other (serious) 144-scale builders may reject it
because of the poor shape of the intakes.
But I enjoyed the build and the favourable
impression it made on other modellers in my region.
Now to do that ‘Watch the birdie’ scene from “Top
Gun” (in a -4G dive?).
| REFERENCES |
Just the
instructions and the internet photos.
George Oh
August 2013
Copyright ModelingMadness.com. All rights reserved. No reproduction in part or in whole without express permission.
If you would like your product reviewed fairly and fairly quickly, please contact the editor or see other details in the Note to Contributors.
2024