
| KIT #: | 02276 |
| PRICE: | $200.00 |
| DECALS: | Three options |
| REVIEWER: | Dan Lee |
| NOTES: | Quinta 3D Cockpit decal set, Linden Hill Decals, Aires Super Detail Set, Reskit Tires, Reskit 30mm Gun Muzzle, Master Details Sensors/Pitot tube, ESD wicks for Sukhoi, Quick Boost parachute pack and resin antennas used. |
| HISTORY |
The Sukhoi 25 Frogfoot came from a 1968 specification for a dedicated subsonic ground attack aircraft aka shturmovik to provide close air support as the current generation of attack jets were based on interceptors and not adequate for the role. The design was to be armored and carry a large number of air to ground weapons.
Unlike the USAF A-9/A-10 competition that was happening at the same time, the Su-25 Grach (Rook, a type of crow) was not designed around a 30mm tank destroying super cannon although it had a similar mission. It flew in competition against the Ilyushin Il-102 which was called “the most gorgeously ugly combat aircraft ever.” The Sukhoi proved to be a better performer all round and won the competition. It had a shoulder mounted cantilever wing and boxy fuselage based on engine pods with a similarity in design to the Northrop A-9 as well as have the cockpit encased in titanium armor, but not exactly a copy rather based on a common aerodynamic necessity like the AA-9 Amos missile and the Buran Space Shuttle.
 The Rook carries a dual barrel 30mm
cannon with 250 rounds, a laser range finder, a large number of chaff/flares
deployed from a number of dispensers located in various areas on the plane, 10
underwing pylons (the inner two are for the fuel tanks and outer two are for the
AA-8 Aphid self defence AAM, leaving six for various underwing air to ground
weapons.)
The Rook carries a dual barrel 30mm
cannon with 250 rounds, a laser range finder, a large number of chaff/flares
deployed from a number of dispensers located in various areas on the plane, 10
underwing pylons (the inner two are for the fuel tanks and outer two are for the
AA-8 Aphid self defence AAM, leaving six for various underwing air to ground
weapons.)
The Frogfoot (NATO codename) would start serving in 1981 with VVS (Soviet Air Force) Frontal Aviation regiments and sent to Afghanistan where they would serve till the end of the war in 1989 when the Soviet Army withdrew. Overall a thousand were produced (mostly in Tbilisi of the Georgian Republic) from 1980 to 2017. It would fight in many conflicts including both sides of the Ukraine-Russian war of 2022.
Service with Ukraine
The Ukrainian Air Force had gotten 92 airframes during the post Soviet breakup, but due to limited funds and maintenance issues only 31 were considered airworthy by 2008 while most of the remaining were put in storage. During the Russian invasion/capture of Donetsk/Luhansk and Crimea of 2014, the Ukrainians used the Su-25 for ground attack missions and lost several Su-25s to Russian fighters and SAMs.
When the Russian invaded in 2022, the Ukrainian Air Force conducted close air support missions with Su-25s and as the war progressed has lost some 25-30 of them as of the time of writing this review. Parts are rather difficult to come by considering the Russian invader is also the main supplier of Su-25 parts so Ukraine has obtained replacement Su-25s and Su-25 parts from sympathetic former/current users of the Su-25.
| THE KIT |
 The Trumpeter 1/32 Kit is based on
the original Su-25K Frogfoot in a very big box crammed to the top with sprues.
There are 15(!) sprues (including two clear sprues) and six main airframe parts
just for the aircraft itself and an eye popping/mind blowing 26 sprues of
various sizes (and some are duplicates) for the weapons (basically most of the
Trumpeter 1/32 Russian Weapons set including radar guided R-77 AAMs which aren't
carried at all by the air-to-air radar less Frogfoot.) Additional parts include
rubber tires, metal landing gear and photo etched harnesses. There are also
several sheets of decals for the weapons, stencils, and various airframe decals.
The Trumpeter 1/32 Kit is based on
the original Su-25K Frogfoot in a very big box crammed to the top with sprues.
There are 15(!) sprues (including two clear sprues) and six main airframe parts
just for the aircraft itself and an eye popping/mind blowing 26 sprues of
various sizes (and some are duplicates) for the weapons (basically most of the
Trumpeter 1/32 Russian Weapons set including radar guided R-77 AAMs which aren't
carried at all by the air-to-air radar less Frogfoot.) Additional parts include
rubber tires, metal landing gear and photo etched harnesses. There are also
several sheets of decals for the weapons, stencils, and various airframe decals.
The parts are pretty clean and mostly free of flash. However there are mold markings that require sanding to remove.
Over the length of this build I bought several correction sets to fix missing details or improve things like the Aires Su-25K detail set that included improved jet exhausts, landing gear wells and open electronic bays (but no cockpit), the Quinta Studios 3D decals cockpit set, Reskit resin wheels/30mm gun, Zactomodels AA-8 Aphid and launch rail and Linden Hill Decals which included Ukrainian markings.
| CONSTRUCTION |
I started building the engine pods. I removed the original plastic exhausts from the engine parts to fit the Aires resin exhausts on. Each multi piece exhaust was glued together and painted with Vallejo Metal Color Burnt exhaust. The intake pieces were glued together and seams filled with Vallejo plastic putty. This is one of the drawbacks to any Frogfoot kit of any scale (at least 1/32 and 1/48) is the rather noticeable seam running down the middle of a very long skinny intake.
Next the intake was painted neutral
grey and the corrected resin turbo fan painted in silver added to the end of the
intake. Once dry, the intake pieces were adjusted to fit at the lip of the
opening to avoid any possible gaps. I think I used Vallejo plastic putty to seal
up any possible gaps (the excess remove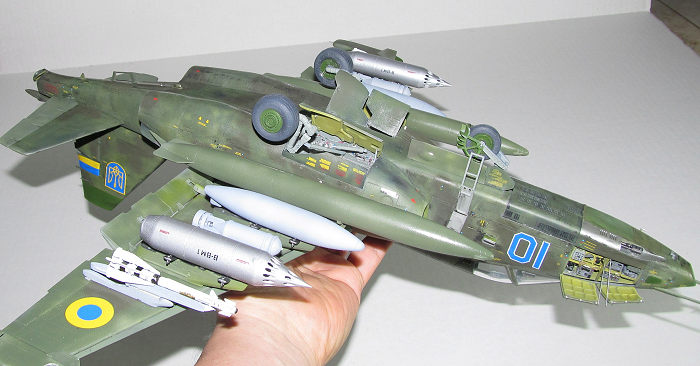 d with damp Q tips.) Afterwards I closed
up the engine pods and glued the halves together with Tamiya extra thin cement.
d with damp Q tips.) Afterwards I closed
up the engine pods and glued the halves together with Tamiya extra thin cement.
Next I cut up the interior of the fuselage so that the resin nose electronic bays fit and the landing gear wheel wells did as well. I chopped out a fair amount of plastic to get the resin main wheel wells to slide in, but I didn't need to sand everything down including the resin to paper thin to get everything to fit. I was impressed that this was the first Aires wheel wells that were almost easy to install. I used CA glue to secure the main wheel wells in place.
In my haste to get the main wheel wells installed, I glued the pods to the fuselage halves instead of dealing with the damn engine pod seams which would come to haunt me later.
The cockpit pieces were put together next. I had to remove most of the surface detail to make room for the 3D decals. I painted the parts Dark Sea Blue, but it was actually too dark compared to the decal pieces so I painted them RLM65 which was a closer match but not a perfect match for the Sukhoi cockpit color. I added whatever 3D decals that I could avoiding the stuff that stuck out or was too fragile that could go on later. I used white glue or CA glue to get the 3D decals to stick. I glued the plastic cockpit onto the deck of the resin nose landing gear and inserted it into portside fuselage half. I added two 1/4 oz steel sinkers behind the rear bulkhead of the cockpit to help keep it a nose sitter.
I then glued the fuselage halves together from the rear to the front because I figured that I was going to have fit issues around the nose. Shockingly, I was right as the resin electronic bays didn't fit so well and had to do a fair amount of cutting/trimming. Even with all that work, I still had a 1/16 to 1/32” gap between the fuselage halves at the nose. I ended up gluing various sizes of plastic card shims and pouring gap filling CA glue everywhere to close it up.
The next thing I would do is paint the interior of the landing gear wells and the electronic equipment bays. I sprayed the interior of the gear wells with one layer of Tamiya XF-22 German Grey and a light dusting of Gunze RLM02 H-70 for the lighter color. I then painstakingly brush painted the various conduits, piping, valves and other pieces in various colors based on photos of actual Frogfoot wheel well interiors. I added some wire and supports as per the Aires instructions but I didn't add everything as it was either too fragile, too complex or too deep to be seen. Same applied to the electronic bay interior as I painted that using a combo of AKAN's Mig yellow primer and Tamiya XF-4 yellow green. The various electronic boxes were painted flat black or grey as per pic the color shots of and used the pdf of the instructions from the discontinued Eduard PE set as a paint guide for each box and various interior bits.
 The wings, ailerons and various
flaps were pretty straight forward to assemble without any issues that I recall.
It was at this point when my life went sideways and I needed focus on dealing
with some familial issues rather than building models so Su-25 like all my
projects I was working basically sat collecting dust for a few months.
The wings, ailerons and various
flaps were pretty straight forward to assemble without any issues that I recall.
It was at this point when my life went sideways and I needed focus on dealing
with some familial issues rather than building models so Su-25 like all my
projects I was working basically sat collecting dust for a few months.
I started up again by filling and sanding the seams. The seams themselves weren't difficult but rather the detail I had to replace. When the seams were dealt with I used a ponce wheel to replace the rivets, but it wasn't enough so I used a metal ruler to guide a heavy duty sewing awl into making lines of “rivets” or used a thin cut saw to make lines. This too a fair amount of time to do because I found it pretty tedious and would only work on one section at time before my eyes glazed over.
Eventually I got all the seam work down and did a final polishing of surface with various grades of sanding/polishing cloths. Next I glued the wings and the ailerons in place and filled any gaps with Vallejo Plastic Putty (excess removed with damp Q-tips.)
I was surprised at how complex the landing gear was as it took some careful work to assemble (I shouldn't have been as I built the Mig-29 and Mig-31 which have pretty complex landing gear systems.) The landing gear was primed then painted FS36040 aka Light Gull Grey at first then RLM02 then RLM65 and finally Gunze RLM02 (again) because I would get new info on what the landing gear color was supposed to be and it would change.
The only thing that didn't change was the use of Reskit wheels. I primed with Grey Stynylrez primer and then painted the rims flat green and tire NATO black. I know the Trumpeter rubber wheels are better than typical Japanese rubber wheels, but I prefer solid wheels over rubber for models which is why I ended up buying the Reskit wheels which also have better detail.
I masked off the canopy and glued on the external plastic parts and waited till after painting to add the internal stuff.
Finally, I painted and added the 30mm cannon into the cannon bay as per instructions. I had to trim off some of the parts to get it to fit, but in the end I would be just wasting my time as you find out later in the build. I cut off the plastic muzzle and used the Reskit muzzle instead.
| COLORS & MARKINGS |
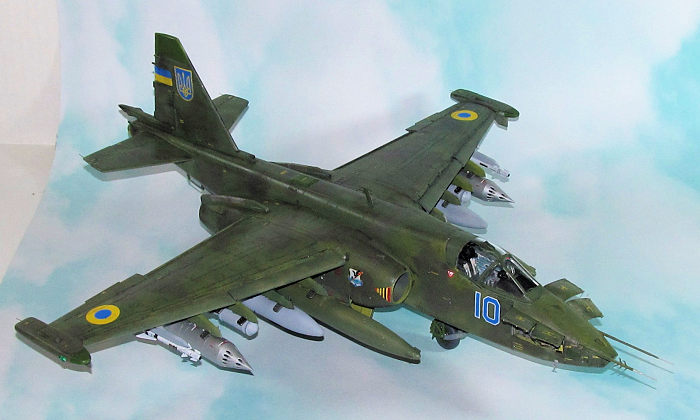
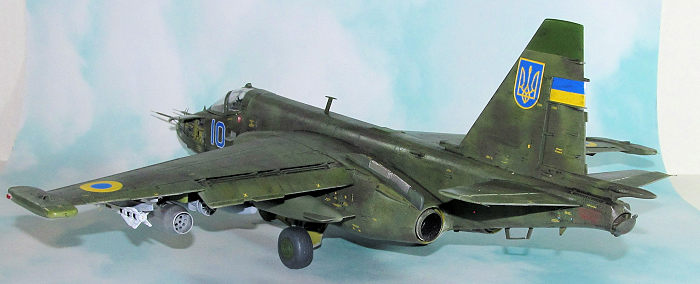
Originally I wanted to build a Soviet era Frogfoot, but sometime during the long slog of a build the 2022-today Ukraine-Russian war happened and I didn't want to build something currently used to glorify someone whose ambitions is to put back together the Soviet Union so I opted for a Ukraine Rook/Grach. I am not someone who enjoys digital camo patterns so I spent a good amount of time looking for a 1/32 decal set that had some kind of Ukraine markings. The Linden Hill Global Su-25 Set 2 provided two Ukraine markings. One based on the original Soviet paint scheme and one based on what is called “Clover.” I picked the “Clover” Scheme for Blue 10 from 2008/9.
Various areas of the massive model was masked off including the gear wells. I first sprayed on the initial coat of grey Stynylrez primer on the model. I had a number of runs, nits and booboos that had to be sanded away and polished. I sprayed on another coat of primer and this coat was less of a mess than the first one, but I still had to polish portions of it smooth.
 Once the primer coat was done to my
satisfaction (this also included the open bay hatches, many landing gear wheel
well covers, doors and flaps.) Earlier I had masked off the canopy parts and
painted with the interior color (RLM65) before the primer coat.
Once the primer coat was done to my
satisfaction (this also included the open bay hatches, many landing gear wheel
well covers, doors and flaps.) Earlier I had masked off the canopy parts and
painted with the interior color (RLM65) before the primer coat.
Next I sprayed on a blotchy coat of flat white for black basing (or in this case, dark grey basing.) As you might have imagined I used a lot of paint. Once dry, I sprayed on two thin coats of Mission Model Paint Russian OD FS34096. I then ran some Mission Model Paint Modern Russian Army Green in thin blotches to add the variation of the paint as per some photos I found online.
When the MMP paint was dry, I sprayed on Gunze Sanyo H421 RLM81 freehand which was the closest color I had to the Ukrainian dark green used for the Clover pattern. I tried to keep the paint thin so that the discoloration underneath would show.
The various green areas were masked off so I sprayed on a thin coat flat white then a thin coat of Tamiya flat green XF-5. FYI, I painted the landing gear doors and canopy at the same time. Once everything was dry, I sprayed on Vallejo acrylic gloss in preparation for the decals.
I used a combination of Linden Hill Decals and the Trumpeter stencils. Like all modern aircraft, the Frogfoot is covered with stencils. I did my best to add whatever stencils I could to the outside of the Frogfoot which was about 90% of the stencils the instructions recommended except those that were covered up Ukrainian markings. I used Micro Sol/Set and some Solvaset for the stubborn ones.
Once dry, I wiped down the model with a damn cloth to remove the excess decal solution before using Flory Weathering solution. It is based on a clay mud that actually sticks which means it is tougher than the water color paint I had been using but not creating a lot of VO chemicals to inhale like oil paints/enamel washes and mineral spirits. I just wash it off with damp Q-tips. It turned out all right. Although I did use some Tamiya Panel line accent for the more stubborn areas of the model. Once everything was dry, I sprayed on several light coats of Vallejo flat coat on the model and various parts.
| CONSTRUCTION CONTINUES |
I started by adding the landing gear post painting, but pre weathering. I was lucky that the Aires wheel bays were designed with to be used with the kit landing gear (“why wouldn't it?” you ask... well, I have had suffered through examples where it didn't fit so well and complicated things.) I drilled out the wheels and trimmed part of the landing gear so the wheels would fit. I let the CA glue air dry after adjusting the wheels to let CA glue get a solid hold on the parts. At this point I added the painted and decaled weapons pylons including the correct resin missile rails from Zactomodel.
I added the many landing gear doors and electronic bay hatches. Instead of using the fragile resin supports and extention rods, I used cut to length pieces of metal wire. They were glued in place (several times to my frustration) with a small dab of CA glue.
 Thanks to the mind blowing variety
of weapons, it took me a while to find a loadout that made sense. I picked out
the 250kg dumb bombs, rocket pods and napalm canisters over the numerous guided
weapons because they probably were unavailable for the Ukrainians. The weapons
and fuel tanks were assembled. Lots of seam work was needed. I built up the
Zactomodel resin Aphids and they were very easy to build considering how complex
the missile shape is. All the weapons were primed then painted (in several cases
many times.) The rocket pods and AAMs were gloss coated and when the gloss coat
was dry, the decals were added. I then glued the various weapons onto the rails
and pylons using CA glue.
Thanks to the mind blowing variety
of weapons, it took me a while to find a loadout that made sense. I picked out
the 250kg dumb bombs, rocket pods and napalm canisters over the numerous guided
weapons because they probably were unavailable for the Ukrainians. The weapons
and fuel tanks were assembled. Lots of seam work was needed. I built up the
Zactomodel resin Aphids and they were very easy to build considering how complex
the missile shape is. All the weapons were primed then painted (in several cases
many times.) The rocket pods and AAMs were gloss coated and when the gloss coat
was dry, the decals were added. I then glued the various weapons onto the rails
and pylons using CA glue.
One thing I discovered was that the main gun panel wasn't designed to be closed. I had to remove most of the gun and sand down the edges to make it fit. However, in the process of gluing the panel in place I found that I cracked my carefully done nose seams top and bottom (a drawback of using CA glue as it doesn't have much lateral strength.) I tried my best to be careful with the model, but I ended up breaking off most of the panel covers and landing gear doors in the midst of repairing the cracked seams. Several sessions of swearing, filling, swearing, sanding, more swearing, painting and even more swearing later, I finally repaired the seam and paint job to my liking. I just ended up having the painted Reskit resin 30mm gun nozzle glued to the nose and no actual gun behind it at all.
I added the many painted antenna, Master brass ESD wicks, counter measures racks, entry ladder, entry step, and QB resin rear landing parachute pack. I ended up having to drill out the holes so that the two very prominent Master brass/resin sensors and pitot tube could be added into the nose. These were glued together and painted before final assembly before being inserted into the drilled out holes.
Finally I added all the cockpit bits I didn't add including the painted seat which was updated with 3D decal straps and belts as well as various stencils and 3D decal handles. The IP coaming didn't fit all that great and I needed to carve out some of the surrounding fuselage to get it in- I also added a dark green painted wire to the coaming as the conduit/tubing is prominent in the cockpit—held on with CA glue.) The 3D decal IP looks a lot better than the kit decal/IP (I had to cut out the raised detail first before gluing the 3D decal on.) It turns out the control stick was fiddly and it required some brute force to get it to stick in place (and a bit of glue.) The canopy pieces were glued in place using white glue. I originally wanted the canopy open, but it was a pain the butt to hold in place and the white glue I was using wasn't up to the task so I just did something different and pose it closed.
After almost three long years, I finally finished my 1/32 Su-25 Frogfoot.
| CONCLUSIONS |
The Su-25K Frogfoot was a tough build because of the size and complexity of the project. I didn't help matter by opening all the hatches and adding in a lot of aftermarket to improve the detail/accuracy of the Frogfoot (I don't intend to be making another one to be honest.)
Definitely for advanced modelers only. Also based on the cost of all the upgrades I added, probably the most expensive kit I've built to date. Did I have fun building it? Kind of. I'm glad I got it done, but I can't really call it fun as the kit became a symbol of my literal grinding battle between reality (the actual Ukraine-Russian War and personal family issues) and the difficulties of the kit. Completing it took a mental load off my mind. It wasn't meant to be that way, but that's how it turned out for me.
Dan Lee
27 August 2024
Copyright ModelingMadness.com. All rights reserved. No reproduction in part or in whole without express permission from the editor.
If you would like your product reviewed fairly and fairly quickly, please contact the editor or see other details in the Note to Contributors.