AMK 1/48 MiG-31BM/BSM
| KIT #: | 8803 |
| PRICE: | $85.00 SRP |
| DECALS: | Four options |
| REVIEWER: | Andrew Garcia |
| NOTES: | One of the finest models I have ever built, with superior fit, moulding & engineering. |
| HISTORY |
The Mikoyan MiG-31 (Russian: Микоян МиГ-31; NATO reporting name: Foxhound) is a supersonic interceptor aircraft developed for use by the Soviet Air Forces. The aircraft was designed by the Mikoyan design bureau as a replacement for the earlier MiG-25 "Foxbat"; the MiG-31 is based on, and shares design elements with the MiG-25. The MiG-31 has the distinction of being one of the fastest combat jets in the world. It continues to be operated by the Russian Air Force and the Kazakhstan Air Force following the end of the Cold War and the collapse of the Soviet Union in late 1991. The Russian Defense Ministry expects the MiG-31 to remain in service until at least 2030 (courtesy of Wikipedia).
| THE KIT |
I am elated to have a MiG-31BM/BSM kit representing the latest configuration of the aircraft in service. For years mediocre and inaccurate MiG-31 kits went into the stash after modelers anxious to build one discovered how crude and simple the kits were. AMK has released what most would consider a near-perfect kit. The wait is over.
 This MiG-31 kit
is a great start to a late MiG collection and if you want to build one of the
earlier MiG-31s, the B/BS versions, AMK announced the earlier airframe
MiG-31B/BS and they have in fact released it in March 2016.
This MiG-31 kit
is a great start to a late MiG collection and if you want to build one of the
earlier MiG-31s, the B/BS versions, AMK announced the earlier airframe
MiG-31B/BS and they have in fact released it in March 2016.
While working on this build I kept thinking how refreshing it is not to read daily reports of errors and multiple press releases of resin correction sets for this model. With the exception of the crew restraints, I felt there is little left for the aftermarket world to enhance this kit. Maybe conversion sets to other variants would be nice but to fix problems – no, it’s not worthwhile. The only small item could be the dangling interior afterburner bits found in Eduard MiG-25 exhaust parts for the Revell MiG-25 kit.
The only aftermarket accessories for this kit that I found to date are decals, resin tires (Eduard EU648248 Brassin resin) because the kit tires have no tread, and metal landing gears made from both white metal and cast bronze. I did manage to break the plastic main gear during painting so a purchase of the bronze replacement gear is worth considering. The white metal gears bend too much for my liking but are an alternative. The plastic gear looks great and I have not heard others imply this is a weak point in the model. I added extra nose weight and that could have contributed to the breakage.
This kit provides options for the MiG-31BM and MiG-31BSM variants. These are MiG-31B and MiG-31BS airframes that were updated (hence the M (“modified”) suffix) replacing analog dials for digital displays. The MiG-31BM also has a retractable refueling probe. The MiG-31B/BS does not have the inflight refueling probe.
This kit is molded in dark gray styrene with 28 parts trees plus one tree of clear parts and one small fret of photo-etched parts. I've seen some nice injection-molded work before, but the slide molding in this kit is hard to believe. The forward fuselage is one hollow part and you "slide" the completed cockpit into place during assembly. In many other kits the attachment and exact location for the cockpit tub is a guess. Not with this kit. Plus, the entire forward fuselage is moulded as one piece so you do not have any seams to fix!
 The textured
pattern work inside the intake trunks is very well done. The separate box
containing the ordnance was a gift unto itself. After years of crudely moulded
rockets, missiles and bombs here's the state of the art and I really like it! I
think the resin aftermarket for the MiG-31 will have to look for ways to create
conversions for other versions rather than the “error fixing” we have become
accustomed to.
The textured
pattern work inside the intake trunks is very well done. The separate box
containing the ordnance was a gift unto itself. After years of crudely moulded
rockets, missiles and bombs here's the state of the art and I really like it! I
think the resin aftermarket for the MiG-31 will have to look for ways to create
conversions for other versions rather than the “error fixing” we have become
accustomed to.
Even my recent pleasure of using Eduard Brassin to up my game by adding resin missile ordnance has stalled with this kit because there are no fiddley fins or tiny parts to attach. AMK gives - straight "otta da box" beauties. What really catches the eye are the R-33 missiles, each is molded in one piece complete with fins in place, only a few tiny details are moulded separately for each missile. Just paint and stencil decal the missiles then attach them to correctly formed pylons - finally a partial cure for AMS. It is refreshing to find a kit where none of the initial builders had to list corrections or scratch built fixes for perceived errors or missing details. Everyone seems to be building this model OOB which is a tribute to its out-of-the-box details and engineering.
The level of detail in this kit is outstanding. The only visual flaw took me some time to uncover. Part # C2 which is the right vertical tail is missing its raised details on the outside only. This is used in step #15 of the instructions. If you look at the correct fin, part # C1 in step # 14 and compare the two, the missing detail will be noticed. Otherwise, I did not see it despite spending a lot of examining room time on the kit itself. After the model was finished it isn’t an issue for me – just an observation. Yes, it is that good!
I noticed after building the ejection seats that they did not have any plastic injection belts and buckles detail. The kit did not include any etched belts or crew restraints, either molded-in, photo-etched, or decal for the variant of the K-36D seat used with the MiG-31. Since I intended to use the Eduard FE752 MiG-31BM Color Zoom, and recommend you do as well, this was a moot point because it has an elaborate color etch belt set. Although I was very pleased with the details found in the Eduard Color Zoom (Eduard FE752 MiG-31BM interior), some of the cockpit instruments presented assembly problems. They seemed slightly oversized by a tiny amount. The kit plastic is such a precision fit that perhaps the error was in my assembly or in incorrectly positioning the etched parts before the plastic pieces were put together. I admit I was overly anxious to see it come together and may have rushed this step out of sequence. So, I would suggest you add the metal etched cockpit displays after the cockpit is glued together. The Eduard color zoom was really appreciated though because it provided both the cockpit instrumentation and the ejection seat details resulting in a very nice look. The alternative would be a well done, with restraints, resin seat with decals for the instrument dials. The kit does not have any instrument panel decals. The raised panel detail is outstanding. If you are a good detail painter the plastic cockpit panels and instruments will work very nicely providing a well detailed accurate cockpit.
The engines are beautiful replicas. With such detailed D-30 engines you could cut-away parts to expose them if you decide to paint and dress them up with some wires and plumbing - you would also have to include detailing the engine bay as well if you show them inside the airframe.
In reality, at
least with this first build, I am not spending any time painting the engine
exteriors since they'll never be seen again after assembly. There is no
provision to display one or both of the engines removed from the airframe
either. But, that does not detract in any way from the model - it just is that
good! You can cut away some panels and open up the kit to expose the engines if
you wish. These are just mode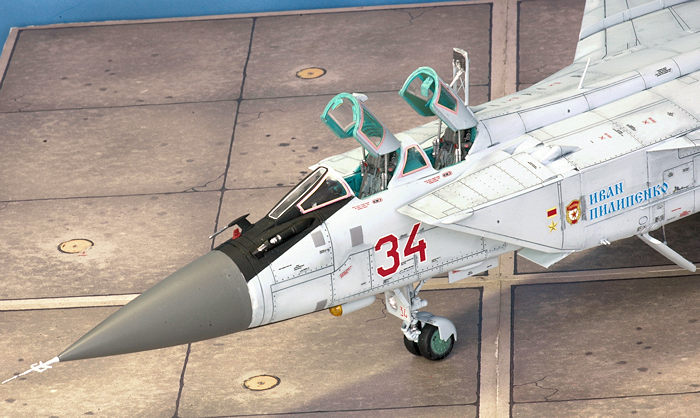 ler musings about possibilities rather than
recognition of any limitations or omissions. Although there was a time I enjoyed
adding Aires and Verlinden resin exposed engines in every build, the expense and
time it took to do them has waned my interest in hanging out the insides as much
as I used to.
ler musings about possibilities rather than
recognition of any limitations or omissions. Although there was a time I enjoyed
adding Aires and Verlinden resin exposed engines in every build, the expense and
time it took to do them has waned my interest in hanging out the insides as much
as I used to.
The kit decals are excellent! They are thin but easy to use. I applied Micro Sol to them and they conformed to every rivet hole and panel line. They stick upon contact so accurate first-time placement is required.
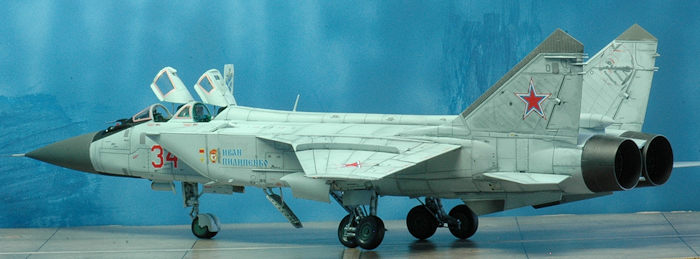
Did I mention how fantastic the canopies are? Both an open canopy and a closed canopy option are included. You can achieve a perfect result with either option. Each canopy is composed of two parts, an inside and outside shell that click-fit together. This permits the moulding of intricate interior parts because the MiG-31 has an insulated padded interior canopy composed of small windows, green padding and interior colored (turquoise) fames. The pilots canopy has a separately moulded pair of rear-view mirrors (part L19) which are attached to the inside canopy frame. No more tiny etched metal mirrors to paint and attach without fogging-up or damaging the canopy rim or worrying about imprecise placement. The front canopy has a very small top clear portion to permit the top exterior rear-view mirror to be seen by the pilot. This accurately represents the front seat canopy interior.
And, for the GIB (Guy-In-Back) the complex periscope mirror assembly is provided. The GIB external periscope mirror assembly uses an etched metal cross bar, part PE1, avoiding the breakage usually experienced with small delicate plastic frames. The interior mirror for the GIB is separately moulded as well (see part L46). I punched out a circular shiny aluminum mirror using a Waldron punch set and the inside of a food wrap with highly-reflective aluminum. This was attached to part L46 which was then glued into the rear canopy. The top of the rear canopy has the square clear area needed for the periscope to work. It requires cautious masking, inside and out, to achieve the desired result, but as I have said, this kit is close to perfect and well within the ability of most modelers to easily build. It is amazing to look at the final product, completed canopy assemblies, because they are a kit in and of itself. Kudos to AMK for putting so much thought and talent into this area.
I recall reading how the Soviets had acquired some F-14 and related Phoenix missile technology after the fall of the Shah of Iran. Looking at the plastic parts and how the R-33 (AA-9 Amos) missiles are mounted in partially submerged underbelly mounts just like the F-14 Phoenix missiles are carried, it looks like the MiG bureau designers had paid the highest complements to the US creators of the F-14 and phoenix missile systems. The rear cockpit in early MiG-31’s had a similar radar console layout as the AWG-9 in the F-14 reaffirming Charles Caleb Colton's quote:
"Imitation is the sincerest form of flattery".
The decals were outstanding. They are thin, in register and conformed well using MicroSol. When you apply them they tend to stick and do not move well for re-positioning or adjustment when applied so I caution you about this.
Assembly instructions come in the form of a 28 page color booklet. They are superb. Do not deviate from the instructions please. I did and found out it was unwise to do so because it required some difficult insertions and fixes. The moulding is complex with extremely close tolerances so heed my warning – stick to the build sequence. I only left off the antennas and exterior parts that could break off before final assembly. The paint guide was not the best for my use. I had to do a bit of color matching and create my own list of paints that related to the paint colors provided.
| CONSTRUCTION |
I followed the kit instructions except for portions of the intake channel as they relate to the landing gear bay. Why – it was due to overconfidence and things were so easy and moving so fast I just blew past something because I did not think it would be an issue. It was to a small degree hard to retrofit some parts such as some parts in steps 2 and 3 so be forewarned. Follow the instructions carefully.
Y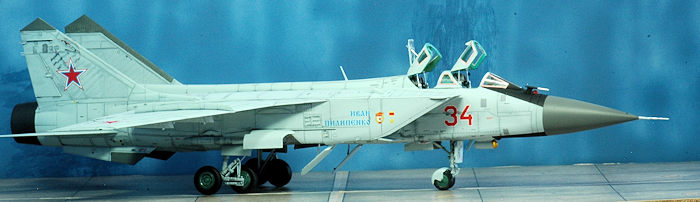 ou don’t start
this kit with the cockpit assembly as most other kits. You build the main part
of the airframe, the wings, engine intakes and fuselage first. Read the
instructions start to finish before you build the kit. You will be impressed
with how tight all the parts fit. There are no weak, wobbly or loose fitting
parts. You must cleanly cut and file away any imperfect contact parts and sprue
nibs or it will not go together. You need to have the understanding that this is
a sophisticated price of plastic molding requiring you to almost test fit parts
to ensure you cleanly file away any sprue connection plastic that remained after
you cut a part from the sprue. I frequently noticed how nicely parts came
together thinking “How clever” the designers were to get the most detail without
compromising on accuracy or fidelity of detail.
ou don’t start
this kit with the cockpit assembly as most other kits. You build the main part
of the airframe, the wings, engine intakes and fuselage first. Read the
instructions start to finish before you build the kit. You will be impressed
with how tight all the parts fit. There are no weak, wobbly or loose fitting
parts. You must cleanly cut and file away any imperfect contact parts and sprue
nibs or it will not go together. You need to have the understanding that this is
a sophisticated price of plastic molding requiring you to almost test fit parts
to ensure you cleanly file away any sprue connection plastic that remained after
you cut a part from the sprue. I frequently noticed how nicely parts came
together thinking “How clever” the designers were to get the most detail without
compromising on accuracy or fidelity of detail.
The only weak point I found was the seam on the main landing gear tires. It was somewhat annoying to eliminate the seam. The fidelity of detail is there so you may be reluctant to toss the wheels for a resin replacement. If you replace them with resin you will get better tire treads for sure.
When you assemble the ejection seats and cockpit interior you should consider using the Eduard FE752 MiG-31BM color etched parts. They provide superior enhancements to the ejection seat and cockpit instrumentation. They were easy to apply and look fantastic. I only added some clear yellow to the pilot’s right side CRT or maybe it’s now an LCD screen based on clear color photos of the cockpit. The GIB instrument panel displays are a dark green and I used two coats of hand applied future floor wax to simulate glass displays and instrument dials.
Nose weights are provided but I added some extra lead weight to the nose when it seemed the model could be a tail sitter. I was cautious about this since the kit plastic landing gear seems thin and wobbly at times but it held up. One of the main landing gear did in fact break off but I would say it was due to rough handling rather than a design flaw or fragile parts.
The detail is so superior you even have well moulded static discharge wicks attached to the wing tips and vertical stabs. It is a challenge not to break them during assembly. I lost one or two.
| COLORS & MARKINGS |
I used Mr. Paint
paints sourced from Red Star Scale Models. I think they are an Acrylic Lacquer.
The exterior was painted with MRP-189 Traffic Grey. The cockpit and interior
area (portions of the canopy trim) were painted with MRP-1 Russia Turquoise
Cockpit. Today looking at the finished model I feel the paint is fantastic
because I found this paint provided excellent color matches. It sprays in thin
coats which m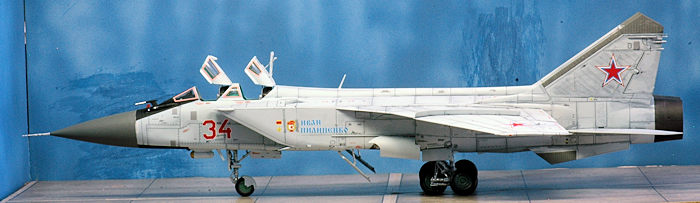 eans no loss of plastic details. It has superb drying qualities –
meaning it does not dry too fast when applied but you can touch it within a few
hours of spraying. There was no apparent etching of the plastic if it goes on
too thick (or thin).
eans no loss of plastic details. It has superb drying qualities –
meaning it does not dry too fast when applied but you can touch it within a few
hours of spraying. There was no apparent etching of the plastic if it goes on
too thick (or thin).
I experienced some problems using the “Mr. Paint” paint (not to be confused with similar sounding Gunze products) but feel they are probably of my own making so I can recommend the paint until further notice. I did not thoroughly clean the model before painting. I should have washed it thoroughly with detergent and or used a cotton swab with alcohol. I did not do any surface prep. This may have affected my results and initial satisfaction or lack thereof. I should have used a primer like Tamiya white before painting. I did not use a primer. I experienced a mysterious leak while painting with my Aztek air brush. I never had this happen before. The airbrush leak caused a substantial loss of expensive paint. It also made a mess and since the paint did not respond to my normal cleanup materials and is tacky to touch I was not pleased to put it mildly. I tried some Gunze Aqueous the next day and had no leakage from the airbrush. The leakage was not around the nozzle which would mean a tightening failure. The paint gushed out from the body as if the paint used a solvent or was so thin it worked its way out from the plastic tubing Testors uses inside the body for the Aztek airbrushes. Based solely on the final result, I am very pleased I used this paint. I used it with some Windsor & Newton oil paint panel wash. The panel wash was applied after the Testors Dullcote.
Were there any problems using the “Mr. Paint” paints. Well, yes there were. Some might find the paint is too thin. Way too thin. I prefer to buy paint that is thick like Gunze or Tamiya and let me buy the thinner and adjust to suit. When paint is too thin it lacks opacity. That makes for inadequate coverage and running or pooling of the paint. Then, when it dries insufficient pigment is left behind and it looks like another coat is required. I do not want to paint twice when once usually works. Some moments I found it was impossible to paint a smooth easy coat due to running and pooling of paint without adhesion upon contact. I also had the paint seep under the scotch tape used to mask the clear parts. This is painful when you think you are done building and remove the tape from clear areas only to find seepage ruining a beautiful paint job by marring the clear parts.
Some may feel given these problems that it is also expensive to use. I used two bottles, entirely used all the paint, due to the airbrush leakage so the cost, $7.00 per 30ml bottle was not a benefit. I used two entire bottles, 30ml each, on one kit for the first coat of paint and felt it needed a second coat. Some areas seemed to have inadequate coverage. I realize Russian aircraft are not kept in pristine condition and I was going to weather this model so I left it alone. From a user perspective I found Mr. Paint was very hard to clean up. It dries well where you don’t want it – on the airbrush components. It took a lot of time to clean up including my hands and other soiled areas. I did buy and recommend you use their thinner and airbrush cleaner.
When paint is
this thin it cannot be easily brush painted. Maybe you can use it on a paint
brush. I was unable to brush paint with it and that affected my ability to do
any post spraying touch up work. I had a bottle of Aeromaster warbird colors
acrylic #1270 WARPAC cockpit blue green which was a perfect m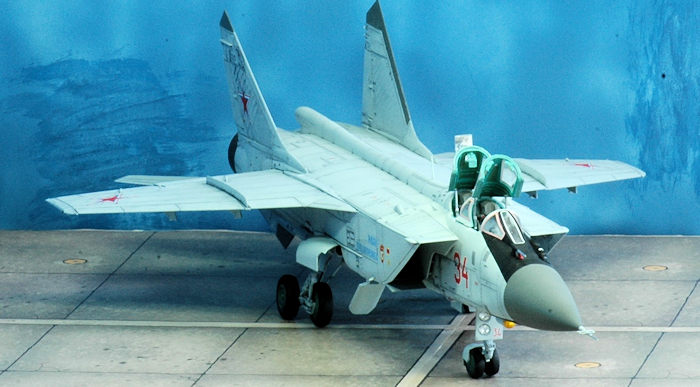 atch for the base
coat of Mr. Paint MRP-1 so it came to the rescue to permit completion of this
model. Testors metalizer TES1406 exhaust buffing (burnt exhaust) was used on the
tailpipe and exhaust interior. The exhaust were attached after all painting was
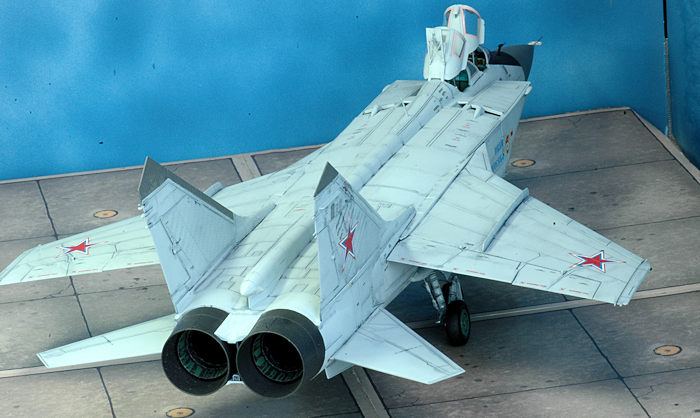
finished. Note – apparently the Russians have some high temperature paint
formulation that is green, the same color as the wheel hubs, which they apply to
all parts inside the afterburner through tailpipe area. I used Gunze H319 Light
Green on portions of the exhaust interior and for the wheel hubs. I was very
surprised to see this color inside the exhaust. Yes, if you find color pictures
looking into the MiG-25 and MiG-31 exhaust you will find green paint used! How
about that – I learned something new during this build which was totally
unexpected – green paint on interior high temperature exhaust areas; not just
sooty black with gray or white ash!
atch for the base
coat of Mr. Paint MRP-1 so it came to the rescue to permit completion of this
model. Testors metalizer TES1406 exhaust buffing (burnt exhaust) was used on the
tailpipe and exhaust interior. The exhaust were attached after all painting was
finished. Note – apparently the Russians have some high temperature paint
formulation that is green, the same color as the wheel hubs, which they apply to
all parts inside the afterburner through tailpipe area. I used Gunze H319 Light
Green on portions of the exhaust interior and for the wheel hubs. I was very
surprised to see this color inside the exhaust. Yes, if you find color pictures
looking into the MiG-25 and MiG-31 exhaust you will find green paint used! How
about that – I learned something new during this build which was totally
unexpected – green paint on interior high temperature exhaust areas; not just
sooty black with gray or white ash!
The nose cone and di-electric panels on the vertical stabilizers and underside dorsal fins were painted with Gunze H83 Dark Gray (2). I looked at a number of web photo references from hi-res photos to see exactly where the paint demarcation lines are. Testors #1790 Chrome Silver was used on most bare metal areas such as the pneumatic oleo landing gear and canopy struts, pitot tip, and for dry brushing.
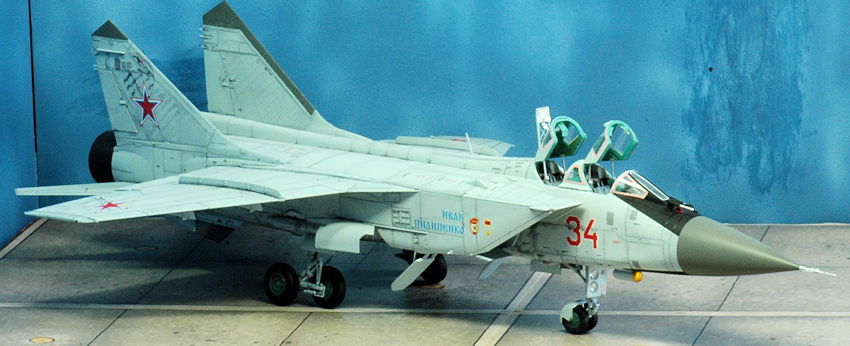
I used the AMK kit decals for marking number one, a MiG-31BM Bort “34 Red”, Russian Air Force. They performed well and I am pleased with using them. The stencils were numerous and reminded me of why I stopped building F-4 Phantoms and F-15’s – due to their far too numerous stencils (just kidding). The kit also has stencils for the copious missile armament and wing racks. This is a beautiful kit.
Furball Aero-design decal 48-052 MiG-31 canopy frame decals were used for the pink window sealant caulking (Germetika canopy sealant). They worked very well and look fantastic. There is enough space on the sheet to have provided the pink sealant strips that go along the canopy inner rim, much as a refrigerator door gasket. Just providing a few long strips in the empty decal carrier sheet areas would have added a lot of value to this decal release.
There are three refueling probe options. It covers the variety of positons you will find in photos of the actual airframe. Note, there is a clear plastic front portion. This allows a clear light (see part J6) to shine during night refueling activity. I drilled a small hole and countersunk the position. I then added a small pearl straight pin tip most of which dropped below the surface due to the counter-sunk hole and it was visible though the clear glass (part J6) to represent the light bulb. I painted it with Testors chrome-silver, when it was dry I attached part J6. It’s a nice detailing step.
I used very shiny reflective film taken from a Vienna wafers cookie package. Many foods such as cookies and potatoes chips use this type of packaging, a plastic film with very shiny aluminum coating which when punched out with a Waldron punch for example or cut with small scissors makes for a superior mirror or reflective surface compared to painting the part. I used this on all the rear view mirrors and on the rear cockpit periscope mirror parts and the HUD lens. You could also use BAR001 or BAR004 Bare Metal Foil Ultra-bright Chrome Adhesive Foil on these parts and the oleo section of the landing gear.
I usually add
all the ordnance, rockets and missiles to most of my kits. The AMK MiG-31
missiles included in this kit are fantastic. In the box you will find
exquisitely moulded external stores options consisting of 4 x R-33 (AA-9 Amos),
4 x R-73T (AA-11 Archer) and 4 x R-77 (AA-12 Adder). The kit doesn't include
R-60 (AA-8 Aphid) or their distinctive APU-60-2 dual-launch rail units, but
these are available from other suppliers in the afte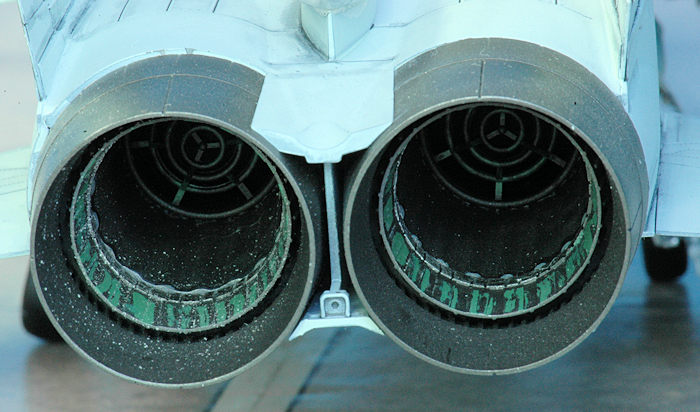 rmarket. There are no
external ferry tanks. Surprisingly, since I usually add some external stores, I
opted not to add them only because most photos I saw of the MiG-31 showed them
without ordnance and I like that look. The kit missiles are so amazing they will
replace some resin ordnance parts planned for other kits in my stash so I left
them off this build.
rmarket. There are no
external ferry tanks. Surprisingly, since I usually add some external stores, I
opted not to add them only because most photos I saw of the MiG-31 showed them
without ordnance and I like that look. The kit missiles are so amazing they will
replace some resin ordnance parts planned for other kits in my stash so I left
them off this build.
A final coat of Testors #1160 Dullcote Lacquer followed by a panel wash of Winsor & Newton Winton Oil Colour #32 Paynes Gray ended the painting process. I like the final finish and look very much. I will be using the Mr. Paint products again for the positive reasons I noted because they outweigh the concerns I expressed. With more time and use things should get better when I use the Mr. Paint products.
| CONCLUSIONS |
I was thoroughly pleased building this kit. I enjoy looking at it after construction. In all respects it is one of the finest, if not the best kit I have ever built. I found while the kit looks complex and has many parts, it is so well designed the quantity of parts is never done for gratuitous reasons. Some kit and resin aftermarket makers seem to want to add to the parts count of their products. The AMK plastic parts are there for ultimate modeling detail. Everything seems well thought out and deliberate in a positive way. No short cuts were taken to give us a perfect example of a MiG-31 airframe. Taking the canopy as an example, the approach was sound and the final open canopy looks simply brilliant.
This kit is very highly recommended. Do yourself a favor and buy one – then build it! It may not be for beginners, but anyone who has built a few kits will be rewarded with a fantastic model. I found it to be a most enjoyable modeling experience, free of frustrations, free of the requirement for aftermarket or scratch building “fixes”. I will purchase every 1/48th scale release by AMK if their quality remains at this level – because it is simply outstanding!
| REFERENCES |
Mikoyan MiG-31 Interceptor by Yefim Gordon and Dmitry Komissarov in the Flight Craft (Book 8) Series Published by Pen and Sword October 19, 2015
Mikoyan MiG-31 by Yefim Gordon Famous Russian Aircraft Series: Famous Russian Aircraft Published by Midland Publishing Ltd. December 16, 2005
MiG-25 'Foxbat' MiG-31 'Foxhound' Russia's Defensive Front Line by Yefim Gordon Aerofax Books/Midland Counties Publications October 17, 1997
"MiG-25 "Foxbat" Famous Airplanes of the World No.83
Scale Models RU website for an excellent close-up walk around series of photo references
Airliners.net - Dmitriy Pichugin MiG-25/31 exhaust interior photos
VVS Modelling.com website
Mikoyan-Gurevich MiG-25RB Iraq AF 25105 Tumansky engines at WPAFB 1-14-2011 web photos
| FINAL CONSTRUCTION |
Andrew Garcia
16 September 2016 Copyright ModelingMadness.com If you would like your product reviewed fairly and fairly quickly, please contact the editor or see other details in the
Note to
Contributors.