Trumpeter 1/32 Su-27 Flanker B
| KIT #: | 02224 |
| PRICE: | Around €120 |
| DECALS: | One option |
| REVIEWER: | Spiros Pendedekas |
| NOTES: | This is big! |
| HISTORY |
 The Sukhoi
Su-27 ‘Flanker’ is a Soviet-origin twin-engine supermaneuverable fighter
aircraft, intended as a direct competitor for the large United States
fourth-generation fighters such as the F-14 Tomcat and F-15 Eagle, with 1,910 nm
range, heavy aircraft ordnance and sophisticated avionics. It was designed for
air superiority missions, with its late variants able to perform almost all
aerial warfare operations.
The Sukhoi
Su-27 ‘Flanker’ is a Soviet-origin twin-engine supermaneuverable fighter
aircraft, intended as a direct competitor for the large United States
fourth-generation fighters such as the F-14 Tomcat and F-15 Eagle, with 1,910 nm
range, heavy aircraft ordnance and sophisticated avionics. It was designed for
air superiority missions, with its late variants able to perform almost all
aerial warfare operations.
Entering service in 1985, its primary role was long range air defense against
B-1B and B-52G/H bombers, protecting the Soviet coast from aircraft carriers and
flying long range fighter escort for Soviet heavy bombers such as the Tu-95
‘Bear’, Tu-22M ‘Backfire’ and Tu-160 ‘Blackjack’.
Developments of the Su-27 design included the Su-30 two-seat, dual-role fighter
for all-weather, air-to-air and air-to-surface deep interdiction missions and
the Su-33 ‘Flanker-D’ naval fleet defense interceptor for use on aircraft
carriers. Further versions included the side-by-side two-seat Su-34 ‘Fullback'
strike/fighter-bomber variant and the Su-35 'Flanker-E' improved air superiority
and multi-role fighter, with the Shenyang J-11 being a Chinese license-built
version of the Su-27.
Apart from Russia, 15 other countries operate the Su-27, with the Ethiopian ones
reportedly having fired shots in anger, downing at least two Eritrean Mig-29s.
In total, 680 Su-27 of all variants have been built.
| THE KIT |
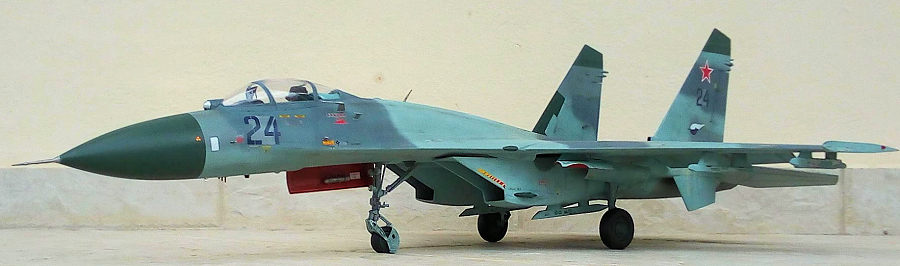
Launched in 2004, this kit made a big impact in the modeling world, who were then treated with a new big scale and sensibly priced Su-27! It comes in a massive sturdy top opening box, with a nice box art of Su-27 “Blue 24”, taking off from (presumably) Chonju, Poland, sometime in 1992. Upon opening the box, one is impressed by not only the vast amount of parts, but also the truly exceptional.packaging.
Seven big sprues contain most of the myriad parts, while top and bottom fuselage
halves, radome, intakes and multi-piece exhausts are separately and meticulously
packed. Detail is plentiful and nicely engraved, with riveting looking just
fine. Cockpit and wheel wells are well appointed (though a higher level of
detail would be very desirable) and gun covers grills are very realistically
hollowed. Full air to air ordnance is provided.
 Molding is
very good with no flash, but there are some ejector pin marks at visible places.
Clear parts are thin and crystal clear, but the canopy suffers from the infamous
central inner mold line, which, at least, is subtle. The instrument panel is a
clear part that is to be attached on top of a provided acetate film with the IP
dials printed on.
Molding is
very good with no flash, but there are some ejector pin marks at visible places.
Clear parts are thin and crystal clear, but the canopy suffers from the infamous
central inner mold line, which, at least, is subtle. The instrument panel is a
clear part that is to be attached on top of a provided acetate film with the IP
dials printed on.
A provided PE fret contains seat belts, rear view mirrors, some external
antennas (optional to styrene parts) and many hinges for the moving surfaces and
canopy. The PE material is of the harder “stainless steel” type, so it might be
a tad more challenging to cut, unless you find some method to soften it by
annealing.
Metal landing gear struts are optionally provided (which is nice, considering
the weight of the model), with the extra option of working oleos by using the
provided mini springs (sounds wonderful, but also very challenging to
attain...). The pitot is provided exclusively in metal and looks very nice
indeed. Tires are vinyl, looking very good, but styrene alternatives should
definitely be provided, as many modelers prefer them (let alone the fact that
many vinyl tires “eat” the styrene rims over time…).
Flaperons, slats, rudders and canopy are supposed to be
constructed moveable, by using the distinctive Trumpeter “shafts and hinges”
rendition, an option that a number of modelers (yours truly included) find too
complicated and refrain from using it…
Instructions are nice and clear (though I wouldn't mind having them spread in
more "simpler" steps, per the modern Revell style). Apart from the external
colors, which are given in FS numbers, all other color callouts are generically
given (like “bluish gray”, “gray”, “olive green” and so on), so some net
research might be helpful here. Only one scheme option is provided, of the 582
IAP’s “Blue 24”, as it stood in Poland in 1992. The specific bird carried some
“kill” markings, a practice done by the Soviet AF in some cases. Though some
solidly based critique has been heard, a quick research proved that the scheme
has good chances of being relatively accurate. A good amount of stenciling is
provided, adding a lot to the final looks. Decals seem to be printed by
Cartograf, looking very good.
I could not resist (who could?) in buying this kit, back in 2005, starting it a
couple of years later, leaving it idling at a very early construction phase for
a good 15 years, deciding to tackle it 15 years later!
| CONSTRUCTION |
Especially with complex
kits like this, I started by looking for subassemblies, in order to transform
the gazillion parts farrago found in the box, into some kind of “basic”
assemblies that could be consequently put together, a method helpful in
construction and also motivating!
 Performing
the radical act of following the instructions, I started by assembling the basic
cockpit elements (9 pieces), followed by the 5-piece main and 6-piece nose wheel
wells. I then attached the cockpit tub and gun housing from the insides of
the top fuselage half, whereas the wheel wells and intakes end plates were
attached from the insides of the bottom fuselage half, with the NLG well extra
secured by four provided screws. Then the two fuselage parts were glued
together. Fit was good, with the attachment process aided by the three screws
provided, which firmly secured the fuselage halves. The airbrake and drag chute
cone were also attached in “closed” position.
Performing
the radical act of following the instructions, I started by assembling the basic
cockpit elements (9 pieces), followed by the 5-piece main and 6-piece nose wheel
wells. I then attached the cockpit tub and gun housing from the insides of
the top fuselage half, whereas the wheel wells and intakes end plates were
attached from the insides of the bottom fuselage half, with the NLG well extra
secured by four provided screws. Then the two fuselage parts were glued
together. Fit was good, with the attachment process aided by the three screws
provided, which firmly secured the fuselage halves. The airbrake and drag chute
cone were also attached in “closed” position.
It was then decision time: Trumpeter provides PE hinges and metal shafts, in
order for the flaperons, rudders, slats and canopy to be moveable. Those seemed
a pain to install and I was not all that positive of achieving a good result,
both visually and operationally. Since I was not interested nevertheless in
having those elements moveable, I decided to leave this option off, being also
aware that many modelers had done the same...
With the “no hinge” decision taken I assembled the 2-piece main wings and
attached them onto the fuselage, followed by attachment of the 2-piece slats.
The also 2-piece flaperons and horizontal stabilizers were assembled but not
attached, in order to be posed at “resting” position on later stages.
 The pair
of 5-piece intakes were assembled and attached. Wings and especially intake
rears fit was not perfect, leaving some gaps and mismatches, which were treated
with liquefied styrene, followed by an initial coarse sanding. Other
subassemblies included the two rudders, fins and ventral strakes, as well as the
eight pylons, all 2-piece affairs.
The pair
of 5-piece intakes were assembled and attached. Wings and especially intake
rears fit was not perfect, leaving some gaps and mismatches, which were treated
with liquefied styrene, followed by an initial coarse sanding. Other
subassemblies included the two rudders, fins and ventral strakes, as well as the
eight pylons, all 2-piece affairs.
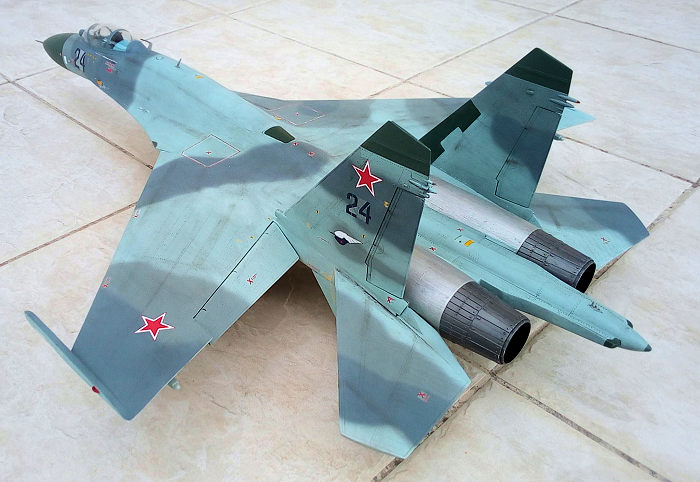
I then went on to assemble the 5-piece exhausts: they looked nice, the only
complaint being that they looked somehow shallow, with the turbine face not
realistically deep inside. To add some depth, I cut two pieces of suitable
diameter PVC plumber’s tubes and attached them at the inner side of the
exhausts, with the turbine face glued at the other end. The lack of the extra
tubes AB lining detail was not that noticeable, especially as they were painted
matt black.
Finishing subassemblies, I
put together the 5-piece main and almost 20 (!) piece nose landing gear legs. I
decided to go full styrene and did not use the metal struts provided, as I
figured out the styrene ones would be strong enough to support the heavy model
(thankfully, I was right). I thus avoided the complexity of using non styrene
parts that would require cyano or epoxy glue. Upon oleos attachment, since I did
not use the spring loaded option, I made sure that they were glued at their
“natural” positions, the ones they have when the aircraft is parked and fueled.
For some extra looks, I added simplistic brake lines at the MLG legs from
stretched sprue. The three wheel rims were assembled at this time, as well.
I continued by attaching the nose cone, dashboard, ventral strakes, vertical
stabilizers, air intakes external finlets and MLG bays fairings. Mislead by my
past 1/48 Sukhoi builds, I refrained from adding nose weight, something that I
would later regret...
A coarse sanding, followed
by filling (quite a bit, I might confess) and a final 1500 grit fine sanding
took place afterwards. As a side note, some external surface details (like small
air scoops and the like), are molded in such a way that they have a non-blended,
rectangular, unrealistic look: they were sanded in such a way as to
aerodynamically blend with the surface.
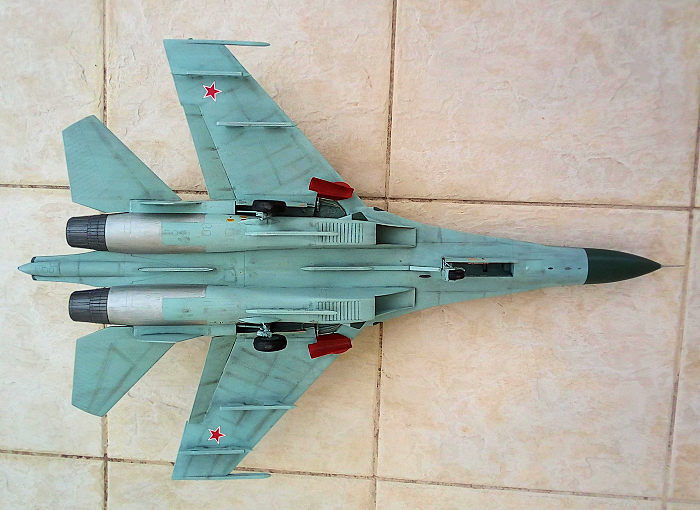
Though instructions call for “bluish gray” landing gear, it became clear, by
checking available time period net pics, that landing gear color was very close,
if not identical to the fuselage undersides. Not reluctant at all, I decided to
attach all three complex looking landing gear legs and paint them together with
the undersides. The 8 underside pylons were also attached. Since I would not add
any ordnance, I run straight pieces of stretched sprue at all friction areas at
pylons undersides, in order to represent some sort of railing. The gorgeous
looking jet then headed to the paint shop!
| COLORS & MARKINGS |
Painting a Su-27 had always been an interesting subject, the main reasons being not only the loosely standardized bluish-grayish shades (as witnessed at different aircraft and/or different times), but also the fact that those colors quickly faded in such a way, that would at times become a blurred, almost monotone pale blue-gray overall shade. The dielectric panels were witnessed dark green, dark gray or white (with white possibly the more modern approach). Cockpits seemed to evolve from a turquoise shade towards a light blue/gray one, whereas bays and landing gear legs looked to have a bluish-gray or under fuselage color shade. Interestingly, the NLG mudguard was most of the time painted per the lower fuselage color, whereas it should “normally” be painted with the landing gear color…).
Understandably, the required approach, regarding
accuracy, might be to have sufficient pictorial evidence of the specific subject
at the specific time, which was partly the case here, as the early 90s were not
particularly lavishly covered times for the Su-27, photo-wise.
 Considering
all the above, I more or less made up my mind, and started by spraying the
radome, fins, intake finlets, shoulder dielectric portions and wheel rims Hu149
dark green. After masking, I gave the whole plane (including flaperons,
stabilizers and gear doors outer surfaces) the basic color, Hu65 light blue – a
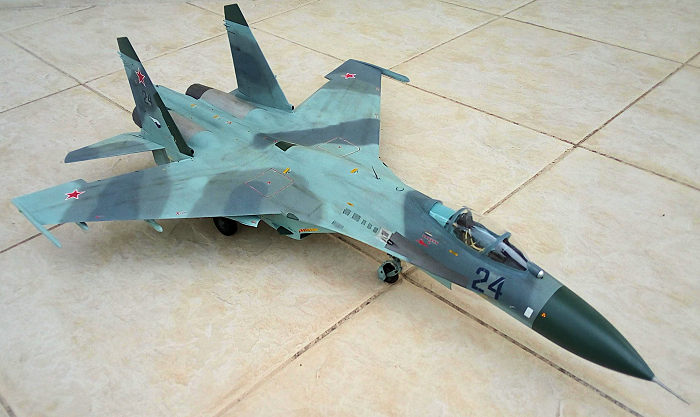
good full bottle of it! I then went on and freehanded the top camo, for which I
used Hu144 intermediate Blue and Hu140 Gull Gray. The characteristic metallic
areas above and below the engines were masked and painted Testors Steel,
followed by uneven smearing of Revell Clear Blue, in order to give those areas
the distinctive high temperature exposed metal look. After minor corrections
(mostly oversprays), I gave the whole model a coat of Future and proceeded to
decaling.
Considering
all the above, I more or less made up my mind, and started by spraying the
radome, fins, intake finlets, shoulder dielectric portions and wheel rims Hu149
dark green. After masking, I gave the whole plane (including flaperons,
stabilizers and gear doors outer surfaces) the basic color, Hu65 light blue – a
good full bottle of it! I then went on and freehanded the top camo, for which I
used Hu144 intermediate Blue and Hu140 Gull Gray. The characteristic metallic
areas above and below the engines were masked and painted Testors Steel,
followed by uneven smearing of Revell Clear Blue, in order to give those areas
the distinctive high temperature exposed metal look. After minor corrections
(mostly oversprays), I gave the whole model a coat of Future and proceeded to
decaling.
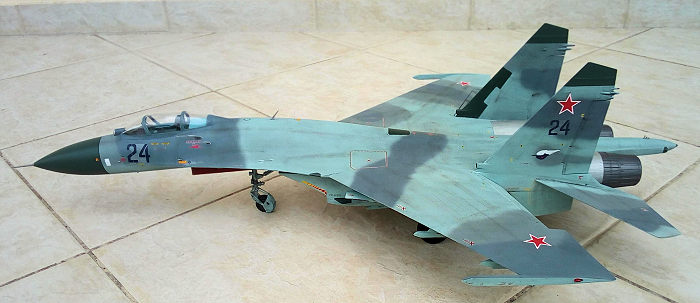
I used the kit decals to represent “Blue 24”, as it stood in Poland, 1992.
Decals behaved generally well, but I did experience some silvering, more
pronounced between the big digits of the serial numbers, which was either my
fault or due to the decals age. The many stencils provided livened up even more
the already charming plane looks. A coat of Future sealed all decals.
| FINAL CONSTRUCTION |
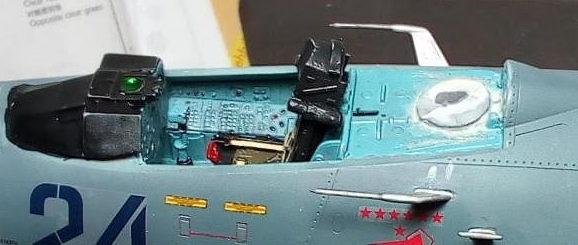
I attached the instrument panel, in which the
instrument faces were depicted by an acetate sheet placed beneath the top
hollowed plate, the result looking nice! I then attached the stick, throttle
quadrant, right joystick and the 10-piece good looking seat. Basic cockpit color
was Hu89 Middle Blue (it dries at a believable turquoise shade), with black anti
glare dashboard. The radar screen and HUD projection lens were represented by
blobs of clear green paint. Red, black and yellow “knobs” were done with a fine
10/0 brush. The seat was painted black, dry brushed with silver, with olive drab
cushions and red ejection handle. The very nice kit provided PE belts were
painted “cream”, with their attractive looking steel buckles left unpainted.
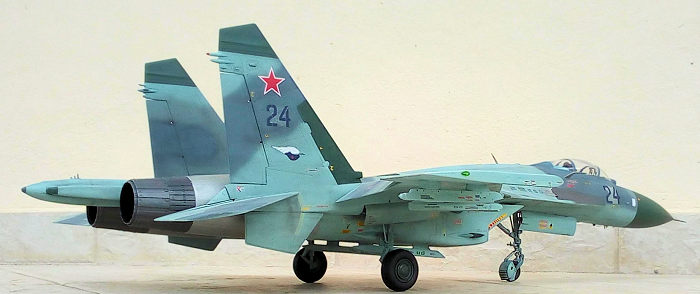
The exhaust nozzles were painted burned metal and attached at the rear, followed
by the flaperons and stabilators, that were attached at a natural "resting"
angle. The various pitots, AOA indicators and antennas were painted silver (the
pitots had their tips painted burned metal) and attached. The two underside DF
antennas were installed, the bigger painted green and the smaller black. The
wheel rims received the beautifully looking tires and attached (the rims were
coated with Future at the contact points, in order to counter fight the rubber’s
tendency to eat styrene over time...).
It was then that tail sitting was realized. Hopefully, my “closed canopy” attitude saved the day, as I was able to drill a hole and attach a hefty lead weight aft of the pilot’s headrest, an area covered by the canopy’s rear inner fairing. Though the two extra tubes added to lengthen the AB liners played their role, if you are building this kit with an open canopy, please make absolutely sure you will have beforehand added sufficient weight at the front (but not too much, as the assembled NLG is flimsy....).
 Relievingly
solving the tail sitting problem, I attached to the gear doors, which had their
innards beforehand painted red. The distinctive alcohol tank was painted steel
and attached to the NLG door innards, as well. The nice looking kit provided MLG
bay tubes were painted respectively cream or olive drab and attached inside the
bays. Finally, all oleos were accentuated with a fine tip silver pen.
Relievingly
solving the tail sitting problem, I attached to the gear doors, which had their
innards beforehand painted red. The distinctive alcohol tank was painted steel
and attached to the NLG door innards, as well. The nice looking kit provided MLG
bay tubes were painted respectively cream or olive drab and attached inside the
bays. Finally, all oleos were accentuated with a fine tip silver pen.
A hefty black wash was applied all over, not only for bringing out the overall
engraved detail, but also for accentuating the landing gear assemblies’ looks! A
generous brown/black weathering with dry pastels then took place, roughly
following panel lines, giving the big jet a well-used look. A final matt coat
sealed everything and gave the Sukhoi its final shade.
The very delicate 3-piece HUD was then assembled, had its framing painted black
and attached. The two piece canopy had its frames painted cockpit color,
followed by the camo color and attached as well. Irritatingly, both windscreen
and main canopy proved to be narrower than the fuselage, most probably due to
premature removal from the mold, without being sufficiently cool. Thanks to them
being thin, I was able to glue them in segments and eliminate the width
difference. Still, some gaps emerged that were taken care of white glue. The
mold seam lines that run through the middle were left “as is”: I had decided not
to sand them off, not willing to take risks with that very thin canopy, and the
truth was that they were not so apparent with the canopy closed.
The characteristic IRST sensor transparent cover was attached at the front: its
looks were not that great, so I decided to paint it chrome with my silver pen.
The three NLG landing/taxi lights had their transparencies affixed, after having
painted chrome inside. Finally, the wingtip lights transparencies were attached
and accordingly painted with clear paints, before calling this beautiful plane
done!
| CONCLUSIONS |
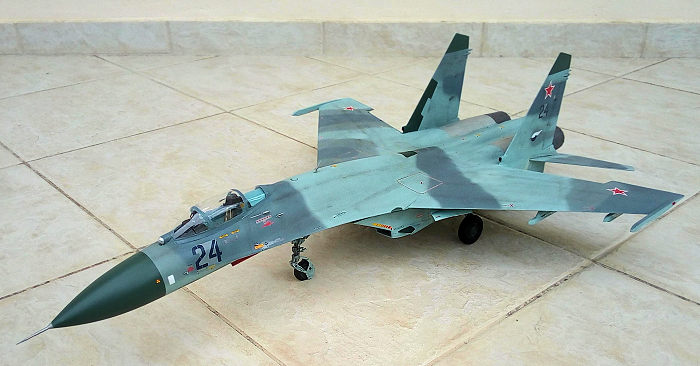
Trumpeter has to be
congratulated not only for bringing out a Sukhoi-27 at this big scale, but also
for the fact that they did a very good job on it: overall shape looks spot on,
detail level is generally good and the same can be said for the overall fit. The
optional stronger metal landing gear parts are a nice touch.
 Some
features like the spring loaded landing gear and the hinged flaperons, slats,
rudders and canopy are complicated to render, with most modelers omitting them.
I dare say that Trumpeter might have diverged the costs from providing the above
options to a more detailed cockpit and landing gear/bays. The rubber tires,
while looking nice, may not be everybody’s preference. Finally, more than a
single decal option should have been provided. At least the decal sheet is very
comprehensive, well printed and the silvering I experienced with some decals
might either be my fault or due to the decals age.
Some
features like the spring loaded landing gear and the hinged flaperons, slats,
rudders and canopy are complicated to render, with most modelers omitting them.
I dare say that Trumpeter might have diverged the costs from providing the above
options to a more detailed cockpit and landing gear/bays. The rubber tires,
while looking nice, may not be everybody’s preference. Finally, more than a
single decal option should have been provided. At least the decal sheet is very
comprehensive, well printed and the silvering I experienced with some decals
might either be my fault or due to the decals age.
Though instructions are clear, the model's sheer size, big number of parts and
complicated at places construction deem this kit unsuitable for novice modelers.
That said, the more experienced modeler can either build it OOB, or even enhance
it by getting his hands on the many aftermarket stuff available.
While not clear if out of production or not, it is not too difficult to find
this kit today (as of 2021) at very sensible prices. If you fancy the idea of
building a big scale model of a gorgeous looking jet, have a number of more
complex kits under your belt and the space to display it, this kit is definitely
for you!
Happy modeling!
25 April 2022
Copyright ModelingMadness.com. All rights reserved. No reproduction in part or in whole without express permission.
If you would like your product reviewed fairly and fairly quickly, please contact the editor or see other details in the Note to Contributors.