HobbyBoss 1/48 Yak-38 Forger A
| KIT #: | 80362 |
| PRICE: | $41.65 |
| DECALS: | Three options |
| REVIEWER: | Dan Lee |
| NOTES: | Eduard Big Edition set, Quickboost intakes, sensors, small intakes, resin exhaust and resin Opushka VM flight data recorder |
| HISTORY |
 The
Yakolev-38 Forger was the Soviet Union's answer to the Harrier. It shared
some similarities in shape and mission, but also had major differences such
as no thrust vectoring (the Forger carried two small engines for lift that
only worked on takeoff), an automatic ejection seat that fired off when the
plane rolled more than 60 degrees off level (which could be problematic in
combat and was), 1/3 the range and no sensors besides the pilot's Mark One
eyeballs. It had a telemetry system to allow for automated landings. Some
say it was rushed into production to equip the then new Kiev class aircraft
carrying cruisers whose main job was to protect the SSBN bastions from ASW
aircraft and submarines.
The
Yakolev-38 Forger was the Soviet Union's answer to the Harrier. It shared
some similarities in shape and mission, but also had major differences such
as no thrust vectoring (the Forger carried two small engines for lift that
only worked on takeoff), an automatic ejection seat that fired off when the
plane rolled more than 60 degrees off level (which could be problematic in
combat and was), 1/3 the range and no sensors besides the pilot's Mark One
eyeballs. It had a telemetry system to allow for automated landings. Some
say it was rushed into production to equip the then new Kiev class aircraft
carrying cruisers whose main job was to protect the SSBN bastions from ASW
aircraft and submarines.
The Forger initially caused a panic among those amateur Team B military analysts who believed that the Soviets could project power beyond their shores and provide a challenge to NATO's dominance of the seas during the late 70s and early 80s. This despite the fact it could probably be easily beaten in a dogfight with an A-7 Corsair (which wasn't designed for air to air combat and had better missiles.... the AA-8 Aphid had too short of a range to be more than a defensive missile.)
| THE KIT |
The Hobbyboss Yak-38 Forger A/M kit is the only mainstream injection molded 1/48 scale Forger around. However, it's not a good or accurate kit. Here is DaBoss' preview of what is in the kit.
| CONSTRUCTION |
 It all began
with the removal of the Quickboost resin exhausts from their pour stubs. I seem
to recall nearly slicing off a small part of my index finger in the process. I
removed most of the remaining resin parts from their pour stubs except the
really tiny parts as I have a tendency to misplace (cough lose cough) them. I
ended up painting everything before gluing the parts in. This would complicate
the build and frustrate me over the 3/4 of the year I built this model.
It all began
with the removal of the Quickboost resin exhausts from their pour stubs. I seem
to recall nearly slicing off a small part of my index finger in the process. I
removed most of the remaining resin parts from their pour stubs except the
really tiny parts as I have a tendency to misplace (cough lose cough) them. I
ended up painting everything before gluing the parts in. This would complicate
the build and frustrate me over the 3/4 of the year I built this model.
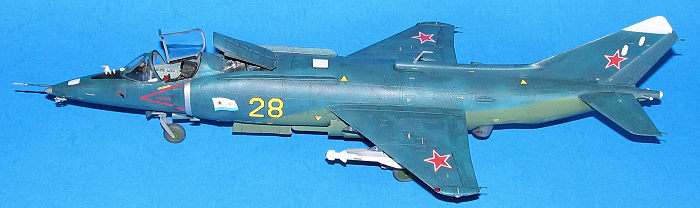
I studied pictures of the Yak38 cockpit and realized that I was going to need a fair bit of the Eduard PE set. The interior was painted Tamiya Neutral Grey as per photos of the Forger cockpit. Most of the PE set's larger parts were added to replace stuff like the instrument panel and gunsight. I avoided adding the tiny levers until the end of the build. I added various PE panels to the interior of the nose landing gear well and glued in the resin nose lift vent to the starboard side of the nose compartment. The instructions say you should add the landing gear at this time, but I didn't. The nose compartment pieces went well together and the seams were dealt with quick and simple.
Next I had to saw off a portion of the tail on either half of the rear fuselage so that the Quickboost resin Opushka VM flight data recorder could fit without too much of a gap. I kept enough of the pour stub on the resin part so that it would fit into the hole and act as a mounting peg rather than all too fragile butt join. The various inserts were glued on including the Quickboost resin intakes for the lift engines behind the cockpit.
 I glued the
rear fuselage halves together using CA glue, but the fit wasn't as good.
Especially on the underside which is why this plane is a 3 footer model (don't
look too close!) I was also dealing with family matters at the same time so it
spent a good 8 months collecting dust till I had enough emotional energy to
actually start building models again. For a while I grew to dislike this kit and
the grief it caused me. I poured a lot CA glue on the ill fitting seams and
spent a fair amount of time sanding and filling (again and again...) Eventually
I got the seams dealt with but I tried to replace a lot of the surface detail
that destroyed. That did not go as well as I hoped which is why I call this
Forger a 3 footer.
I glued the
rear fuselage halves together using CA glue, but the fit wasn't as good.
Especially on the underside which is why this plane is a 3 footer model (don't
look too close!) I was also dealing with family matters at the same time so it
spent a good 8 months collecting dust till I had enough emotional energy to
actually start building models again. For a while I grew to dislike this kit and
the grief it caused me. I poured a lot CA glue on the ill fitting seams and
spent a fair amount of time sanding and filling (again and again...) Eventually
I got the seams dealt with but I tried to replace a lot of the surface detail
that destroyed. That did not go as well as I hoped which is why I call this
Forger a 3 footer.
The wings went on without too much issue. I was not really happy with the Quickboost resin intakes as they were a little oversized and didn't fit as well as they should have. I ended up using the HB original plastic parts as the fit was better which was important to me than the poor fit and better detail of the Quickboost parts. I still had to sand fill the intake/fuselage join a few times with several grit of sandpaper and polishing cloths to get it smooth enough for painting. Finally I added the top and bottom strakes on the fuselage using CA glue.
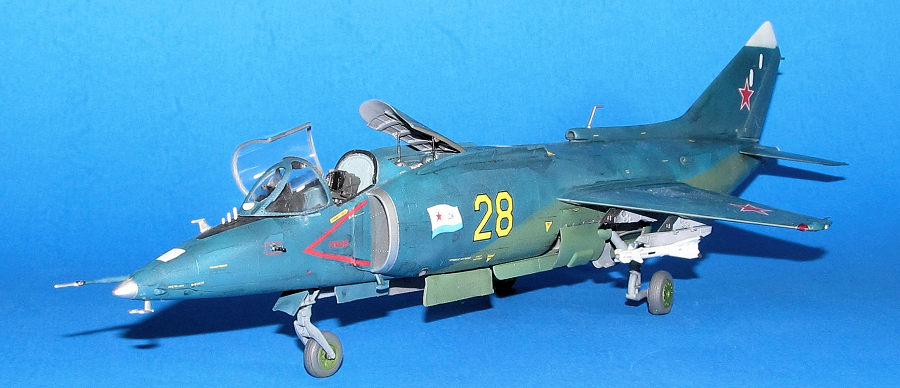
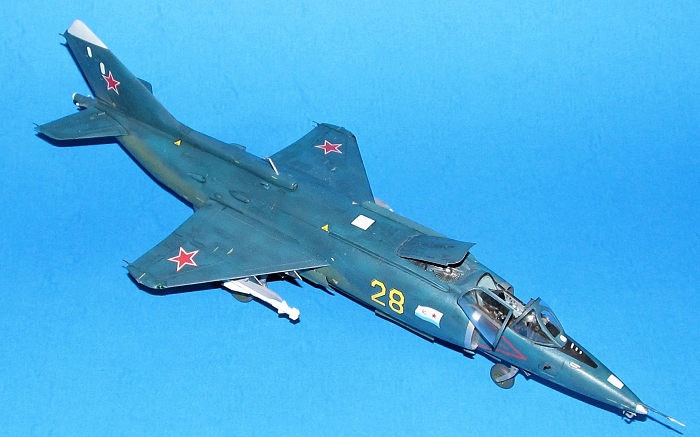
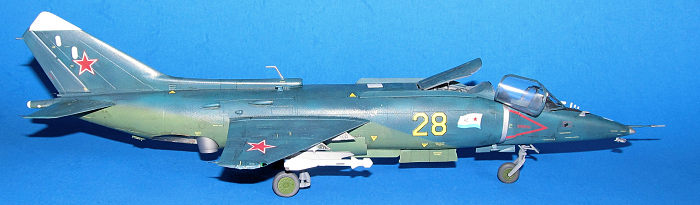
| COLORS & MARKINGS |
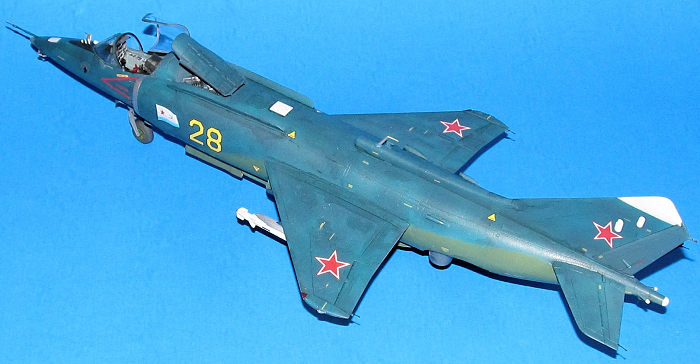 I went with
the traditional USSR blue and green scheme. A couple of years earlier I ended up
buying an AKAN paint set for the Forger which has the accurate colors for the
Forger in its traditional scheme or its Afghanistan scheme.
I went with
the traditional USSR blue and green scheme. A couple of years earlier I ended up
buying an AKAN paint set for the Forger which has the accurate colors for the
Forger in its traditional scheme or its Afghanistan scheme.
After masking and stuffing sponges in various areas, I primed the model with Stynylrez Grey and let it dry for a day. I then went over the model with various grits of polishing pads/cloths to remove any nits or booboos that stuck the primer or fix any sanding oopsies that I had missed. I then took my fine tipped Iwata Revolution and then sprayed blotches of white paint over as part of black basing (or in this dark grey) to create uneven paint background.
Next I sprayed on the AKAN Soviet naval green in several thin coats on the underside. Unfortunately, I missed a few areas that needed work that had some very deep scratches so I had to respray the primer and the green all over again.
Next I masked off the green and white areas and sprayed on AKAN Soviet Naval blue in thin coats. Thinking I was right, I then sprayed on a couple of thin blotchy coats of the faded Soviet naval blue, but when I went back to verify the color was what I was looking for, I realized that I was looking at a museum model that was kept outdoors! The lesson here folks is always double check your references even if it is Google. It looked nice, but it was wrong for what I wanted.
I had to make another couple of passes with the unfaded blue to get the paint stressed the way I wanted and based on the photos of operational Forgers on Kiev “aircraft carrying cruiser” decks.
 The various
white parts were masked off and sprayed flat and gloss white. I was pretty happy
with how the paint job turned out, but I find that the weathering stage is
usually where the paint scheme either proves to be something to be proud of or
something to shove deep into the model cabinet never to be seen again.
The various
white parts were masked off and sprayed flat and gloss white. I was pretty happy
with how the paint job turned out, but I find that the weathering stage is
usually where the paint scheme either proves to be something to be proud of or
something to shove deep into the model cabinet never to be seen again.
Next the intake edges were masked off and painted bright silver as per instructions. I did the canopy at the same time when I painted each stage. Interior was neutral grey, then primed then painted with the two shades of Soviet naval blue. The wheels were masked off, primed and painted with Soviet Green hubs and NATO black wheels (oh the irony.) When everything was dried, I sprayed on Vallejo Acrylic Gloss as the decals basecoat.
I used the HB decals as I didn't have much of a choice. Unlike the older decals from Trumpeter/China, these did okay. No major issues. I mostly used Microset with a few decals getting (carefully) slashed with a knife then splashed with the more powerful Solvaset to settle down into the detail.
I used Tamiya Panel line black and brown to high light the panel lines as well as the weathering. I removed a lot of the excess with mineral spirit damped paper towels. I worked from front to back to show any streaking in the air flow direction except the landing gear which went from top to bottom to highlight the power of gravity. Once everything was dry, I sprayed on Vallejo flat coat.
| FINAL CONSTRUCTION |
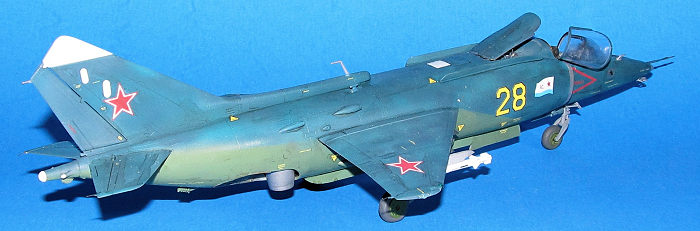
My encounters with Soviet landing gear have not been pleasant. I find them to be the hardest part of any modern Russian/Soviet era jet as there are so many doors and struts to deal with. I find it amusing to say this, but I like the simplicity of US landing gear and landing bay doors. Despite my usual whinging and crying, I added the complex landing gear with a couple of glitches that I had to fix to the nose as the resin nose wheel was more difficult to add than I thought.
 Next I
added the various prepainted probes and sensors on the fuselage. I thought
about using the PE versions but preferred the plastic parts because they
weren't as fragile as the PE versions, but I did use the resin pitot tube.
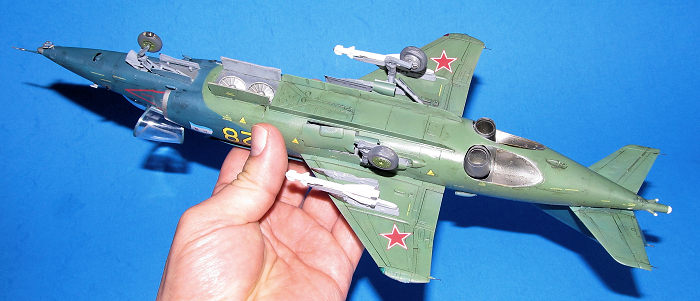
The weapons pylons were added next. I was trying to load up the Forger with
a pair of AA-8 Aphids and a pair of resin rocket pods, but the resin rocket
pods were actually too big for the inner pylons and interfered with the
landing gear doors so I ended leaving them off so the Forger is just armed
with a pair of AA-8s.
Next I
added the various prepainted probes and sensors on the fuselage. I thought
about using the PE versions but preferred the plastic parts because they
weren't as fragile as the PE versions, but I did use the resin pitot tube.
The weapons pylons were added next. I was trying to load up the Forger with
a pair of AA-8 Aphids and a pair of resin rocket pods, but the resin rocket
pods were actually too big for the inner pylons and interfered with the
landing gear doors so I ended leaving them off so the Forger is just armed
with a pair of AA-8s.
I added the PE blast defectors to the engines. These parts hides an annoying and difficult to clean seam that would be otherwise to sand/fill. Finally, I added the various small cockpit and PE parts I didn't add during the main construction phase including the pre painted canopy, its PE mounting hinge and a number of ESD wicks on the trailing edges. It took several long frustrating months and a family crisis to finally finish my Yak-38 Forger.
| CONCLUSIONS |
Not my best or favorite model, but I'm glad I finally completed a VSTOL (sort of) combat aircraft. I wish it had turned out better (especially the underside) but under the circumstances I can live with it. Goes to show that not every model one builds is going to be a winner. The Hobby Boss Forger has a lot of detail issues so it does need a fair amount of aftermarket to make it “accurate” which made the build all that more frustrating. Unfortunately, it is the only game in town for a 1/48 scale Forger. If it is built out of the box then it is okay for any level of modeler, but if you insist on some degree of accuracy then it should only be tackled by someone with light experience with PE and resin parts or above.
Dan Lee
1 July 2024 Copyright ModelingMadness.com. All rights reserved. No
reproduction in part or in whole without express permission of the editor.
If you would like your product reviewed fairly and fairly quickly, please contact the editor or see other details in the
Note to
Contributors. Back to the Main Page
Back to the Review
Index Page
Back to the Previews Index Page