|
KIT: |
Monogram 1/48 A-10A Warthog |
|
KIT # |
5505 |
|
PRICE: |
$19.98 MSRP |
|
DECALS: |
two options |
|
REVIEWER: |
Len Roberto |
|
NOTES: |
2Bobs decals used |
|
HISTORY |
 The Connecticut Air
National Guard unit traces its history back to just after WWI- it is the
3rd oldest Air Guard Unit in the US. The 103rd
Fighter Wing, 118th Tactical Recon Squadron has a storied
history. To celebrate the 80th Anniversary (1923-2003) Lt.
Brian Boeding suggested they take one of the unit’s current A-10’s and
devise a new paint scheme using the famed black lightning bolt scheme the
unit wore on their P-51’s in WWII.
The Connecticut Air
National Guard unit traces its history back to just after WWI- it is the
3rd oldest Air Guard Unit in the US. The 103rd
Fighter Wing, 118th Tactical Recon Squadron has a storied
history. To celebrate the 80th Anniversary (1923-2003) Lt.
Brian Boeding suggested they take one of the unit’s current A-10’s and
devise a new paint scheme using the famed black lightning bolt scheme the
unit wore on their P-51’s in WWII.
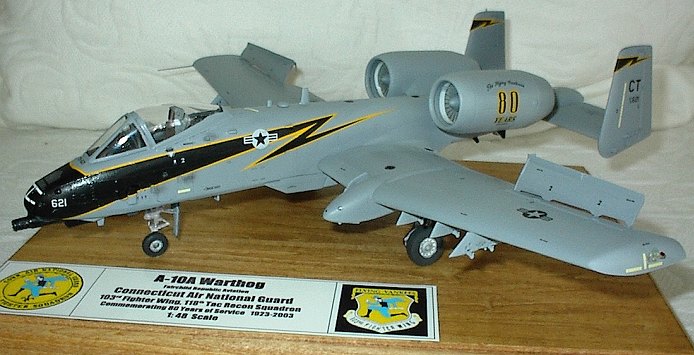
Hence we have this striking scheme of which 2 decal companies (Cutting Edge and Two Bob’s) produced beautiful sets. One look at the layout of the decals and I knew they would be a royal pain to conform to the curve of the A-10’s nose but more on that later…
|
THE KIT |
Revell/ Monogram’s 1/48 kit of the A-10 has been around a while, much like the A-10 itself. Horror stories are well known about the fit challenges but still, it is regarded as the best 1/48 Hog out there. This boxing was in dark green plastic and provided decals for an early 1990’s European based Warthog. If you go over to ARC, there are many great build articles that take you through what needs to be added to the kit if you want to build the A-10 as it currently is outfitted today. Most of the work involves replicating and relocating the various antennas, LASTE pods, and other things that stick out of the fuselage!
|
CONSTRUCTION |
You can go crazy buying resin to update this kit’s cockpit and other bits but I usually choose the cheap way out. I wanted to build it canopy closed so I could mount the model on a base with a nameplate, the unit’s coin that I received for building a few models for their display, and to display an actual empty 30mm shell, which was fired by one of the unit’s A-10’s in Iraq.
Most of what is said about the kit is true. Fit is not that bad but know that putty will be needed on just about every seam and major sanding will be in your future. I used heavy tape to protect as much of the surrounding detail as I could. Areas of special attention where elbow grease is needed:
-Fuselage- all the way around.
-Tail planes
-Wings- leading edge and underside where the chaff dispensers are located- big seam!
-Engine pod- needs a lot of patience and sanding here to remove joints.
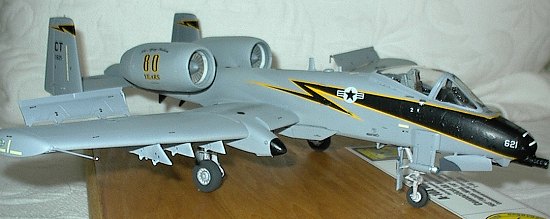 Pay careful attention to joining the wings to
fuselage. The wings have long tabs that are supposed to interlock inside
the fuselage and provide the proper dihedral. Look at photos and take
your time on this step. The inboard portion of the wings are just about
perpendicular to the ground and the outer wing sections flare up towards
the wingtips. I’m not sure the tabs worked as they intended but care was
needed to make sure the wings stayed in alignment while drying. I held
each wing longer than normal while the initial glue set up and then stood
the model up vertically while leaned against a stack of books overnight
to fully dry.
Pay careful attention to joining the wings to
fuselage. The wings have long tabs that are supposed to interlock inside
the fuselage and provide the proper dihedral. Look at photos and take
your time on this step. The inboard portion of the wings are just about
perpendicular to the ground and the outer wing sections flare up towards
the wingtips. I’m not sure the tabs worked as they intended but care was
needed to make sure the wings stayed in alignment while drying. I held
each wing longer than normal while the initial glue set up and then stood
the model up vertically while leaned against a stack of books overnight
to fully dry.
The engine pod is another battle- be as careful as you can at the initial joining to get the seams lined up and then go back when the assembly is fully dry and then putty and sand away.
All antennas were cut off and put aside. This did 2 things- made the sanding easier and they had to come off anyway to be relocated. I raided the spares box for some better-looking and additional antennas as well. I did not add any nose weight, which would be required because I planned on attaching the model to the base using paper clip stubs drilled into the wheels
WHAT I ADDED:
-LASTE pods on both tails- I used the little extra round plastic tags you sometimes get on thin parts to replicate these- 2 on each tail.
-Under the tail I also had to add 3 pods- I used wheels from an old ammo carrier and sanded them down to look like the pics I was using for reference.
-On the port side nose, I added a smaller vent just in front of the kit supplied larger vent door.
-Antennas on fuselage were placed as per current photos.
|
COLORS AND MARKINGS |
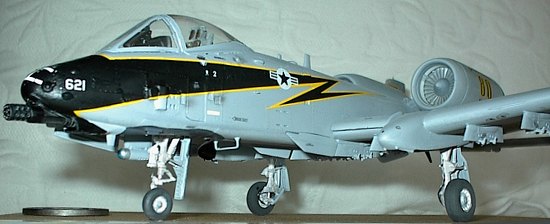
The current gray scheme is not too difficult to do. It uses Light Ghost Grey and Dark Ghost Grey with a “false” canopy in Gunship Grey painted under the nose section. I primered first with my trusty Krylon Sandable primer. Some areas needed additional sanding. The starboard side gear pod nose was painted black and masked off. I used Testor’s Acryl line for both grays. I then cut paper masks and held them on the areas to be covered instead of masking off. Photos I have of the actual plane 78-621 show a clean plane but the demarcation is visible but very faint. At model viewing distance, a sharp demarcation line would just not look like the real plane so this is why I decided to use a piece of paper for the masks and get a feathered edge between the grays.
 When the paint was dry, I added the
landing gear and painted them white. Pictures showed the inner faces of
the gear doors were not white but matched the exterior color. The false
canopy was brushed on using Testors Gunship Grey.
When the paint was dry, I added the
landing gear and painted them white. Pictures showed the inner faces of
the gear doors were not white but matched the exterior color. The false
canopy was brushed on using Testors Gunship Grey.
DECALS:
After a heavy gloss coat, it was time for the real challenge. The main bolt decals were 2 pieces on each side. The nose portions wrap around the nose and Two Bob’s were sliced in 3 places to help them settle down around the curves of the nose. Here is my method for these stubborn decals:
This method worked for me and they came out looking sharp! The rest of the decals went on flawlessly. Two Bob’s decals have always been top notch and are of excellent quality. When all the decals were on and dry, dull cote was sprayed over the whole model. I was happy to see that the marker touch up spots blended in nicely and are really hard to find.
DISPLAY PREP:
I use a basswood plaque which you can get at arts and craft stores. I drilled into each tire and inserted a 1 inch length cut from a big paper clip. I marked where they go on the base and drilled into the wood. This allows the model to be secured to the base but still removable if needed. On my PC, I prepare a nameplate printed on heavy gloss photo paper with the unit’s crest and the model’s info. 3M spray on adhesive is used to apply the nameplate to the base.
|
CONCLUSIONS |
The A-10 is a lot of work but anyone can do it if you take your time and use your fundamental modeling skills. The decals are intimidating but the method I used worked out just great and they look very striking on the model. Break out your putty and sandpaper!
|
REFERENCES |
February 2004
If you would like your product reviewed fairly and quickly by a site that has nearly 250,000 visitors a month, please contact me or see other details in the Note to Contributors.