Airfix 1/48 E.E. Lightning F.2
|
KIT # |
9179 |
|
PRICE: |
$33.98 |
|
DECALS: |
Six Options |
|
REVIEW: |
Drew Nix |
|
NOTES: |
Cutting Edge resin cockpit set (CEC 48118) and Aeromaster decals(48-369) |
|
HISTORY |
The Lightning was developed by English Electric to meet a British government requirement for a transonic/supersonic research aircraft that could ultimately be developed into an interceptor fighter for the RAF. The resultant aircraft was unusual in its arrangement of jet engines, one above the other, and its severely swept flying surfaces. While other manufacturers were experimenting with 45-degree sweep, E.E. swept the Lightning's wings and tailplanes to 60 degrees. In service in various marks for more than 30 years, when the last Lightning was retired it could still hold its own with some of the later generations of jets then in use.
|
THE KIT |
The kit comes in a box about the size of a small suitcase. Inside one finds a large number of parts molded in light gray and clear plastic. The major parts have nicely recessed panel lines. The instruction booklet is a sixteen-page affair with a clearly drawn assembly sequence. The decal sheet is HUGE, covering the bottom of the box. Besides the decals for the six aircraft featured, there is extensive coverage of the myriad of stencils that covered the Lightning, many being specific as to type. These stencils will be needed even if one chooses to use an after market decal set.
|
CONSTRUCTION |
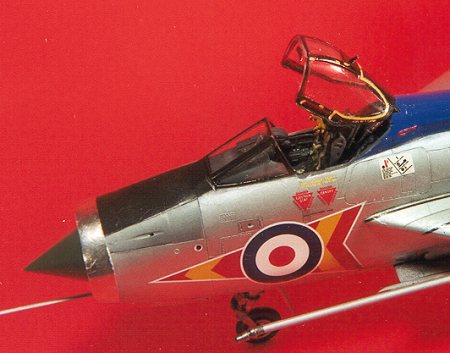
Airfix's cockpit is nice, but with the release of the Cutting Edge resin set, it was no contest. With the Cutting Edge set comes a cockpit tub, an ejection seat with molded on seatbelts, an instrument panel combing, a replacement instrument panel, rudder pedals (one of mine was missing, but unless you are looking for them, the rudder pedals can't be seen once the cramped cockpit is closed up), two side consoles, two glare shields (one in the folded position and one in the open position), a replacement control stick, a selector box, and a canopy actuator. The cockpit tub has to be sanded to fit over the kit's intake trunks. I sanded the tub for an hour with frequent dry-fitting in order to get an acceptable fit. Always sand resin parts wearing a mask or under running water. Resin dust is a carcinogen as well as being microscopic daggers and will damage your lungs if the dust particles are inhaled.
The Cutting Edge instructions call for the cockpit to be painted black. I painted mine Euro I Dark Gray (FS 36081) to give a more scale effect and to keep one from feeling like he was looking into a black pit when viewing this area. I lost the resin replacement control stick, but the kit-supplied stick was more than adequate. After all cockpit parts were painted, a wash of black artist oil color was applied over the assemblies causing various details to pop out. Lighter shades of gray were then drybrushed to pick out even more detail.
Because the replacement cockpit is such a tight fit, I completed and installed the intake trunking to the right fuselage halves first. The shock cone was painted Gunze Sanyo Dark Green. It was left off until the model was completed. A large bell-shaped fishing weight was glued into the cone. Once the cockpit assembly, the intake trunking, and the exhaust assembly were completed the two fuselage halves were glued together. Make sure that you drill out the holes in the fuselage sides shown on the diagram so that the cable conduits particular to each mark can be added later. Surprisingly some of these holes were already opened on my example. The resultant seams were filled with gap filling super glue, hit with an accelerator, sanded, and progress checked with liquid whiteout. Any seams that remained were given this treatment again. Then the canopy hinge base from the kit was trimmed to fit the new cockpit before being installed to the fuselage spine. Again the seams required attention.
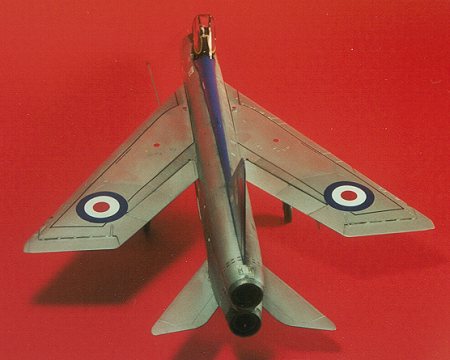
Construction of the wings was next. Besides this kit, Airfix also offers a companion kit of the Mark 2A and the Mark 6 Lightning. In order to have as much commonality of parts as possible between the two, both sets of wing leading edges are included in the kit. While this is a cost-saving idea, it does make for a more "fiddly" assembly of the wings. Before assembling the left wing, I drilled out the two holes that would later accept the refueling probe. The flaps are separate items and can be posed in a down position, but for this model they were secured in a neutral position. Both the windscreen and the canopy were masked with Scotch tape and then sprayed Gloss Black. These were set aside to be added later after all assembly was complete.
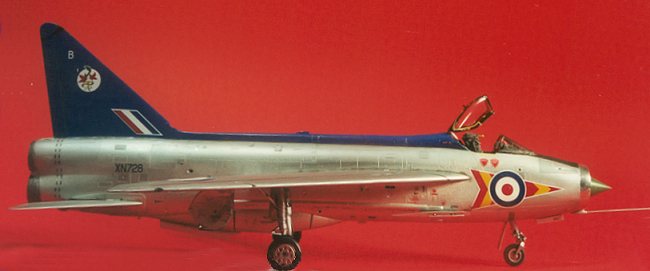
Since I was building a Mark F.2 Lightning, I chose the round-tipped tail. The wings, tailplanes, airbrakes, nose ring, and various bits and pieces were added next. Filler was required on everything, especially the nose ring. The F.2 had the Aden 30mm cannon on top of the nose so the specific panels were added for these cannon. The cannon troughs are very shallow and the ports for the guns have to be drilled out. Some F.2's only had the cannon on top of the nose; others had an additional two cannon on the bottom of the nose. Pay attention to reference materials to decide which combination applies to your F.2. The example I was doing, serial number XN728, only had the top two cannon.
The Lightning's gear retraction system was a complicated one. The main gear rotated back about 45 degrees before folding outward into the wings. Airfix has replicated the landing gear very well, but this also means that there are quite a few small, fiddle parts that have to be assembled. One of the oleo scissors links was missing from my kit, but sending the enclosed request card to Airfix got me two new sets of these parts in under two weeks. Well done, Airfix. Wish all manufacturers were this customer friendly! The main gear legs fit into very shallow depressions in the wheel wells making for almost a butt joint. This means the gear is somewhat wobbly.
Lightnings were covered with a myriad of aerials and probes and Airfix gives them to you individually. Although I dutifully glued all of them on, I must confess that some were lost during later handling. Once they drop into the carpet, abandon hope of ever finding them. Also different marks of the aircraft had different cable conduits. This is where the pre-drilled holes mentioned earlier come into play. Depending on the mark you build, either the Firestreak or Redtop missiles will need to be constructed. These are very well done indeed, each being a miniature model in itself.
|
PAINT & DECALS |
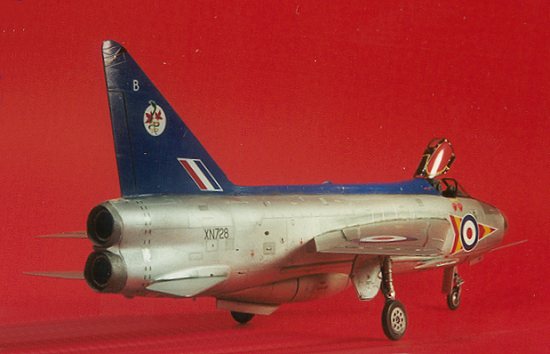
I decided to finish my Lightning as an F.2 of the number 92 Squadron of the Royal Air Force based at Leconfield, UK in 1965. These were finished in a multi-tonal natural metal scheme with a Roundel Blue tail and spine, very attractive. First the model was painted with an undercoat of flat primer gray. This turned out to be a mistake because when the primer was sanded, it still left a number of rough spots, most of those being in hard to reach places. When the natural metal coat (my own formula) was added, therefore, it too was rough in those same spots. Next time I will use a GLOSS white or gray to act as an undercoat. I used SNJ's polishing powder to reduce some of the roughness. Various panels were masked with frisket paper and different shades of Metallizer were added since Lightnings had a very splotchy appearance. This also helped reduce the roughness in some areas.
The fuselage was masked in such a way as to expose the spine and tail. Then Testors Pla Gloss Dark Blue was sprayed onto these areas. The anti-glare panel was next masked and painted flat black. The nose ring on Lightnings was a highly polished aluminum. This was replicated using Bare Metal Foil's Chrome.
Although the kit decals included markings for the No. 92 Squadron, the red parts of the markings had a definite orange tint to them. Instead I opted to use the excellent Aeromaster decal sheet number 48-369, Lightnings Pt.I, The Early Days. These decals went on without a hitch, although some of the markings were replicated by using two or even three separate decals. This was to prevent the decals from being out of register, but made for a very fiddly process. As mentioned earlier, the kit decals will have to be used for the many data decals found on all modern aircraft, as well as for the wing walks and various stripes. I had a little trouble with one or two of the stripe decals wanting to peel up after they were dry, but a little Future floor wax brushed under them helped them to settle down and stick better.
|
CONCLUSIONS |
Once the decals were down, the spine and vertical tail was coated with Future to hide any decal film and to even out the sheen of this area. A wash of Payne's Gray artist's oils was applied to the aircraft followed by dark gray pastel chalks being used to replicate wear and tear. Finally, the landing gear, refueling probe, pitot tube, shock cone, windscreen and canopy were added. Voila, a 1/48 scale Lightning. Did it live up to what I had anticipated? Yes. Recommended.
1998
Copyright ModelingMadness.com