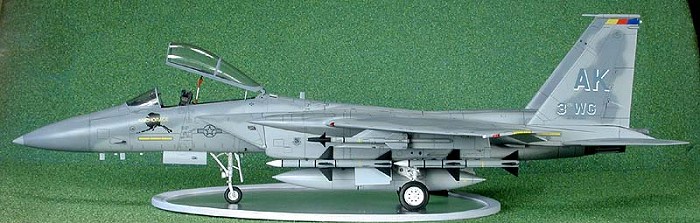
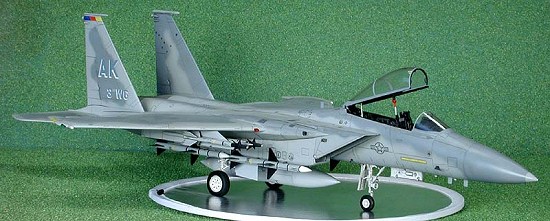
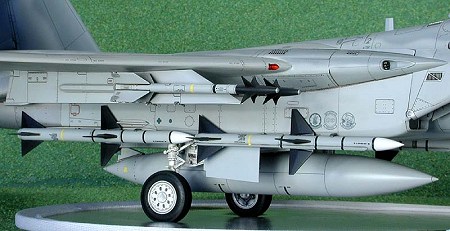
Tamiya 1/32 F-15C Eagle
|
KIT # |
60304 |
|
PRICE: |
$124.00 |
|
DECALS: |
Three options |
|
REVIEWER: |
|
|
NOTES: |
CAM resin seat |
|
HISTORY |
While others may argue, it is my feeling that the most successful air superiority aircraft ever built is the McDonnell Douglas (now Boeing) F-15C “Eagle”. Quite frankly, its combat record is enviable, without a single loss to enemy air-to-air combat fire while tallying up over 100 air-to-air victories. While one can make a fairly good case that the SU-27 “Flanker” (and its myriad derivatives) would seriously challenge the “Eagle” in air-to-air combat, it simply does not have the combat record to back up those claims.
 The “Eagle” was born from a series of studies
conducted in the mid-1960’s leading to a development program designated
Fighter Experimental (FX). These studies led the USAF to announce a
Concept Formulation Study (CFS) in March 1966 in which six manufacturers
chose to participate (Grumman, Lockheed, North American Rockwell, General
Dynamics, Fairchild, and McDonnell Douglas). Designs from these six were
submitted in 1967, and in late 1969, the USAF selected the McDonnell
Douglas design for full-scale development. It is interesting to note that
no prototype aircraft were built and the competition took place--using
aircraft designed only on paper!
The “Eagle” was born from a series of studies
conducted in the mid-1960’s leading to a development program designated
Fighter Experimental (FX). These studies led the USAF to announce a
Concept Formulation Study (CFS) in March 1966 in which six manufacturers
chose to participate (Grumman, Lockheed, North American Rockwell, General
Dynamics, Fairchild, and McDonnell Douglas). Designs from these six were
submitted in 1967, and in late 1969, the USAF selected the McDonnell
Douglas design for full-scale development. It is interesting to note that
no prototype aircraft were built and the competition took place--using
aircraft designed only on paper!
In December 1969, the USAF awarded a contract for about 100 full-scale development (FSD) aircraft to McDonnell Douglas and the rest as they say, is history. While the F-15 was designed primarily as an air superiority fighter, it also had the capability for ground attack, leading to arguably the finest combat aircraft ever built.
|
THE KIT |
I always jump at the chance to build a Tamiya kit
due to their fantastic reputation for quality, engineering, and fit, and
when a client asked me to build this kit I wasted no time to jump right
in! The kit is huge and consists of about 235 injected molded plastic
parts that are the envy of the business in terms of quality, featuring
recessed panel lines throughout. Also included are white metal landing
gear (to support this huge beast!), rubb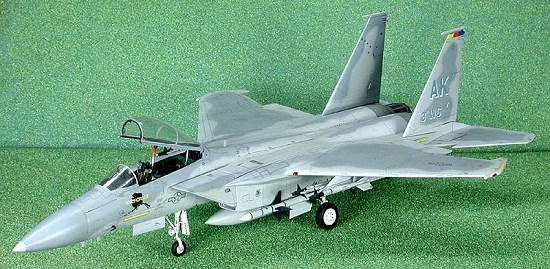 er tires, and an assortment of
screws & nuts to use during assembly. Three decals options are provided
featuring the; 1) 18th Wing Commanders Aircraft at Kadena AB, 2) 44th
Fighter Squadron at Kadena, and 3) 3rd Wing Commanders
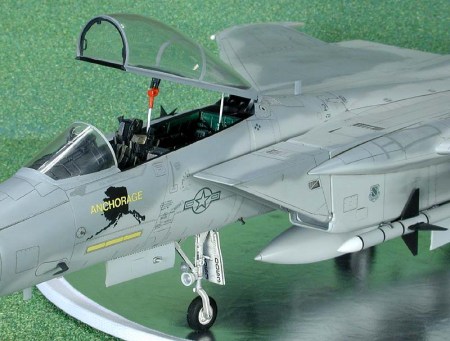
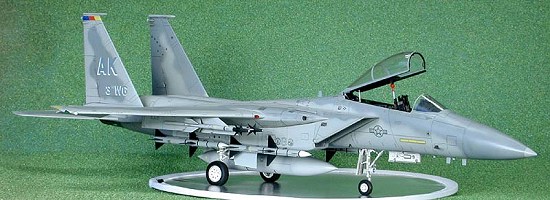
Aircraft in Alaska (the aircraft modeled in this article). Decals are
typical Tamiya, nicely done but a bit on the thick side. The instruction
booklet is typical Tamiya, concise and well illustrated, and consists of
a whopping 28 pages containing 40 assembly steps. As is usual for Tamiya,
paints are only referenced for the Tamiya brand and since no
“out-of-bottle” matches are available from Tamiya the modeler must mix
their own using the referenced formulae.
er tires, and an assortment of
screws & nuts to use during assembly. Three decals options are provided
featuring the; 1) 18th Wing Commanders Aircraft at Kadena AB, 2) 44th
Fighter Squadron at Kadena, and 3) 3rd Wing Commanders
Aircraft in Alaska (the aircraft modeled in this article). Decals are
typical Tamiya, nicely done but a bit on the thick side. The instruction
booklet is typical Tamiya, concise and well illustrated, and consists of
a whopping 28 pages containing 40 assembly steps. As is usual for Tamiya,
paints are only referenced for the Tamiya brand and since no
“out-of-bottle” matches are available from Tamiya the modeler must mix
their own using the referenced formulae.
While the kit provided seat is fairly good (no harness provided), in 1/32 scale a kit like this begs for more detail so I used a CAM ejection seat. This seat is very nicely done featuring a high level of detail, quality casting, and molded on harness.
|
CONSTRUCTION |
 As is usual for me, construction started in the
cockpit. All parts were pre-painted as indicated in the instructions
using Tamiya Sky Grey (XF-19), and a mix of Gunze Sangyo Metallic Blue
Green (H63) and Clear Yellow (H91) (in equal parts) for the two prominent
cockpit colors. All other detail painting was done as indicated in the
instructions using a wide variety of paints. After painting, all parts
were given a light wash of highly thinned Tamiya Smoke (X-19) and then
assembled in accordance with the instructions. Assembly was smooth with
no surprises except I had to carve out a large hole in the base of the
CAM seat to fit over the protruding screw mount. The only complaint I
have is that you must install the forward landing gear early in
construction (I typically leave the landing gear off until final assembly
so I won’t break them off!).
As is usual for me, construction started in the
cockpit. All parts were pre-painted as indicated in the instructions
using Tamiya Sky Grey (XF-19), and a mix of Gunze Sangyo Metallic Blue
Green (H63) and Clear Yellow (H91) (in equal parts) for the two prominent
cockpit colors. All other detail painting was done as indicated in the
instructions using a wide variety of paints. After painting, all parts
were given a light wash of highly thinned Tamiya Smoke (X-19) and then
assembled in accordance with the instructions. Assembly was smooth with
no surprises except I had to carve out a large hole in the base of the
CAM seat to fit over the protruding screw mount. The only complaint I
have is that you must install the forward landing gear early in
construction (I typically leave the landing gear off until final assembly
so I won’t break them off!).
Assembly of the forward fuselage section was easy and I was cruising along expecting an easy build (heh, heh, heh!). I actually built up the kit as the series of sub-assemblies as indicated in the instructions fairly easily and will only highlight some significant issues. But just wait until you put the sub-assemblies together!
 The air duct assembles easily, but you are faced
with the problem of a long seam that is impossible to fill along its
entire length. I only filled the portion nearest the intake and left the
rest alone, as it requires a visit from the “pen-light-probers” to see
any ways! I would love to hear from some one on how they can erase this
seam! The same seam problem exists with the engine duct.
The air duct assembles easily, but you are faced
with the problem of a long seam that is impossible to fill along its
entire length. I only filled the portion nearest the intake and left the
rest alone, as it requires a visit from the “pen-light-probers” to see
any ways! I would love to hear from some one on how they can erase this
seam! The same seam problem exists with the engine duct.
The exhaust cones while nicely detailed, are plagued with ejector pin marks on the inside surfaces. I left them alone since I didn’t think they were that prominent (wrong!). I will definitely fill them next time! The exhausts did fit very nicely, so after painting them separately they were left off until final assembly to ease the masking chore.
Again, I was sailing along marveling at the ease of the build when it came time to start joining the sub-assemblies. The forward fuselage join to the central fuselage was my first indication of trouble with significant steps resulting, but when I got to the wings my patience was really tested! Now I don’t know if I screwed up during the sub-assemblies (pretty straightforward stuff) but the wings fit atrociously. Definitely not the famed Tamiya fit! Lots of filler was needed to get a smooth, gap free join and the attendant rescribing of lost detail. The nose cone was problematic also. Oh well, at least the rudder fins went on nicely (I left the stabilizers off until after painting)!
The canopy was another mess that required me to use heavy clamps to get it to fit correctly. Fortunately, since you have to remove the center seam any ways and polish the entire canopy this ended up to adding only a little additional work. Well, now we’re ready for a visit to the paint shop after a quick wipe down with Polly’s Plastic Prep!
|
CAMOUFLAGE & MARKINGS |
The first order of business was to spray the wheel
wells and landing gear with Tamiya Flat White (XF-2). After letting this
dry overnight I stuffed the wheel wells full of U-Knead-It (a silly putty
type substance) and sprayed the unpainted engine section SNJ
 Aluminum
(since SNJ allows masking with no damage). After masking off with Tamiya
masking tape I airbrushed Polly Scale acrylic Light Ghost Gray over the
entire model. Since there is not a lot of contrast between Polly’s Ghost
Grays, I used Model Master Dark Ghost Gray (#1741) airbrushed freehand in
accordance with the painting instructions. A light topcoat of Future was
shot to prepare the flat surface for decaling.
Aluminum
(since SNJ allows masking with no damage). After masking off with Tamiya
masking tape I airbrushed Polly Scale acrylic Light Ghost Gray over the
entire model. Since there is not a lot of contrast between Polly’s Ghost
Grays, I used Model Master Dark Ghost Gray (#1741) airbrushed freehand in
accordance with the painting instructions. A light topcoat of Future was
shot to prepare the flat surface for decaling.
The kit decals are nice, but a bit on the thick side. I would recommend after-market decals for this kit if the thickness bothers you, but to be honest they are difficult to find since they are OOP. I applied MicroSol setting solution and the decals responded to the setting solution very nicely. After drying overnight, I wiped the decals off with Polly S Plastic Prep to remove any residue and after drying I shot a light coat of Future over the decals to seal them. For weathering, I chose to accentuate the engraved panel lines and surface detail with a sepia watercolor wash.
|
FINAL CONSTRUCTION |
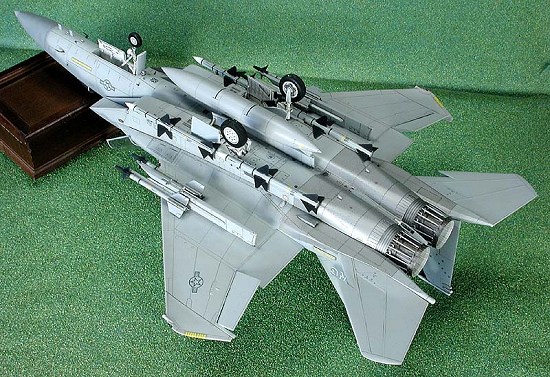 The landing gear, doors, exhaust nozzles, pylons,
weapons, and drop tank were all installed without any problems (finally
that famous Tamiya fit!). After a final topcoat of Testors Dullcote to
provide the final finish, all masking was removed and the final antennae
were mounted in place to finish off the model.
The landing gear, doors, exhaust nozzles, pylons,
weapons, and drop tank were all installed without any problems (finally
that famous Tamiya fit!). After a final topcoat of Testors Dullcote to
provide the final finish, all masking was removed and the final antennae
were mounted in place to finish off the model.
|
CONCLUSIONS |
Tamiya models are my absolute favorite to build, as they usually have no major problems to contend with. This kit unfortunately has a few issues with fit that makes this kit better suited to a more advanced modeler, but it certainly builds up to a beautiful (and huge!) model.
|
REFERENCES |
Squadron/Signal Publications, F-15 Eagle in Action #183
Squadron/Signal Publications, Walk Around F-15 Eagle #28
Squadron/Signal Publications, Modern Military Aircraft – Eagle
In Detail & Scale, F-15 Eagle Vol. 14
September 2003
If you would like your product reviewed fairly and fairly quickly, please contact the editor or see other details in the Note to Contributors.