|
KIT # |
61059 |
|
PRICE: |
$52.00 MSRP |
|
DECALS: |
two options |
|
REVIEWER: |
Bob Laskodi |
|
NOTES: |
Black Box cockpit used |
|
HISTORY |
The actual concept of a “stealth” aircraft had been around since the 1940’s, long before the F-117A “Nighthawk” debuted in 1981. So while the F-117A was in fact a revolutionary aircraft designed from the start with a primary emphasis on reducing the radar cross section (RCS) of the aircraft, in reality it was a compilation of evolutionary designs that Lockheed Advanced Development Projects (better known as the “Skunk Works”) had used in building the first production aircraft featuring “stealth” technology in the late 1950’s, the incomparable SR-71.
In the 1970’s many defense companies were studying
“stealth” technology applications for aircraft including Boeing,
Northrop, and General Dynamics in addition to Lockheed. In the late
1970’s, plans for a “stealth” aircraft were rapidly developing to the
point that the Defense Advanced Research Projects Agency (DARPA)
sponsored a prototype development effort named “Have Blue” that was
issued to the major players in the industry. In 1977, Lockheed was issued
a 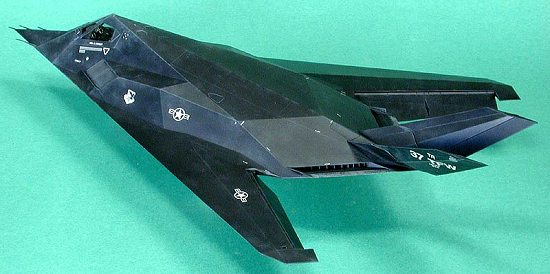 contract to participate in the “Have Blue” program to build two
subscale developmental aircraft for further testing and concept
development. The two prototype aircraft were built very rapidly at
Lockheed’s Burbank facility in a few months using “off-the-shelf”
aircraft components (i.e. GE J85 engines, A-10 and F-16 components, to
name a few). After completion at Burbank, the first aircraft was sent to
Groom Lake, Nevada for its first flight test in Jan-Feb 1978. The second
aircraft followed a few months afterwards.
contract to participate in the “Have Blue” program to build two
subscale developmental aircraft for further testing and concept
development. The two prototype aircraft were built very rapidly at
Lockheed’s Burbank facility in a few months using “off-the-shelf”
aircraft components (i.e. GE J85 engines, A-10 and F-16 components, to
name a few). After completion at Burbank, the first aircraft was sent to
Groom Lake, Nevada for its first flight test in Jan-Feb 1978. The second
aircraft followed a few months afterwards.
While both aircraft were subsequently destroyed in accidents, the fantastic success of the “Have Blue” prototypes along with a significant increase in funding under the Carter administration led the U.S. Air Force to seek an operational aircraft. Lockheed was given a contract to produce a full size operational aircraft named “Senior Trend” and designated the F-117A in November 1978. The first five aircraft were pre-production aircraft having slightly smaller tail fins/rudders and first flew in June 1981. After successful testing, a subsequent contract was placed for an initial production run of twenty aircraft, but further contracts authorized a total of 59 aircraft.
|
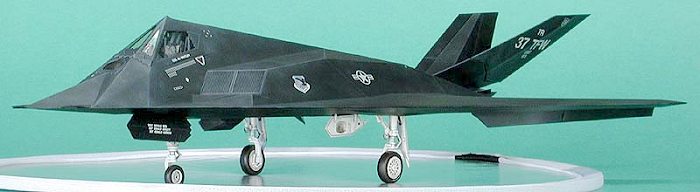
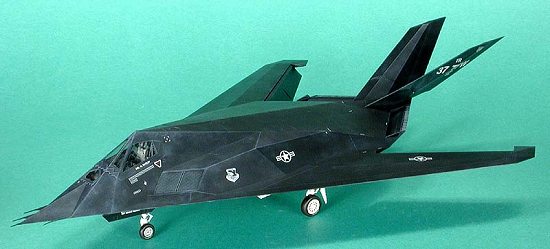
THE KIT |
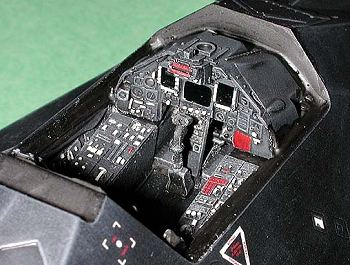
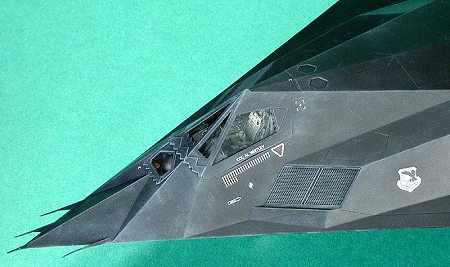
What can I say about this kit other than the fact it is a typical Tamiya kit with great quality, engineering, detail, and fit! Nothing for most modelers to gripe about except for the usual complaints about the decals being “un-useable”! While they are a bit thick, they are very useable! I am a confirmed “resin-o-holic” and cannot resist the “sirens call” of aftermarket resin cockpits (even though the Tamiya cockpit is pretty good) so I used the Black Box (BB) cockpit set (#48043). I wish I would have had more willpower as this set proved to have so many troublesome fit issues that I almost flung the model against the wall!
|
CONSTRUCTION |
 I will warn you straight up. If you are timid about
cutting, dry fitting, sanding, and filling DO NOT use the BB cockpit set!
In fact, most of this article is going to deal with the pitfalls of this
set (except for a few minor boo-boo’s of my own doing!) since the Tamiya
kit can almost be built with your eyes shut if you follow the directions!
I will warn you straight up. If you are timid about
cutting, dry fitting, sanding, and filling DO NOT use the BB cockpit set!
In fact, most of this article is going to deal with the pitfalls of this
set (except for a few minor boo-boo’s of my own doing!) since the Tamiya
kit can almost be built with your eyes shut if you follow the directions!
Removal and initial clean-up of the resin pour stubs was quickly accomplished using my trusty diamond-coated cut-off wheel. Now how you are supposed to remove the stub from the resin HUD frame is a mystery to me and I quickly demolished mine beyond recognition. Oh well, as we shall soon see, “it matters not”, since it won’t fit! The BB set has you use several kit parts that require significant surgery from the kit donor part. The most difficult of these are the seat rails which need to be removed and attached to the resin ejection seat (which is beautiful). Unfortunately, while the resin seat fits quite nicely in the tub, when you add the seat frames it won’t! Oh well more “Dremeling”!
Now it was time to remove the kit cockpit sills and
front coaming. The only word of advice is to not remove near as much
plastic as indicated in the instructions and to dry fit the tub in place
repeatedly. This is where I ran into BIG problems. Mounting the resin
coaming in place on the upper FLIR housing seemed straight-forward (or so
I thought!). But when it
 came time to get the cockpit tub in place I
couldn’t get it in the correct location for love or money! After
uncountable dry fit sessions and much resin and plastic removal from the
kit and tub (and waaaaaaay too many bad words!), I finally resorted to
grinding down the front tub to get the cockpit in place the best I could.
No matter what, I couldn’t get it right! Thank the modeling gods for
motor tools as I can not see any way of building this set without one!
came time to get the cockpit tub in place I
couldn’t get it in the correct location for love or money! After
uncountable dry fit sessions and much resin and plastic removal from the
kit and tub (and waaaaaaay too many bad words!), I finally resorted to
grinding down the front tub to get the cockpit in place the best I could.
No matter what, I couldn’t get it right! Thank the modeling gods for
motor tools as I can not see any way of building this set without one!
I finally surrendered, and decided to close up the cockpit to hide the fact that the tub would never fit correctly. Of course I always open up my cockpit canopy to show off all that gorgeous resin detail (after all isn’t that why we spend tons of money on resin sets?) but not this time. As a side bar, BB includes the most beautiful interior canopy framings/railings but you can’t use it if you close the cockpit up since it won’t fit. I really don’t know where I went wrong with BB cockpit, but I can say that I have never had a situation where I actually was forced to close the cockpit up when using a resin cockpit set to salvage the build. And I use a lot of resin cockpit sets!
Oh well, the rest of the kit assembly was so trouble
free that I won’t even mention it. Except for my one little boo-boo!
Tamiya gives you the option of opening the bomb bay and letting those
wonderful GBU-27 Paveway III laser guided bombs hang out that give Saddam
so much trouble! Well, I thought I was smarter than the average bear and
would modify the construction sequence so I could add all the bomb bay
parts after painting so I would not have to deal with masking all that
 delicate detail. I dutifully assembled the bomb “trapeze” structures and
bomb bay, figuring I would add the “trapezes” later. Well, as I
unfortunately found out way too late in the build, you can’t do it as the
center bomb bay divider prevents this. DOOOOOHHHHH! Oh well, let’s see,
the canopy is now closed and so will my bomb bay! Another word of
caution; be very careful when assembling the bomb trapeze structures and
do it exactly as indicated in the instructions. It is quite easy to
“mirror image” some parts. Don’t ask me how I know this as I’m just
thankful I had three kits in my stash to do this right! Follow the
instructions or you will be sorry!
delicate detail. I dutifully assembled the bomb “trapeze” structures and
bomb bay, figuring I would add the “trapezes” later. Well, as I
unfortunately found out way too late in the build, you can’t do it as the
center bomb bay divider prevents this. DOOOOOHHHHH! Oh well, let’s see,
the canopy is now closed and so will my bomb bay! Another word of
caution; be very careful when assembling the bomb trapeze structures and
do it exactly as indicated in the instructions. It is quite easy to
“mirror image” some parts. Don’t ask me how I know this as I’m just
thankful I had three kits in my stash to do this right! Follow the
instructions or you will be sorry!
There was only one area of the kit that required any filler. The kit design splits the model into a top and bottoms half and when you put the two halves together you will have to fill the resulting join area. This really presents no great problem since you can fill with Mr. Surfacer and sand away to your hearts content since there is no detail to destroy/obliterate and it’s all on the bottom obscuring IPMS judges prying eyes.
|
CAMOUFLAGE & MARKINGS |
Now what could be simpler than an all-black airplane? Therein lies the rub – black is boring and is a bit*@ to photograph! In addition a caution is in order – the genuine article has no exposed panel lines since these would be radar reflecting magnets and make the plane stand out like a sore thumb. The real aircraft has radar absorbing material (RAM) putty filled in all the panel joins so no panel lines should be visible in 1/48 scale. I briefly considered filling all the panel lines (very briefly!) but ruled this out since I was: 1) lazy; and 2) an all-black model with no panel lines would be extremely boring!
 Tamiya provides a set of wonderful masks to cover
the complex shapes present on the canopy and FLIR housings. They are not
pre-cut but a sharp Exacto knife will do the job wonderfully. The masking
material is beautiful and I wish all kits came with something like this,
even if they aren’t pre-cut. After using the provided masking material, I
gave the model a quick wipe down with Polly’s Plastic Prep and sent it
off to the paint shop. First up was airbrushing all the landing gear
wheel wells and components Testor Model Master (TMM) Flat White. After
letting this dry overnight, I stuffed the wheel wells full of wet tissue
paper and airbrushed the entire model TMM Aircraft Interior Black. After
letting this dry overnight, I attacked the exterior surfaces by dry
brushing heavily with TMM Gunship Gray. This highlighted the raised
portions and provided a “splotchy” appearance that I was looking for.
Tamiya provides a set of wonderful masks to cover
the complex shapes present on the canopy and FLIR housings. They are not
pre-cut but a sharp Exacto knife will do the job wonderfully. The masking
material is beautiful and I wish all kits came with something like this,
even if they aren’t pre-cut. After using the provided masking material, I
gave the model a quick wipe down with Polly’s Plastic Prep and sent it
off to the paint shop. First up was airbrushing all the landing gear
wheel wells and components Testor Model Master (TMM) Flat White. After
letting this dry overnight, I stuffed the wheel wells full of wet tissue
paper and airbrushed the entire model TMM Aircraft Interior Black. After
letting this dry overnight, I attacked the exterior surfaces by dry
brushing heavily with TMM Gunship Gray. This highlighted the raised
portions and provided a “splotchy” appearance that I was looking for.
In preparation for decals, I airbrushed a nice coat
of Future (using a brand new bottle) but something bad happened when I
applied decal setting solutions. I used to be a big fan of Future but no
more as the Future underneath the decals turned white. Now this has
happened before, and the solution is to cover the “white” portions with
Future and it will clear up. Well this happened, but unfortunately it
couldn’t penetrate under the decals and all were surrounded by
“ring-around-the-collar”. So it was time to strip the decals off using
masking tape (fortunately I had only put on the stencils), wet sand the
area smooth with a Squadron Polishing Stick and apply another coat of
Future to level out all the fixed areas. After letting
 the Future cure
for another week I airbrushed a heavy coat of Testor Metalizer Sealer to
prepare the surface for decals. Mission accomplished with a beautiful end
result, as all the decals snuggled down beautifully using Microscale
“Micro Sol” with no discoloration.
the Future cure
for another week I airbrushed a heavy coat of Testor Metalizer Sealer to
prepare the surface for decals. Mission accomplished with a beautiful end
result, as all the decals snuggled down beautifully using Microscale
“Micro Sol” with no discoloration.
Now everyone claims that the formulation for Future has not recently changed, but I disagree. I have never had a problem of this magnitude before. To double check, I did my next model using the tiny bit of Future left in my old bottle with the exact same decal process, and bingo – no problem. Some modelers suggested that the Future was not fully cured but this was not the case since I went on vacation for a week after spraying. Typically, I only wait 24 hours for Future to cure. IMNSHO, Future HAS changed, and I am no longer using it as a pre-decal coat. I like Metalizer Sealer as it works beautifully, but you have to airbrush quite a bit to get a good glossy finish and it is quite expensive. Fortunately, I found out that Floquil Railroad (enamel) Hi-Gloss and Crystal Cote makes a very good decal under coat that doesn’t react badly to decal solvents
|
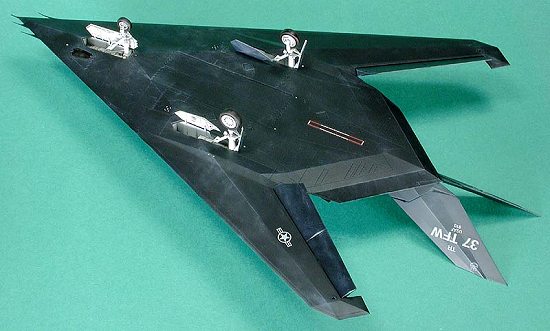
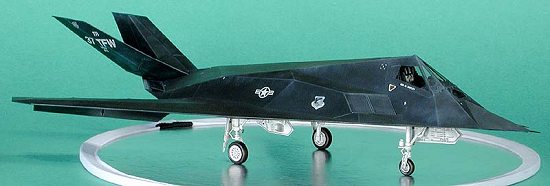
FINAL CONSTRUCTION |
In order to prevent breakage, I left off the landing gear, gear doors, and rudder/tail fin until after painting/decaling. These all went on with no problems, although I recommend replacing the plastic pins on the rudder/tail fins with metal pins as they are not very strong (don’t ask me how I know this!). After a final “leveling coat” of Future (great for hiding those superglue splooges!), I airbrushed Testor Dullcote for the final finish. Remove the masks and you are done with a great model build.
|
CONCLUSIONS |
This is a great model of a historically significant aircraft and Tamiya is to be commended for their great quality, engineering, and ease of build. This kit can be built with beautiful results by a beginning modeler. Unfortunately, I can not recommend the Black Box cockpit unless you are a highly skilled modeler who is not timid about cutting, fitting, filling, and sanding. In fact, if you are planning on leaving the canopy closed, other than the “bang” seat, it is a waste of money since you can see very little of it any ways!
|
REFERENCES |
Squadron Signal Publications, F-117 Stealth In Action, SS1115, $9.95
December 2003
Copyright ModelingMadness.com. All rights reserved. No reproduction in part or in whole without express permission.
If you would like your product reviewed fairly and fairly quickly, please contact the editor or see other details in the Note to Contributors.