
ESCI 1/48 MiG-23MF 'Flogger'
Kit: #4022
Price: $12 at an online auction site
Decals: All gray V-VS interceptor, or camo V-VS 16th Army aircraft (not used)
Review & Photo by: Fred Krause
As most of you know, this kit has been around, in various forms, for a number of years. It is also still the only the only kit out there of the MiG-23 in 48th scale. Hobbycraft has released this kit under their name, but its still the same kit. I’ve got Hobbycraft’s MiG-27 kit, which is also ex-ESCI, and after comparing the ESCI MiG-23 kit to it, I’d have to say that the older ESCI kit has much crisper molding.
So what prompted me to do a Hungarian AF MiG-23MF, you ask? The usual; spur of the moment! I had acquired back issue volume 8 of World Airpower Journal, and the feature aircraft for that issue was the MiG-23/27. One user of "23" that caught my eye were those of the Hungarian AF. I had recently done Minicraft’s very nice MiG-21MF kit, and it came with decals for the new style Hungarian national insignia. I had this MiG-23 kit sitting around, with no immediate plans, so I went for it.
The first step after deciding what I’d like to do, was to see if it was possible. There are numerous versions of the MiG-23, with some only having minor differences. A book that was a great help in showing the differences between the versions, is Squadron/Signal’s "MiG-23/27 in action". Its got a number of line drawings that clearly show the differences between the different versions. My main paint scheme reference was the aforementioned WAJ volume #8.
The kit is quite good in overall shape, and accuracy, but it is very typical of 70’s/80’s ESCI, in being very sparsely detailed in the cockpit, and wheel wells. Since I planned on closing the canopy, and would have to paint an additional canopy brace across the top for a late model 23MF, I decided that the only modification that I’d do to the cockpit, was to replace the kit ejector seat, with a True Details resin KM-1 seat. I used soft copper wire to bend a "between the legs" pull ring, and added it to the seat. The cockpit picture in the WAJ article showed that the ESCI cockpit wasn’t even close to the real thing, so I figured with a closed lid, you wouldn’t be able to see much anyhow. I did however, add a homemade HUD. I quickly managed to break off the "Odd Rod" antenna’s just ahead of the canopy. The were later replaced with very small sewing pins. The kit went together quite well, with minimal fit problems, and was more or less assembled per kit instructions. This was the first kit in which I used gap filling super-glue to fill seams, instead of putty. I’m very happy with the way this procedure turned out. There are a couple of vents on either side of the tail that I have not seen on any MiG-23, so these were filled, and sanded. The biggest modification I did to the kit was to extend the exhaust interior.
 On
the kit exhaust part, the afterburner section is way too shallow. To fix
this, I cut the afterburner section away from the exhaust can, and added
a middle section to move the "burner" further inside the aircraft. After
some head scratching, I figured that the best item to use for the burner
middle section was one of those plastic coin tubes that coin collectors use
to store coins. I picked up a few different sizes at a local coin shop, and
the nickel size was just about a perfect match. I did have to do some grinding
with my Dremel tool to get the finished assembly to fit into the fuselage.
Unfortunately, in a seconds inattention, I managed to grind right through
the plastic, and ended up with a hole to fill in the rear body section! I
finally got the burner assembly to fit good, and glued it, minus the exhaust
can, into the already assembled rear fuselage half. The only other modifications
I did was to cut the middle third of the shoulder mounted missile pylons
out, then glue the two end pieces to the missile launch rail. I cut a piece
of brass tube, and slipped it over the kits main gear actuating struts, as
they were way too thin. I simulated the bulge in the main gear doors with
an oval ECM hump that is used when modeling the MiG-27 kit (a lot of the
parts are common to both kits). It stands a little "proud", but looks acceptable.
Using a scribing tool I scribed a second hinge to the rudder on the left
side of the tail. I also added trim tabs made of sheet plastic, to the horizontal
stabilizers. The "in Action" book was invaluable in helping me to determine
the size and location of these tabs. I also added some wire "piping" to the
main gear bays, using a picture in WAJ #8 as a guide. My MiG-23MF, in basic
form, was now complete.
On
the kit exhaust part, the afterburner section is way too shallow. To fix
this, I cut the afterburner section away from the exhaust can, and added
a middle section to move the "burner" further inside the aircraft. After
some head scratching, I figured that the best item to use for the burner
middle section was one of those plastic coin tubes that coin collectors use
to store coins. I picked up a few different sizes at a local coin shop, and
the nickel size was just about a perfect match. I did have to do some grinding
with my Dremel tool to get the finished assembly to fit into the fuselage.
Unfortunately, in a seconds inattention, I managed to grind right through
the plastic, and ended up with a hole to fill in the rear body section! I
finally got the burner assembly to fit good, and glued it, minus the exhaust
can, into the already assembled rear fuselage half. The only other modifications
I did was to cut the middle third of the shoulder mounted missile pylons
out, then glue the two end pieces to the missile launch rail. I cut a piece
of brass tube, and slipped it over the kits main gear actuating struts, as
they were way too thin. I simulated the bulge in the main gear doors with
an oval ECM hump that is used when modeling the MiG-27 kit (a lot of the
parts are common to both kits). It stands a little "proud", but looks acceptable.
Using a scribing tool I scribed a second hinge to the rudder on the left
side of the tail. I also added trim tabs made of sheet plastic, to the horizontal
stabilizers. The "in Action" book was invaluable in helping me to determine
the size and location of these tabs. I also added some wire "piping" to the
main gear bays, using a picture in WAJ #8 as a guide. My MiG-23MF, in basic
form, was now complete.
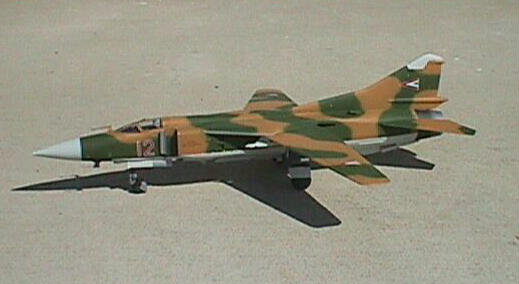
Since I had no painting pattern to go by, I photocopied plan views, and using the photo’s in WAJ #8 as a guide, traced the pattern onto the copies. There seems to be quite a bit of variation between both the pattern, and colors, of the Hungarian AF MiG-23’s, so an absolute pattern really doesn’t exist. The Hungarians have 12 MiG-23MF’s, numbered 01 through 12. I had originally planned to model #04, which had crashed spectacularly during Hungary’s first airshow in 1990. I also chose this aircraft because the "0", and "4" were together on the decal sheet. However, upon inspecting photo’s of the 04 crashing, I discovered that it had crashed with the old style "star" national insignia, and not the newer style "kite" insignia. I settled on number 12, because there’s a good picture of it in WAJ #8, and because the "1", and "2’, were together on the decal sheet. The underside, nose cone, and tail dielectric panel of the aircraft were painted Model Masters FS36495 Light Gray. On some Hungarian "23’s", the nose cone, and tail dielectric panel are a darker gray, close to FS36231 Dark Gull Gray, so check your photo’s. The upper camo is FS34097 Field Green, and the brown is a 80/10/10 mix of Testors Wood/Radom Tan/Yellow colors. Testors silver was used to paint the intake lips, front half of the splitter plates, and gun blast section on the aircraft’s bottom, and nose gear doors. Black was used to paint the IR sensor anti-glare panel under the nose, just ahead of the nose gear. Metalizer Plate Aluminum, and Burnt Iron were used on the exhaust section. After a coat of semi-gloss was dry, I added the decals. All went on well with a little Solvaset. The Hungarian national insignia came from the Minicraft MiG-21MF kit, the ECSI kit stencil decals were used, and the #12 came from Superscale sheet #48-332 "Russian Numbers".
After painting, and decaling, the canopy, and windscreen were added, along with the landing gear, and ventral stabilizer. I also added some True Detail sway braces to the fuselage pylons, and thin steel tubing to the pre-drilled belly gun pod. Since I don’t have any dust free area to display my models at the moment, I leave off the fragile antenna’s, and the pitot tube, and wrap the finished model in a plastic bag.
Overall, I’m quite pleased with the finished product. The kit went together well, and with a bit of research, and some modifications, can be built into a nice model. As a footnote, before assembling this kit, I cloned the intake ramps, and belly gun pod, in resin, for future use in doing some MiG-23BN’s. The "BN" looks very much like a MiG-27. If you use the MiG-27 kit, and add MiG-23 splitter plates, and gun pack, you’ve just cleared the biggest obstacles in doing an accurate MiG-23BN. Contrary to what you may have seen from kit, and decal makers, the only export customer of the MiG-27 is India. All others you’ve seen represented as a MiG-27, are actually MiG-23BN’s! Again, the MiG23/27 in action book is a great help in updating either kit.
Back to Main Page
Back to Reviews Page 2016