
Italeri 1/48 F-16B/D Viper
|
KIT # |
848 |
|
PRICE: |
$22.00 |
|
DECALS: |
Three Aircraft |
|
REVIEW : |
|
|
NOTES: |
Major components taken from Hasegawa F-16CJ (Block 50) kit V10; Black Box F-16B resin cockpit used and slightly modified to F-16D (Block 40) standards |
|
HISTORY |
The ubiquitous F-16 Fighting Falcon has been a tremendous success story for General Dynamics (now Lockheed Martin), with over 4000 built to date in 10 production blocks. It has been sold to a number of allied countries, with a significant number going to the Israeli Defense Force, where it forms the backbone of that small nation’s elite air force. The relatively low cost and high capability of this airplane makes it a very attractive choice for a country with a limited defense budget. Called the Barak (Lightning) in Israeli service, a number of models from various blocks have entered the inventory since 1980. The most famous use of F-16s by Israel occurred in 1981 during Operation Opera, when eight F-16As bombed the nearly-operational Osirak nuclear reactor near Baghdad. In the following years, Israeli Baraks have racked up a number of air-to-air kills (47), the most of any nation using the F-16.
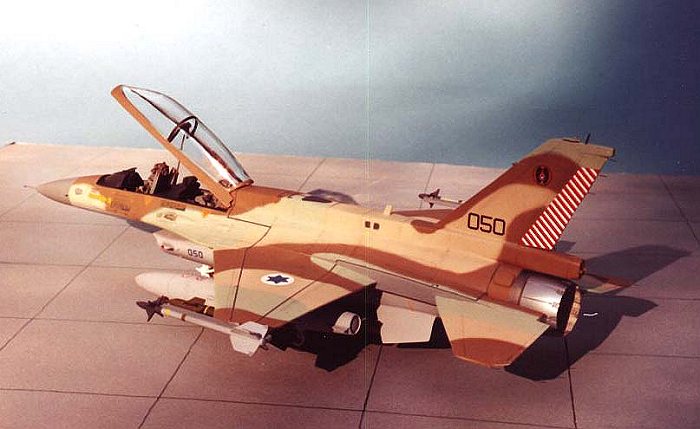
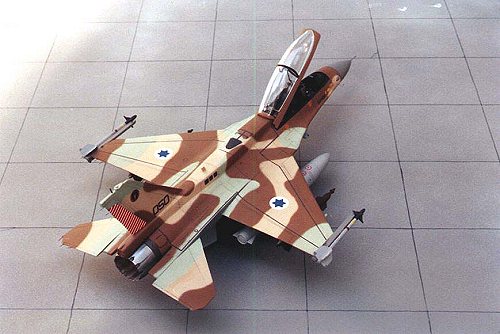
The two-seat F-16D (referred to as Brakeet, or Thunderbolt) has been delivered to Israel in two initiatives, known as Peace Marble II (twenty four Block 30 aircraft) and Peace Marble III (thirty Block 40 aircraft). Israeli F-16Ds have a distinctive enlarged spine that extends from the back of the canopy all the way past the engine exhaust. The exact nature of its contents is not certain, owing to the tight security Israel places on information about its military weapons and armaments, but it is suspected that Wild Weasel-type electronic gear are employed. Other extensive modifications were made to the airframe, giving a much higher gross weight than standard USAF F-16Ds. Other external differences are seen in the extension of the navigation light pedestals on either side of the engine air intake, where more electronic gear has been located, as well as some prominent bumps on the rear area of the fuselage.
Israel has recently placed an order for 50 F-16I aircraft to replace its aging F-4, A-4, and Kurnass 2000 aircraft, ensuring a long service life for the Barak. Israeli pilots are some of the most highly trained and skillful military aviators in the world, and they have shown over the past two decades how fearsome a weapon the little jet from General Dynamics can be.
|
THE KIT |
 The Italeri F-16B/D Viper kit can be built as
either a B model for the US or Norwegian Air Forces, or as a D model for the
Israeli Defense Force/Air Force. The D includes the special dorsal spine
specific to the IDF variants, as well as the extension to the tail that contains
a parachute (Norway) or more electronics (Israel). The D also gets the
navigation light pedestals on either side of the air intake. Molded in light
gray plastic with finely engraved panel lines, the kit also provides a number of
things to hang under the wings, namely a centerline 300 gallon fuel tank, two
370 gallon fuel tanks, two GBU-12 500 pound laser-guided bombs, two AIM-120
AMRAAMS, and what appear to be two obsolete AIM-9E Sidewinder missiles. The
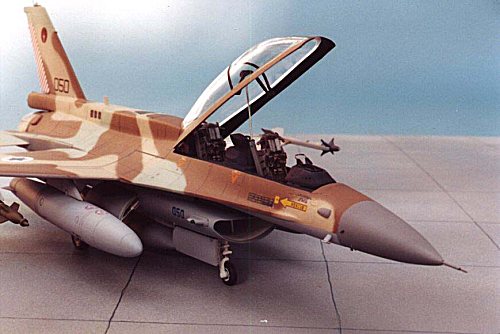
canopy is commendably thin and clear, although it is not tinted and does not
possess the hemispheric profile of the real canopy. The kit decals are nicely
printed and are of high quality. The prominent eagle tail marking of the IDF/AF
109 Squadron is unfortunately printed in white, instead of the correct sand
color.
The Italeri F-16B/D Viper kit can be built as
either a B model for the US or Norwegian Air Forces, or as a D model for the
Israeli Defense Force/Air Force. The D includes the special dorsal spine
specific to the IDF variants, as well as the extension to the tail that contains
a parachute (Norway) or more electronics (Israel). The D also gets the
navigation light pedestals on either side of the air intake. Molded in light
gray plastic with finely engraved panel lines, the kit also provides a number of
things to hang under the wings, namely a centerline 300 gallon fuel tank, two
370 gallon fuel tanks, two GBU-12 500 pound laser-guided bombs, two AIM-120
AMRAAMS, and what appear to be two obsolete AIM-9E Sidewinder missiles. The
canopy is commendably thin and clear, although it is not tinted and does not
possess the hemispheric profile of the real canopy. The kit decals are nicely
printed and are of high quality. The prominent eagle tail marking of the IDF/AF
109 Squadron is unfortunately printed in white, instead of the correct sand
color.
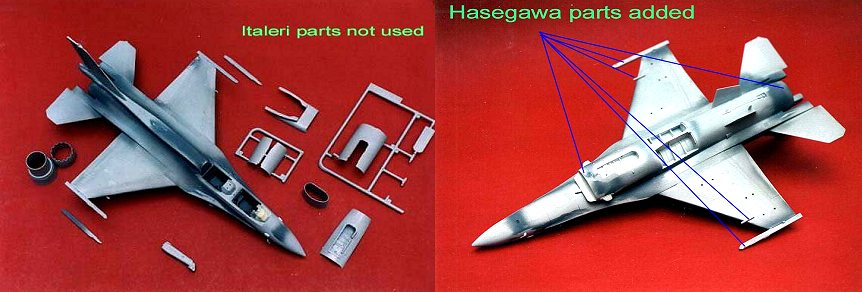
In the box, the model looks great, but further exploration quickly leads to the discovery of very basic accuracy problems, especially with the D model. First of all, Block 30 and 40 aircraft are powered by General Electric F110 engines, which require a larger air intake (the so called "big mouth" intake) and a different exhaust. While Italeri provides an attempt at replicating the GE engine turkey feathers, they molded the exhaust with fourteen petals instead of the correct twelve. The most glaring omission is the lack of a wide mouth air intake. Instead you get the smaller, Pratt and Whitney F100 engine intake from earlier production blocks. Block 40 aircraft introduced beefier landing gear struts and wheels, again not provided. Also, the Italeri wheel spoke pattern is not related to any F-16 block that I am aware of. Block 40 and 50 aircraft have bulges in the landing gear doors to accommodate the larger wheels, but you don’t get these either. To complete the list of missing items, Italeri doesn’t give the modeler the RWR "beer can" antennae on the leading edge of each wing, nor do they mold the correct wingtip AMRAAM launchers. The cockpit is mostly an A model configuration, with the rear cockpit being especially fictitious. The ejection seats are quite basic and are devoid of any of the prominent harnesses. There is no trace of throttle controls. Finally, the contours of the Israeli tail extension don’t look right when compared to pictures of the real thing – there’s too much space between the extension and the exhaust and it is oddly angled downwards as it flows towards the rear.
What’s a modeler to do if they wish to build an Israeli F-16D Brakeet? There are four options. First, one could just build it as is and not worry about the inevitable scorn of F-16 experten. Second, one could just pass on this kit and make a much more accurate model by starting with the newly released Hasegawa F-16DJ Block 50 kit, although one would have to scratch-build the spine and navigation line pedestals. Third, one could by a resin update set from Eagle Designs and get a replacement spine, wide-mouth intake, bulged doors, and bigger wheels. The fourth option is the insane, AMS-derived course of action – naturally, I chose this one -- which is to buy a single seat Hasegawa F-16CJ Block 50 kit (the double seat DJ kit was released the week after I started my project – doh!) and graft on the necessary corrected parts to the Italeri kit. The way Hasegawa engineered the Block 50 kit, extra sprues are employed with all the newer parts to update their older but still excellent Block 25 kit. The cost of the Hasegawa kit is less than the Eagle Designs resin set, and in the end, the modeler still has a complete Block 25 model to make with the leftovers. It’s sort of like killing two birds with one stone.
You may ask why was I so determined to use the Italeri kit when I knew it was so far off in accuracy?
Because I had to.
I received the model as a Father’s Day present from my six-year-old son, who spied it in the hobby shop and instantly decided that this is what Dad should have. He proudly brought it home and presented it to me. As any good father should do, I acted like it was the best thing that anyone could ever get me and thanked the little guy profusely. He was pleased, and I’m hoping he’ll remember how great a father I am when he has to commit me to a nursing home sometime in the distant future. After the heart-warming exchange, the immediate question from him was, "So when are you going to build it, Dad?" Uh oh. This was serious. I was going to have to actually build the thing. I told him that I would start on it right after I finished my then-current project, the Monogram B-36B. He patiently waited as the weeks went by, as I feverishly did research on an aircraft that I knew next to nothing about. Through on-line discussion boards, I corresponded with Mike Valdez, an F-16 ground crew chief, who was extremely helpful in improving my understanding of the complex world of Vipers and all the differences between variants. He also made the suggestion of getting the Hasegawa kit to accurize the Italeri offering. The just-announced Black Box F-16B resin cockpit arrived at my local hobby store, and I decided to use it to improve the look of the model, even though it technically is not correct for a D. My apologies for offending any Viper fans reading this, and advise other modelers to use the soon-to-be-released Black Box F-16D cockpit instead. Finally, AeroMaster has just put out a new decal sheet devoted to Israeli F-16s, so I got that as well to correct the color mistake made in the kit decal sheet. This is classic AMS behavior: I got a kit as a gift and spent another $50 on stuff to help me build it. At least my little boy was happy.
|
CONSTRUCTION |
Guess what? This project does not start with the cockpit! That might be a first. What I had to do first is find the correct Block 50 parts to use in the Hasegawa kit and substitute them for the corresponding inaccurate Italeri parts. Then I proceeded to glue them on the model, dealing with differences in fit and design. The "big mouth" air intake required filling of the interior seams, which I did with gap-filling CA glue and some creative sanding. I then attached it to the fuselage, and noticed that Hasegawa and Italeri engineer the transition between the underside of the nose and the top of the air intake differently. I used strips of sheet styrene to restore the correct profile, and smoothed it out using CA glue. I also installed a blanking piece of sheet styrene between the end of the intake and the main wheel well.
 Lead fishing sinkers were added to the nose
to allow the model to sit properly. I sawed the wingtip missile launching rails
off and substituted them with the Block 50 rails from the Hasegawa kit. As a
note again to Viper experts, I’m not entirely certain that this is correct for
a Block 40 airframe, so I apologize if I got it wrong. I then added the Peace
Marble dorsal spine to the top half of the fuselage. Unlike the rest of the kit,
this did not fit particularly well and required a lot of seam filling to blend
in properly. As mentioned before, the rear extension of the spine past the
exhaust doesn’t look right in profile, so I adapted the parts Italeri provide
for the Norwegian Air Force parachute pack extension instead. Instead of a
parachute on the rear, I made a blanking plate from sheet styrene. With some CA
glue and a lot of sanding, I was able to make the extension look more like the
photos of the real aircraft.
Lead fishing sinkers were added to the nose
to allow the model to sit properly. I sawed the wingtip missile launching rails
off and substituted them with the Block 50 rails from the Hasegawa kit. As a
note again to Viper experts, I’m not entirely certain that this is correct for
a Block 40 airframe, so I apologize if I got it wrong. I then added the Peace
Marble dorsal spine to the top half of the fuselage. Unlike the rest of the kit,
this did not fit particularly well and required a lot of seam filling to blend
in properly. As mentioned before, the rear extension of the spine past the
exhaust doesn’t look right in profile, so I adapted the parts Italeri provide
for the Norwegian Air Force parachute pack extension instead. Instead of a
parachute on the rear, I made a blanking plate from sheet styrene. With some CA
glue and a lot of sanding, I was able to make the extension look more like the
photos of the real aircraft.
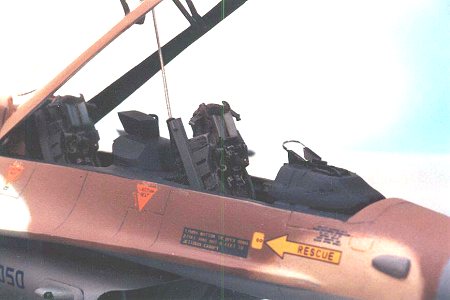
I then set about building and painting the Black Box resin cockpit. The ACES II ejection seats are very nicely detailed and consist of six parts each. Overall, the interior was painted in FS 36231 Dark Gull Gray, with flat black consoles and drybrushed light gray switches. The multi-function display screens were painted light green and shined up with a drop of Micro Krystal Klear. A black-gray wash was applied, and the cockpit looked really sharp. I scratch-built a hood and grab-handle for the MFD in the rear cockpit and glued it on top of the coaming. That is my one small attempt to make the Black Box Block 15 F-16B cockpit look more like a Block 40 F-16D. It’s not completely accurate, but it’s a lot closer than what Italeri provides. Getting the entire cockpit assembly glued into the fuselage was a challenge that required a lot of chopping, cutting, filing, and sanding before I got it to snuggle in between the top and bottom halves.
The Hasegawa GE F110 engine rear, afterburner tube, and exhaust petals were glued onto the fuselage without any trouble. The seams were filled and sanded, and panel lines lost in the process were rescribed. The two bumps on either side of the nose (threat warning antennae) are slightly bigger on Israeli F-16s, so I scratch-built new ones. I also scratch-built the four ECM bumps on the rear of the fuselage from sheet styrene. Some Brakeets have these rear bumps, and some don’t, but I decided to add them anyway. Since I always accidentally break off pitot tubes, I replaced the kit’s plastic one with piece of stainless steel hypodermic tubing and some stiff wire I stole from the twisty thing that keeps the plastic bag closed on a loaf of bread. All the other pointy things were replaced with small lengths of wire as well. The Hasegawa Radar Warning Receiver (RWR) antennae were glued on each wing. I’ve read that these should straddle the wing’s leading edge, but Hasegawa mounts them slightly below. I chose to leave it as is. The model was washed and air-dried, ready for the paint shop.
|
PAINT & DECALS |
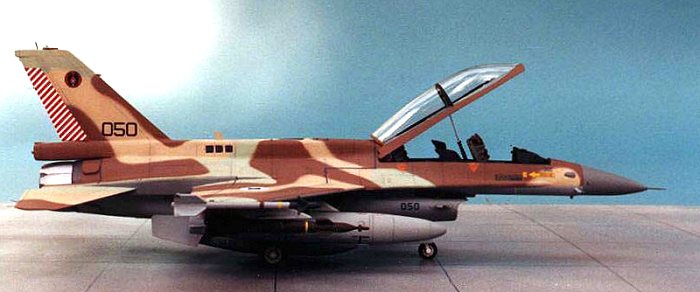
I used Model Master Acryl paints
for almost all of the painting, except for the Metalizer shades used for the
exhaust. Gloss white went in the air intake and landing gear bays, with Sand
FS33531, Dark Tan FS30219, and Pale Green being used for the attractive
camouflage scheme. It sure is nice to see an F-16 in something other than those
boring USAF grays! Be careful with the camouflage pattern, as aircraft of
various squadrons deviate from the standard Israeli F-16 pattern to accommodate
the art on the tail. The demarcation line between colors is very slightly soft.
I tried to use masking tape lifted slightly off the surface of the model to
replicate this effect, but it created a line that was too hard. I ended up just
doing it 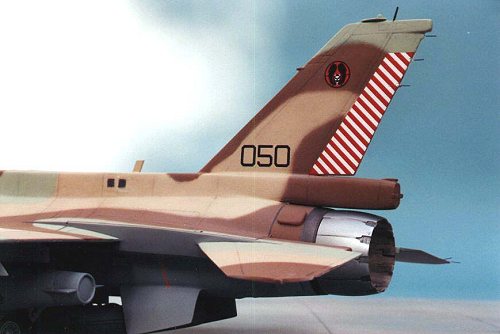 freehand and
correcting the areas that received too much overspray. Both AeroMaster and
Italeri call out for Pale Green FS 34227 in their instructions (although
AeroMaster includes an addendum), which is incorrect (too dark and green) for
F-16s, although it is proper for IDF/AF F-15s, A-4s, F-4s, etc. I didn’t
realize this until I had painted my model and happened to read Yoav Efrati’s Fine
Scale Modeler article on IDF/AF F-16 colors. Doh! I used good old Britsh Sky
Type S as a substitute for the correct FS34424 and resprayed the green sections
of the aircraft. The underside was painted Light Ghost Gray FS36375, and Neutral
Gray FS34270 was used for the nose cone, those ECM bumps on the sides of the
nose, the area between the wing and the horizontal stabilizers, and the wingtip
missile launcher rails. The interior of the exhaust was painted flat white with
a drop of tan to simulate the ceramic material used. I dirtied up the exhaust
with dark gray and black pastels.
freehand and
correcting the areas that received too much overspray. Both AeroMaster and
Italeri call out for Pale Green FS 34227 in their instructions (although
AeroMaster includes an addendum), which is incorrect (too dark and green) for
F-16s, although it is proper for IDF/AF F-15s, A-4s, F-4s, etc. I didn’t
realize this until I had painted my model and happened to read Yoav Efrati’s Fine
Scale Modeler article on IDF/AF F-16 colors. Doh! I used good old Britsh Sky
Type S as a substitute for the correct FS34424 and resprayed the green sections
of the aircraft. The underside was painted Light Ghost Gray FS36375, and Neutral
Gray FS34270 was used for the nose cone, those ECM bumps on the sides of the
nose, the area between the wing and the horizontal stabilizers, and the wingtip
missile launcher rails. The interior of the exhaust was painted flat white with
a drop of tan to simulate the ceramic material used. I dirtied up the exhaust
with dark gray and black pastels.
A coat of Future floor polish sealed the paint in preparation for decals. I chose to use markings for a 101 Squadron aircraft from AeroMaster sheet 48-487. I accentuated the panel lines with a sharp HB pencil, instead of my usual dark gray wash. I found that I could control the application in the delicate lines better than a wash, and the effect is very subtle.
The canopy was then masked with drafting tape and sprayed with Polly Scale RLM66 Scale Black, then the exterior camouflage color. I made several attempts at imparting a gray tint to the canopy using Future that had a few drops of black added to it, but I couldn’t get a uniform opaqueness, so I gave up. Some modelers have success using Tamiya Color’s Smoke paint, but I didn’t have the nerve to try. The cockpit decking was masked off and sprayed with Scale Black, like the canopy interior.
Final Assembly
 I glued on the Hasegawa landing gear, wheels,
and landing gear doors. I drilled small holes on each side of the nose and added
short bits of wire to simulate the angle of attack indicator probes. Note that
the Block 50 wheels are not exactly correct, as the Brakeet retains Block
40 wheels, unlike USAF aircraft. To be more accurate, wheels from a Hasegawa
A-7D Corsair II are an even better representation, but I don’t own that kit
and felt the Hasegawa wheels are close enough. The static dischargers at the
trailing edges of the wings and tail were broken off in construction, so I
replaced them with short lengths of nylon fishing line. The huge canopy and
delicate static discharge whiskers make this a very fragile model. I always have
to think carefully before I pick the thing up.
I glued on the Hasegawa landing gear, wheels,
and landing gear doors. I drilled small holes on each side of the nose and added
short bits of wire to simulate the angle of attack indicator probes. Note that
the Block 50 wheels are not exactly correct, as the Brakeet retains Block
40 wheels, unlike USAF aircraft. To be more accurate, wheels from a Hasegawa
A-7D Corsair II are an even better representation, but I don’t own that kit
and felt the Hasegawa wheels are close enough. The static dischargers at the
trailing edges of the wings and tail were broken off in construction, so I
replaced them with short lengths of nylon fishing line. The huge canopy and
delicate static discharge whiskers make this a very fragile model. I always have
to think carefully before I pick the thing up.
Almost as confusing as F-16s themselves is the stuff that can be hung under the wings. Looking at every picture I could find of Israeli F-16s (that is, ones that have been cleared by the military censors), I decided to attach the centerline fuel tank, two 370 gallon fuel tanks on the inner wing pylons, and GBU-12 laser-guided bombs on the middle wing pylons. The outer wing pylons were not mounted. Since the Sidewinders provided by Italeri are of the older AIM-9E types, I swiped modern AIM-9Ms from the Hasegawa Block 50 kit and glued them on the wing tips. Between the Hasegawa and Italeri kits, I have a lot of ordnance left over for my spares box, like neat HARM (AGM-88) and AMRAAM (AIM-120) missiles.
|
CONCLUSIONS |
It’s a shame that Italeri put out such a nice kit without doing better research. This seems to be a common complaint about their modern aircraft releases. The model itself fits very well and has nice panel detail. Of the four options that I faced in building this kit, I definitely chose the most involved route. The finished model is quite interesting with a striking camouflage scheme, especially when compared to other nation’s two-seat F-16s. Most importantly, I was able to learn more about an aircraft that I hadn’t previously known much about. For me, that made the entire effort worthwhile. Would I recommend this kit? Probably not, as the Hasegawa kits cost about the same and are more accurate. But they don’t provide the Peace Marble spine, and unless one gets the resin replacement, Italeri is the only game in town for those modelers wishing to make an Israeli Brakeet in this scale.
|
REFERENCES |
Valdez, Mike: E-Mail conversations concerning accurization of the Italeri kit
Efrati, Yoav: "International Color and Camouflage: Israeli F-16", Fine Scale Modeler, December 1995
Norton, Bill: "Workbench Review: Italeri F-16B/D Viper", Fine Scale Modeler, February 1998
Kinzey, Bert: US Aircraft and Armament of Operation Desert Storm, Detail and Scale Volume 40
Drendell, Lou: Viper F-16
Baugher, Joseph: General Dynamics F-16 Fighting Falcon for Israel, Elevon, Aviation on the Internet www.csd.uwo.ca/~pettypi/elevon/
Dewitte, Lieven and Vanhastel, Stefaan: www.f-16.net
Federation of American Scientists: www.fas.org
IAF – The Legendary Aircraft: www.geocities.com/CapeCanaveral/Hangar/4142/index.htm
If you would like your product reviewed fairly and fairly quickly, please contact the editor or see other details in the Note to Contributors.