|
KIT: |
Monogram 2/48 AH-64A |
|
KIT # |
5443 |
|
PRICE: |
$6.50 in 1985 |
|
DECALS: |
One aircraft |
|
REVIEW: |
|
|
NOTES: |
|
|
HISTORY |
As the war in Southeast Asia drew to a close, Army Aviation planners began exploring options for a purpose-designed helicopter gunship to supplant the AH-1 Cobra. Though Bell’s platform still possessed substantial growth potential, the Army was determined to field an all-new aircraft specifically tailored to support the service’s emerging ‘combined arms’ doctrine, while remaining organic to field and theater commanders.
The still-born AH-56 Cheyenne program provided a datum point for tacticians and engineers to further define the required performance parameters. Technological advances in laser range-finding and thermal imaging combined with second-generation anti-tank missile design would furnish the requisite combat potential necessary to check the Warsaw Pact’s overwhelming quantitative edge in Europe.
Developments in composite airframe construction combined with advanced metallurgy were emphasized as primary assets for improved survivability, while the weight reduction this technology afforded was accepted and appreciated as a bonus. Twin engines were specified with General Electric’s new 1500shp T700 gas turbine a leading contender. An armored transmission and bullet resistant rotor blades would provide additional insurance.
Parallel improvements in defensive electronic systems would be utilized to achieve and maintain a competitive edge in the burgeoning arena of electronic warfare. Infra-red signature suppression, radar warning receivers with omni-directional antenna arrays, and countermeasures dispensers would all operate cohesively as an integrated threat management system, providing the comprehensive ability to detect, analyze, and defeat any potential peril.
 The dual crewmember
concept, validated with the AH-1 series, was deemed to be a vital component to
the aircraft’s combat effectiveness and was specified from the outset. Dual
flight controls were considered as essential survivability equipment, as well as
heavily-armored seats and other critical cockpit structures. Concurrently
developing helmet-mounted target acquisition systems were to be integrated into
the total avionics package.
The dual crewmember
concept, validated with the AH-1 series, was deemed to be a vital component to
the aircraft’s combat effectiveness and was specified from the outset. Dual
flight controls were considered as essential survivability equipment, as well as
heavily-armored seats and other critical cockpit structures. Concurrently
developing helmet-mounted target acquisition systems were to be integrated into
the total avionics package.
A fully turreted, rapid-fire 30mm cannon was envisioned as a secondary weapon system, slaved to acquire and fire in concert with the helmet-mounted sighting equipment. Other ‘point’ and ‘area’ targets would be serviced by 70mm Hydra rocket pods, also an integral component of the secondary package. Carried externally on pylons, these stations would also be plumbed to permit carriage of auxiliary fuel tanks, allowing for self-deployment.
By June of 1973 various feasibility studies and engineering ‘test mules’ convinced the Army to release an RFP to the aerospace industry. Five proposals were received but only two companies were actually awarded contracts for prototypes, Bell and Hughes. A third contender from Sikorsky based on its S-76 was of sufficient merit that further development was warranted, eventually becoming the UH-60 Blackhawk.
Both Bell and Hughes were ready with their respective designs by 1975 and began flight testing. In June of the following year the prototypes were handed over to the Army to undergo a rigorous fly-off competition under simulated field conditions. Bell’s contestant was a scaled-up incarnation of its decade-old Cobra design but the all-new Hughes aircraft performed like a high-tech thoroughbred in comparison.
In December of 1976 Hughes was declared the winner and received additional contracts for follow-on testing and further engineering studies. Six years of operational trials and many modifications later the AH-64A Apache, as the new aircraft came to be designated by the Army, was approved for production. A new manufacturing facility was built in Mesa, Arizona as the airspace over Hughes’ original plant in Culver City , California had become too crowded.
The first production aircraft was delivered in September 1983 and Army aviators were quick to appreciate its considerable performance. Apaches first saw combat service in Panama during Operation Just Cause and have been deployed to every subsequent crisis event in which the Army was assigned a major role. They rendered outstanding service during the Gulf War, destroying entire Iraqi armored columns with near impunity at stand-off ranges.
The AH-64A has been supplemented by the new AH-64D Longbow Apache, offering flight crews a new millimeter-wave radar system and enhanced Hellfire missiles with true "fire and forget" capability. Selected ‘A’ models are being re-manufactured to AH-64D standards while the remainder of the Apache fleet is undergoing up-grades under the Army Helicopter Improvement Program (AHIP). Apaches are also in production for FMS/MAP customers.
|
THE KIT |
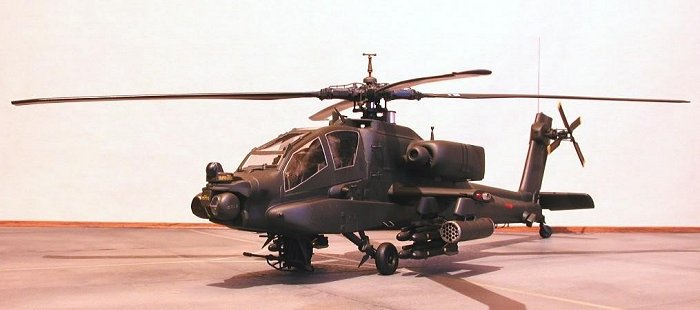
Monogram’s AH-64 kit comprises 123 parts molded in dark olive green, ten transparent pieces, a terribly done decal sheet offering the briefest of generic markings only for one airplane (83-23824) and an instruction pamphlet containing a short history of the aircraft, recommended assembly procedures, and a painting guide referenced to Humbrol enamels.
 Helicopter kits can be
difficult to engineer and this model is certainly no exception. To Monogram’s
credit, they did a commendable job capturing the sinister appearance and
ungainly lines of the Apache. Surface detailing consists of both raised and
recessed panel lines, correctly-scaled rivets, and recessed vents, louvers, and
intake ducts.
Helicopter kits can be
difficult to engineer and this model is certainly no exception. To Monogram’s
credit, they did a commendable job capturing the sinister appearance and
ungainly lines of the Apache. Surface detailing consists of both raised and
recessed panel lines, correctly-scaled rivets, and recessed vents, louvers, and
intake ducts.
On the other end of the spectrum, many small antennas and sensors are either glossed over or omitted altogether. The prominent bumpers for the engine nacelle covers are missing while both rotor heads are devoid of details needed to be truly convincing. As this model was tooled very early in the AH-64’s career it lacks all of the AHIP modifications to construct the currently configured Apache.
The fuselage assembles conventionally with right and left halves, plus a ventral insert at the front. The stub wings, engine nacelles, and gearbox housings all attach to this structure with sturdy locating tabs. The two-piece tail plane mounts very delicately to an actuator at the rear and caution must be exercised during installation and subsequent handling. The landing gear is fair, though the main struts lack some basic details.
The highly visible cockpit is extremely well appointed with 19 parts, including a pair of two-piece seated pilot figures. All components feature details in raised relief and really look the part after painting and assembly. The three-piece canopy is highly polished and the entry doors may be attached in the open position to showcase the interior. The requisite grab bars and foot steps are included.
The TADS, FLIR, and PNVS sensor turrets are designed to rotate and elevate, with clear parts supplied for all the optical windows. The doppler/radar altimeter fairing below the fuselage lacks the dielectric window but this can easily be added. The hemispheric RWR antenna domes located at the front of each sponson and on the fin tip are likewise absent.
 The rotor heads are
sturdy enough when assembled but the tradeoff is over-simplification of both
structures. Retention straps on the main rotor have no detail whatsoever, while
the push-pull tubes and articulated forks for the tail unit are molded as a
solid web. Likewise, the take-off shaft for the tail rotor is molded integral to
the fin and very poorly depicted. As with virtually all helicopter models, the
rotors are designed to be permanently installed with retainers midway into the
build. This folly is an invitation to disaster.
The rotor heads are
sturdy enough when assembled but the tradeoff is over-simplification of both
structures. Retention straps on the main rotor have no detail whatsoever, while
the push-pull tubes and articulated forks for the tail unit are molded as a
solid web. Likewise, the take-off shaft for the tail rotor is molded integral to
the fin and very poorly depicted. As with virtually all helicopter models, the
rotors are designed to be permanently installed with retainers midway into the
build. This folly is an invitation to disaster.
External ordnance consists of two quartets of Hellfire missiles carried on the correct launch rail mounts, a pair of four-piece Hydra rocket pods, and a poorly done rendition of the 30mm chain gun. What’s given here is adequate—it’s just not enough to be realistic given its prominence on the airframe. The two-part wing pylons are of the production type with the flat surfaces adjacent to the stub wings.
The sparsely appointed decal sheet displays Monogram’s prototypical commitment to mediocrity. Over half of the items go on the Hellfire missiles with the remainder consisting of service logos, serial numbers, and some basic stenciling. Aftermarket replacement is definitely recommended although locating suitable substitutes may be difficult, if nigh impossible.
|
CONSTRUCTION |
After a cursory scan of the instruction sheet I tossed it into the FOD can and formulated my own plan of attack. First on the agenda was to build and detail the various components that attached to the fuselage. In this manner I was able to glue them into position from the inside of the fuselage, thus minimizing joint clean-up and loss of rivet detail due to sanding.
Pre-shaped chunks of colored and clear Lexan were installed as position and strobe lights at the tip of each stub wing along with a pitot tube constructed of a #21 hypo needle and a short length of guitar string. Small bits of monofilament line were trapped between the wing halves at the trailing edge to simulate the static dischargers.
The engine nacelles were assembled and attached then I detailed the support brackets for the exhaust ducting with steel wire. To further define the APU exhaust I walled off the opening with Evergreen sheet prior to gluing the starboard nacelle on. The bumpers for the engine access covers were fabricated from sprue and pinheads then affixed with Testor’s liquid cement.
The dual gearbox housings were somewhat fiddly to fit snugly to the fuselage yet mount concentric to the primary input shafts of the engines. Though frustrating, careful pre-fitting and adjustment was ultimately rewarding. Convection fin detail on these parts is murky , although under a coat of paint they are acceptable.
At this point I taped the fuselage together and installed the wing pylons. Caution plus a bit of trimming and shimming were necessary to ensure uniform geometry at the bottom of the pylons—critical if the missile racks are to align properly. I installed the window in the Doppler fairing using some transparent stock from my spares box.
Brass tie-down rings and wire brake lines were added to each gear strut then I attached them to the fuselage. Wire cutters fabricated from sheet aluminum were fitted into slots carved lengthwise into the struts. All of the numerous steps and grab handles were replaced with brass wire equivalents after I lost the first plastic one while cutting it from the sprue. Domed pinheads were installed at the fronts of both sponsons to depict the missing RWR antennas, then I glued the sponsons to the fuselage.
 My next step was to
construct and detail the rotor assemblies, then re-engineer the fit to allow for
a glue-less and removable installation. I started with the main rotor, gluing
the blades to the head. Missing low-pressure hydraulic lines were added to the
top of the hub while a new aluminum main shaft was lapped onto the original
plastic spindle. I cut the new shaft extra long to slip into a brass bearing
glued to the transmission tail shaft housing molded on part #42.
My next step was to
construct and detail the rotor assemblies, then re-engineer the fit to allow for
a glue-less and removable installation. I started with the main rotor, gluing
the blades to the head. Missing low-pressure hydraulic lines were added to the
top of the hub while a new aluminum main shaft was lapped onto the original
plastic spindle. I cut the new shaft extra long to slip into a brass bearing
glued to the transmission tail shaft housing molded on part #42.
After dry-fitting part #42 into the fuselage I dropped the rotor into position and checked for fit and rotation. The rotor seemed rigidly supported and remained contiguous with the model through all projected ‘flight regimes’, save for totally inverted. The rotation was satisfactory so I glued the swash plates and push-pull tubes to the hub then set the assembly aside to address the anti-torque rotor.
 The first thing here to
be replaced was the take-off shaft molded to the fin. I cut the area away,
sanded it smooth, then obliquely drilled a hole from the inside of the fin to
the outside of the gearbox housing. A new shaft fabricated from steel wire and
sheet aluminum was installed through both holes and anchored with Crazy Glue.
The static mast (part #60) was then glued to the fin after I added a brake
control rod to it.
The first thing here to
be replaced was the take-off shaft molded to the fin. I cut the area away,
sanded it smooth, then obliquely drilled a hole from the inside of the fin to
the outside of the gearbox housing. A new shaft fabricated from steel wire and
sheet aluminum was installed through both holes and anchored with Crazy Glue.
The static mast (part #60) was then glued to the fin after I added a brake
control rod to it.
With the rear mount completed I assembled the anti-torque rotor and set it aside to dry. When the glue had fully set I very carefully cut away the solid webbed portions of the teetering bearings to get then into scale. Differential control rods and push-pull tubes made from .013" guitar string were inserted into holes drilled into the hub. After checking and adjusting the fit of the tailshaft to the static mast I set the tail rotor aside and proceeded to the cockpit.
The pilot figures, though nice, were permanently assigned to my spares box
‘BOQ’ then I assembled and painted the interior without additional detailing or
modification. After f itting
the cockpit into the right fuselage half the left side was mated and glued with
gap-filling Hot Stuff. Masking tape was used to shield the rivets from being
sanded into oblivion near the seam areas. The fuselage bottom was glued into
position after two hours of test-fits and fiddling. Even then I ended up sanding
some of the corrugations away in a valiant attempt at a flush fit.
itting
the cockpit into the right fuselage half the left side was mated and glued with
gap-filling Hot Stuff. Masking tape was used to shield the rivets from being
sanded into oblivion near the seam areas. The fuselage bottom was glued into
position after two hours of test-fits and fiddling. Even then I ended up sanding
some of the corrugations away in a valiant attempt at a flush fit.
Next up were the turreted sensor/designators on the nose. Here I drilled out all the optical devices and replaced them with short lengths of aluminum and stainless steel tubing. Micro ‘Kristal-Kleer’ was used to simulate the glass lenses. The transparent covers were replaced by thin acetate, cut to shape and attached with white glue. The FLIR cover has a decidedly orange tint to it so a quick trip to S-4 (supply) was rewarded with a set of colored marking tabs for the standard government-issue manila folders. Needless to say, orange was one of the colors included (your tax dollars at work!).
I assembled the chain
gun and mount then added a few details from the spares box and scrap metal.
Evergreen rod was used to build the wire deflector cage, one of the more visible
AHIP mods. I pre-shaped .025" rod and glued the pieces individually with Crazy
Glue. After test-fitting the gun to the fuselage I set it aside and moved to the
roof. A couple of missing blade antennas were installed here along with a
temperature sensor. The dorsal strakes were attached then I studied my photos of
the ALQ-144 "disco light" infra-red jammer.
assembled the chain
gun and mount then added a few details from the spares box and scrap metal.
Evergreen rod was used to build the wire deflector cage, one of the more visible
AHIP mods. I pre-shaped .025" rod and glued the pieces individually with Crazy
Glue. After test-fitting the gun to the fuselage I set it aside and moved to the
roof. A couple of missing blade antennas were installed here along with a
temperature sensor. The dorsal strakes were attached then I studied my photos of
the ALQ-144 "disco light" infra-red jammer.
Standard equipment on all production Apaches (but conspicuously missing from the kit), this enigmatic detail is very elusive to model. The device features twelve faceted surfaces through a 360-degree arc and can alternatively be described as luminescent orange, luminescent green, luminescent hot pink…the point is obvious—it’s a very deceptive color and multi-coated refractive optics are doubtless responsible. I examined one of these units on a bench in our avionics shop under fluorescent lighting and it looked like chrome to me.
 Consequently, I took a
piece of 3/8" aluminum tubing and used a sanding disc chucked into my Dremel
tool to grind facets lengthwise in the exterior. Each facet was then hand sanded
with 600-grit to remove any tooling marks. Hand polishing followed, using Brasso
and a T-shirt. Finally, I used jeweler’s rouge and a buffing wheel to give it a
chrome-like gloss.
Consequently, I took a
piece of 3/8" aluminum tubing and used a sanding disc chucked into my Dremel
tool to grind facets lengthwise in the exterior. Each facet was then hand sanded
with 600-grit to remove any tooling marks. Hand polishing followed, using Brasso
and a T-shirt. Finally, I used jeweler’s rouge and a buffing wheel to give it a
chrome-like gloss.
The ‘top hat’ portion was turned from plastic stock using my Dremel tool as a poor man’s lathe while the mount was scratch-built from 7/16" aluminum tubing cut wafer thin. Crazy Glue was used to assemble all the bits and install the completed part to the fuselage. The remainder of the antennas were added, starting with the ADF long wire below the fuselage.
Monofilament line was used here, stretched taut between mounts made from
hypodermic needles. A lower ECM antenna was installed using bits of brass wire.
RWR domes were added to the trailing edge of the fin tip, again using domed pin
heads.  Prior to this I made
and attached a rear position light from clear sprue. At the top of the fin I
drilled a hole to install a telescoping FM whip antenna but held it for later
attachment until the painting and decaling were completed. Upper and lower
anti-collision beacons were fabricated from transparent red styrene, preshaped
and affixed with CA.
Prior to this I made
and attached a rear position light from clear sprue. At the top of the fin I
drilled a hole to install a telescoping FM whip antenna but held it for later
attachment until the painting and decaling were completed. Upper and lower
anti-collision beacons were fabricated from transparent red styrene, preshaped
and affixed with CA.
I wasn’t thrilled with the fuel cap detail so I rebuilt them using a large straight pin for each handle. I drilled a pilot hole at each cap’s location then used a 3/32" drill bit to chamfer a dimple on the surface. Next, I ground the heads of the pins into a ‘T’ shape using my Dremel tool. After enlarging the original pilot holes in the dimples to the same size as the shaft of the pins, I pushed the pins in until the ‘T’ handles were flush with the surface of the fuselage.
A large MV lens was substituted for the kit’s landing/taxi light then I blew
out all of the sanding debris from the cockpit and attached the canopies, using
white glue. Scratch-built wire cutters were mounted below the nose and on the
top of the pilot’s glass then I finished detailing the boom. I used a surplus
tailpipe from Monogram’s F-5E kit to fashion a mount for the chaff dispenser on
the boom and carefully faired it in using Crazy Glue. Both the rack and the
chaff dispenser itself were made from rectangular brass channel, with a
photo-etched grill simulating the chaff ejection chutes.
The tail wheel fork was rebuilt using bits of aluminum tubing as a spindle to allow the wheel to caster freely, allowing for a more candid appearance. I assembled and very carefully attached the tailplane to its actuator using Testor’s liquid cement (note: there are supposed to be a pair static dischargers on the trailing edges—these were missing from the airplane on loan to EPG, my main reference for this project).
Lastly, the ordnance was assembled and test-fitted to the pylons. After some adjustment to correct the geometry I painted and decaled the rocket pods and missiles then set them aside for final assembly. Time to paint this mutha…
|
PAINT & DECALS |
Painting this model was much more challenging than I ever envisioned. But wait, but wait…jus’ shoot the thing with Modelmaster "Army Helo Drab"! Not so fast Mistah Bond!
First of all, the United States Army has no ‘helos’—we have ‘choppers’ (those guys with the boats, they have helos). Modelmaster’s designation for this color is a misnomer. Secondly, I shot some Modelmaster ‘Army Helo Drab’ on a couple of scrap fuselage halves, one primed with FS 36270 Neutral Gray and the other left in Monogram’s dark OD. I took both pieces out to the flightline and held them next to EPG’s ‘loaner’ Apache. Neither matched. Hmmm…
Both sample pieces were a little too green and too light. The next day I took my FS595a out to the ramp at lunchtime to try and get a handle on things. The closest match between color chip and our airplane was FS 34086 Green Drab, though it was still a little on the blue side by comparison.
Clearly, drastic measures were necessary so the next weekend I took all my paints out to the field and mixed a very close approximation of the correct AH-64 color. To fine-tune this blend I dabbed a few brushfuls of the new mix onto various portion’s of the Apache’s anatomy, adjusting the color with each dab (geez, don’t tell the sergeant major—he signed for this plane!). When the dabs were no longer visible when applied I sealed the bottle, packed my trash, and nonchalantly un-assed the AO.
 After thinning my
corrected paint I masked the windows, lights, and all the optic systems and
sprayed the new green overall. When it had dried I masked the non-skid areas of
the wings and sponsons plus the dielectric panels on the tailplanes then shot
flat black. These masks were removed and Testor’s Glosscote was applied to prep
the model for decals.
After thinning my
corrected paint I masked the windows, lights, and all the optic systems and
sprayed the new green overall. When it had dried I masked the non-skid areas of
the wings and sponsons plus the dielectric panels on the tailplanes then shot
flat black. These masks were removed and Testor’s Glosscote was applied to prep
the model for decals.
I used Monogram’s decal only as a template to size replacement items to. There isn’t a lot of aftermarket stuff for helicopters but MicroScale did offer a sheet for Hueys and Loaches. "United States Army" logos, tail numbers, and some of the stenciling came from this sheet with the remainder of the servicing data cobbled together from SuperScale’s F-111 and AV-8 stencil sets. Slime lights came from ScaleMaster while the decals for the Hellfire missiles were taken from the Academy UH-60A kit, also printed by ScaleMaster.
When the decals had dried I cleaned the model thoroughly using Q-Tips dampened with distilled water to remove any SolvaSet residue, then I sealed the decals with Testor’s Dullcote. Liquitex black watercolor was used to highlight all the vents, louvers, and grills, followed by more Dullcote. The remaining masks were removed and I proceeded to final assembly. The wheels and tires were painted then installed along with the ordnance. I glued the FM whip in place at the top of the fin with a small drop of Crazy Glue and returned to the rotors.
Flat black was sprayed overall on both units and when it had dried I masked the blades and used powdered graphite to burnish the hubs, giving them a metallic color and sheen. The tips of the tail rotor were painted yellow (note: these markings have since been abandoned).
The chain gun was finished in a manner identical to the rotor hubs then plugged into its mount and glued with Testor’s liquid cement. The rotor assemblies were spun into position at their respective transmissions, thus completing the model.
|
CONCLUSIONS |
Monogram’s AH-64 is a solidly-engineered kit with a lot of potential. However, it falls woefully short in the delicate details department. Too many components have been overlooked or ignored, even though these features are clearly apparent in photographs of the initial batch of production vehicles taken in 1983.
These AWOL details are, for the most part, easily added if the modeler does some basic research. The real chore is all of the necessary (and highly visible) AHIP mods that the Apache fleet is currently equipped with if a current production aircraft is desired.
Modelers who can accept this kit’s shortcomings will find an enjoyable (if not totally accurate) build within the box, while those with an eye for detail and some scratch-building experience will undoubtedly produce a show-stopper. The choice, as always, is to the builder.
 As of this writing
(November 2001) there is very little available from the aftermarket industry for
use with this kit. TriMaster produced a generic set of photo-etched stainless
steel grills for use with helicopters but these are long OOP. True Details
currently catalogs some photo-etched brass wire cutters which may be useful
while Micro/SuperScale offered a few decals for other U.S.Army rotorcraft.
As of this writing
(November 2001) there is very little available from the aftermarket industry for
use with this kit. TriMaster produced a generic set of photo-etched stainless
steel grills for use with helicopters but these are long OOP. True Details
currently catalogs some photo-etched brass wire cutters which may be useful
while Micro/SuperScale offered a few decals for other U.S.Army rotorcraft.
With the impending release of Hasegawa’s new-tool Longbow Apache this situation will surely change. Aftermarket companies are notoriously quick to capitalize on the arrival of any new kit, especially wunderkits from Japan. The fallout is bound to inspire modelers to give the Monogram offering a try, considering the all-too-certain price differential between the kits.
This project was not exactly a weekend shake-and-bake build…about sixteen years from start to inevitably anti-climactic conclusion. I started the model in 1985, shortly after the kit’s initial release but various professional commitments forced the model to be shelved for several months at a time. I completed the basic airframe in 1994, at which time the EPG’s requirement for an Apache had expired and my main reference departed for Mesa to receive its AHIP mods.
Further detailing progressed via internet search and all the photographs I could clip from Aviation Week & Space Technology, Soldier, and Army magazines. Ultimately, an "up-close-and-personal" walk-around of a full AHIP bird at Biggs AAF, Ft. Bliss, Texas in 1999 gave me the rest of the pieces to complete the puzzle.
A protégé recently alluded to my penchant for inordinately long builds, gleefully opining that my alacrity (or lack thereof) was due to "falling off the Harley one too many times without a helmet". Fact is, this was a long build—maybe too long. I just wish that I could afford a Harley. Now where’s my Steppenwolf eight-track?
|
REFERENCES |
AH-64 Apache – Lyle Monson & Kenneth Peoples; Aerograph, Inc.
Army Aviation – Hans Halberstadt; Presidio Press
World Airpower – Bill Gunston; Crescent Books
Aviation Week & Space Technology; various issues
Soldier; various issues
Army; various issues
Various internet sites
Personal walk-around inspections
Ó November 2001 by Roger M. Jackson

First Time North American Rights To Scott Van Aken and ‘Modeling Madness’
If you would like your product reviewed fairly and quickly by a site that has thousands of visits a day, please contact me or see other details in the Note to Contributors.