
|
KIT: |
Academy 1/48 F-111C Aardvark |
|
KIT # |
` |
|
PRICE: |
$40.00 AUD |
|
DECALS: |
One aircraft |
|
REVIEW & |
|
|
NOTES: |
This kit has taken as long to build as the original TFX project took to get off the ground. I daresay with the same degree of language as well! I’ve enjoyed the project despite some basic inaccuracies –most being ignored! It’s the three sets of decals and four coats of paint that have almost cost me my sanity! Aussie Decals Kits A48010 and A48022 used |
|
HISTORY |
The General Dynamics F-111 is regarded as one of the most controversial aircraft that ever flew. It received tremendous undue criticism from the media, suffered an incredibly long development cycle and cost a bomb. The F-111 became the subject of bitter debate within Congress and opponents called the aircraft the "flying Edsel" and it was described as being "more of a threat to the US than any potential enemy."
Despite all this criticism the F-111 continued to become one of the most effective all-weather interdiction aircraft in the world. It gained the best safety record of any of the aircraft of the Century Series of fighters with only 77 lost in a million hours of flying time. It still has the best record of carrying out long distance precision air strikes under all weather conditions and is still in service with the USAF toady and should remain so until 2010. (Ed note: Grenville worked on this kit a LONG time. The F-111 has been out of the USAF inventory for at least 3, perhaps 5 years.)
It began its life as a project designed by the then new Secretary of Defense, Robert McNamara on February 16, 1961. It was to be an aircraft that satisfied both the requirements of the Air Force and Navy as well as being able to be used by the Army and the Marines as a close support aircraft. The project became known as the Tactical Fighter Experiment, or TFX for short. It was doomed to fail under these requirements and McNamara was convinced to drop the Army and Marine Corps versions from the program. He reluctantly agreed but maintained his attitude of close commonality between the USAF and Navy, despite them both thinking the idea was unrealistic.
Fitted with two YTF30-P-1 turbofans the first test F-111A (63-9766) rolled out of the General Dynamics Fort Worth, Texas plant on October 15, 1964 some 22 months after the programs actual beginning and two weeks ahead of schedule. It was fitted with two ejector seats pending delivery of the escape capsule. This aircraft flew on its maiden flight from Carswell AFB, Texas on December 21, 1964 and the resultant flight was regarded as generally satisfactory despite a flap malfunction. In early testing the F-111A achieved Mach 1.3 and the wings were swept from the minimum 16 degrees to the maximum 72.5-degree position.
The cost of the aircraft blew out in 1965 and the Defense Department cut the original F-111 program sharply. A contract for 431 production aircraft was placed on April 12, 1965 that was 50% less than originally planned.
The Pratt & Whitney TF30-P-1 turbofan first flew on an F-111A on July 20, 1965. This engine configuration experienced numerous engine compressor stalls, particularly at high speeds and high angles of attack. This resulted in a change to the 18,500 lbs thrust TF30-P-3 and the new "Triple Plow I" variable geometry inlet ducts with larger areas. This did not solve the stalling problems and many years of hard work were required to find the correct air intake geometry.
For many years the F-111 was known simply as "McNamara’s Folly" and did not receive an official name. It became officially known as the Aardvark owing to its long nose, or "Vark" for short, during the retirement ceremony for the F-111F in late 1996. The Australians call their F-111’s "Pig", although there is no clear-cut reason as names such as ‘Galawindi’, ‘Arkana’ and ‘Taipan’ were suggested but rejected. Perhaps it was as a result of F-111 drivers being former Sabre and Phantom pilots, and the aircraft handled "like a pig" compared to their previous planes. It may also have been the likelihood of the F-111 ever getting to Australia was as probable as "pigs flying!" It may be as simple as Aardvark translates to "Earth Pig" and Aussies are famous for shortening names.
The Australian Government placed an order for 24 F-111As on October 24, 1963 and this version was to be designated the F-111C. It was a hybrid between the F-111A, F-111B and the FB-111A, and to be equipped with the F-111B large span strategic wing (70 feet when fully extended). The first aircraft was delivered on September 6, 1968, but problems with the F-111A’s wing carry-through box caused delivery of the remaining 23 aircraft to be delayed until 1973. The first of these delayed aircraft finally arrived in Australia on June 1, 1973. They replaced the RAAF’s fleet of Canberra bombers and were operated by no’s 1 and 6 Squadrons based at Amberley in South East Queensland.
On June 29, 1993 Australia announced that it would purchase a further 15 surplus F-111Gs from the USAF to augment the 22 surviving aircraft in the RAAF fleet. The price was regarded as "bargain basement" at about $60-80million AUD plus$10-15 million AUD upgrade per plane. The last plane to be part of this order came from the AMARC (Aircraft Maintenance and Recovery Centre) Boneyard at Davis-Monthan AFB in Arizona, Bu No. 68-0272. It became the first operational F-111G with the RAAF and was known as the Boneyard Wrangler, serial number A8-272. It arrived at the Amberley base on May 10, 1994.
My first sight of this phenomenal aircraft was during 1974 when I was working at the Williamtown RAAF airbase outside of Newcastle, NSW, Australia. One had come down from Amberley to harass the Mirages stationed there. It did three rotations of the circuit, one with all gear and flaps down, the next with just the flaps down, and the last totally clean. Meanwhile two Mirage IIIC’s were revved up as this thing flew along the main runway over their heads, got to the end and then flipped onto it’s tail with flames pouring out of the exhausts, afterburners on full, and disappeared into the clouds. The Mirages took off in half their normal take off distance and played cat and mouse with it for what seemed to be hours. A most impressive display!
|
THE KIT |
The kit is presented in a large box with very impressive artwork, if you’ve never visited Sydney before and, given the light show at the end of the 2000 Summer Olympics most people would now be familiar with the Harbour vista. The first glaring error is that there is no Harbour Bridge! Shame for all those people living in the northern suburbs who have to get into the city! The second glaring error is the aircraft itself, which show the outer pylons 2 & 7 able to pivot – they do not!
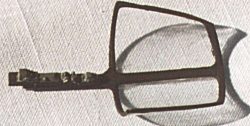
The kit comes in light grey plastic sprues with one clear sprue, which holds a one-piece canopy and the gunsight. There are no landing lights present. The sprues are wrapped in plastic bags to prevent undue damage and my kit was in good condition. The instruction sheet is quite clear although somewhat basic, with the relevant parts being called for during the construction of the "C" variant.
The instructions do mention that a weight will be required in the nose, to prevent the model from being a "tail sitter", but no mention of just how much. I recommend using slightly more than an ounce and slightly less than a ton. As I intended to use aftermarket wings and stores the extra weight would prove both beneficial and a bane as you will find out!
The decal sheet is barely adequate with many of the relevant stenciling not present. I elected to source my own as I was going to build the "G" variant and wanted to represent one of the 82nd Wing aircraft using the low viz. decal sheet offered by Aussie Decals (pronounced "Ozzie"). This set of decals is reasonably priced, although after three sets it was getting a bit beyond the joke.
|
CONSTRUCTION |
The Cockpit
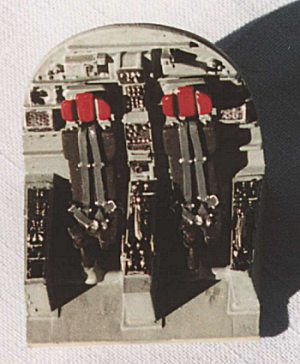
As the kit has a very basic cockpit, and I like to add as much detail as possible, I chose to use the Verlinden update set for the model. This kit is well moulded in a greenish resin with photo-etched parts included to fit out the fine details. There is a part for the overhead console between the two seats that needs to be attached to the canopy, which then allows both access panels to be cut away from the single piece canopy to display the interior. Extreme care should be taken when attempting this as the clear parts are very fragile and do not respond well to ham-fisted modellers! The left and right canopy access panels have photo-etch parts attached and are then attached to the center line of the canopy, allowing the whole unit to be open to display the cockpit upgrade.
 As with most modern cockpits I commence building with the seats and then move
onto the instrument panel followed by consoles and sidewall panels. This kit was
no exception and, although there are no ejection seats to paint, the seats and
frames are still present and need painting. As I was building an Australian
"G" variant the seat covers were painted flat black, to emulate the
sheepskin covers, the only thing missing was the fluffy dice on the mirror! The
headrests are painted red in keeping with the norm. Seat belts were painted
olive and grey/blue and the buckles were painted in Aluminium.
As with most modern cockpits I commence building with the seats and then move
onto the instrument panel followed by consoles and sidewall panels. This kit was
no exception and, although there are no ejection seats to paint, the seats and
frames are still present and need painting. As I was building an Australian
"G" variant the seat covers were painted flat black, to emulate the
sheepskin covers, the only thing missing was the fluffy dice on the mirror! The
headrests are painted red in keeping with the norm. Seat belts were painted
olive and grey/blue and the buckles were painted in Aluminium.
The instrument panel, sidewalls, rear bulkhead and floor pan were painted light grey with the consoles and instrument surrounds painted flat black. Various knobs were painted red and yellow, with the ejection handles painted yellow with black stripes. The individual assemblies were then highlighted to simulate wear and tear by dry brushing with silver.
Once the cockpit had been completed it was installed in the forward fuselage, which had a sizeable lump of fishing lead added to prevent the model becoming a tail sitter. The instrument panel and cover was installed and the latter was painted flat black. The angle of attack indicators were added to either side of the instrument cover and the gunsight installed on the left hand side.
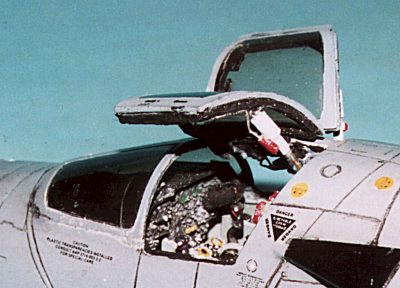 The overhead console placed between the two canopy halves was painted black
and photo etch was added. This part was painted flat yellow and black and dry
brushed to bring out the detail. The inside of the canopy was sprayed using
Gunze Sangyo spray, Smoke to simulate the glass tinting on the real
"Pig". The canopy was then attached to the airframe and masked off in
preparation for spraying. I decided to leave off both hatches until last and
scratch built the hydraulic openers for each door. The inside clear parts were
also painted with the Gunze Sangyo, Smoke. This paint is very thin and
you will need to apply a few coats to get the correct density. You should also
paint the inside rather than the outside as it has a gloss finish.
The overhead console placed between the two canopy halves was painted black
and photo etch was added. This part was painted flat yellow and black and dry
brushed to bring out the detail. The inside of the canopy was sprayed using
Gunze Sangyo spray, Smoke to simulate the glass tinting on the real
"Pig". The canopy was then attached to the airframe and masked off in
preparation for spraying. I decided to leave off both hatches until last and
scratch built the hydraulic openers for each door. The inside clear parts were
also painted with the Gunze Sangyo, Smoke. This paint is very thin and
you will need to apply a few coats to get the correct density. You should also
paint the inside rather than the outside as it has a gloss finish.
The Fuselage and Wings
Although the kit has no problems with the wings, and in fact
the detail is quite fine with recessed panel lines, I had opted to obtain an
aftermarket kit that allowed me to display the flaps and slats extended. As my
kit is the "C" variant I scoured the net to find someone who made the
longer strategic wing of the FB-111A, F-111C and the F-111G. This actually
proved to be easier than I initially thought as a local guy, Stephen Thrum who
has close connections with the RAAF base at Amberley, had not only made the
wings but also a number of other bits and pieces to construct both the
"C" and "G" variants.
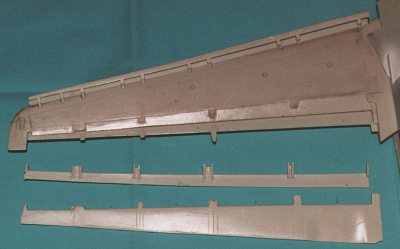 Stephen’s wing set (SDA48001)
included the entire wing section as well as the flaps making the removal of the
area where the glove box attaches the only part that needed cutting. This simple
configuration comes at the price of a moveable swing-wing mechanism, although
displaying the flaps and slats extended pre-empted that anyway. It was also
necessary to remove the two pins towards the front of the fuselage in order to
get Stephen’s wings to fit snugly. For interested parties information about
Stephen’s products can be found at http://www.f-111.net/models/index.htm.
He has an extensive list of products available and an even more ambitious list
of "things to be done". The website provided an extensive library of
information that was invaluable in building this particular model and Stephen
contributed by lending me a set of close up shots of the Bone Yard Wrangler, the
model featured in this review. Stephen is a Master Model builder and produces
resin aftermarket bits under the name of Scaledown.
Stephen’s wing set (SDA48001)
included the entire wing section as well as the flaps making the removal of the
area where the glove box attaches the only part that needed cutting. This simple
configuration comes at the price of a moveable swing-wing mechanism, although
displaying the flaps and slats extended pre-empted that anyway. It was also
necessary to remove the two pins towards the front of the fuselage in order to
get Stephen’s wings to fit snugly. For interested parties information about
Stephen’s products can be found at http://www.f-111.net/models/index.htm.
He has an extensive list of products available and an even more ambitious list
of "things to be done". The website provided an extensive library of
information that was invaluable in building this particular model and Stephen
contributed by lending me a set of close up shots of the Bone Yard Wrangler, the
model featured in this review. Stephen is a Master Model builder and produces
resin aftermarket bits under the name of Scaledown.
Buyers Beware! Paragon offer the flap and slat set and, on the Hannants web page http://www.hannants.co.uk/ it is listed as being for the A, D, E, F and G. This is incorrect as the G has the longer wings and the flaps and slats are not long enough! The same applies to the "A" variant.
 |
 |
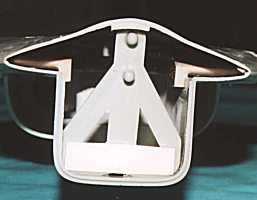 |
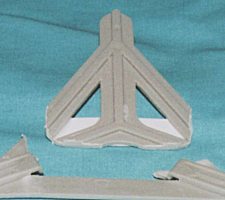
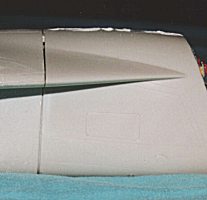
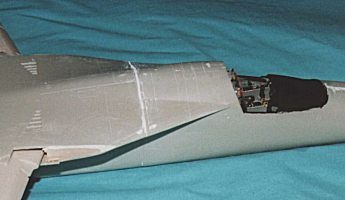
Now the main problem encountered with building the Academy F-111 is the join between the rear fuselage and forward, cockpit fuselage, as shown in the series of figures below. The reason is that there is a significant step between the two subassemblies. I had been forewarned about this and decided to brace the rear with plastic to enable a cleaner join and reduce the amount of filler required. Great in theory, but this proved to be wrong as filler was required to help form a smooth surface – twice! Typical of model construction where you strive to overcome adversity, I had successfully filled and smoothed, and subsequently re-scribed panel lines. I then painted the airframe and proceeded to glue the canopy onto the cockpit. I precariously balanced the model to allow the canopy join to fill, prior to sanding and painting when disaster struck in the form of a small bump on the surface upon which all my hard work rested. The resultant fall of one metre (3 feet for my American cousins) of a nose heavy model (remember the one ounce to one ton remark?) resulted in the fuselage snapping at my so hard worked on joint! Aaaargh! Oh well, back to the drawing board to re-gluing the now jagged join and yet more filler and subsequent sanding and re-scribing of the panel lines. Finally it was ready for the coat of Model Masters FS36118, Gunship Grey enamel. This was to happen a third time but not as disastrous due to the partial separation of the two assemblies.
 |
 |
I elected to scrap the tail cone in preference for the aftermarket one from Stephen Thrum’s Scaledown set (SDA48004) and attached it with superglue. I used the Alcad range of metal paints to finish the part. The twin booms, that sit outside the exhaust nozzles, had flare and chaff dispensers added by taking a piece of flat plastic and cutting four square holes into it. The pieces were then attached to the boom and filled to match the profiles. The holes were filled with fine photo etch mesh to approximate the photo references. As an afterthought I elected to fill them with clear glue and paint them smoke. This was after close inspection of another "G" at Amberley RAAF base, where the openings were covered with what appeared to be perspex plates.
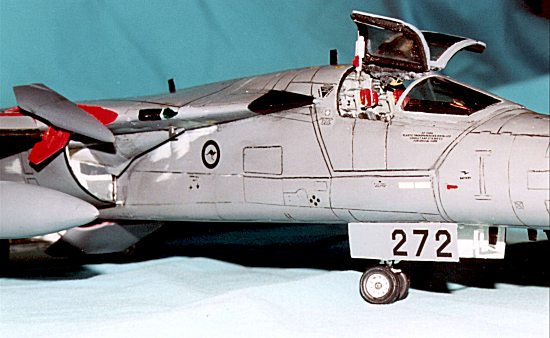
As well as adding the flare and chaff dispensers I also added the thing that distinguishes the "G" from other variants, the "INS" fairing. This is the inertial navigation system and is located in front of the cockpit and immediately aft of the radome. I added a piece of flat plastic and used Milliput to smooth the edges of the housing.
A membrane of rubbery material on the real aircraft covers the wing attachment area, which acts as a barrier to the elements. This is similar to that used by the F-14 and Tornado aircraft. I had purchased the Paragon wing flap set, which includes a photo etch for the membrane, but as the set was for the B, D, E and F variants I did not use the flaps. I did use the photo etch. This is painted a grey-green colour and required a little filing to get it to sit snugly in position. If anyone wants the flaps and slats without the photo etch please contact me.
The tailerons are a simple affair and are attached via a single hole. These are generally shown sloping downwards at the back when the aircraft is parked. Each unit is interchangeable with its counterpart and this is reflected in the four static dischargers at the rear of the wing, which are on the top of one and the underside of the other. These were simulated by brass and plastic rod cut at an angle and then painted steel with a silver band next to the wing and yellow on the end. I did not go to the extra pain of adding the two little wires on top and underneath of the yellow end. The tail and wings also received this treatment with three static dischargers being positioned on the outer edge of both wings and at the top of the tailplane.
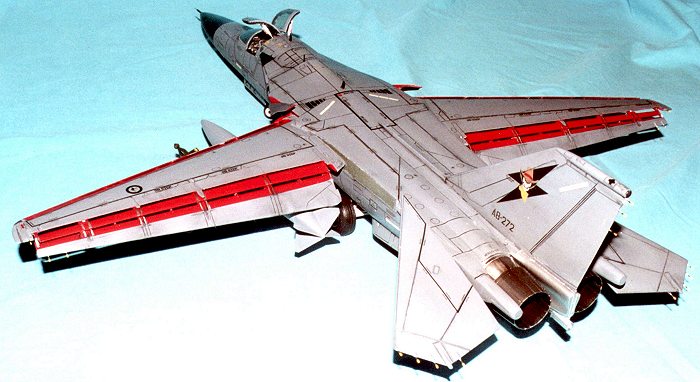
I painted the flaps and slats in both Humbrol Insignia Red and AeroMaster acrylic FS36118, Gunship Grey. The former colour was used on the inner surface of the slats, the rear flap, the inner surface of the wing glove and it’s corresponding fuselage surface, the inner surface of the wing where the slats and flaps retract and finally the inner flap extension – both upper and lower surfaces. The leading edge of the slats is painted flat black to depict the de–icing strip.
 The intakes of the "G" variant used the TPII type,
or Triple Plow II. This version did not have the splitter plate as depicted on
the "C" variant and used three blow-in doors on the outer intakes. The
intake also had a number of vortex generators attached to the upper inner
surface designed to disrupt the airflow into the engine. I also added some
plastic card to prevent a straight through view from either side of the engine
intakes. The entire area was then painted with Model Masters Gloss White
enamel. The inner walls of the intake vary in colour and usually have plates
painted in different shades of grey. As I had no specific reference for my
chosen subject I improvised a little bit!
The intakes of the "G" variant used the TPII type,
or Triple Plow II. This version did not have the splitter plate as depicted on
the "C" variant and used three blow-in doors on the outer intakes. The
intake also had a number of vortex generators attached to the upper inner
surface designed to disrupt the airflow into the engine. I also added some
plastic card to prevent a straight through view from either side of the engine
intakes. The entire area was then painted with Model Masters Gloss White
enamel. The inner walls of the intake vary in colour and usually have plates
painted in different shades of grey. As I had no specific reference for my
chosen subject I improvised a little bit!
The intakes are attached to the fuselage side and a small pipe is attached from the intake to the fuselage. This is a stabilizing rod and is clearly visible on some of my personal shots of the beast.
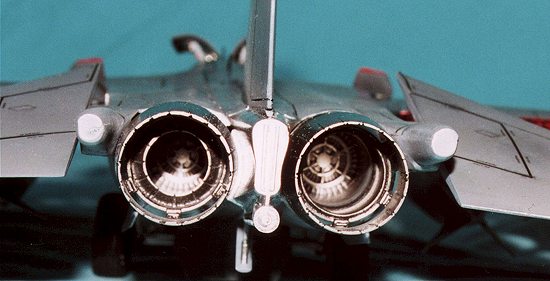 The afterburner cans were from Scaledown (SDA48002)
and show the accurate representation of one nozzle closed and the other open.
This is a failsafe mechanism that takes place when one engine is shut down. The
loss of power closes the other engine nozzle so that either the right or the
left has a closed nozzle. The turkey feathers were from the kit and the entire
assembly was painted using various shades from the Alcad range of metal
paints. These paints are supplied pre-mixed and require that the surface to be
sprayed be undercoated, the company recommending the use of automotive
undercoat. They spray beautifully out of the gun and require no buffing,
although it can be done if so desired. The only extra bit of work I carried out
was to thin the painted surface between the engine outlet and the turkey
feathers as it shows signs of oil stains and grime on the real McCoy. The engine
assembly was set aside and attached after final painting had taken place.
The afterburner cans were from Scaledown (SDA48002)
and show the accurate representation of one nozzle closed and the other open.
This is a failsafe mechanism that takes place when one engine is shut down. The
loss of power closes the other engine nozzle so that either the right or the
left has a closed nozzle. The turkey feathers were from the kit and the entire
assembly was painted using various shades from the Alcad range of metal
paints. These paints are supplied pre-mixed and require that the surface to be
sprayed be undercoated, the company recommending the use of automotive
undercoat. They spray beautifully out of the gun and require no buffing,
although it can be done if so desired. The only extra bit of work I carried out
was to thin the painted surface between the engine outlet and the turkey
feathers as it shows signs of oil stains and grime on the real McCoy. The engine
assembly was set aside and attached after final painting had taken place.
Undercarriage
The Academy kit can only be described as abysmal in this area. There is very little detail in the nose wheel bay, although some piping is evident, no landing lights, the aircraft uses three, and a major seam to contend with running the length of the bay. The main undercarriage is no better and, having seen the real thing up close and very personal, requires a bit of work. Not impossible but certainly necessary to depict an accurate model. I now have in my possession a very comprehensive set of photos of both the nose and main undercarriage bays if anyone needs further references.
 I purchased the resin wheels set offered by Scaledown (SDA48003) as
these include the chined nose wheels. These wheels have a raised rib that works
to deflect the water spray away from the engine intakes. The detail on these
sets is superb and, like so many aftermarket wheel sets, they are weighted. I
painted the hubs in Model Masters Gloss White and the wheels were painted
in Gunze Sangyo Tire Black. I used Model Masters Flat Black on the
tread and, after drying, rubbed it to attain a semi gloss appearance.
I purchased the resin wheels set offered by Scaledown (SDA48003) as
these include the chined nose wheels. These wheels have a raised rib that works
to deflect the water spray away from the engine intakes. The detail on these
sets is superb and, like so many aftermarket wheel sets, they are weighted. I
painted the hubs in Model Masters Gloss White and the wheels were painted
in Gunze Sangyo Tire Black. I used Model Masters Flat Black on the
tread and, after drying, rubbed it to attain a semi gloss appearance.
Both undercarriage assemblies were painted in Gloss White and then "dirtied" up to simulate the wear that is apparent on these operational aircraft. I added pipes and wires to both bays and brake lines to both wheels. The forward door of the main undercarriage acts as an air brake and is painted flat red on the inside. Not readily apparent from any photo but viewed during the photo shoot is the presence of three areas of non-slip black where maintenance crews step to reach up into the cavernous wheel bay. This is not depicted in the model and I chose to leave the depth of the undercarriage bay as found as there is sufficient detail to not warrant fixing it. That and the fact that it looks shallow and I didn’t measure either bay. To give you some frame of reference the photos I took of A8-274 were done whilst standing in the main undercarriage wheel bay between the airbrake and the wheels. I am just on six feet and there was still headroom available of at least another foot or two above me. The model would scale out at about my chest area, leaving me with one very sore head!
I also used Bare Metal Foil Chrome to simulate the oleos on both the main and nose units.
The landing lights were from MV lenses, thanks to the gentleman who commented on my F-117 review. I had purchased a number of different sized lenses but used the same for all nose wheel lights. Two are mounted on a diagonal brace for the main oleo, and the third is attached to the front brace near its connection point on the strut. The two lights up on the diagonal brace are used for landing, and the one on the front brace is used for taxiing.
I also cut off the lower part of the front wheel and drilled a small hole on both ends to insert a brass rod. The madness behind this was to depict the wheel slightly off centre. I’m starting to become anal with my modeling! I did say that this model was starting to get to me!
|
PAINT & DECALS |
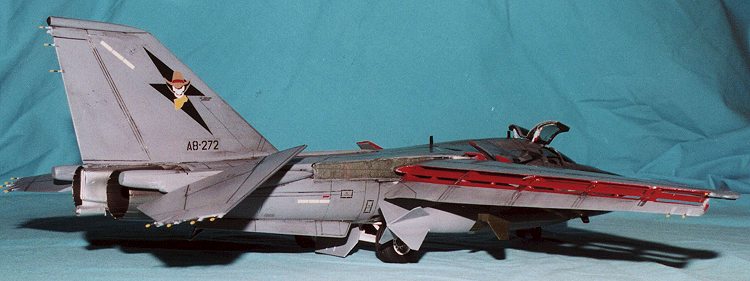
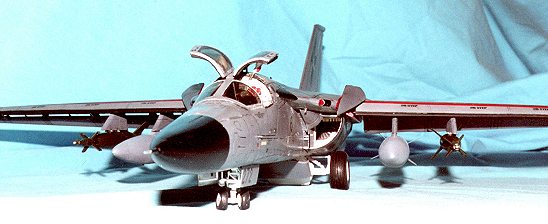
Although the kit is for the "C" variant of the F-111, the aircraft originally purchased by the Australian Government, I decided to build a specific aircraft of No. 6 Squadron of the 82nd Tactical and Reconnaissance Wing, based at Amberley in South East Queensland. This aircraft was the last to arrive from the original order and was originally called the "WILD HARE" FB-111A attached to the 509th Bomb Wing at Pease AFB. It was the first F-111 to be recovered to flying condition and take-off from AMARC (Aircraft Maintenance and Recovery Centre) at Davis-Monthan AFB, Arizona. It was also the first FB to roll off the modification line at McClellan AFB, Sacramento and fly over the North Pole and back as part of a thirteen-hour mission to simulate SAC mission capabilities. It became known as the "Boneyard Wrangler" Bu No. 68-0272 when one of the recovery crew, Stan Murray of Crew 5 – AMARC, adorned the tail with the artwork. Group Captain Dave Dunlop and Flight Lieutenant Dave Riddel flew it to Australia arriving on May 10, 1994. It was re-designated A8-272.
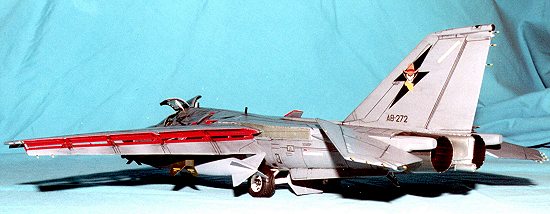 The airframe is entirely FS36118, Gunship Grey with de-icing
strips painted flat black, along with the radome nose and two leading edges at
either side aft of the cockpit. It is a fairly boring colour scheme with decals
that are low viz., altogether uninspiring. The tail is the only area of real
colour and this is in the form of a skull complete with cowboy hat and bandana
(from the original artwork applied at Davis-Monthan AFB) overlaying a stylized
lightning bolt – No. 6 Squadron symbol. I initially used the Model Masters
enamel Gunship Grey and Flat Black and then sprayed clear gloss over the finish
to apply the decals. I did this twice, experiencing a nasty clouding after
applying a flat clear over the decals in preparation for dirtying up the
airframe, believe me these suckers are dirty! The second time I used the local
equivalent of Future (Johnson’s Shine Magic) for my clear applications, gloss,
flat and semi gloss. (Thanks for the advice Scott!) This was after I had rubbed
the whole thing back, did the panel lines again, and then re-sprayed the Gunship
Grey. Of course, I needed another set of decals. More blue air above the
modeling table and much roaring and gnashing of teeth! Did I mention that this
model took longer to build than the original TFX project??
The airframe is entirely FS36118, Gunship Grey with de-icing
strips painted flat black, along with the radome nose and two leading edges at
either side aft of the cockpit. It is a fairly boring colour scheme with decals
that are low viz., altogether uninspiring. The tail is the only area of real
colour and this is in the form of a skull complete with cowboy hat and bandana
(from the original artwork applied at Davis-Monthan AFB) overlaying a stylized
lightning bolt – No. 6 Squadron symbol. I initially used the Model Masters
enamel Gunship Grey and Flat Black and then sprayed clear gloss over the finish
to apply the decals. I did this twice, experiencing a nasty clouding after
applying a flat clear over the decals in preparation for dirtying up the
airframe, believe me these suckers are dirty! The second time I used the local
equivalent of Future (Johnson’s Shine Magic) for my clear applications, gloss,
flat and semi gloss. (Thanks for the advice Scott!) This was after I had rubbed
the whole thing back, did the panel lines again, and then re-sprayed the Gunship
Grey. Of course, I needed another set of decals. More blue air above the
modeling table and much roaring and gnashing of teeth! Did I mention that this
model took longer to build than the original TFX project??
OK, it is at this point that I almost gave up in sheer frustration as I experienced another problem with the paint surface. I was painting this model over Christmas and, here in South East Queensland it gets very muggy and damned hot. There was so much moisture in the atmosphere that I experienced more clouding in the final surface. In sheer frustration I put the model away for the best part of three months, my confidence shot to pieces. I have sprayed quite a few of my cars during my younger days and can honestly say that I am a fair spray painter, but this model and the problems almost brought me to my knees. I know that if I had not invested so much money in after market bits I would have used it as a football with the intent of kicking it over the posts from 100 metres!
After my brain and blood pressure had returned to normal – three months later and many emails to Scott explaining what was happening. (The man has the patience of a Saint!) A fellow club member, David Roach, convinced me to try acrylics and I chose the Aeromaster acrylics. I also noticed that their Gunship Grey was a slightly paler shade of FS36118 and was closer to the proper colouring of the Amberley "Pigs", this being confirmed by Mr Aussie Decals during my moaning session to him about the number of paint jobs this model had received, whilst I was purchasing yet another set of decals for my beastie!
The aforementioned decals used were obtained from Aussie Decals and come as two separate sets, the one containing all stencils and roundels (A48010) and the other (A48022) containing two sets of decals, one for the Boneyard Wrangler and the other for the 25th Anniversary of the arrival of the F-111C into Australia. I found these decals to be easy to use and require very little soaking to get them to separate from the carrier sheet. I did encounter a little bit of silvering but the use of decal setting solution seemed to eliminate most of the problems. I now know that it also relates to the paint surface. I found that if I used a polish to buff up the flat finish I ended up with a nice smooth shiny surface to put the decals on. In the majority of cases there was no silvering and only in areas where the polish was not good enough did I find signs of silvering.
A word of advice: In the Aussie Decal sheet (A48010) when using the low viz decals it is noted that decal No. 26, which is either black or yellow, depending on the decals being applied, is also placed inside the nose wheel bay in the centre top. This position is correct and from personal photographs the decal to use in this location is the yellow one, regardless of those being applied on the exterior of the aircraft. In the case of the "Boneyard Wrangler" the decals mounted on the top aft of the cockpit exterior are also yellow.
Once the decals were applied the model was then sprayed with Gunze Sangyo acrylic, Flat Clear to apply the weathering and highlight the panel lines. It was at this point that I also applied a light grey-green colour to some panel lines to simulate the loss of the Gunship Grey due to fuel leakages. This aircraft, like the Sr-71A Blackbird, leaks like a sieve on the ground and only when it is flying and the airframe has warmed up, and consequently expanded, does it stop leaking. It is not fuelled until about fifteen minutes before an operation and the resultant fuel that "bleeds" out leaves the undersurface of the paint visible as streaks when the fuel bleeds back along the airframe with the slipstream.
The final coat is the semi gloss clear, using a mixture of Gunze Sangyo’s Flat Clear and Clear over the entire airframe and then the attaching of the wheel well doors, flaps and slats, plus the exhaust nozzles.
The last bits to be attached were the pitot tubes on either side of the intakes at the top, the probe at the front of the nose, various aerials and some brass pipe painted silver to simulate the hydraulic rams for the flaps. I constructed the clearance lights out of old toothbrush handles - Although I did knock off my other half’s new toothbrush – I just hope I can get another before she finds out!
 I then set about building the hydraulic rams for the cockpit
doors. I used three different brass rods, two were hollow and the third was
solid. All slid into each other and cut to size. I added a plastic plate to
attach a cable connected to the inner handle and this was made out of copper
wire painted silver. I cut a small piece of plastic dowel to simulate the
attachment points for each ram and attached it to the door frame and the inside
rear of the cockpit. This enabled the doors to be attached open, although I didn’t
have the inner and outer handles opened, as is the case with the open doors –
I figured at this stage that my luck was running very close to the wind!
I then set about building the hydraulic rams for the cockpit
doors. I used three different brass rods, two were hollow and the third was
solid. All slid into each other and cut to size. I added a plastic plate to
attach a cable connected to the inner handle and this was made out of copper
wire painted silver. I cut a small piece of plastic dowel to simulate the
attachment points for each ram and attached it to the door frame and the inside
rear of the cockpit. This enabled the doors to be attached open, although I didn’t
have the inner and outer handles opened, as is the case with the open doors –
I figured at this stage that my luck was running very close to the wind!
The final thing to be done was to paint the little red light strips on top and underneath each wing tip and at the front and rear of the fuselage. I am not sure what these are but all my photo references have them. The wing tip ones are quite pronounced and I figure they are probably clearance lights.
Armament
The Australian F-111’s carry a variety of ordnance, depending on the variant. In the case of the F-111C they have the Pave Tack pod installed in the bomb bay. These pods provide precision delivery of GBU-12 and GBU-10 Paveway II laser guided bombs (500-lb and 2,000lb respectively). There are a limited number of the Pave Tack pods and this has resulted in them being shared amongst the F-111C fleet. I have opted to include two GBU-10 LGBs on the "Boneyard Wrangler" to give it an operational look. I have also included two aftermarket fuel cells, again from Scaledown, and these are resin units being a total replacement for the Academy kit offerings. The fins are attached at 60 degrees and not 90 degrees, as shown in the kit examples.
The GBU-10 Paveway II LGBs are from the Hasegawa missile accessory kit. The only modification was to insert a MV lens in the front. They were painted with Tamiya acrylic, Olive Drab. The fuel cells were sprayed with Aeromaster acrylic FS36118, Gunship Grey.
Other ordnance carried by the F-111 includes the Sidewinder AIM-9L/M missiles, on the outboard shoulder pylons, as well as a locally made cluster bomb, Karinga. Other stores are the AGM-84D Harpoon anti-ship missile, Mk 82 bombs, Mk 36 Destructor mines, ACMI pod, AN/ALE-28 CMDS and AGM-84E SLAM.
|
CONCLUSIONS |
This model has been quite a challenge and has almost taken as long to build as the original TFX project took to get off the ground. I had started it with all the enthusiasm of my model building, having obtained the aftermarket bits from Paragon and Verlinden only to have my enthusiasm crushed when I realised that the flap and slat sets was too short for the "C", "FB" and "G" wings. This delayed the project while I sought out an alternative that came in the form of the F-111.net website that led to Stephen Thrum and his upgrade wing, complete with flaps and slats etc.
Numerous other events contributed to the delayed completion of this kit, least of which has been the three decal sets and four painting applications! I have almost sought psychiatric help during this build and have had nightmares featuring painting the same kit over and over again – Oops; they were no nightmares, it really happened! The main thing to remember here is that if it gets too hard simply put it to one side. You can always come back to it once your blood pressure has gone down and the wife and kids have come back home!
I elected to convert to the "G" variant rather than purchase another kit. It has been a rewarding experience, although my good wife would contest that statement having listened to less than polite words emanate from me during the building process. It has also been an eye opener in so much as this is supposed to be one of the better kits on the market in this scale. I only wish that someone else would produce this kit to today’s standard. Don’t get me wrong, I think Academy have done a wonderful job, especially considering the age of this kit. The amount of surface detail and panel line definition is fantastic, but so are some of the glaring errors.
I would certainly entertain building another F-111 and would not baulk at the idea of another Academy kit, it would be easier the next time anyway. I also recommend that if anyone is thinking of doing this kit then set yourself some time to prepare and get as much reference material as you can. The kit can be built into a very good model worthy of shows and showcases. It does, after all, represent an aircraft that has an amazing safety record and has always been a sight to behold, whether parked on the apron or dumping fuel at a show. Spectacular!
|
REFERENCES |
F-111E/F Aardvark Peters, W., Lock On No. 5 Verlinden Publications 1989,ISBN: 90-70932-14-8
http://www.f-111.net/ F-111 web site dedicated to the F-111 and her crews
Stephen Thrum Personal communications and loan of photographs of A8-272 and others
RAAF Amberley Photographs taken by the Author during a visit to the base. Available on request.
If you would like your product reviewed fairly and quickly by a site that averages over 2,800 visits a day, please contact me or see other details in the Note to Contributors.