Revell 1/72 Panavia Tornado
| KIT #: | 4288 |
| PRICE: | 18 Euro or so |
| DECALS: | Oneptions |
| REVIEWER: | Fernando Rolandelli |
| NOTES: | Modeldecal decals; Aires resin and Eduard PE cockpit and Hasegawa weapons |
| HISTORY |
The Tornado was the result of the needs of
European air forces for a low-level interdiction/strike machine, one that would
be able to survive combat in the Central Front, in sorties against both front
troops and rear areas, especially airfields (probably the most heavily defended
targets of them all). At the time, technology could only offer
“variable-geometry” as the compromise between high low-level speed and a
reasonably short takeoff and landing performance (“variable-geometry” was some
of a hype in the ‘70s, the term being used for many subjects far off aviation,
and it is still today); a reasonably
 sophisticated electronic suite to allow for
all-weather terrain-following and first-pass hitting (comprising a Texas
Instruments multi-mode forward-looking, ground-mapping, terrain-following radar,
Ferranti digital INS (DINS) and combined radar/map display and a Decca 72
Doppler radar system). As could be expected from a Western European plane, it is
simpler (though not less capable) than the American equivalent (the F-111) and
more sophisticated than the Soviet one (the Su-24), and considerably smaller
than both.
sophisticated electronic suite to allow for
all-weather terrain-following and first-pass hitting (comprising a Texas
Instruments multi-mode forward-looking, ground-mapping, terrain-following radar,
Ferranti digital INS (DINS) and combined radar/map display and a Decca 72
Doppler radar system). As could be expected from a Western European plane, it is
simpler (though not less capable) than the American equivalent (the F-111) and
more sophisticated than the Soviet one (the Su-24), and considerably smaller
than both.
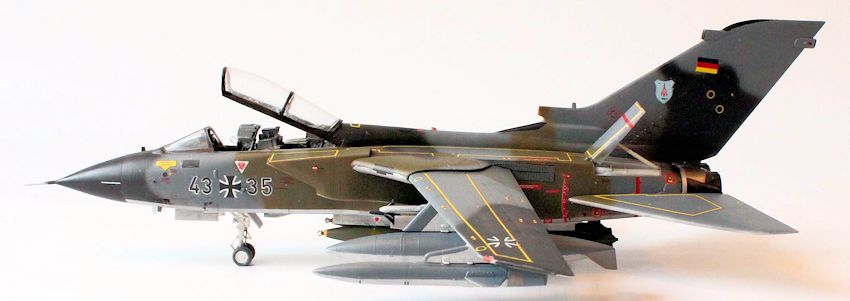
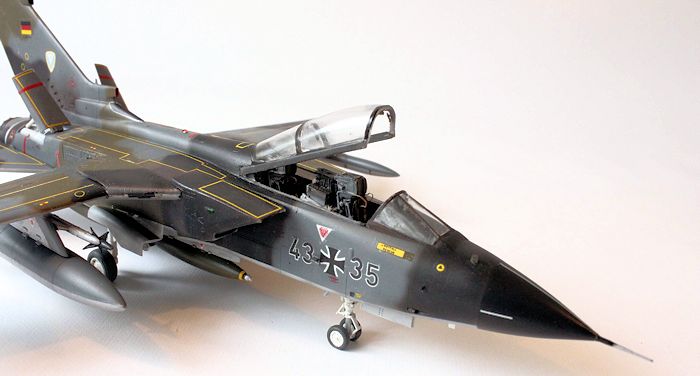
WaKo (Waffenabteilungs Komando, though I have seen it named “Komponente”) is the German Bundesluftwaffe equivalent to a “weapons training unit”. It existed until around 1984 where its role was taken by JaboG 38. I assume it was not just a flying club but that, had the Cold War turned hot, these machines would have gone “to the breach”, just like everyone else. The aircraft, photographed at its base at Erding, during an open day back in 1984, displays the shields of the T. Grp.11 (Technische Gruppe 11) and of the Lw.Vers.Rgt.1, one each side of the tail.
| THE KIT |
Revell AG Tornado is a small jewel, within the budget limits
the firm uses to impose to its kits. It is accurate in shape (the nose cone is
the only suspected area) and fairly well detailed. In retrospective, the whole
swinging wing and pivoting tailplanes could have been avoided, and these
valuable molding be dedicated to a better cockpit interior or a slatted, flapped
wing, but I guess the company cared for the youngs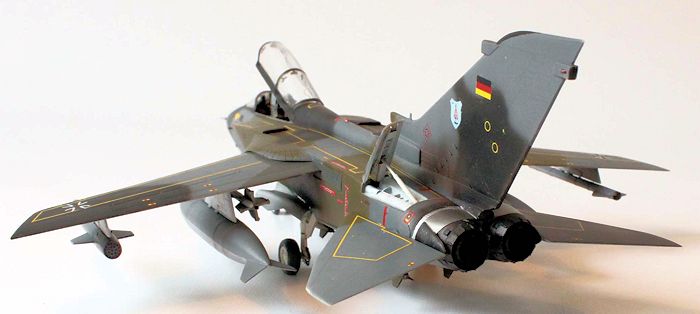 ters here. Weapons load, at
least in the German boxings, is rather limited (in the RAF GR.1 one, it is
outstanding!). Newer editions use to come with cheesy (or spectacular, according
to your tastes!) Tiger Meet, anniversary or deactivation schemes; finding
operative ones is rather difficult, even as alternatives (I have detected one in
Norm 83 camo in the “Boelcke” boxing; one in the “Black Panther” and in an ECR
Tiger Meet boxes, in Norm 95). I did a small work to “backdate” the kit, which
involved shortening the RWR in the fin and scratchbuilding a new Cerberus ECM
pod.
ters here. Weapons load, at
least in the German boxings, is rather limited (in the RAF GR.1 one, it is
outstanding!). Newer editions use to come with cheesy (or spectacular, according
to your tastes!) Tiger Meet, anniversary or deactivation schemes; finding
operative ones is rather difficult, even as alternatives (I have detected one in
Norm 83 camo in the “Boelcke” boxing; one in the “Black Panther” and in an ECR
Tiger Meet boxes, in Norm 95). I did a small work to “backdate” the kit, which
involved shortening the RWR in the fin and scratchbuilding a new Cerberus ECM
pod.
Trying to solve the “poor cockpit interior” problem, I added an Aires resin set (big mistake); and to get at least a “partially operative” machine, I resorted to an old Modeldecal sheet, which is a treasure of pre-series and very early operative machines, both Bundesluftwaffe and Marine, in the early Norm 76 scheme. Armament was mainly sourced from a Hasegawa weapons set.
| CONSTRUCTION |
As usual, the resin cockpit made it best to founder this
project; a lot of swearing and sweat was put into just coercing it inside the
fuselage. The front floor was all but obliterated to make room for the wheel
bay, and nevertheless I feel the coaming came too high up. The seats look to be
too large, and the front one interferes with the stick and instrument panel,
whose PE parts kept popping out to the very last. The fact
 that you have to
actually paint all the detail for it to look good doesn’t help. I am really all
for Eduard pre-painted PE sets.
that you have to
actually paint all the detail for it to look good doesn’t help. I am really all
for Eduard pre-painted PE sets.
This being my first Tornado, I assembly the wing, together to the pylons, and the tailplanes as moving units as indicated in the instructions, trusting in gluing them fix at a later stage. Big mistake. The wings proved a chore to get a symmetric anhedral. The moving tailplanes were certainly a help when painting the complex camo scheme (by rotating them out of the way); one, however, broke its peg at the very last moment, forcing me to re-glue it to the already painted and decaled surface. The same happened to one of the pylons.
Intakes, the bane of jet aircraft kits, are a black hole. The see through effect can be stopped by some scratchbuilt bulkheads; but the inside of the intakes need some radical filling and sanding, and the fit is not good. There is a piece inside the intake –a sort of divider- I could not asses its right location to this day!
I did use an old, copperish Eduard PE set for some external parts. The back of the BOZ 101 was a fine addition, as the internal structures of the airbrakes (great looking, but they proved a chore to fit to the fuselage with them added). Canopy sills (a usually neglected detail) were also provided, as some of the blade antennaes.
Undercarriage was also a chore and a
potential source of much grief and accumulated error. You have to first glue the
well from the inside (glue it well, so that it doesn’t later come out –well,
“in”-, inside the fuselage); then, each main
 leg is separated in three parts,
with no positive fit (it is actually better than it looks). With no means of
checking alignment as you go, it is very, very difficult that something doesn’t
come out crooked in the end. I do not like “weighted” wheels, which are arguably
realistic and can be a chore to align, the angle of the seat being rather
unknown until all four wheels are in place.
leg is separated in three parts,
with no positive fit (it is actually better than it looks). With no means of
checking alignment as you go, it is very, very difficult that something doesn’t
come out crooked in the end. I do not like “weighted” wheels, which are arguably
realistic and can be a chore to align, the angle of the seat being rather
unknown until all four wheels are in place.
Exhausts and rear area, on the contrary, are exceedingly well designed and fit very well. You could even leave the whole rear part aside, greatly simplifying the painting.
All in all, the building proved difficult; even accounting for a thumb-fisted modeler used to 1/48 scale Spitfires. The model is not perfectly square, being slightly misaligned; having to my horror detected an asymmetric anhedral (bane of banes!) Attempts to “move” the wings up or down proved unsuccessful and I had to resort to the cheap trick of shortening one of the legs in the main undercarriage to “compensate”. It did, but it threw off alignment all the rest of the model. It is very slight, but visible if you look from the right angle and know what to look for.
Having said that the kit comes with a rather lackluster
armament selection (or rather no armament at all, loads being a buddy refueling
pod and a MBB/Aeritalia recce pod), and considering my desire to depict a
“war-ready” operational machine, I had to outsource the weapons. Now, primary
armament at that moment was the impressive MW-1 submunition dispenser, now
available only in some old Italeri and Hasegawa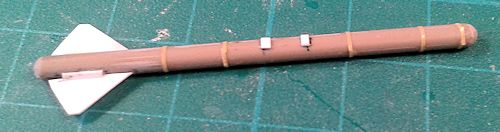 Tornado boxings. Those were days
before smart bombs, so an alternative load was numbers of Mk.83 1000 lb bombs,
(I have seen up to eight in pictured, but five being quoted as usual) available
in a Hasegawa weapons set; I went for them. The in-box Sidewinders are, no
wonder, unusable; I replaced them by those in the Revell Taifun; not that they
are perfect (they have no body where the fins are!) but at least the nose and
forward canards are great; they can be improved (a slice of rod mimicking the
rocket exhausts) and were used. The BOZ 101 was improved with a PE piece for the
exhausts; the Cerberus was made from scratch, the kit comes with the more modern
Cerberus III, which is markedly different.
Tornado boxings. Those were days
before smart bombs, so an alternative load was numbers of Mk.83 1000 lb bombs,
(I have seen up to eight in pictured, but five being quoted as usual) available
in a Hasegawa weapons set; I went for them. The in-box Sidewinders are, no
wonder, unusable; I replaced them by those in the Revell Taifun; not that they
are perfect (they have no body where the fins are!) but at least the nose and
forward canards are great; they can be improved (a slice of rod mimicking the
rocket exhausts) and were used. The BOZ 101 was improved with a PE piece for the
exhausts; the Cerberus was made from scratch, the kit comes with the more modern
Cerberus III, which is markedly different.
| COLORS & MARKINGS |
Being an early Tornado, it is painted in Norm 76 (Luftwaffe)
of RAL 7012 Basaltgrau, RAL 6014 Gelbolive and RAL 9005 Tiefschwarz, over RAL
7001 Silbergrau. The instructions show the tank with a funny wavy demarcation
line that I gave up reproducing. It also says they were painted Geloboliv, but
all pictures I have seen show them in Basalgrau. German colours were mimicked
with Xtracrylixs paints FS 26118, ANA 613 and Night Black, respectively.
Silbergrau was made with a mix of Silver and FS26473 (already tried in an F-4F);
it is a paint, not NMF, and was treated accordingly. They were airbrushed free
hand, though “floating m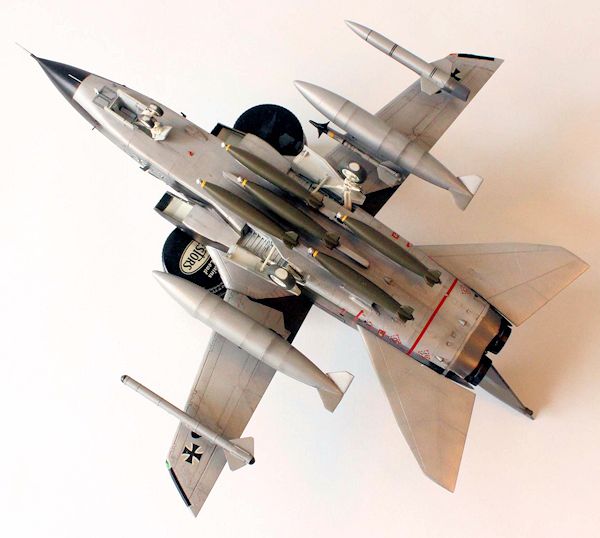 asks” (or even hard masks) would have still been true to
the scale. They are very forgiving allowing retouches with both airbrush and handbrush; they however tend to clog the airbrush tip every other pass. Gloss
coat was from the brand’s gloss varnish, handbrushed; final coat from a mix of
the brand’s matt coat plus an artist acrylic flat coat.
asks” (or even hard masks) would have still been true to
the scale. They are very forgiving allowing retouches with both airbrush and handbrush; they however tend to clog the airbrush tip every other pass. Gloss
coat was from the brand’s gloss varnish, handbrushed; final coat from a mix of
the brand’s matt coat plus an artist acrylic flat coat.
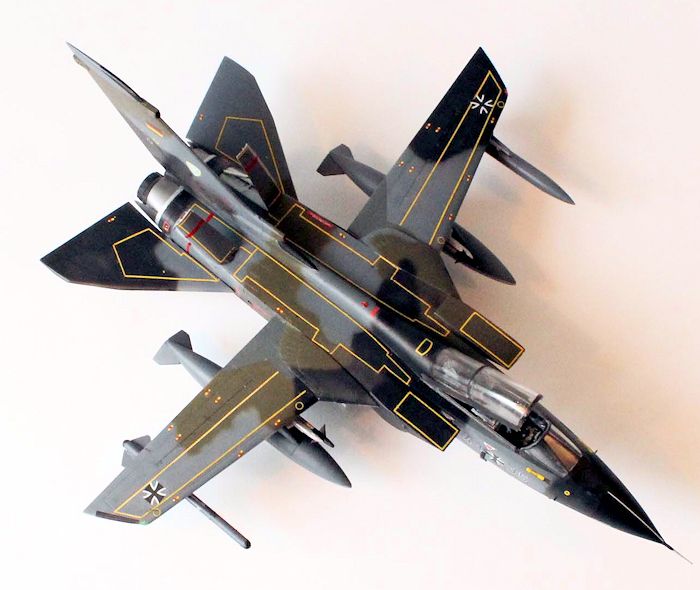
Again, full marks for the Modeldecal decals. They come in that white-oozy-glue decal paper which does not transmit confidence, but they are thin (to the point of curling on themselves at the first opportunity), leave no silvering and they are opaque and solid. The motives are a bit oversize; possibly they were made for the Italeri or Airfix kits. Instructions are superb, amounting to reference material, with pictures of the airframes depicted in the decals. The myriad of stencils and the awesome looking walkways took time and care to apply.
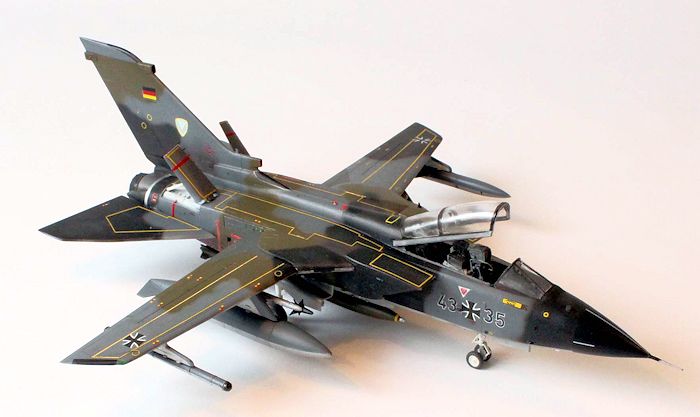
Well, that took almost as long as all the previous steps! But it was almost uneventful, at least. Mk. 83 bombs were attached gluing pegs to the ventral pylons and making a mounting hole on them; then they, as all the rest of the ordnance, were glued with White glue. Undercarriage doors were a bit complicated and the rear front one hangs to an incorrect angle. Canopy is held in place by a big brace I failed to see in any picture; I left it out. Airbrakes were a chore to fix in the correct angle.
| CONCLUSIONS |
 The look of the model is rewarding; however,
it proved unexpectedly tiresome, rather dissuading me from my plans to build a
sizeable collection of them (well, might be only a few!). It sits rather
straight, when the real thing has a slight but noticeable nose-down attitude (I
later learnt that the front leg can be raised to shorten the takeoff run); I
have already commented on the slightly crooked alignment. Satisfying, but not
entirely encouraging; they are complex kits for its size, and not easy builds at
all.
The look of the model is rewarding; however,
it proved unexpectedly tiresome, rather dissuading me from my plans to build a
sizeable collection of them (well, might be only a few!). It sits rather
straight, when the real thing has a slight but noticeable nose-down attitude (I
later learnt that the front leg can be raised to shorten the takeoff run); I
have already commented on the slightly crooked alignment. Satisfying, but not
entirely encouraging; they are complex kits for its size, and not easy builds at
all.
| REFERENCES |
- “Panavia Tornado”, Krzysztof Barcz, Kagero Topshots 111010;
- “Panavia Tornado”, Bill Gunston, Ian Allan Publications;
- “Tornado. Der Kampfflugzeug der NATO”, Alfred Krüger, Waffen-Arsenal;
- “Tornado”, Michael J. Gething, Warbirds Illustrated n° 42, Arms and Armour Press;
- “Panavia Tornado GR.Mk 1”, Roger Chesneau, Aeroguide n° 24, Linewrights;
- “Panavia Tornado IDS”, Randy Evans, Airdata 2, SAM Publications.
September 2015
If you would like your product reviewed fairly and fairly quickly, please contact the editor or see other details in the Note to Contributors.