
| KIT #: | A73005 |
| PRICE: | $15.00 |
| DECALS: | Two options |
| REVIEWER: | Torben Plesberg |
| NOTES: | Tail sitter. Airfix Club kit. |
| HISTORY |
When the old Jet Provost trainer needed a successor, several types of trainer aircraft were in consideration, both jet and turboprop aircraft were in question. In the end, the Brazilian Embraer EMB-312 Tucano was selected as basic airframe. However, the RAF wanted some modifications to fit the demands of the flying schools of the RAF. The 130 Tucanos ordered by the RAF were built by Shorts in Belfast.
 The most
obvious difference between the Jet Provost and the Tucano, apart from the power
plant, is that the Jet Provost is a side-by-side trainer, while the Tucano is a
tandem trainer. Thanks to its turboprop engine, the Tucano is much more
economical to fly than the Jet Provost. The rate of climb of the Tucano is far
better than that of the Jet Provost. Among the modifications for the RAF Tucano
was a more powerful Garrett TPE 331 turboprop engine of 1100 shp, compared to
the original Pratt & Whitney Canada PT6A of 750 shp.
The most
obvious difference between the Jet Provost and the Tucano, apart from the power
plant, is that the Jet Provost is a side-by-side trainer, while the Tucano is a
tandem trainer. Thanks to its turboprop engine, the Tucano is much more
economical to fly than the Jet Provost. The rate of climb of the Tucano is far
better than that of the Jet Provost. Among the modifications for the RAF Tucano
was a more powerful Garrett TPE 331 turboprop engine of 1100 shp, compared to
the original Pratt & Whitney Canada PT6A of 750 shp.
The layout of the Tucano is designed to ease the student’s transition from basic to advanced trainer. A student flies up to 60 hours basic flying on a bulldog or Firefly. Next comes approximately 150 hours on the Tucano. The Bae Hawk is for advanced training and tactical weapons training: gun shooting (30 mm Aden gun), Sidewinder missile firing and practice bomb dropping.
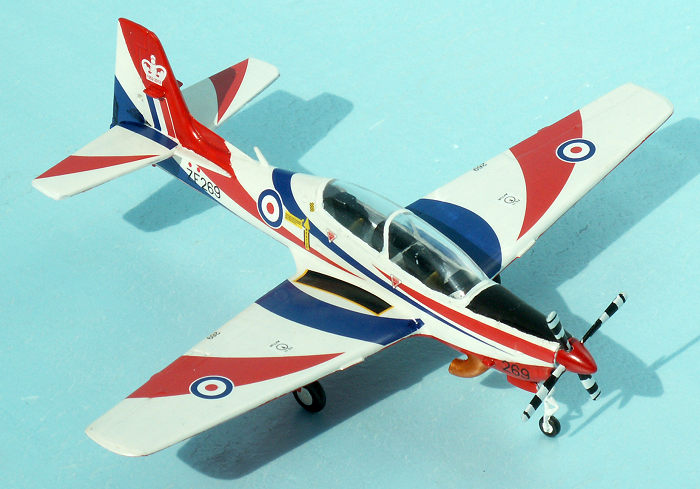
Some Tucanos are used for aerobatic demonstrations at air shows. The Airfix kit has decal options for two such aircraft, each with a color scheme to commemorate the diamond jubilee of Queen Elizabeth on the throne. One color scheme is all black with a large Union Jack on the fin and rear fuselage, the other is more colorful red and white with blue and red stripes. The latter is the subject of my model.
| THE KIT |
 The kit
comes in a shiny red box with a nice photo on the lid of the white-red-blue
colored Tucano and the text: “The Queen’s diamond jubilee Shorts Tucano T. 1”.
It is a limited edition kit for members of the Airfix Cub only. In the bottom,
there is a commercial for joining the Airfix Club. The box is well suited as a
base for the construction. The instructions is an A4 leaflet with eight pages.
Page one tells about the color schemes of the Tucano Display Team, has a
biography of the two pilots, tells about the aircraft, the Tucano T 1, and about
the RAF base Linton-on-Ouse. Page two has assembly instructions in 12 languages
and an assembly icon explanation. Pages three to five show in 6 steps how to
paint the details with Humbrol references, and how to put the model together.
Page six shows the color scheme and decaling of Tucano ZF 269 in full colors,
and page seven shows color and decaling scheme of Tucano ZF 374, the all black
color scheme. Page eight is for your personal notes. The decal sheet is large
and comprehensive, and the quality is first class. The decaling of the ZF 269 is
definitely not an easy one! The decaling is an important part of the entire
color scheme. The all black ZF 374 is a much easier decaling job.
The kit
comes in a shiny red box with a nice photo on the lid of the white-red-blue
colored Tucano and the text: “The Queen’s diamond jubilee Shorts Tucano T. 1”.
It is a limited edition kit for members of the Airfix Cub only. In the bottom,
there is a commercial for joining the Airfix Club. The box is well suited as a
base for the construction. The instructions is an A4 leaflet with eight pages.
Page one tells about the color schemes of the Tucano Display Team, has a
biography of the two pilots, tells about the aircraft, the Tucano T 1, and about
the RAF base Linton-on-Ouse. Page two has assembly instructions in 12 languages
and an assembly icon explanation. Pages three to five show in 6 steps how to
paint the details with Humbrol references, and how to put the model together.
Page six shows the color scheme and decaling of Tucano ZF 269 in full colors,
and page seven shows color and decaling scheme of Tucano ZF 374, the all black
color scheme. Page eight is for your personal notes. The decal sheet is large
and comprehensive, and the quality is first class. The decaling of the ZF 269 is
definitely not an easy one! The decaling is an important part of the entire
color scheme. The all black ZF 374 is a much easier decaling job.
| CONSTRUCTION |
If you follow the instructions, you will end up with a nice model of a Shorts Tucano T. 1. In the following, I shall give some advice according to my experience from building the model:
 Step 1: The
pilot figures are too large, and I omitted them.
Step 1: The
pilot figures are too large, and I omitted them.
Step 2: The propeller blades are not symmetrical and a little too narrow. The propeller and spinner should be of metal. This would solve an important part of the tail sitting problem in the best possible way.
Step 3: 7 g of nose weight as recommended in the instructions is not enough! A 9 mm bullet weighs 7 g, and there is sufficient room for it – if you cut two thirds off to the rear of part 18. The extra room around the 9 mm bullet should be topped up with small pieces of lead. This will add to the weight approximately 2 gram The two pins shown in the cockpit opening of part 16 do not exist! Part 17 was very warped in the rear. There was a gap of almost two cm between the fin halves.
Step 4:
The parts 25 and 26 are too thick and should be replaced by metal foil. The
starboard half of the underwing (part 2a) is rather warped. The assembled wing
is a problem, because the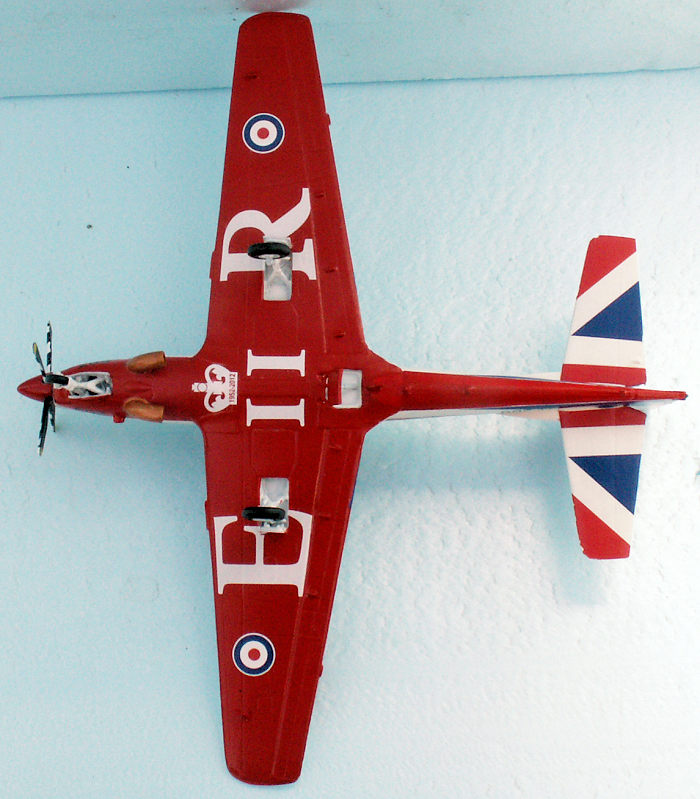 trailing edge is not in alignment with the fuselage. Some sanding is necessary
to make it fit. When the wing has been glued to the fuselage, the starboard wing
has no dihedral! The dihedral of the port wing is correct.
trailing edge is not in alignment with the fuselage. Some sanding is necessary
to make it fit. When the wing has been glued to the fuselage, the starboard wing
has no dihedral! The dihedral of the port wing is correct.
To get a right dihedral of the starboard wing, I clamped the fuselage to a piece of plywood. Then I cut halfway down through the starboard wing about 1 cm from the root, using a razor saw. The wing tip was elevated with a wedge until the dihedral was corresponding to that of the port wing. Finally, the saw track was filled with glue. On the following day, the glue had set, and the correct dihedral of the starboard wing was now permanently established.
Before gluing the front piece with the propeller in place, I drilled a couple of holes through the front piece of the fuselage and put some further small pieces of lead into the fuselage, and they were even protruding into the front piece. I seriously considered to replace the exhaust parts 47 and 48 with scratch built brass exhausts. However, I hoped that the nose weight was sufficient! In this connection, consider that the weight of the paint on the rear fuselage, fin and tail plane will move the center of gravity in the wrong direction! If you will be absolutely sure, not to get a tail sitter, use a golden 9 mm bullet! This will add 5 g extra to the nose weight, and that is sufficient.
To avoid tail sitting with an Airfix Tucano is a real challenge. Brass exhausts would help considerably doing the job.
Steps 5 and 6: No problems worth mentioning.
| COLORS & MARKINGS |
Color
and decaling: The Queen’s diamond jubilee special color scheme of Tucano ZF 269
is gloss white on the upper sides and the underside of the tail plane (HB 22
gloss white), and gloss red on the underside and the spinner (HB 19 bright red).
The anti-glare area in front of the canopy is matt black (HB 33), the turboprop
exhausts are copper (HB 12 copper). The propeller has a special color scheme:
The rear face is matt black with yellow tips (HB 24 trainer yellow). The front
face is matt white (HB 130), with black stripes of different size. The black
stripes were drawn with a 0.7 mm black Posca pen. This tool is very suited for a
pr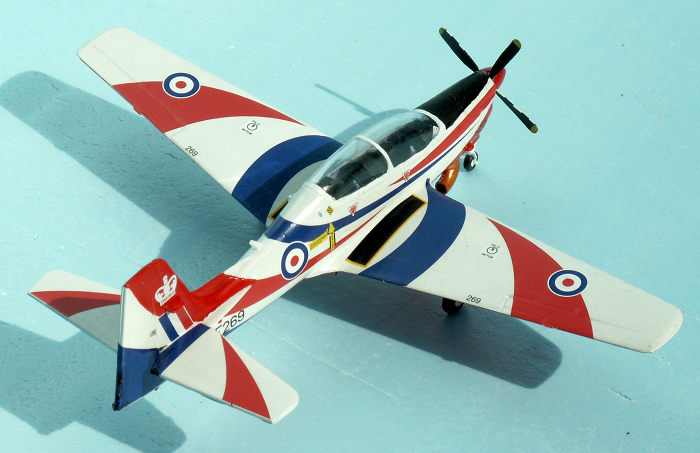 ecision
job like this. The Posca color is matt, corresponding to HB 33. The details
(undercarriage, wheel doors etc.) were painted previously according to the
instructions.
ecision
job like this. The Posca color is matt, corresponding to HB 33. The details
(undercarriage, wheel doors etc.) were painted previously according to the
instructions.
All other parts of the color scheme are decals! However, a single decal could not do the job satisfactorily: The red decal covering the fin above the tail plane. I masked the area of the decal and painted it with HB 19 bright red, which matched the red color of the decals. In a couple of places some small “humps” were sanded away. Otherwise, the decals would have been impossible to make fit properly. I would state, that it is rather difficult to decal this model properly. Besides, the decals did not entirely match the color scheme drawing on page six in the instructions. This fact did not make the application of the decals easier!
However, in the end I succeeded in applying the decals in a reasonable way that satisfied my ambition. I had considered the other decal option and color scheme for the all black aircraft. This choice would probably have been easier to carry out. Finally, the entire model got a layer of gloss clear varnish to protect and seal the decals and provide a nice overall finish of the aircraft.
| CONCLUSIONS |
The Airfix Tucano T. 1 special edition kit with decals for the Queen’s diamond jubilee color schemes produces a striking model of a very nice aircraft. The kit itself was a disappointment, compared to the Vampire T 11 two seater 1/72 kit and the Spitfire PR XIX 1/48 kit. The warped and unprecise parts make it a challenge to build this Tucano kit. Furthermore, the decaling is not an easy one, if you choose the more colorful of the two options. Finally, you will face a serious tail sitting problem. The kit is definitely not recommended for beginners. This kit was offered to members of the Airfix Club only, as far as I remember. It was a real challenge to build this kit, and as such it is recommendable to experienced modelers, who fancy trainer aircraft.
| REFERENCES |
Wikipedia article: Short Tucano.
18 August 2020
Copyright ModelingMadness.com.
If you would like your product reviewed fairly and quickly, please contact the editor or see other details in the Note to Contributors.