| KIT #: | 2677 |
| PRICE: | $16.00 on sale |
| DECALS: | 12 serial options |
| REVIEWER: | Spiros Pendedekas |
| NOTES: |
| HISTORY |
The Red Arrows, officially known as the Royal Air Force Aerobatic Team, is the aerobatics display team of the Royal Air Force (RAF) based at RAF Waddington. The team was formed in late 1964 as an all-Royal Air Force team, replacing several unofficial teams that had been sponsored by RAF commands.
The Red Arrows have a prominent place in British popular culture, with their aerobatic displays a fixture of British summer events. The badge of the Red Arrows shows the aircraft in their trademark diamond nine formation, with the motto Éclat, a French word meaning "brilliance" or "excellence".
 Initially, they were
equipped with seven Folland Gnat trainers inherited from the RAF Yellowjacks
display team. This aircraft was chosen because it was less expensive to operate
than front-line fighters. In their first season, they flew to 65 shows across
Europe. In 1966, the team was increased to nine members, enabling them to
develop their Diamond Nine formation. In late 1979, they switched to the BAE
Hawk trainer. The Red Arrows Hawks feature an uprated engine and a modification
to enable smoke to be generated; diesel is mixed with a coloured dye and ejected
into the jet exhaust to produce either red, white or blue smoke.
Initially, they were
equipped with seven Folland Gnat trainers inherited from the RAF Yellowjacks
display team. This aircraft was chosen because it was less expensive to operate
than front-line fighters. In their first season, they flew to 65 shows across
Europe. In 1966, the team was increased to nine members, enabling them to
develop their Diamond Nine formation. In late 1979, they switched to the BAE
Hawk trainer. The Red Arrows Hawks feature an uprated engine and a modification
to enable smoke to be generated; diesel is mixed with a coloured dye and ejected
into the jet exhaust to produce either red, white or blue smoke.
The Red Arrows have performed over 4,800 displays in 57 countries worldwide. The team celebrated their 60th Diamond Season in 2024, with an anniversary decal applied to the fuselage and fin, as well as a special 'anniversary break' manoeuvre being included in the display.
| THE KIT |
Italeri came in 2008
with its new tool Hawk, reboxing it another three times so far, with Tamiya and
Academy also reboxing it in 2009 and 2012 respectively, covering various
subtypes. The specific copy is the 2010 “Red Arrows” edition and was bought
sealed in 2023 at a sale price that I couldn’t refuse.
 It is by all means a nice looking kit that offers sufficient detail at all
areas, backed by a PE fret to boost the cockpit looks and for a more in-depth
look at its contents you may read its preview, found in the ever growing MM
archives.
It is by all means a nice looking kit that offers sufficient detail at all
areas, backed by a PE fret to boost the cockpit looks and for a more in-depth
look at its contents you may read its preview, found in the ever growing MM
archives.
Though I generally avoid red styrene, red paint and complicated schemes, let alone all three together, my young sons’ passion for The Red Arrows meant that I had to build a Red Arrow Hawk sooner or later. So, here it went...
| CONSTRUCTION |
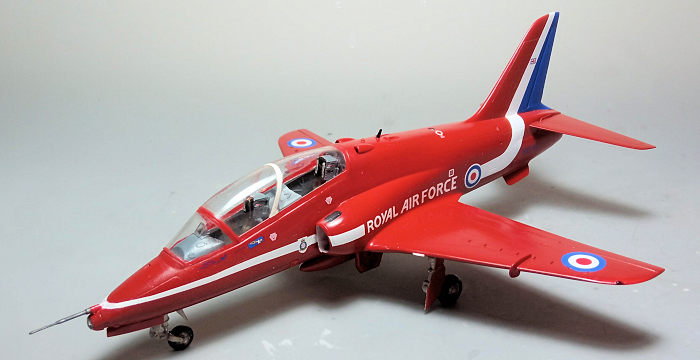
I first assembled the cockpit and the rear exhaust, which, together with the nose bay and the small starter exhaust, were trapped between the fuselage halves. Instructions state 50 grams of weight added to the front. Just to be sure, I secured around 60 grams of fishing weights over the nose bay before closing the fuselage halves.
Basic cockpit color was Tamiya XF-66 Light Gray, while the stick grips were painted black. Since I try to avoid PE and was nevertheless going for a closed canopy, I did not use the very nice PE instrument panels and consoles but went on with the quite nice looking decals provided. The seats had the same cockpit gray framing, black head cushions and olive drab seat cushions. Seat belts were added from masking tape (if you don’t hate PE, like Yours Truly, you can use the very nice kit-provided PE belts). The tail pipe and also the tiny spine-located starter exhaust innards were painted Mr Color 61 Burnt Iron.
 Moving along, I attached
the 2-piece intakes, followed by the 2-piece upper main bay wall. The spine
panel aft of the rear seat received the two air conditioning air inlets and was
attached in position. The ventral strakes are a one piece affair with the
airbrake housing and were attached in position as well, followed by the
elevators, which were positively set in position and the aft plate on top of the
tailpipe exit which serves to hold the smoke generator fuel injectors in place.
Moving along, I attached
the 2-piece intakes, followed by the 2-piece upper main bay wall. The spine
panel aft of the rear seat received the two air conditioning air inlets and was
attached in position. The ventral strakes are a one piece affair with the
airbrake housing and were attached in position as well, followed by the
elevators, which were positively set in position and the aft plate on top of the
tailpipe exit which serves to hold the smoke generator fuel injectors in place.
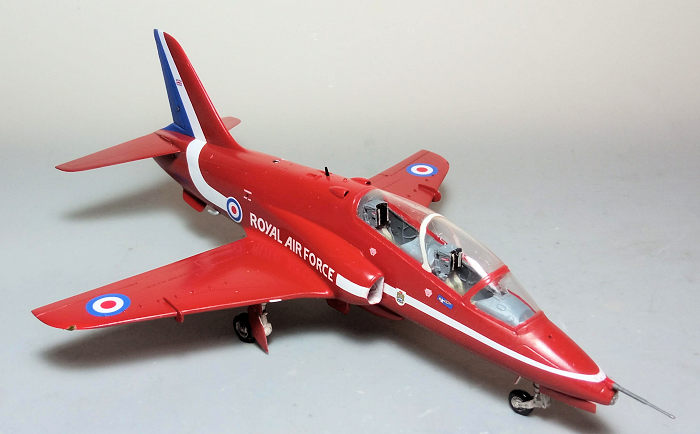
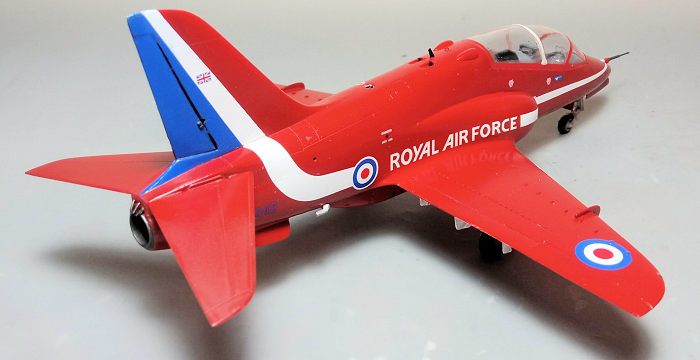
The main wing, a 16 piece affair, including the six actuators and two wing fences, was next assembled and attached to the fuselage. I elected the flaps-up position, which is easier to do and also the normal stance of the Hawk. For the same reason the airbrake was attached “retracted”, as was the small cockpit step on the port side of the fuselage.
Next, the wingtip lights were finally attached (to be blended during filling and sanding), followed by the 2-piece smoke generator, concluding basic assembly. Overall fit, while not Tamiya, was not bad either, needing moderate amounts of filler at the usual areas (wing roots, intakes and a few other panel joints). After a first filling/sanding round with liquified styrene and a second one with “normal” filler, I took the Hawk to the paint shop!
| COLORS, MARKINGS, & THE REST |
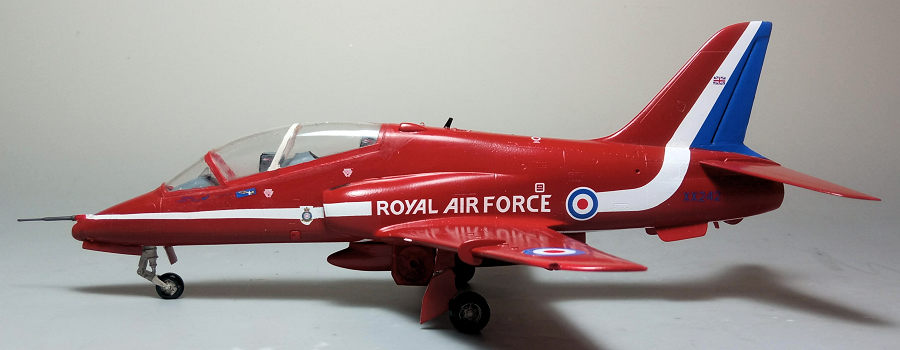
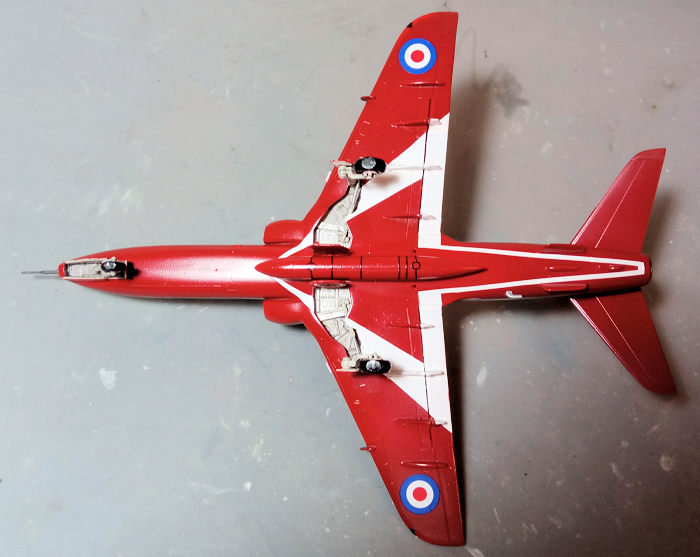
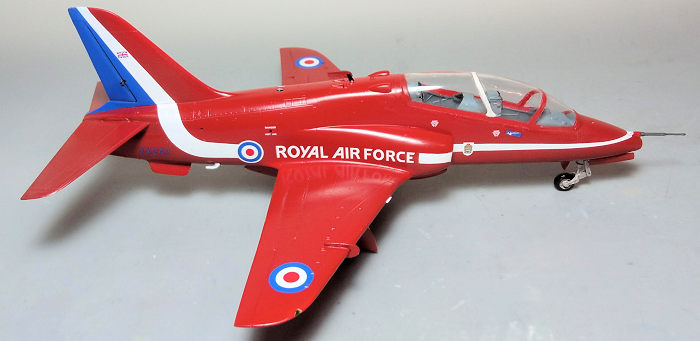
I first painted the complete model, including gear doors, Hu220 Gloss Italian Red, which, to my eye, was close enough to the Red Arrows shade. The intake innards were painted white. Since I try to avoid masking as much as I can, for the white decorations I went with the kit decals, which, despite their age, behaved reasonably well. The fact that they had to conform onto very challenging areas (like the moving surfaces actuators), meant that they had to be sliced and positioned, leaving a few uncovered spots that had to be touched up. The rest of the decals were applied as well, with a coat of Future sealing them in.
 The landing gear was
assembled and attached in position, with the bird nicely and securely standing
on its feet. Legs, wheel rims, door innards (except from the main doors which
featured the basic red also inside) and wheel bays were painted Hu28 light gray.
Tires were painted black. Oleos were highlighted with a fine tip silver pen.
The landing gear was
assembled and attached in position, with the bird nicely and securely standing
on its feet. Legs, wheel rims, door innards (except from the main doors which
featured the basic red also inside) and wheel bays were painted Hu28 light gray.
Tires were painted black. Oleos were highlighted with a fine tip silver pen.
Since those birds are kept in an absolute pristine condition, the only weathering I added was a light black wash in the landing gear area, with a satin coat giving the bird its final hue.
The front pitot was attached in position and was painted Testors Burned Metal, with its base accordingly painted to blend with the surrounding fuselage color. The spine-located UHF blade aerial was painted black and attached as well. Finally, the tiny aft-port located fuel vent and the even tinier three smoke generator fuel injectors aft of the exhaust were attached in position and painted Mr Color 61 Burnt Iron.
The transparencies had their well defined frames hand painted and attached in position, with fit being very good and the tiny gaps faired with white glue. The long lost nose headlight lens was replicated with a big blob of clear glue, the same being true with the long shaved-off spine anti-collision light. The wingtip lights were painted with red and green clear paint, before calling the red bird done!
| CONCLUSIONS |
This is a nice kit of the iconic Hawk: general shape is accurate, molding is nice and crisp, panel lines are nicely engraved with the added bonus of rear raised rivets, overall detail is very good, the key areas of cockpit, landing gear and wings layout included, fit is good with no unpleasant surprises, transparencies are nice and clear, instructions are concise and the superbly printed decals still worked after almost 25 years!
 Following the
company’s trend, it is not an overengineered kit, which makes it suitable for
anyone but the absolute beginner. My only serious note of caution lies in the
somewhat complicated Red Arrow scheme, where you can either use the kit decals
or mask and spray the white areas. The first option seems initially attractive
(aided by the good behavior of the decals), but it might prove tedious in the
end, as you will have to slice/reposition the decals and retouch some areas. The
second option requires tedious masking, but afterwards will be a walk in the
park and, possibly, yield a more homogeneous result. Your choice.
Following the
company’s trend, it is not an overengineered kit, which makes it suitable for
anyone but the absolute beginner. My only serious note of caution lies in the
somewhat complicated Red Arrow scheme, where you can either use the kit decals
or mask and spray the white areas. The first option seems initially attractive
(aided by the good behavior of the decals), but it might prove tedious in the
end, as you will have to slice/reposition the decals and retouch some areas. The
second option requires tedious masking, but afterwards will be a walk in the
park and, possibly, yield a more homogeneous result. Your choice.
Aside from some past limited run releases (Ailes Suisses, Premiere, High Planes), which are difficult to build and difficult to find, the other mainstream 1/48 Hawk releases are the 2003 Airfix and 2014 Hobby Boss offerings. All three can be considered “modern” toolings, offering more or less comparable levels of detail and their retail prices don’t differ that much.
That said, the Italeri kit can easily hold its own nowadays and is certainly recommended if you want to build a quarter scale Hawk, especially if found at “a price you can’t refuse”, as was my case.
Happy Modeling!
Spiros
Pendedekas 11 November 2025 Copyright ModelingMadness.com. All rights reserved. No
reproduction in part or in whole without express permission. If you would like your product reviewed fairly and fairly quickly, please
contact
the editor or see other details in the
Note to
Contributors.