
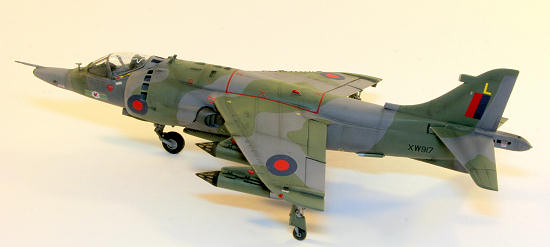
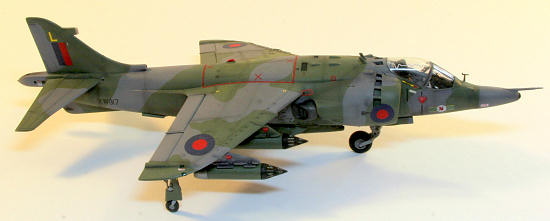
Monogram/Airfix 1/48 Harrier GR.3
| KIT #: | ? |
| PRICE: | $ Out of Production |
| DECALS: | At least one option per kit |
| REVIEWER: | Paul Mahoney |
| NOTES: | Kit bash of both kits to provide more detailed GR3 |
| HISTORY |
The Hawker Harrier was the
first fully-operational fighter/ground-support aircraft with Vertical/Short
Takeoff and Landing (VSTOL) capabilities.
It’s lineage can be traced back to the Hawker P.1127, designed by Sir
Sydney Camm (who also designed the famous Hurricane and Typhoon fighters of
WWII, among others). In the late
1950s/early 1960s many Western companies were experimenting with the development
of the VSTOL designs, but only the Hawker examples actually reached the
production level.
VSTOL effectively means this aircraft is
(in addition to normal flight characteristics) able to take off and land
vertically like a helicopter, or in an extremely short distance.
This unique capability is accomplished by rotating the engines
exhaust/thrust nozzles. The Harrier
has 4 nozzles (2 per side) that can rotate from 0 degrees (straight back) to 98
degrees (slightly forward of
 straight down).
During ‘normal’ flight, these nozzles are in the 0 degree position, like
any other jet aircraft. Rotating
these nozzles to varying degrees allows the aircraft to ascend and descend
vertically as well as allowing it to hover.
First generations (models GR1 and GR3) of this unique aircraft were used
by the RAF, the Royal Navy, the
straight down).
During ‘normal’ flight, these nozzles are in the 0 degree position, like
any other jet aircraft. Rotating
these nozzles to varying degrees allows the aircraft to ascend and descend
vertically as well as allowing it to hover.
First generations (models GR1 and GR3) of this unique aircraft were used
by the RAF, the Royal Navy, the
The GR1 was the first
production model of the Harrier, which was then further developed into the GR3
with upgraded avionics, engine, and an extended nose section to house a laser
tracker. GR3s saw combat operations
for the first time during the Falklands War, flown by the RAF off of HMS Hermes.
The Royal Navy version of the GR3, Sea Harrier, also saw service in this
conflict.
Second generation Harriers were
actually developed by the McDonnell Douglas company in the
A Personal History:
 I have been building WW2
aircraft models, with the occasional foray into WW1 builds, for about as long as
I can remember. I love aircraft,
and love model building. But I know
next to nothing about jets, and even less about jet models.
I have been building WW2
aircraft models, with the occasional foray into WW1 builds, for about as long as
I can remember. I love aircraft,
and love model building. But I know
next to nothing about jets, and even less about jet models.
In December of 2010 (ironically
just as the
So, after our meeting, I set to work finding out what I would need to build his model. I quickly came to the conclusion that the Monogram AV-8A (a Harrier I) is the most detailed of the early Harriers in 1/48, and that Airfix made a rather basic GR3 as well. I found a few online builds where these kits were combined, and decided I would do the same. In what was to become a series of challenges with this build, I also quickly discovered they are both OOP. I posted a plea for help on another forum, and one kind gentleman came to my rescue with an Airfix kit, a black box Harrier II cockpit, and the ability to answer many of my dopey questions. I located a Monogram kit on ebay, and away I went…
| THE KIT |
Well, both kits are
certainly right in line with their vintage.

The Airfix kit,
unfortunately, is also a classic example of their early ‘80s work:
decent outline, little-to-no detail in the cockpit and gear bays,
poorly-defined raised panel lines, lots of flash, and a bit of a general
‘clunky’ feel to it. BUT, it is a
GR3, and it has the 4 SNEB rocket launchers I will need (or so I thought they
were what I will need). I
think Airfix made several boxings of this, including a GR1 and possibly a Sea
Harrier. The kit I was fortunate
enough to get did not have any decals.
Airfix decals of this vintage would probably be close to unusable, but I
did need one in particular which I will discuss a bit later.
So, my plan was to use the Monogram kit as the base, and take the necessary GR3 bits from the Airfix. Initial test fitting shows that the fuselages of the 2 kits are almost identical (save the extended GR3 nose and the RWR fairing on the tail fin), so grafting the appropriate pieces should be straight-forward. (Should being the operative term here!). I intended to build this more or less out of the box, after allowing for the conversions.
| CONSTRUCTION |
As I mentioned, upon
matching up the fuselage halves of the two kits I had discovered they were a
very, very close match. I initially
had thought I could chop the nose off of the Monogram at a panel line forward of
the cockpit, and do the same with the Airfix.
Then a simple graft would provide the solution.
Unfortunately (I feel like I am using that word a lot in this article),
the underside (starting under the cockpit) of the Monogram kit tapers up toward
the nose much more sharply than the Airfix.
Chopping at the panel lines would result in a step between the nose of
the Airfix and the body of the Monogram.
In other words, the circumference of the nose at that panel line is
greater on the Airfix than on the Monogram.
Filling and sanding wouldn’t fix that, and if I reduce the underside of
the Airfix nose it would have the wrong profile.
So, my solution was to cut the Airfix nose vertically, starting at the
top of that panel line, down about 85% of the way, and then turn my cut line 90
degrees and cut backward until I was under the windshield area, then turn the
cut back down and cut through to the bottom.
The final downward cut would come at an area where the undersides of the
two kits were identical. So the
piece I cut out would look like a nose cone with an extension to the rear on the
underside. The photos describe this
a little better than words.
 In order to achieve some
sort of uniformity, I held the Airfix fuselage halves together and used liquid
glue to join just the nose section and the tail (more on the tail shortly).
Once dry, I made the cuts as described above using a UMM tool (basically
a very fine razor saw). I cut the
corresponding area out of the Monogram kit as
In order to achieve some
sort of uniformity, I held the Airfix fuselage halves together and used liquid
glue to join just the nose section and the tail (more on the tail shortly).
Once dry, I made the cuts as described above using a UMM tool (basically
a very fine razor saw). I cut the
corresponding area out of the Monogram kit as well, but only taped the halves
together prior to cutting. A rough
test fit revealed there would be a fair amount of filling to do, but the overall
shape looked correct, and the lower surfaces had no step.
well, but only taped the halves
together prior to cutting. A rough
test fit revealed there would be a fair amount of filling to do, but the overall
shape looked correct, and the lower surfaces had no step.
Next up was the tail – the
GR3 carried a fairing on the forward edge of the tail fin that housed RWR
equipment. Again, the Airfix kit
had what I needed, while the Monogram kit did not.
I followed a similar procedure to the nose operation here as well.
A couple of horizontal slices were made in the Airfix tail, following the
line of the fairing from front to back, cutting about 1/3 of the way into the
tail itself. The tail was already
glued together, so there was mind I had sliced into the fin itself), and then held the cutout up
to each side of the unassembled Monogram tail halves.
I drew around the outline of the cutout onto the Monogram tail, then cut
out the appropriate slice. The idea
here was, once the halves were assembled, I could just insert the fairing into
the tail fin. The Airfix tail’s
cross section is a little thinner than Monograms, so the small concave area
would have to be built up with putty.
 After the minor surgery,
attention was turned to the cockpit.
The kind gentleman that provided the Airfix kit to me also included a
Black Box cockpit designed for the Monogram Harrier II kit.
This was a very nicely detailed addition, much better than the already
decent Monogram interior. One minor
problem was that this was designed for the Harrier II, not the Harrier I.
Besides the difference in the actual aircraft’s cockpit, the kits are
different so this would in no way be a drop fit.
Still, that detail was so nice I really wanted to use it.
I en
After the minor surgery,
attention was turned to the cockpit.
The kind gentleman that provided the Airfix kit to me also included a
Black Box cockpit designed for the Monogram Harrier II kit.
This was a very nicely detailed addition, much better than the already
decent Monogram interior. One minor
problem was that this was designed for the Harrier II, not the Harrier I.
Besides the difference in the actual aircraft’s cockpit, the kits are
different so this would in no way be a drop fit.
Still, that detail was so nice I really wanted to use it.
I en ded up using a combination of the kit interior and the Black Box.
The back side of the rear wall of the cockpit tub on the kit provides the
front wall for the nose gear – the back side of the Black Box cockpit has
virtually no detail. Since the
floor and sides of the Black Box set looked very nice, I decided to slice off
the kit’s rear cockpit wall and mate that to the Black Box resin.
The Harrier II instrument panel is decidedly different than the GR3’s
(which in turn is different than the GR1’s !), so I used the kit instrument
panel. From photos located on the
web, I had a rough idea of the look of GR3’s instrument panel, so I modified the
kit’s panel to represent this. I
also used the kit’s control stick as it looked closer to the original.
Finally, the ejection seat in the Black Box set was much nicer than the
kit’s (and looked accurate to me), so that was used.
ded up using a combination of the kit interior and the Black Box.
The back side of the rear wall of the cockpit tub on the kit provides the
front wall for the nose gear – the back side of the Black Box cockpit has
virtually no detail. Since the
floor and sides of the Black Box set looked very nice, I decided to slice off
the kit’s rear cockpit wall and mate that to the Black Box resin.
The Harrier II instrument panel is decidedly different than the GR3’s
(which in turn is different than the GR1’s !), so I used the kit instrument
panel. From photos located on the
web, I had a rough idea of the look of GR3’s instrument panel, so I modified the
kit’s panel to represent this. I
also used the kit’s control stick as it looked closer to the original.
Finally, the ejection seat in the Black Box set was much nicer than the
kit’s (and looked accurate to me), so that was used.
I painted up the cobbled
together cockpit using web photos as a reference.
I tried to stay more or less OOB in terms of any additional items other
than the mix-and-match resin and kit cockpit.
The Monogram kit has a very nice intake fan, as well as very decent nose
gear well details. All the interior
pieces were added in, and the fuselage halves were assembled.
As much care as possible was taken while applying the liquid glue, so as
not to disturb the raised panel lines.
Having been spoiled over the
years by engraved panel lines which can be easily replaced with a few swipes of
a scriber, the raised lines presented a small extra challenge.
As I was attempting to be more or less OOB, I didn’t want to go through
the efforts of rescribing all the panel lines.
This would have been a first for me, and I didn’t want to attempt it for
the first go on a model I was presenting to someone.
In the end, the amount of effort involved in attempting to retain the
raised lines, and replacing those damaged during assembly, probably took more
time than just rescribing it. I did
scribe in the lines representing the closed doors
 for the rear landing gear, as
they most definitely needed it.
Some of the raised panel lines matched up beautifully between the halves, and no
work was needed. In other cases the
seam between the halves needed work, which resulted in obliterating some of the
raised lines. I decided to scribe
in the lost portion of the line, and carry this scribe on until the first
perpendicular panel line it would hit.
This, in theory, would keep the scribing neat and to a minimum.
One huge life-saver courtesy of Monogram is a one-piece top half of the
wings, extending over the bulk of the top of the fuselage.
No major seam line on top to worry about.
for the rear landing gear, as
they most definitely needed it.
Some of the raised panel lines matched up beautifully between the halves, and no
work was needed. In other cases the
seam between the halves needed work, which resulted in obliterating some of the
raised lines. I decided to scribe
in the lost portion of the line, and carry this scribe on until the first
perpendicular panel line it would hit.
This, in theory, would keep the scribing neat and to a minimum.
One huge life-saver courtesy of Monogram is a one-piece top half of the
wings, extending over the bulk of the top of the fuselage.
No major seam line on top to worry about.
After cleaning up the
fuselage joins and doing what rescribing I felt was needed, I added in the
Airfix sections. The tail RWR
slotted right in, and with some super glue, putty and a little sanding looked
pretty good. One panel line on each
side was also scribed back in.
The nose was placed on, and
I promptly discovered that my cuts were not so straight.
In order to properly align things along all axes, large gaps were left
between the pieces. I did my best
to sand and reshape the nose cone attachment points, studying drawings to make
sure the length remained accurate.
In the end, the nose cone only touched the Monogram fuselage in about 40% of the
area. I used super glue to tack it
in place, made some final a lignments, then applied liquid glue.
Once dry, more super glue was flowed into the join.
I inserted bits of scrap plastic and resin to fill the holes, then used
more super glue to seal everything up.
A few coats of putty and Mr Surfacer finished the job.
The details on the Airfix surface were poor to non-existent, so there
wasn’t much to worry about obliterating.
I put some definition back in the camera port on the left side, and then
drilled and carved out the actual camera opening with an Xacto knife.
I also scribed in some panel lines that had been lost or weren’t there to
start with.
lignments, then applied liquid glue.
Once dry, more super glue was flowed into the join.
I inserted bits of scrap plastic and resin to fill the holes, then used
more super glue to seal everything up.
A few coats of putty and Mr Surfacer finished the job.
The details on the Airfix surface were poor to non-existent, so there
wasn’t much to worry about obliterating.
I put some definition back in the camera port on the left side, and then
drilled and carved out the actual camera opening with an Xacto knife.
I also scribed in some panel lines that had been lost or weren’t there to
start with.
The mounting for the pitot
tube extending directly out of the top of the nose was added from the Airfix
box. I would add the pitot tube
itself towards the end of the build to prevent breaking it off.
In honesty, the Airfix pitot tube/mounting comes as one piece.
I attached the entire piece and ended up breaking off the pitot within an
hour. It was too short anyway.
In the end I removed the front piece from the Monogram pitot (which has a
different mounting location entirely), drilled a hole in the back of this and
inserted a small piece of steel wire.
I then drilled a hole in the mounting and was able to insert the wire
into this, making a strong joint on a very exposed item.
 Moving on to the wings, the
situation was now becoming familiar.
Per the pilot, I was planning to load this out with 4 SNEB rocket
launchers. The Monogram kit has
nicely detailed pylons, but not the right armament.
The Airfix kit has crudely molded pylons and weapons, but has the RIGHT
weapons (or so I thought). So, it
is to be Monogram pylons and Airfix weapons.
Now came the next glitch… my Monogram kit only had
Moving on to the wings, the
situation was now becoming familiar.
Per the pilot, I was planning to load this out with 4 SNEB rocket
launchers. The Monogram kit has
nicely detailed pylons, but not the right armament.
The Airfix kit has crudely molded pylons and weapons, but has the RIGHT
weapons (or so I thought). So, it
is to be Monogram pylons and Airfix weapons.
Now came the next glitch… my Monogram kit only had
The lower wing halves had
the holes drilled out for the pylons and were then added to the one-piece top
half. This fit relatively well onto
the fuselage, but there were large gaps on the underside between the wings and
the fuselage. After attaching the
wing, I filled these gaps with Mr Surfacer 500.
Once dry, a heavy wipe down with a rag soaked in fingernail polish
remover will remove all the putty on the surface, and leave the seam nicely
filled in. This method works great
in these situations. The seam is
not eradicated, but it is filled in smoothly and easily.
I also used this method to blend in the pylons, as their fit was also not
quite exact.
The intakes were another
matter that needed addressing. The
intakes have a series of inlet doors molded around just aft of the lip.
Monogram molded the top doors open (represented as cut outs) and the
lower ones shut (but done with raised lines, which I rescribed).
This lip with the doors is molded as a separate piece that attaches to
the fuselage. This piece is of a
smaller circumference than the part of the fuselage it attaches to, resulting in
a pronounced step between the pieces.
At first I thought it was not too noticeable,
 but on further reflection I
realized it had to be fixed. I
glued a small strip of styrene stock into the ‘step’ area that matched the
height of the higher step, then feathered it by sanding the edge facing away
from the step. Putty and some
superglue finished the blending job, then I rescribed the closed doors.
The hardest part in this was protecting the surrounding raised details as
I sanded everything flush.
but on further reflection I
realized it had to be fixed. I
glued a small strip of styrene stock into the ‘step’ area that matched the
height of the higher step, then feathered it by sanding the edge facing away
from the step. Putty and some
superglue finished the blending job, then I rescribed the closed doors.
The hardest part in this was protecting the surrounding raised details as
I sanded everything flush.
The horizontal tailplanes (elevons,
stabilators, what do you jet guys call these?) were left off until after
painting.
Monogram’s canopy is very clear and molded quite well. Unfortunately (there’s that word again!) the edge that mates to the canopy frame has no framing on it, and it is tough to create a perfect seam between a clear part and regular kit plastic. On top of this, the fit between the two pieces was less than perfect as well. My solution here was to attach it using a few drops of liquid glue, then flood it with Future to solidify the join. Then I would mask it just slightly above the seam so the paint would mask being able to see the join itself. I know the proper way to do this would have been to superglue the two parts together, then sand and polish forever until the seam is gone. Then polish even more to restore the clarity. I have done this before, and know my limitations. If I messed it up, it would be difficult to fix, so I opted for the easier way out.
| COLORS AND MARKINGS |
The recipient of this model
was interested in a particular serial-numbered aircraft, flying out of Gutersloh
Germany with 3(F) Squadron. As none
of either kit’s decals were usable (or present!), I obtained the Aztek Harrier
decal sheet which had all the stencils and national markings I needed.
It also had enough letters and numbers on it to allow me to piece
together the proper airframe number.
All that was left was the squadron badge and the individual pilot’s name
under the cockpit. I was planning
on making both on my computer. The
name was easy enough, but the squadron logo was a little bit more of a
challenge. There are
 decals of this
available for Harrier II’s, but they are of a different style than the ones used
on the GR3. It is possible the
decals included in the Airfix kit are correct, but since I didn’t have those,
this was not an option. A good
friend of mine in Arizona offered to help me alter some images I had of the
later-style logo and make it match the photos I had of the GR3s at Gutersloh.
Just as I was ready to go down this path, once again the man who provided
the Airfix kit, came through and found exactly the proper decals!
A nice big sigh of relief as I wouldn’t have to tackle making that decal!
decals of this
available for Harrier II’s, but they are of a different style than the ones used
on the GR3. It is possible the
decals included in the Airfix kit are correct, but since I didn’t have those,
this was not an option. A good
friend of mine in Arizona offered to help me alter some images I had of the
later-style logo and make it match the photos I had of the GR3s at Gutersloh.
Just as I was ready to go down this path, once again the man who provided
the Airfix kit, came through and found exactly the proper decals!
A nice big sigh of relief as I wouldn’t have to tackle making that decal!
After a lot of checking and
re-checking of seams and panel lines and such, and more than a few coats of
primer to check still further, it was time to apply the camouflage.
The one good thing (to me) about Harriers of this era is that they were
painted in more or less flat colors, and they showed a small amount of wear and
tear. This is right in line with
the way I paint WW2 aircraft, so at least I am back in familiar territory.
Photos of operational
Harriers showed effects on the camouflage that I thought might be achieved by
some preshading, so that is where I started.
Over my final coat of Tamiya Primer, which is light
 grey in color, I
airbrushed lines and control surface lines with a generic black from a craft
store. This comes pre-thinned for
an airbrush and is ideal (and cheap!) for this sort of work.
I don’t do preshading often, but this seemed like the perfect scheme on
which to use it. In the end the
effect was pretty minimal.
grey in color, I
airbrushed lines and control surface lines with a generic black from a craft
store. This comes pre-thinned for
an airbrush and is ideal (and cheap!) for this sort of work.
I don’t do preshading often, but this seemed like the perfect scheme on
which to use it. In the end the
effect was pretty minimal.
Next I sprayed the aircraft
overall with Gunze Aqueos Ocean Grey.
Gunze acrylic paints spray beautifully, and I happen to have this in my
supply. They are impossible to get
at the m oment in the US, so I got lucky having this and a few others on hand.
It was thinned in a ratio of 2 parts paint to 1 part Isopropyl Alcohol
(91%). This Harrier was camouflaged in
the standard “wrap-around” camouflage of the time.
Every set of camouflage patterns I had (Airfix instructions, Aztek and
Sky Decals sheets) all show slight variations in patterns.
After lots of studying of pictures, I concluded the Aztek one was
probably the closest. They are all
similar, but not quite identical.
oment in the US, so I got lucky having this and a few others on hand.
It was thinned in a ratio of 2 parts paint to 1 part Isopropyl Alcohol
(91%). This Harrier was camouflaged in
the standard “wrap-around” camouflage of the time.
Every set of camouflage patterns I had (Airfix instructions, Aztek and
Sky Decals sheets) all show slight variations in patterns.
After lots of studying of pictures, I concluded the Aztek one was
probably the closest. They are all
similar, but not quite identical.
I originally envisioned
using rolls of Blu-Tak to create
all the curves and bends necessary for the demarcation between the Green and the
Grey already on the model. I was
not able to get a consistency in the lines that I was happy with so I ended up
with Plan B. I scanned the Aztek
instruction sheet into my computer, and enlarged the camouflage diagrams so that
I could print them out in 1/48 scale.
I very gently placed strips of Tamiya masking tape over the printouts and
cut out the patterns, which were then applied to the model.
Gently pressing the tape onto the scans allowed it to easily lift off the
paper after cutting it. Naturally,
the plans of the top and bottom did not match up with the side patterns, so some
artistic license was necessary. All
of the Grey areas on the pattern were masked off using this method.
I was fortunate enough to have a bottle of Gunze Aqueos Dark Green as
well, so that was now sprayed on to the masked off areas, using the same
thinning ratio as the grey. I spent
about 5 hours measuring, tracing, cutting and applying, and then spent about 20
minutes spraying the paint!
After all the paint was
nicely dry, a few coats of Future were hand-brushed on in preparation for the
decals. As I mentioned, the Aztek
decal sheet was my source for all the stencils, national markings, and
individual aircraft code. These
decals performed pretty well, and were printed nicely.
My new jet friend had kindly provided me with the proper squadron
markings after much searching on both our parts.
He also provided me with the Sky Models decal sheet for the Harrier which
was the source (after some cutting and pasting) of the fuselage serial numbers.
I printed out the pilot’s name from my printer onto clear decal stock. A coat of MicroScale decal coat was then brushed over the decals to seal them. When this was dry, I cut them as close as possible to the design (one large sheet of carrier film on these), and applied them as normal. Finally, Gunze clear flat from a rattle can was used to bring everything back to a flat sheen. Some light weathering was applied using some pastels to dirty up the airframe a little. Photos show some decent wear and tear on these Harriers.
| FINAL BITS |
 The landing gear was
attached prior to the Future and decal applications.
Making sure things line up properly on the Harrier’s landing gear took a
little planning. First, the nose
gear was glued in place, and the aft gear was slotted in to place (but not
glued). The aft gear attachment was
allowed to ‘float’ in it’s locating hole while I aligned the outrigger gear on
the wings. These outrigger gear
were then attached using tube glue so I would have some time to adjust them and
make sure everything was square and level.
They naturally wanted to go into the slots at an angle, but checking
pictures confirmed they should be straight vertically.
After getting these fully-aligned, I applied a bit of superglue and hit
it with accelerator. Finally,
with the aft gear resting in the proper place, I applied the superglue and
accelerator to that as well. I
added an MV Products lens to the nose gear to spruce it up a little, and then
added some final weathering to the landing gear assemblies.
Once again I felt out of my element as I had no worries about rigging or
antenna wires on this one!
The landing gear was
attached prior to the Future and decal applications.
Making sure things line up properly on the Harrier’s landing gear took a
little planning. First, the nose
gear was glued in place, and the aft gear was slotted in to place (but not
glued). The aft gear attachment was
allowed to ‘float’ in it’s locating hole while I aligned the outrigger gear on
the wings. These outrigger gear
were then attached using tube glue so I would have some time to adjust them and
make sure everything was square and level.
They naturally wanted to go into the slots at an angle, but checking
pictures confirmed they should be straight vertically.
After getting these fully-aligned, I applied a bit of superglue and hit
it with accelerator. Finally,
with the aft gear resting in the proper place, I applied the superglue and
accelerator to that as well. I
added an MV Products lens to the nose gear to spruce it up a little, and then
added some final weathering to the landing gear assemblies.
Once again I felt out of my element as I had no worries about rigging or
antenna wires on this one!
The very last thing to go on
were the 4 SNEB/Matra Rocket pods.
Once again another “challenge” presented itself.
I was questioning the blank back on the pods in the Airfix kit (surely
there has to be some sort of opening for the rockets’ exhaust?), so I started
prowling the web for some photos. I
realized there was a plate of some kind with appropriate holes in it.
But I also thought if I were to simulate the rocket bodies in there, that
would look nice enough. I counted
about 48 openings in the front of the pods, so set about making 48 small rocket
bodies out of sprue and mechanical pencil lead.
My idea was to bundle these together and insert them into the opening of
the Airfix rocket pod. Well, a
little further research (that I wish I had done earlier) led me to realize the
Airfix pods were completely wrong.
They should be carrying 18 rockets, NOT 48.
Back to the drawing board again.
My limited research showed me that the kit’s pods possibly are some RNAF
weapon, but even that I am not sure about.
 What I was sure about was that these were wrong, and I needed some
correct ones. Can’t be easy of
course… I struggled for a while to
locate after-market pods, and was very close to buying an Eduard Mirage
What I was sure about was that these were wrong, and I needed some
correct ones. Can’t be easy of
course… I struggled for a while to
locate after-market pods, and was very close to buying an Eduard Mirage
These very nice resin pods
are made by Flightpath from the UK , and are crisply molded.
All I needed to do was trim a little flash and drill mounting holes.
From photos I noticed the bodies and tail pieces of these pods came in
several different colors, but the nose (actually the nose cover) was black.
I decided to go with a metal-colored tail cone and dark green body.
Photos clearly show a translucent, gold-ish color to the opening for the
rockets. This appears to be part of
the nose cover and is meant to break when the rockets are fired.
I simulated this by painting the openings with Tamiya Gold Leaf, then
going back and dry-brushing black over the area to touch up where I got paint
out of the opening. Then a drop of
Kristal Kleer was put into each opening.
Finally I brushed some black pastels over the nose cones to tone down the
Kristal Kleer a bit and blend everything in.
The final item on this build was a custom-made base from 3 Wire Design. They were good enough to be able to put a 3 Squadron crest on one of their tarmacs designed for jets. They make a series of nice bases printed on foam board. This could easily be mounted on a wooden plaque, but I decided not to do that for weight reasons (since this was getting shipped to the UK).
| CONCLUSIONS |
This was a fun build and a
labor of love for me. Little did I
know the challenges that lay ahead when I volun teered for this build.
While nothing earth-shattering, I did enjoy the many hurdles that
presented themselves to me during this build.
I will never again think “those jet builders” have it easy, and that they
all have state-of-the-art kits. I
did achieve a couple of firsts with this build, the most important being my
first official ‘kit bash’. My
efforts almost guarantee we will see a state of the art GR3 in the near future!
At the end, I must say it was rewarding knowing this was going to someone
who flew many different types of aircraft, but favored this one over all others.
teered for this build.
While nothing earth-shattering, I did enjoy the many hurdles that
presented themselves to me during this build.
I will never again think “those jet builders” have it easy, and that they
all have state-of-the-art kits. I
did achieve a couple of firsts with this build, the most important being my
first official ‘kit bash’. My
efforts almost guarantee we will see a state of the art GR3 in the near future!
At the end, I must say it was rewarding knowing this was going to someone
who flew many different types of aircraft, but favored this one over all others.
The Monogram kit and Aztek decals purchased courtesy of my wallet. The Airfix kit, Black Box cockpit, Sky Decals, and the all-important Griffon squadron emblem were kindly donated by a fellow modeler (thanks Bob!).
| REFERENCES |
Photos and recollections of
the recipient of the model (can’t beat going directly to the source!).
Herbote, Marcus.
AirDoc
Various Harrier websites:
http://www.primeportal.net/hangar/luc_colin/harrier_gr3_walk.htm
http://s10.photobucket.com/albums/a103/F18/Harrier%20GR3%20Walkaround/
http://www.tantopergioco.it/nggallery/page-820/album-2/gallery-51/
The base came from:
http://www.3wiredesign.com/
The SNEB pods came from:
http://www.djparkins.com/acatalog/1_48th_Post_War_RAF_RN.html
Moral support and offers of
image drawing assistance came from my good friend Mike in Arizona.
September 2011
Copyright ModelingMadness.com. All rights reserved. No reproduction in part or in whole without express permission.
If you would like your product reviewed fairly and fairly quickly, please contact the editor or see other details in the Note to Contributors.