Italeri 1/72 Sea Harrier FRS.1
| KIT #: | 1236 |
| PRICE: | $18.00 |
| DECALS: | Two options |
| REVIEWER: | Fernando Rolandelli |
| NOTES: | Airwaves PE, Master pitot and Xtradecal decals |
| HISTORY |
 BAe
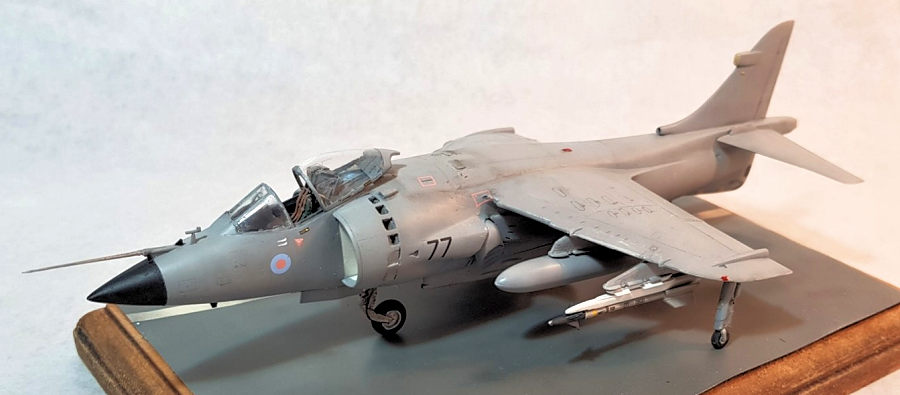
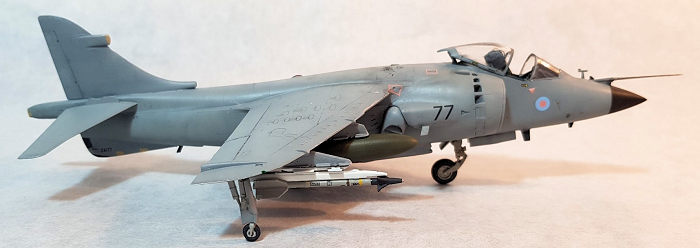
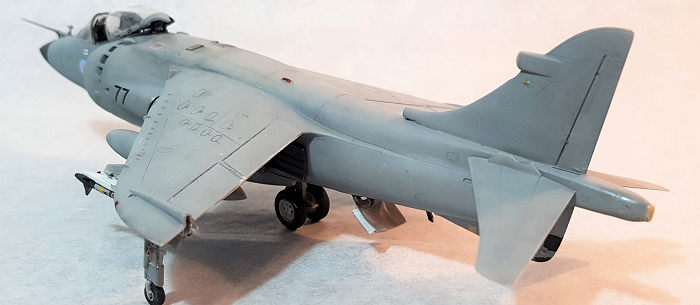
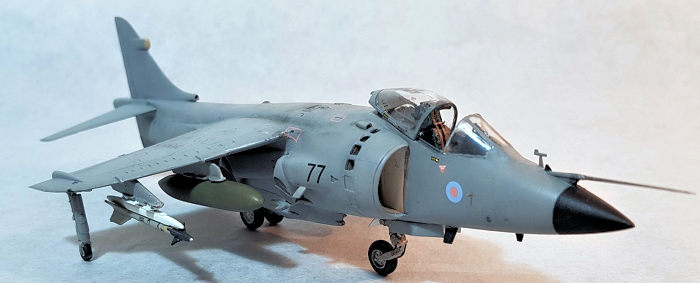
Sea Harrier FRS.1, ZA177 “77”, 809th NAS, HMS Hermes, South Atlantic, 1982.
BAe
Sea Harrier FRS.1, ZA177 “77”, 809th NAS, HMS Hermes, South Atlantic, 1982.
ZA117 was one of the reinforcements allocated to HMS Hermes. Painted in Medium Sea Grey/”Barley” Grey (officially “Light Camouflage Grey”), they had the big 809th NAS badge (the “Phoenix Arising”) and the letter “ROYAL NAVY” in the fin painted over (they were painted in low-viz colours anyway). This machine was used by Flt. Lt. David Morgan to shoot down two A-4Ps Skyhawks, C-226 and C-228, on 08 June. It featured on the ramp of Hermes on arrival to Portsmouth, with the two kill marks painted (wrong Mirage silhouettes), Sidewinder rail launchers in White and a Harrier tank under the port wing.
| THE KIT |
 It
is the old Italeri kit, itself a rehash of the older Esci one. Though
Harrier/SHAR kits are not lacking in the scale, there is no one to modern
standards (shame on you Airfix). This kit is correct in proportions and shapes
(unlike the slightly tidier Hasegawa one) but very simple, and offering little
scope for improvements: it will build up OOB into a nice little kit, but adding
anything will prove a chore. That’s what happened to this build. The most
obvious area is the cockpit, absolutely bare (I added an old Airwaves PE set -a
modern one is needed) and sporting a laughable chair as seat; I added an
Aeroclub metal seat. The auxiliary intakes are depicted closed, and the exhausts
are inexplicably severed in two pieces; I replaced them by Pavla resins. The
pitot tube is also featurless (you cannot keep it from breaking, anyway); I
threw in a Masters metal one. For good measure, I also used an Xtradecals sheet
with a lot of information and detail (more on that later)
It
is the old Italeri kit, itself a rehash of the older Esci one. Though
Harrier/SHAR kits are not lacking in the scale, there is no one to modern
standards (shame on you Airfix). This kit is correct in proportions and shapes
(unlike the slightly tidier Hasegawa one) but very simple, and offering little
scope for improvements: it will build up OOB into a nice little kit, but adding
anything will prove a chore. That’s what happened to this build. The most
obvious area is the cockpit, absolutely bare (I added an old Airwaves PE set -a
modern one is needed) and sporting a laughable chair as seat; I added an
Aeroclub metal seat. The auxiliary intakes are depicted closed, and the exhausts
are inexplicably severed in two pieces; I replaced them by Pavla resins. The
pitot tube is also featurless (you cannot keep it from breaking, anyway); I
threw in a Masters metal one. For good measure, I also used an Xtradecals sheet
with a lot of information and detail (more on that later)
| CONSTRUCTION |
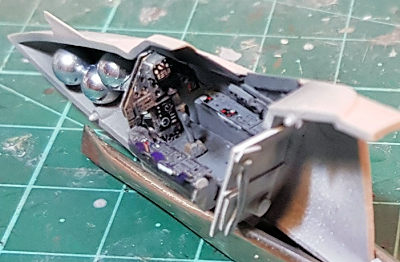 Starting
with the cockpit I scratch built the most detail I dare while permanently
testing the seat fit (it was so much bigger than the original than I feared it
wouldn’t) I erased the moulded harness by the PE pieces. The instrument panel
had no instrument backing; I cut pieces of the kit’s decal and placed them on
the back: some instrument faces seem to show through. I completely rebuilt the
HUD base and added some weight before closing the halves.
Starting
with the cockpit I scratch built the most detail I dare while permanently
testing the seat fit (it was so much bigger than the original than I feared it
wouldn’t) I erased the moulded harness by the PE pieces. The instrument panel
had no instrument backing; I cut pieces of the kit’s decal and placed them on
the back: some instrument faces seem to show through. I completely rebuilt the
HUD base and added some weight before closing the halves.
Then I turned to the front wheel well, which is made in two halves. There is no way the seam in the mid of these shows, so I devised a kind of cover in plastic sheet, to which I attached some detail, as in the sidewalls, looking loosely at the references. The piston that retracts the wheel and goes all the way to the roof of the well was scratchbuilt. The main wheel well I kept safely closed.
The Pavla resin intakes fitted like a glove, easily the best fitting part in the model! However, I later found that the exhausts leave too wide a gap at their front; I think it is the way the kit is molded, and not the resin parts; it is not noticeable anyway.
Take care with the airbrake well when closing the fuselage; the front of it should be flush to the undersurface and the piece can only be added from the inside before closing the fuselage halves. Mine sunk into it, forcing me to built it up with putty. It worked.
 Wings
pose no problems except for some huge sinks in the movable surfaces areas that
must be compensated in putty. Take care with the dog teeth in the leading edge;
I lost the inner ones while sanding and had to recover them sculpting them with
cyano and putty. The circular intakes at the wing roots also disappear (if ever
present) and had to be drilled.
Wings
pose no problems except for some huge sinks in the movable surfaces areas that
must be compensated in putty. Take care with the dog teeth in the leading edge;
I lost the inner ones while sanding and had to recover them sculpting them with
cyano and putty. The circular intakes at the wing roots also disappear (if ever
present) and had to be drilled.
Transparencies are very poor. The windscreen fits well, but the hood has a lot of moulding imperfections, to which nothing can be done.
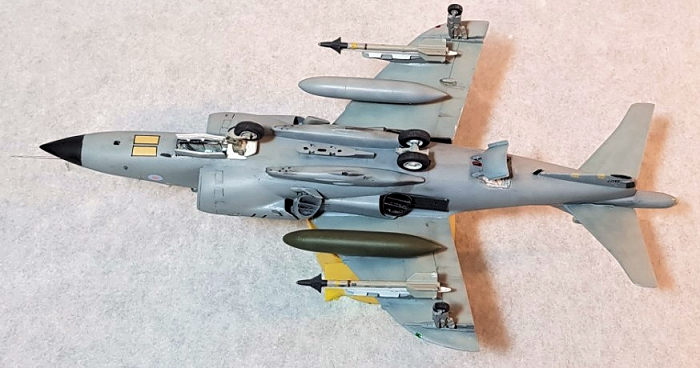
The gun pods are very simplified, lacking a proper muzzle (but in this scale a simple hole can do), the many vents (drilled) and having a wrong shape to the cartridge ejector (corrected in a way). Next one will have resin replacements.
The various blade antennae were a chore, lacking any reasonable anchorage to the fuselage. I replaced them with PE, which kept constantly coming off. Not a single antenna remained in place throughout the build. I replaced most with plastic ones. The angle of attack probe from Masters went without problem drilling the base, but the pitot was another thing: the base is split between the fuselage halves and it is impossible to drill without tearing the halves apart; I resorted to gluing the pitot flat. I drilled the camera port and made successive coats of Gun Metal/Tamiya Clear Green/Flat Clear to get an acceptable result. Sidewinders came from an old Hasegawa weapons set, with some new decals.
| COLORS & MARKINGS |
 For
all the simplicity, painting was not without problems. I made a preshade in
Black and White and painted irregularly with Xtracolor Barley Grey first, and
then MSG; I had expected more contrast than it showed in the end. Decals were of
the utmost quality, but the sheet lacked the prominent dielectric panels in the
nose; I painted it in a Sand colour and made the Black borders with decal
strips. Incredibly, the kit’s decal sheet also lacked those (but I remember an
old Superscale stencil decal which had them). I made a relatively light
weathering, trying to show some panels that are not well moulded in the kit’s
surface.
For
all the simplicity, painting was not without problems. I made a preshade in
Black and White and painted irregularly with Xtracolor Barley Grey first, and
then MSG; I had expected more contrast than it showed in the end. Decals were of
the utmost quality, but the sheet lacked the prominent dielectric panels in the
nose; I painted it in a Sand colour and made the Black borders with decal
strips. Incredibly, the kit’s decal sheet also lacked those (but I remember an
old Superscale stencil decal which had them). I made a relatively light
weathering, trying to show some panels that are not well moulded in the kit’s
surface.
| CONCLUSIONS |
Well, it is done, in this quite significant year; that’s the best I can say. That said, the model looks… nice, and most probably I shall try another in EDSG “dark” scheme. Afterwards, I noticed that ZA177 had the serial number on the fuselage and not on the ventral fin strake… oh, well.
| REFERENCES |
SAMI Modellers Datafile n° 11 – The British Aerospace Sea Harrier
BAe Sea Harrier FRS.1, Aeroguide n°3, Linewrights Ltd Publications
Sea Harrier FRS.1 vs Mirage/Dagger, Osprey Air Combat.
28 July 2022
Copyright ModelingMadness.com. All rights reserved.
No reproduction in part or in whole without express permission.
If you would like your product reviewed fairly and fairly quickly, please
contact
the editor
or see other details in the
Note to
Contributors.