Airfix 1/48 Hawk T.1/1A/51
| KIT: | Airfix 1/48 Hawk T.1/1A/51 |
| KIT #: | 05111 |
| PRICE: |
£10 GBP |
| DECALS: | Two options |
| REVIEWER: | Patrick Barratt |
| NOTES: | Kit only supplied RAF Red Arrows markings |
| HISTORY |
The H.S.1182 Hawk is one of the few modern jet aircraft to
have been ordered into production 'from the drawing board', the first few Hawks
produced acting as development aircraft for the initial order of 175 for the
Royal Air Force. The two-seat Hawk first flew on 21st August 1974, and
deliveries to No.4 Flying Training School (FTS) at Valley began in late 1976,
replacing the H.S.Gnat trainers. Conceived for the duel roles of advanced pilot
training and tactical weapons training, it is a tribute to the basic design that
very few external modifications to the aircraft were ever required. The
camouflaged armed Hawk TI’s that entered service with the Tactical Weapons Units
at Brawdy and Chivenor allowed the Hunters to be retired from that role. This
armed version carries a 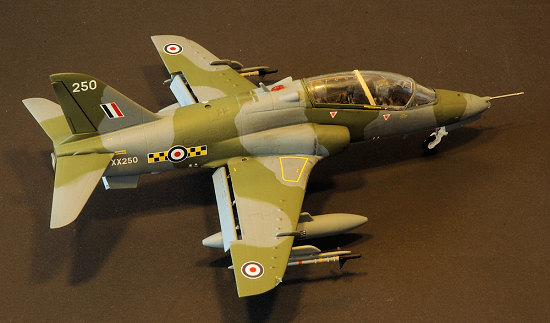 30mm Aden gun pod under the fuselage, together with
rocket pods or bombs and fuel tanks under wing. 1980 saw the world famous RAF
Arrows aerobatic team replacing their bright red Gnats with similarly painted TI’s, which they have used ever since.
30mm Aden gun pod under the fuselage, together with
rocket pods or bombs and fuel tanks under wing. 1980 saw the world famous RAF
Arrows aerobatic team replacing their bright red Gnats with similarly painted TI’s, which they have used ever since.
Such was the reliability and excellence of the Hawk that in the mid-1980's a new armed version entered service with the TWU’s - the T1A. Its additional pair of ASM-9L Sidewinders carried under the inner wing pylons allowed it to take on a new role, that of localised air defence to deal with any hostile aircraft that might evade front line defences in the event of war. It is not surprising that there have been many export orders for both training and operational single and two-seat Hawks, the major success being the BAe-McDonnell Douglas T-45A Goshawk carrier jet trainer for the U.S. Navy. Britain's most successful jet aircraft has a bright future. The 5,340lb thrust Roils Royce/Turbomeca Adour Mk.151 turbofan gives the Hawk T1A a maximum speed of 646mph at sea level. To date 900 Hawks have been sold around the World in 10 variants and countless sub-variants.
The latest version is the Hawk 200 is a single seat, lightweight multirole combat fighter with emphasis on air defence, air superiority, anti-shipping, air-denial, long range interdiction, short range close air support and ground attack. The aircraft is fitted with the AN/APG-66H, an advanced version of the F-16A APG-66 radar with multimode systems. The aircraft is able to be equipped with the AIM –9 and AGM-65 Maverick. Malaysian aircraft have the most extensive modification to the aircraft with illumination "slime" lights, wingtip AAMs and inflight refuelling. The 200 is a long way from the 1974 TI and it says a great deal for the initial design of the airframe that its kept pace with the rapid improvement of Aircraft over the last 35 years and remains top of its class.
| THE KIT |
Anyone who has tackled the Airfix 1:48 Buccaneer, Tornado or Harrier will probably be trying to control a nervous twitch at this point…but relax, while this is not up to the standard of their excellent Lightning, it is buildable. The first thing you notice on opening the box is the canopy that has some very heavy markings in it where the explosive charge cord runs. I suppose its possible to polish some of this marking out on the inside where it seems to be 3D but I had chosen to use the Czech Master Kits CMK4142 interior set. Containing photo-etched parts, new cockpit, ejection seats and a vacu-formed canopy. This is not a road I would normally go down when reviewing a kit, particularly as the interior set costs £2 more than the kit its self. While the supplied kit parts are good they are very simple and as the Hawk has such a large expanse of Plexiglass, I feel the extra cost could be worth it. We shall soon find out. I also used set CMK4144, an exterior set including flaps and rudder.
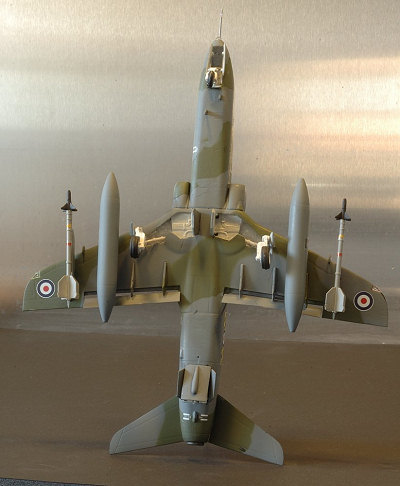
Parts come on 6 spru’s and are moulded in a light grey plastic with recessed panel lines and two pilot figures. A pair of drop tanks, a centre line gun pack, a smoke pod (Red Arrows) and a pair of AIM-9L sidewinders. Flaps can be cut off and posed in the down position.
| CONSTRUCTION |
This section is the construction of the Airfix parts unless stated.
Instructions are in the form of an A4 booklet and
construction is called out in 27 stages starting as always with the tub that
incorporates the nose wheel. The kit comes with nice seats and side control
 panels
but very basic instrument panels. A 10g weight is essential to stop it tail
sitting and there is plenty of room in the nose for this. The tub is then
sandwiched between the fuselage halves and the fit here is actually very good.
The jet intakes on either side of the cockpit/fuselage are another matter and
these need blending in and maybe a little filler.
panels
but very basic instrument panels. A 10g weight is essential to stop it tail
sitting and there is plenty of room in the nose for this. The tub is then
sandwiched between the fuselage halves and the fit here is actually very good.
The jet intakes on either side of the cockpit/fuselage are another matter and
these need blending in and maybe a little filler.
Wing construction is straight forward, don’t forget to open up holes for pylons if your going to fit stores and although you are advised to cut out the flaps after joining the top and bottom wing halves, I would seriously consider doing this before hand. Hawks do tend to sit with their flaps down on the tarmac so this is probably a good move. One common criticism of this kit is the shallow wheel wells in the wing. If this bothers you I suppose you could cut out the bottom of the well and extend the sides a little to make them deeper but personally I don’t think they look to bad as they are. The undercarriage doors on the other hand are waaaaaaaay to thick and if not using after market, you will need to sand them down or even scratch build some from card, not the end of the world as they are pretty basic. Add you canopy, stores and tail plane and your done! It’s a very simple aircraft with smooth lines and no hidden gremlins for the builder.
For those of you like me who thought the vacuform canopy was going to be an easy way out! Think again. As I usually find with resin sets and aftermarket parts, it turned out easier to fix the original canopy than to try and get the aftermarket one to fit. I used the Airfix canopy but I sanded down the charge cord marks from the inside and then polished the surface clear again using BMF plastic polish. The resin cockpit tub fits as well as the original Airfix tub but you will need to cut off the fuselage locating pin and socket from the tub area of the fuselage halves to fit the new tub in. I also found that if you use a resin tub you will not need to add the weight to the nose but check for yourself because this may vary depending on which interior kit you use.
| COLORS & MARKINGS |
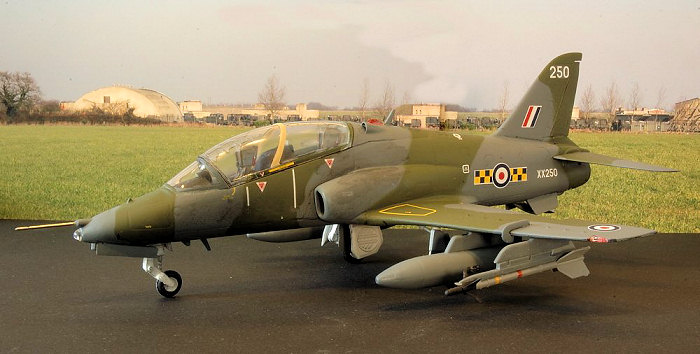
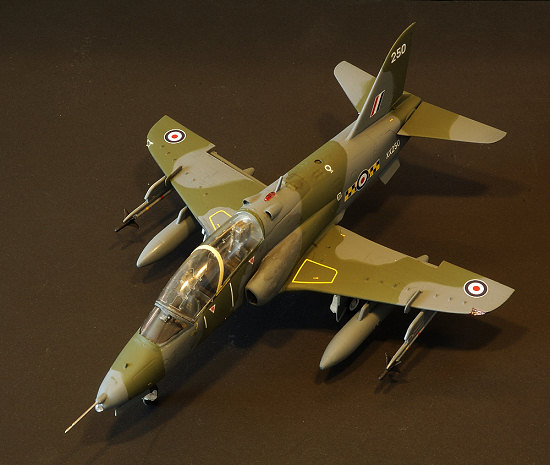
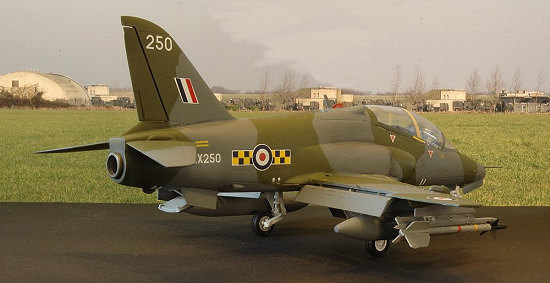
RAF Hawks have been a variety of colours over the years ranging from standard RAF Grey/Green camouflage, Barley grey, Red arrows Red, Gloss black and even Red/White/Blue so the choice is yours.
In the UK we don’t have the money or the need for a dedicated aggressor squadron but we do have the Hawks of 100Sqn who perform the role of badies when needed. They are based at RAF Leeming with the Tornado F3’s of 25 Sqn who form part of the UK’s rapid response tasking and often practice hostile interceptions over the North Sea with the F3’s playing the good guys.
100 Sqn also supplies a solo air show act each season and lots of special decals are available to suit. I had already brought a set 100Sqn decals so that is what I used despite 100sqn converting to Hawks too late for the camouflage scheme so look on this as a bit of a wifer….or just pretend its Black !. The standard decals supplied with the kit are for a Red Arrow display aircraft or a Finish AF Mk51.
 100Sqn
Hawks are painted high gloss black all over which makes life easy for the
modeller and means the decals sit nicely…..or so I thought!
100Sqn
Hawks are painted high gloss black all over which makes life easy for the
modeller and means the decals sit nicely…..or so I thought!
For some reason I just could not spray a good finish on this kit in fact I scrapped two!! trying to paint them. First I tried Tamiya aerosol cans. Parts were washed in a mild detergent and left to dry. As soon as I tried to give the model a light misting of gloss black the paint seemed to separate out in a fashion I have not seen before. A heavier coat and the paint seemed to “fizz” on the surface almost as if the plastic was gassing under the paint. I then tried semi gloss black with an airbrush. This gave a more uniform finish but not the gloss I wanted. Next I tried gloss Black with an airbrush and I just could not get an even finish. One wing was gloss the other matt !! I thinned the paint a little more to give a good “wet” coat and got the most appalling finish! Having had this problem, I wiped the second kit over carefully with alcohol before painting but again the paint seemed to “fizz” on the surface for a second or two after application. At a guess I would say the problem could be with the plastic and it needs some sort of sealing coat before finish spraying. I did try an etch undercoat/primer but that would not take to the plastic either. I also think that the surface texture of the plastic (a sort of vinyl finish if you look carefully) doesn’t lend itself to a gloss (smooth) finish. The answer for me at least was to go for the early 80s wrap around camouflage used on Hawks at that time because the problem I was having with Gloss was almost completely masked by using a Matt finish.
Because of the increased threat from the Soviet Union in the 80s it was decided to convert many of the Flight training Hawks to a basic “Home Defence” role. It was envisaged that these Hawks would operate in pairs with a Phantom or Lightning as a lead aircraft to supply Radar info, as the Hawks were not equipped with any form of weapons Radar. They would be flown by the instructors at FTS and carry a pair of Sidewinders each. Consequently they were given the wrap around, two-colour camouflage I have chosen here. Incidentally, even the Red Arrows were expected to perform this task.
| CONCLUSIONS |
I really wanted to like this kit because I love the subject. Anyone who has seen the RAF solo Hawks on the UK display circuit will know what a fast and manoeuvrable little jet they are and what a spirited display they put on.
The temptation to scrap the model and this review was very strong throughout the build but in the end I suppose the point of a review is to highlight problems as well as plus points and show that some older kits do not just fall together “Tamiya fashion”.
 As hard as I tried I just struggled with this model from the
start. Poor soft surface detail means this will never be a great kit. My
inability to get a gloss coat to look uniform means many will struggle with a
gloss Red Arrows finish or the modern gloss black of No4 FTS aircraft. The
general fit of parts was not too bad but the under carriage doors and the canopy
are just too thick, chunky almost! The ejector seat is nice as is the cockpit
tub but the instrument panel is awful. The kit ejector seats are so big they
cant be used with the aftermarket resin set which has seats barely 2/3 the size
of the Airfix ones. While I am grumbling, the supplied decals were pretty awful
as well!
As hard as I tried I just struggled with this model from the
start. Poor soft surface detail means this will never be a great kit. My
inability to get a gloss coat to look uniform means many will struggle with a
gloss Red Arrows finish or the modern gloss black of No4 FTS aircraft. The
general fit of parts was not too bad but the under carriage doors and the canopy
are just too thick, chunky almost! The ejector seat is nice as is the cockpit
tub but the instrument panel is awful. The kit ejector seats are so big they
cant be used with the aftermarket resin set which has seats barely 2/3 the size
of the Airfix ones. While I am grumbling, the supplied decals were pretty awful
as well!
Was the aftermarket cockpit set worth the money in this case? Well some would say without a doubt, yes. Others would say its good but not worth doubling the price of the kit. My view?? Buy the model and have a look at what you’re dealing with before you splash out on extras. Money aside, the cockpit set is a worthwhile improvement but that is not to say you couldn’t build a reasonable model without it. What started life as a £9.99p kit very soon trebles to £28.00 kit with cockpit set and decals…and a £35.00 kit with the exterior set.. You pays your money and makes your choice but my advice would be to go for the interior set if only for the PE instrument panels and forget the exterior simply because Airfix supply a separate set of flaps, should you choose to cut the raised ones from the wings, as well as a separate set of lowered hinges thus making the exterior set rather superfluous.
It’s a straightforward build for the novice and with the interior resin set/PE set and vacuform canopy, its a challenge even for the experienced modeller but given my time again, I wouldn’t have bothered especially with a new 1:48 Hawk from Italeri on the horizon. Its very easy to turn out a very mundane model and blame the Kit so for that reason alone please take this review in context, ie: I am a builder who has only been at this a year after a 30 year brake. Others may well succeed where I failed…
Now, how do I salvage my reputation after this…….?
| REFERENCES |
Everything a Hawk spotter needs to know here, http://www.aeroflight.co.uk/types/uk/bae_systems/hawk/hawk1.htm
http://www.aircraftresourcecenter.com/AWA1/401-500/walk423_Hawk_Butcher/walk423.htm
http://www.paulnann.com/Make.asp?Make=BAe&Family=Hawk
February 2008
If you would like your product reviewed fairly and quickly, please contact me or see other details in the Note to Contributors.