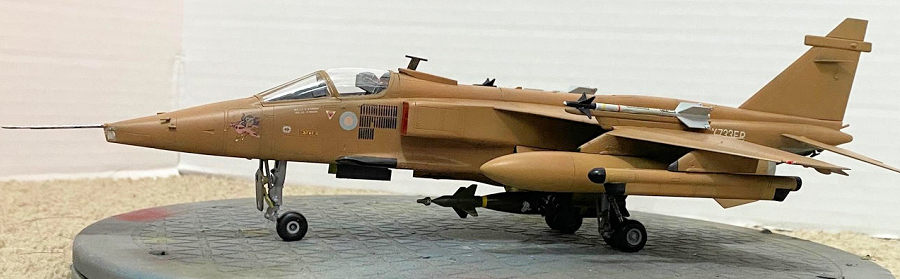
Airfix 1/48 Jaguar GR.1
| KIT #: | A11010 |
| PRICE: | $60.00 |
| DECALS: | Three options |
| REVIEWER: | Shanee Cowland |
| NOTES: | Kits World decals 148051, Quinta Studios cockpit 48613, Hasegawa weapons set D. |
| HISTORY |
 The
SEPECAT Jaguar was an Anglo-French attack fighter developed for use by the
French Air Force and the Royal Air Force. More than a dozen variants were
built including the Jaguar A (French Air Force) GR1/GR3 (RAF) and the Jaguar
B/T2/4 (2 seater trainers). Jaguars have also seen service in the air forces
of India, Ecuador, Nigeria and Oman. Over five hundred have seen service
around the world between 1973 and the present day.
The
SEPECAT Jaguar was an Anglo-French attack fighter developed for use by the
French Air Force and the Royal Air Force. More than a dozen variants were
built including the Jaguar A (French Air Force) GR1/GR3 (RAF) and the Jaguar
B/T2/4 (2 seater trainers). Jaguars have also seen service in the air forces
of India, Ecuador, Nigeria and Oman. Over five hundred have seen service
around the world between 1973 and the present day.
The Jaguar has seen service in several theaters including Mauritania, Chad, Bosnia, Pakistan and in Iraq. It was retired from service in France in 2005 and in Britain in 2007 but is still in service in India at time of writing. Its roles have involved tactical strike, ground attack, all weather tactical strike as well as training (two seater version).
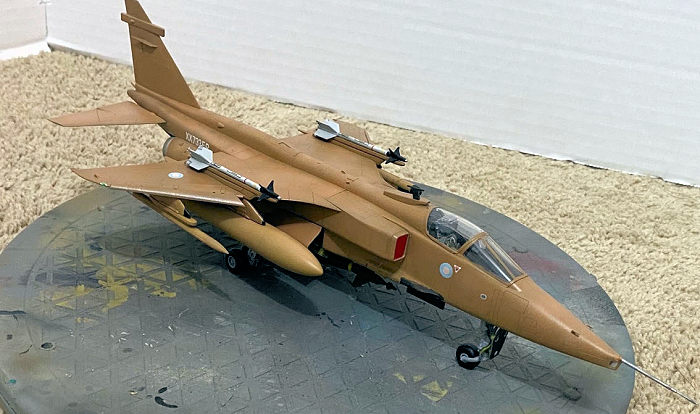
During the Gulf War, British Tornados and Jaguars were widely photographed and reported and commonly seen in their dessert pink colors. The GR1 and GR3 Jaguars were easily identified through their wing top hard points that carried AIM 9L Sidewinders.
I’ve always liked the Jaguar. Just like Jaguar cars, Sepecat Jaguars seem to have a certain aesthetic to them. With slender lines and amazing proportions they have the cold war equivalent look of the spitfire.
| THE KIT |
 The last
Jaguar that I built was the Kitty Hawk Sepecat Jaguar, which I also reviewed
here. This kit is no
longer in production and since Airfix built a Jaguar in the mid 1990’s I was
glad to see them come out with a new one. As soon as I heard that Airfix were
about to release the new Jaguar I determined that I was going to get one and did
so immediately.
The last
Jaguar that I built was the Kitty Hawk Sepecat Jaguar, which I also reviewed
here. This kit is no
longer in production and since Airfix built a Jaguar in the mid 1990’s I was
glad to see them come out with a new one. As soon as I heard that Airfix were
about to release the new Jaguar I determined that I was going to get one and did
so immediately.
The new kit is far different to the one released thirty years ago. In fact it bares more of a resemblance to the Kitty Hawk kit in terms of the assembly method. It’s almost like someone looked at the Kitty Hawk kit and determined that they could make the same, but better.
| CONSTRUCTION |
 The
build begins in the cockpit and Airfix provides two pilots, a nod to the two
seater kit that has just been released. The cockpit detail is outstanding but I
replaced most of it with the 3D printed decals from Quinta Studios. There are
two different Martin Baker Ejector seats available in the kit (9b Mk 2 and 9b Mk
3). The seat sits in a cockpit tub that connects to the front landing gear bay
beneath it. The kit also comes with two pilots so displaying the Jaguar ‘in
flight’ is a simple adjustment..
The
build begins in the cockpit and Airfix provides two pilots, a nod to the two
seater kit that has just been released. The cockpit detail is outstanding but I
replaced most of it with the 3D printed decals from Quinta Studios. There are
two different Martin Baker Ejector seats available in the kit (9b Mk 2 and 9b Mk
3). The seat sits in a cockpit tub that connects to the front landing gear bay
beneath it. The kit also comes with two pilots so displaying the Jaguar ‘in
flight’ is a simple adjustment..
The forward fuselage halves hold the cockpit and landing gear bay and fit is excellent. The nose comes built for the GR1 Jaguar but a jig is provided to build the ‘pointy nosed’ version. The GR1 comes with a clear plastic lower nose. allowing you to mask the part remaining clear and paint the rest. I built the GR1 so I dont know how easy the jig is to modify the nose.
The rear fuselage also comes in left and right halves. Structure is provided by the landing gear bay and the airbrake on each side of the aircraft. Airfix has been clever in that these bays connect together on both sides of the fuselage adding rigidity and structure.
Mating the forward and aft fuselage parts was, unlike with the Kitty Hawk kit, simplicity itself. Next onto the intakes. Airfix provide another jig to hold the two parts of each intake together as they form. I may have assembled one of my intakes incorrectly despite the jig as it sat slightly off when attached to the kit. The difference was small and I was able to remedy it with not too much difficulty. Airfix do not provide internal air ducts but they do provide intake covers to add to the accuracy of a parked aircraft.
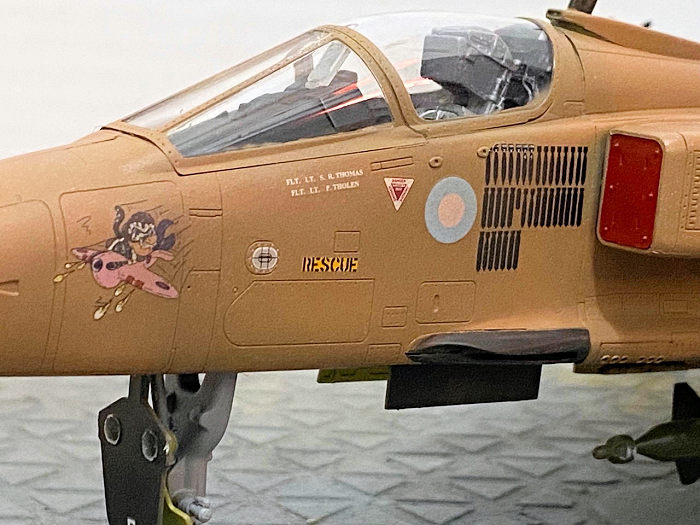 The
wings have the option of AIM 9 pylons on the upper surface or wing braces.
Because armaments tend to break off jet aircraft, I embedded neodymium magnets
into the weapons and the pylons on the beneath the wings. They are fiddly to get
right, however once installed the stores can be removed so that the aircraft and
the stores can be painted separately.
The
wings have the option of AIM 9 pylons on the upper surface or wing braces.
Because armaments tend to break off jet aircraft, I embedded neodymium magnets
into the weapons and the pylons on the beneath the wings. They are fiddly to get
right, however once installed the stores can be removed so that the aircraft and
the stores can be painted separately.
The wings themselves are a simple affair with one full top span and two lower wing spans and two pairs of flaps for each wing (I dont know the exact vocabulary). They attach nicely and the instructions advise clipping the wings onto the fuselage to cure. The remainder of the fuselage went together quite simply.
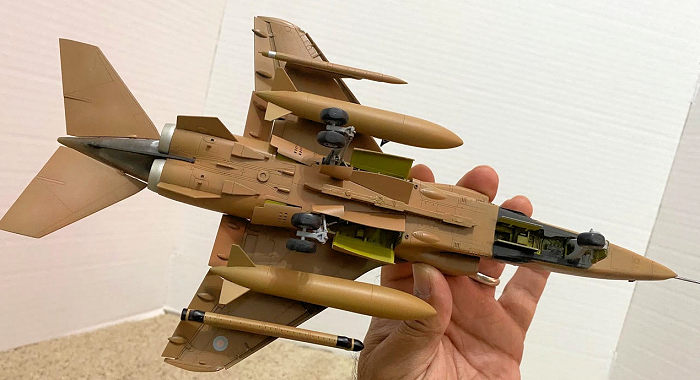
The landing gear seemed to have many parts to them with weighted wheels. However they were designed well and lock into the model securely. Doors are provided for wheels up and also wheels down option. Even though I assembled one of the landing gear braces upside down, it wasn’t something that impacted the balance of the kit. The doors are a little fiddly but fit well once in place. I couldn’t attach the airbrake brace to the airbrake and instead arranged it nearly closed.
Stores include two pairs of two types of 1000 lb bombs, PHIMAT pod, AN/ALQ-101 pod, AIM 9L sidewinders, EMI reconnaissance pod and a pair of 1200 liter drop tanks. For my aircraft I used the sidewinders, PHIMAT and AN/ALQ-101, fuel tanks and a laser guided bomb along the centerline. The laser guided bomb was a GBU 16 Paveway 2 from the Hasegawa weapons set D.
| COLORS & MARKINGS |
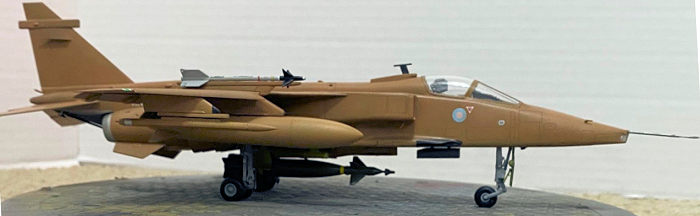 For
the scheme, i went for the option displayed on the lid, that of a gulf war
Jaguar. I used Tamiya XF2 White, XF-7 Red and XF59 Desert Yellow as the base. I
tried adding an overspray of white or a lighter coat over the main cover but I
do think that final color is a little too rich. Probably because most of the
reference pictures were of aircraft that had already been bleached but the sun.
I really didn’t bother with weathering this kit this time.
For
the scheme, i went for the option displayed on the lid, that of a gulf war
Jaguar. I used Tamiya XF2 White, XF-7 Red and XF59 Desert Yellow as the base. I
tried adding an overspray of white or a lighter coat over the main cover but I
do think that final color is a little too rich. Probably because most of the
reference pictures were of aircraft that had already been bleached but the sun.
I really didn’t bother with weathering this kit this time.
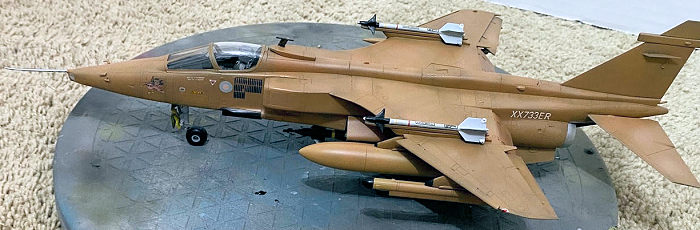
Instead of building the aircraft option on the decal sheet, I built XX733ER the “Pink Spitfire” taken from the kits world decal set: KW148051. Aside from the Pink Spitfire markings, the other markings were from the Airfix kit. All went on without a hitch.
Most of the stores, aside from the AIM 9s and the Paveway were painted in desert colors. The Paveway was painted in Olive Green with a yellow stripe (deviating from standard coloring). I also added an additional decal to the bomb.
| CONCLUSIONS |
I had taken a short break from building models and this was the first one that I really took seriously since returning. I made a few mistakes but am definitely happy with the result. Airfix have found a niche in the market (replacing Kitty Hawk’s offering) and filled it admirably with some smart engineering, clear instructions and beautiful decal sheet. There really isn’t anything that I could think of that could have improved the kit.
Well done Airfix and I look forward to building some more of the new Airfix cold war toolings.
| REFERENCES |
https://en.wikipedia.org/wiki/SEPECAT_Jaguar
https://www.militaryfactory.com/aircraft/detail.asp?aircraft_id=92
https://www.scalemates.com/kits/airfix-a11010-sepecat-jaguar-gr1-gr1a--1594480
https://www.scalemates.com/products/img/4/8/0/1594480-35-instructions.pdf
https://www.scalemates.com/kits/kitty-hawk-kh80106-jaguar--185771
8 November 2021 Copyright ModelingMadness.com.
All rights reserved. No reproduction in part or in whole without express
permission. If you would like your product reviewed fairly and
fairly quickly, please
contact
the editor or see other details in the
Note to
Contributors.