
| KIT #: | KH80138 |
| PRICE: | $145.00 |
| DECALS: | Seven options |
| REVIEWER: | Francisco Santoro |
| NOTES: | Calcas del Sur 48001 decal set |
| HISTORY |
From Wikipedia: "The Dassault-Breguet Super Étendard (Étendard is French for "battle flag", cognate to English "standard") is a French carrier-borne strike fighter aircraft designed by Dassault-Breguet for service with the French Navy.
 The aircraft
is an advanced development of the Étendard IVM, which it replaced. The Super
Étendard first flew in October 1974 and entered French service in June 1978.
French Super Étendards have served in several conflicts such as the Kosovo war,
the war in Afghanistan and the military intervention in Libya.
The aircraft
is an advanced development of the Étendard IVM, which it replaced. The Super
Étendard first flew in October 1974 and entered French service in June 1978.
French Super Étendards have served in several conflicts such as the Kosovo war,
the war in Afghanistan and the military intervention in Libya.
The Super Étendard was also operated by Iraq (on a temporary lease) and Argentina, which both deployed the aircraft during wartime. Argentina's use of the Super Étendard and the Exocet missile during the 1982 Malvinas War led to the aircraft gaining considerable popular recognition. The Super Étendard was used by Iraq to attack oil tankers and merchant shipping in the Persian Gulf during the Iraq-Iran War. In French service, the Super Étendard was replaced by the Dassault Rafale in 2016."
| THE KIT |
 Inside
Kitty Hawk's top opening box one finds nine sprues (8 in grey plastic and one in
clear plastic). Six sprues are dedicated for the general parts of the aircraft
(cockpit, fuselage, engine), two are solely dedicated for the armament, and the
last one is the clear sprue.
Inside
Kitty Hawk's top opening box one finds nine sprues (8 in grey plastic and one in
clear plastic). Six sprues are dedicated for the general parts of the aircraft
(cockpit, fuselage, engine), two are solely dedicated for the armament, and the
last one is the clear sprue.
Upon initial inspection, the kit parts don't have any flash visible, which is a good sign of things to come.
Instructions is of the booklet style with black and white diagrams for the general assembly, and full colour painting indications.
There's a small photoetch fret dedicated for the spoilers and the seatbelts for the cockpit.
| CONSTRUCTION |
Even though the instructions start in the cockpit, I decided to start on the wings. These were separated from their sprues and glued with Revell Contacta. The spoilers come in the shape fo photoetch pieces, so those were glued with white glue, and then secured with a dab of CA. After drying, I removed the wingtips from their sprue and glued them into the main wing body, and left them to cure. Once the wings were cured, I glued the flaps in place. Kitty Hawk's instructions are vague on the flaps stage. They don't tell you the flap actuators are built from two pieces each (only two are shown in the instructions where the other parts are).
While the wings were drying, I tackled the fuselage. Unlike Kinetic, who gives you a full fuselage body, Kitty Hawk decided to separate the fuselage in three parts, with the consequent fit difficulties when trying to glue them together. I began by assembling the rear fuselage section by gluing them together, and also adding the arrestor hooks (the sharp eyed in the bunch will note I glued them upside down by accident). After I finished working with the rear fuselage, I passed on to the middle section. Before closing it, you need to glue the wheel wells and the speed brake housings.
 I next
worked on the engine. These pieces have big, and I seriously mean, big ejector
pin marks on the inside. I didn't clean the ones in the engine because they
wouldn't be seen, but the rear fuselage also had those ejector towers. Test
fitting showed I'd have to remove the ejector pins before installing the engine
into the rear fuselage, to give clearence for the exhaust to fit properly.
I next
worked on the engine. These pieces have big, and I seriously mean, big ejector
pin marks on the inside. I didn't clean the ones in the engine because they
wouldn't be seen, but the rear fuselage also had those ejector towers. Test
fitting showed I'd have to remove the ejector pins before installing the engine
into the rear fuselage, to give clearence for the exhaust to fit properly.
Wheel wells come in four parts each. These were painted in aluminium before being glued together. When the glue was dry, I placed the wells inside the central fuselage. Once the wheel wells were properly dry, I glued the central fuselage halves together. I then glued the rear fuselage, and glued the roof of the middle section of the fuselage.
I next worked on several things at the same time. First came the nose wheel well. The pieces of this area were painted in aluminium too, and once dried, I glued the nose landing gear strut. Next order of business was the cockpit. The seat was painted black (Revell 08 Black) with green cushions and black and yellow ejection cords. After I finished working on the seat, I painted all the cockpit walls in black, and drybrushed them with some aluminium to make the details pop out. With the cockpit complete, I glued it, together with the nose gear well, to the forwar fuselage half. Kitty Hawk doesn't give you the option of gluing the refueling probe in the closed position, but you can actually glue it closed by using the its faring. With that done, I glued the forward fuselage halves into place. At this time, I didn'´t know if the Super Etendard was going to be a tail sitter, so I sliced a 60 grammes lead weight in half, and glued it behind the cockpit with some epoxy glue. After letting it cure, I test fitted the front section of the fuselage to the middle section. The fit was a bit off, and the contact areas were minimal. But in the end, the frontal section was solidly glued.
Before going into the painting stage, I glued the vertical stabilizer into place. This piece comes in four parts (left and right halves, pitot, and rudder), which were eventually glued into place. Once those parts were dry, I glued the vertical stabilizer to the rear section of the fuselage. I then glued the horizontal stabilizersin place, and left them to set (together with the photoetch pieces for the trim indicators).
| COLORS & MARKINGS |
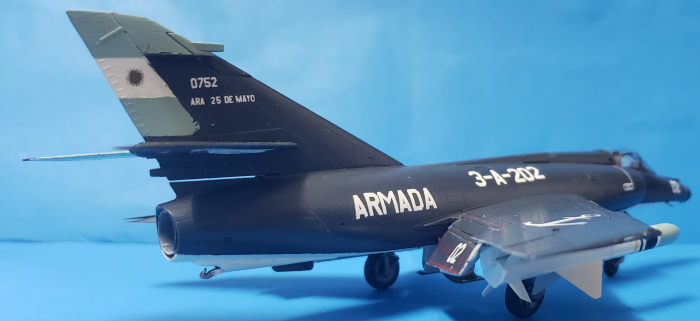
 From the
start, I knew I wanted to built my Super Etendard as 3-A-202. This one, together
with 3-A-203, lauched an Exocet missile, which impacted on the HMS Sheffield.
For this scheme, I had bought Calcas del Sur's set 48001, originally desinged
for the Super Étendard from Kinetic.
From the
start, I knew I wanted to built my Super Etendard as 3-A-202. This one, together
with 3-A-203, lauched an Exocet missile, which impacted on the HMS Sheffield.
For this scheme, I had bought Calcas del Sur's set 48001, originally desinged
for the Super Étendard from Kinetic.
I painted the upper surfaces with Revell Aqua 78 Panzer Grey, and then painted the lower surfaces with Revell Aqua 05 Matt White. The flag on the rudder and elevators were painted with light blue and white. Once that was done, I gloss coated the entire model with Revell's gloss varnish.
The decals from Calcas del Sur behaved perfectly, and conformed to the model's surface very well. The only exception was for the flaps, which decals were a bit too large for them.
The model was then matt coated with Revell's matt varnish.
To finish things up, I first installed the main landing gear. These two are a butt join, and I used a bit of CA alongside the regular Contacta. I then glued the wheels and underwing stores (fuel tank and Exocet antiship missile).
| CONCLUSIONS |
An imposing model once built, it's as big as an A-4 Skyhawk. The kit will look good next to another French aircraft built.
Francisco Santoro
15 November 2021 Copyright ModelingMadness.com. All rights reserved. No
reproduction in part or in whole without express permission. If you would like your product reviewed fairly and fairly quickly, please
contact
the editor or see other details in the
Note to
Contributors.