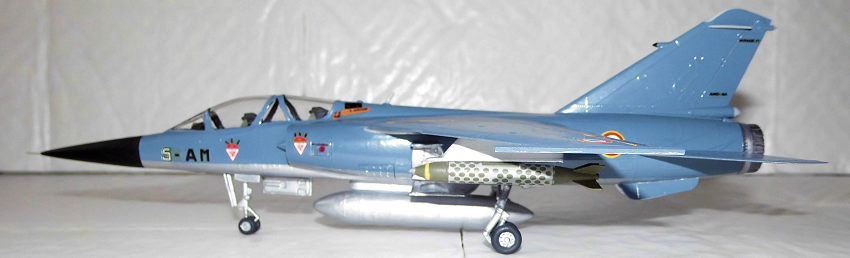
Heller 1/72 Mirage F.1B
| KIT #: | 258 |
| PRICE: | $16.98 |
| DECALS: | Five options |
| REVIEWER: | Nicolai Plesberg |
| NOTES: |
| HISTORY |
While the Mirage III was entering service and due to uncertainty of the success it would create, Dassault was thinking of a replacement. Based on the Mirage IIIE, Dassault gave the new design conventional wings and tail like those from the abandoned Mirage F2 and powered by the SNECMA Atar 9K-50 turbojet, the Mirage F1 was born. The prototype, the F1-01, flew on 23 December 1966. It was, however, destroyed on May 18 1967 caused by flutter; it nevertheless had proven its superiority over the Mirage III / 5 family, so the Armée de l’Air ordered three more prototypes. They, the F1-02, F1-03 and F1-04 flew respectively on 20 March 1969, 18 September 1969 and 17 June 1970. The Mirage F1 was a very much higher aerodynamic efficient design, had much greater maximum lift / drag ratio, 40 percent greater internal fuel capacity, reduced landing speed and landing run and much enhanced dogfight capability compared to its delta winged ancestor. The first production F1C (C – chasseur – interceptor) flew on 15 February 1973 and first deliveries took place a few months later. Operational capability was obtained in December 1973.
As is
almost the case with a new combat aircraft to ease training pilots to fly it a
two-seat version is needed. This, the F1B (B – biplace – two-seater), flew on 26
May 1976. Space for the extra cockpit was obtained by stretching the forward
fuselage by 30 centimetres, reducing the capacity of the forward fuel cell and
deleting the two internal DEFA 30mm cannon. Furthermore two Martin Baker Mk
 10
zero-zero ejector seats were installed, as the Mk 4 seat used in the F1C had a
forward speed limitation. Despite its primary role as a conversion trainer, the
two-seat F1B is fully combat capable as the single-seat F1C; the two variants
performance profiles are identical.
10
zero-zero ejector seats were installed, as the Mk 4 seat used in the F1C had a
forward speed limitation. Despite its primary role as a conversion trainer, the
two-seat F1B is fully combat capable as the single-seat F1C; the two variants
performance profiles are identical.
As the case with the Mirage 5, which was a simplified version of the Mirage III, optimized for ground attack, so that philosophy was also implemented for the Mirage F1. The F1A (A – appui – attack) was the result of that philosophy. After removal of the Cyrano radar the nose cone became more slender and simplified electronics, to support its use as a day attack fighter, were put in its place. Developed in cooperation with the South African Air Force, which bought 32 F1AZs and was put to good use during its involment in the conflict in Angola. However, the F1A was only good for daylight attack, since it lacked the capability to strike at night. This was addressed in the next export variant, the F1E, which had the necessary electronic equipment to fulfil such missions. In fact the F1E was a true multi-role fighter capable of both air-air and air-ground missions under all weather conditions. The F1E became widely exported to a number of client states in Europe (Spain), Africa, the Middle East and South America (Ecuador). A two-seat version of the F1E was developed, this being the F1D, however, despite its capabilities only Spain and Qatar bought it, as the F1B, such as it was, apparently, adequate with most export customer’s needs.
As this time there are four military operators left; Gabon (ex-South African F1AZs), Iran (ex-Iraqi aircraft flown to Iran by defecting pilots during Desert Storm in 1991), Libya and Morocco. France retired their last F1s in June 2014 and Spain (the largest European export customer) retired their F1 fleet in February 2013. Quite recently the US government defense contractor, Airborne Tactical Advantage Company, have acquired 63 ex-French F1s (both single-seaters and two-seaters) for dissimilar air combat training.
| THE KIT |
Heller’s
kit of the Mirage F1 has been around for quite a while. To my knowledge it was
first released in the late 1970s offering the possibility to construct a F1C or
the two-seat F1B. This boxing is exactly like that consisting of around 100
parts molded in a medium grey plastic with six parts in clear. The clear parts
have sharply defined frames which will ease painting. Surface detailing is
typical of the time; of the raised va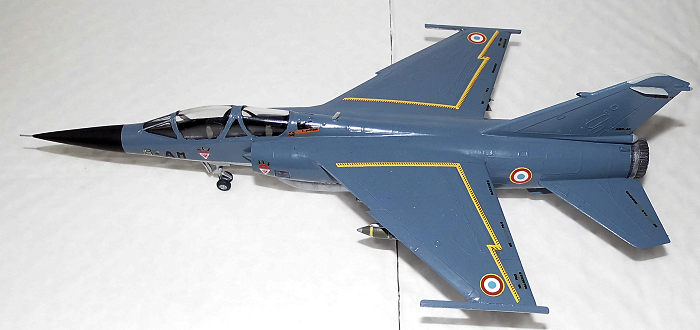 riety,
but in no way exaggerated so it will look quite discrete under a coat of paint.
The fit is also quite good, but filler will be needed in a few places, such as
the wing / fuselage joints. Some under wing / fuselage stores are available; two
drop tanks, two Matra R530 missiles, two Sidewinder missiles (oddly, but Matra
Magics would have been more correct) and four bombs together with the associated
pylons. The decal sheet is of the typical Heller variety, printed almost in
register and with a matt appearance. Five decal options are possible (all
F1C’s); four French versions and one from the Hellenic Air Force. The two-seat
option is supposed to be of the F1B prototype, but no specific decals for this
are given; only the placement of the ejection seat warning stencils is given.
The funny part is that there are not enough of them on the kit sheet to properly
do the two-seat variant, but more on this later.
riety,
but in no way exaggerated so it will look quite discrete under a coat of paint.
The fit is also quite good, but filler will be needed in a few places, such as
the wing / fuselage joints. Some under wing / fuselage stores are available; two
drop tanks, two Matra R530 missiles, two Sidewinder missiles (oddly, but Matra
Magics would have been more correct) and four bombs together with the associated
pylons. The decal sheet is of the typical Heller variety, printed almost in
register and with a matt appearance. Five decal options are possible (all
F1C’s); four French versions and one from the Hellenic Air Force. The two-seat
option is supposed to be of the F1B prototype, but no specific decals for this
are given; only the placement of the ejection seat warning stencils is given.
The funny part is that there are not enough of them on the kit sheet to properly
do the two-seat variant, but more on this later.
| CONSTRUCTION |
Due to
the break down of the parts for the fuselage, two rear and two front parts plus
two fin halves it invites for some challenges to ensure correct alignment of
parts. I decided to go on and produce two whole fuselage halves, sans the nose
cone, but with the fin. So how is this done? Well, it is actually quite simple.
First I glued the right rear fuselage half together with the right fin half and
putting them on an exact plane surface it will ensure that the fin will be
vertical. When that had set the procedure was repeated for the left rear
fuselage half / fin half and then the assembly was taped together with the right
fuselage / fin half. You see, you can’t do the thing with the plane surface for
the left parts without either cutti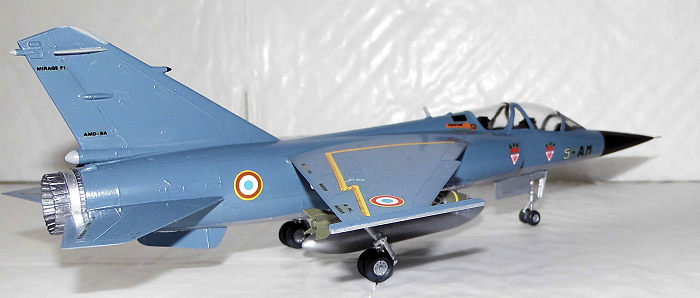 ng
off the locating pins (bad idea!) or drilling some holes in your plane surface
for the locating pins to fit in (probably also a bad idea!). When this had been
done the right front fuselage half was mated to the rear part – put on the plane
surface to dry; then the procedure for the left parts repeated as before.
ng
off the locating pins (bad idea!) or drilling some holes in your plane surface
for the locating pins to fit in (probably also a bad idea!). When this had been
done the right front fuselage half was mated to the rear part – put on the plane
surface to dry; then the procedure for the left parts repeated as before.
While the completed fuselage halves dried, I glued the wing halves and drop tanks together. The exhaust petal was painted burned metal as this is the usual color for such an item on a jet aircraft. The interior was assembled next, except the seats to ease painting. Some ejector pin marks in the cockpit sides were dealt with also prior to painting. The nose weight issue was dealt with next; I found that the whole space in front of the interior should be utilized for this; the nose cone alone doesn’t hold much space and is anyway nowhere near enough to keep the nose wheels on the ground. The interior was painted grey (Humbrol 64) while the cockpit sidewalls went flat black along with instrument panels, handgrips on control sticks seats and side consoles. Gear bays went silver and seat cushions went army green (Humbrol 102). The in-molded seat belts were painted khaki and the finished seats glued to the interior after some sanding at their bottom to get a precise fit and also correcting the seat angle; the seats, as molded, lean too far behind in my opinion. They could of course just be replaced by aftermarket seats as well! The interior was then glued to the right fuselage half and taped together with the left half to get a proper alignment. The nose weight was similarly done; when set the fuselage was joined including the nose cone. However, when I sanded the seams it occurred to me that the nose was a bit off alignment, so it was carefully separated then reglued to the fuselage; the fuselage seam was also enhanced with the aid of CA glue where necessary. The wings were also given some seam treatment as the fit was actually so-so but solvable. An important issue to deal with here is to eliminate the gun troughs and vents in the lower fuselage as the two-seater didn’t have these!
When the
fuselage seam had been eliminated, I took the clear part constituting the, from
what I understand is a search light in the left air intake and painted it
transparent red (Vallejo 934) and attached it to the intake piece with clear
gloss. A small shim of a quarter of a millimetre was used to get an exact fit.
The interior of the intake parts were then painted French Mirage Blue (Vallejo
900). When that dried, I glued them in place as with the airbrakes and exhaust
piece. When air intakes had been faired in the wings and tail planes were glued
to the fuselage. Upon setting they of course required the usual treatment by the
seams with gluefilling from the glue bottle and filler was employed where the
glue was unable to fill the gaps. Eventually it all got “seamed up” and the last
painting in the cockpit area was done before the clear parts were attached with
clear gloss. As the two-seat canopy consists of four parts it can look
confusing, but I took the secure route. I strongly recommend first to attach the
rear canopy (part 78), let it dry for a while because now it becomes tricky; the
middle piece (part 79) between the two cockpits does not really have well
defined surfaces to be attached to, other than the rear canopy, so utmost care
must be exercise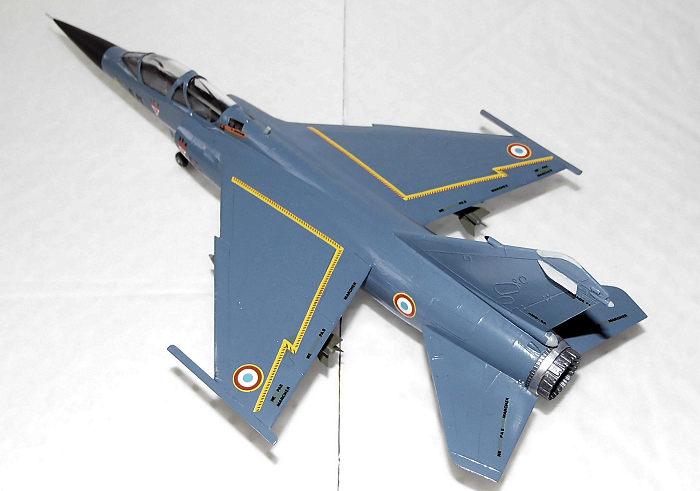 d
here. Attach it carefully to the rear canopy, let dry for a while, then (again
carefully) attach the front canopy (part 77) then the windscreen (part 75) can
be attached. Following this procedure will ensure the clear parts look decently
assembled. Any gaps were filled with clear gloss and smoothed out with a moist
cotton bud while still wet.
d
here. Attach it carefully to the rear canopy, let dry for a while, then (again
carefully) attach the front canopy (part 77) then the windscreen (part 75) can
be attached. Following this procedure will ensure the clear parts look decently
assembled. Any gaps were filled with clear gloss and smoothed out with a moist
cotton bud while still wet.
The next step was to assemble the gear legs; the nose gear is easy – cleaning the parts from mold lines, are, however, a bit tedious. The main gear legs are quite a different matter. If I were to build this kit again, I would assemble the main gear legs while gluing them to the gear bays; this will definitely ease aligning of the parts. As the whole lot is to be painted silver, one can easily follow this procedure without worrying scraping paint away from surfaces to be glued together. I, however, did not do this and it was a pain to get them just about equal mirrors of each other. As each leg consists of six parts (wheels excluded) it demands great precision to get them assembled correctly. After getting the legs about correct they were painted silver together with the wheel hubs and inner side of gear doors. Tires went tire black. Wheels were glued to the legs once the paint had dried. The finished gear legs were attached in the gear bays with slow drying CA glue as were the fuselage pylon for the drop tank, I planned to put there. The last non-knock off details were attached and, after the usual cleaning procedure, the model went to the paint shop.
| COLORS & MARKINGS |
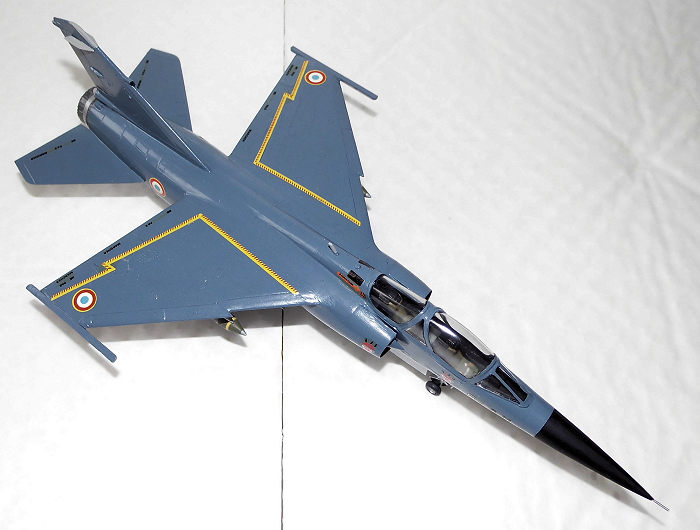
The underside went silver and, as always, needed several coats to cover perfectly. The canopy frames were painted flat black before the topcoat of blue was applied. First some masking tape was applied to create a sharp demarcation to the upper surface color. The sides and upper surfaces were then painted French Mirage Blue from Vallejo and it took two coats before the coverage was ok. The masking tape was then removed and some slight touch ups along the demarcation line became necessary including on the gear doors. Some antenna panels were painted grey (Humbrol 64) and the nose cone went flat black. As soon as all this had set properly a glossing coat went on, except on the nose cone of course!
As
mentioned earlier there was really no decal option for the two-seat option so
some ingenuity was required to obtain a reasonable result. First the trouble
with too few ejection seat triangles was solved by snatching two from the decal
sheet to my Heller Mirage III (I’m not going to use tho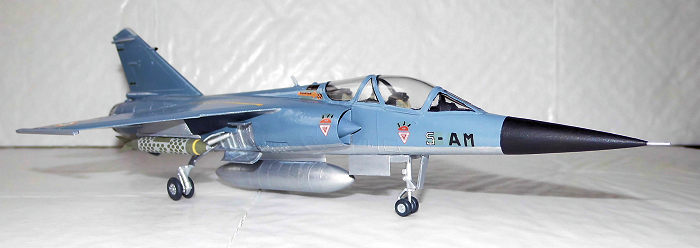 se
decals anyway because they looked a lot worse (probably exposed to moisture)
than the decals for this kit). The rest were nicked from the kit sheet, but not
totally in blind; in fact it was this
review
on Modeling Madness by our editor that provided a picture of a real Mirage F1B
that inspired me. Sure some of the numbers were not of the right style, but hey
you can’t get it all at once. They worked okay, maybe because I had given them a
coat of gloss to prevent disintegration but settled down without any trouble.
se
decals anyway because they looked a lot worse (probably exposed to moisture)
than the decals for this kit). The rest were nicked from the kit sheet, but not
totally in blind; in fact it was this
review
on Modeling Madness by our editor that provided a picture of a real Mirage F1B
that inspired me. Sure some of the numbers were not of the right style, but hey
you can’t get it all at once. They worked okay, maybe because I had given them a
coat of gloss to prevent disintegration but settled down without any trouble.
When dry they were given a gloss coat to reduce / remove some of the little silvering that occurred; upon setting the model was given a satin coat to tone down the gloss appearance. The nose cone, however, stayed flat black as it should be. Touching up the edges a bit with flat black, however, became necessary but that was expected anyway.
| FINAL CONSTRUCTION |
The
final bits included first and foremost attaching the gear doors and under wing
thingies, which consisted of a centreline drop tank and two Belouga cluster
bombs from a Heller High Tech weapon set. The “high tech” was that the fins (in
this instance) were etched metal parts glued to the plastic bomb casing. T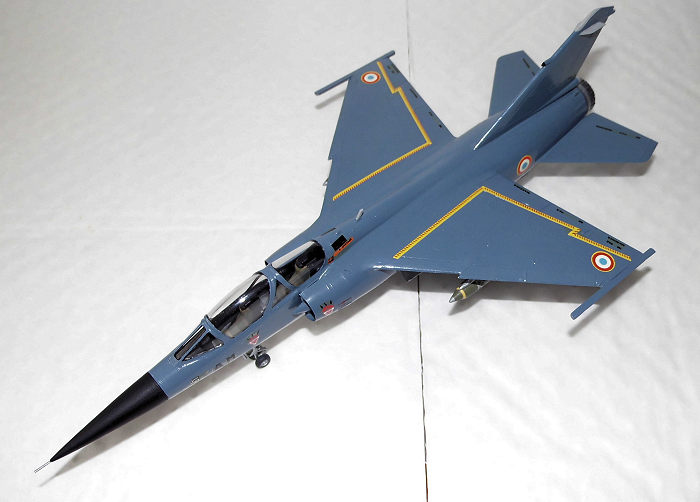 hey
were painted and decaled as per weapon set instructions and attached to the
appropriate pylons glued to the wings. The drop tank had a special treatment:
the grooves from the tank fins were filled and sanded smooth as a centreline
mounted drop tank didn’t require the fins – according to Heller’s instructions.
Since I had glued the wing tip launch rails for the Matra Magic AAMs, I felt
obliged to get some Magic’s, but those I had in my spares bin were a bit “out”,
at least compared to the Magic’s in the aforementioned weapon set – it
unfortunately only contained two of those missiles. However, I could not use
them for this build as they were already spoken for; I used them for my Iraqi
Mirage F1 that I built in parallel to this one. Perhaps if I in the future come
across some decent ones, I will go ahead and use them. Anyway the last item to
be glued in place was the pitot probe, painted silver and my 1/72 Heller Mirage
F1B was finished.
hey
were painted and decaled as per weapon set instructions and attached to the
appropriate pylons glued to the wings. The drop tank had a special treatment:
the grooves from the tank fins were filled and sanded smooth as a centreline
mounted drop tank didn’t require the fins – according to Heller’s instructions.
Since I had glued the wing tip launch rails for the Matra Magic AAMs, I felt
obliged to get some Magic’s, but those I had in my spares bin were a bit “out”,
at least compared to the Magic’s in the aforementioned weapon set – it
unfortunately only contained two of those missiles. However, I could not use
them for this build as they were already spoken for; I used them for my Iraqi
Mirage F1 that I built in parallel to this one. Perhaps if I in the future come
across some decent ones, I will go ahead and use them. Anyway the last item to
be glued in place was the pitot probe, painted silver and my 1/72 Heller Mirage
F1B was finished.
| CONCLUSIONS |
Although old, the kit, with some care and modeling skills applied, nevertheless finishes into a beautiful representation of one of the French arms industries greatest successes. It would, however, be a good idea to supply some decent weapons or other “thingies” under the fuselage / wings from the aftermarket, as the kit supplied parts are not especially something to write home about. It is also self evident that aftermarket decals can be utilised to great advantage – the Mirage F1 was operated by more than a dozen nations so the possibility to find an attractive scheme, that might attract you, is present.
| REFERENCES |
The Encyclopedia of Modern Warplanes General Editor: Bill Gunston © 1995 Aerospace Publishing Limited Blitz Editions ISBN 1-85605-290-7
Military Aircraft of the World by Gordon Swanborough © Ian Allan Ltd 1981 ISBN 0-7110-1139-7
Wikipedia, the Online Encyclopedia
12 September 2017
Nicolai Plesberg
Copyright ModelingMadness.com
If you would like your product reviewed fairly and fairly quickly, please contact the editor or see other details in the Note to Contributors.
Back to the Main Page Back to the Review Index Page Back to the Previews Index Page