Heller 1/35 Super Frelon
|
KIT #: |
80849 |
|
PRICE: |
Around €40 in 2006 |
|
DECALS: |
One option |
|
REVIEWER: |
Spiros Pendedekas |
|
NOTES: |
|
The SA 321 Super Frelon ("Super Hornet") is a large single-rotor heavy
transport helicopter, produced by the French Sud Aviation (later
Aérospatiale). Furnished with a relatively atypical three-engine
configuration, it held
 at one
point the distinction of being the most powerful helicopter to be built in
Europe, as well as being the world's fastest one, with a recorded speed of
217.7 mph (350.4 km/h).
at one
point the distinction of being the most powerful helicopter to be built in
Europe, as well as being the world's fastest one, with a recorded speed of
217.7 mph (350.4 km/h).
With its maiden flight taking place on 7 December 1962, the Super Frelon
came out as a more powerful development of the original SE.3200 Frelon,
which had failed to enter production. Whereas both civilian and military
versions were produced, the type was predominantly sold to military
customers. Production was terminated in 1981, due to a lack of orders. A
total of 110 were built.
It was most heavily used by naval air arms, such as the French Navy and the
People's Liberation Army Naval Air Force. On 30 April 2010, the type was
retired by the French Navy, having been gradually replaced by the NH90. It
was in use for an extended period within China, where it was manufactured
under license and sold as the Harbin Z-8. A modernised derivative of the
Z-8, marketed as the Avicopter AC313, performed its first flight on 18 March
2010.
This venerable kit was first introduced in 1975 (non-radar version), with an
additional 7 commando figures. From the mid-80s and onwards it was offered
as the radar version with Exocet missiles, with the final kit evolution
being the 2004 “G” version, which includes the radar but neither the Exocets,
nor the 7 commando figures. This last version is the one I tackled.
Bought for around a very sensible €40 back in 2006, this kit comes in the
nice typical Heller big top-opening box, with a beautiful boxart, which
portrays a Super Frelon performing a SAR operation. Upon opening the box,
you are understandably treated with a lot of plastic: first thing you notice
are the two massive fuselage halves, followed by the rest of the parts in 7
sprues of light gray soft-ish styrene, packed in three bags. External detail
is plenty, raised allover, with the characteristic riveting very
realistically represent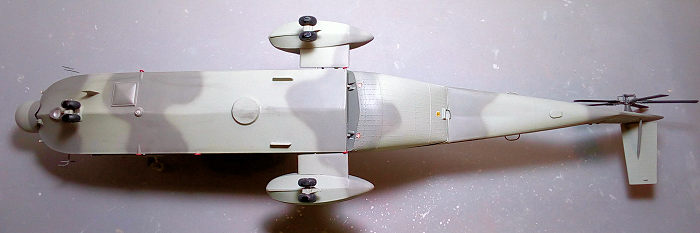 ed.
In fact, I dare to say that raised detailing looks much more accurate than
engraved would look, when representing heavy riveted (in real life)
subjects, especially at such big scales! All prominent external areas are
well addressed (blades, exhausts, landing gear with sponsons, winch
mechanism, bazillion of aerials, latches etc) and the rotor hubs look
believable. General shape looks good, as well.
ed.
In fact, I dare to say that raised detailing looks much more accurate than
engraved would look, when representing heavy riveted (in real life)
subjects, especially at such big scales! All prominent external areas are
well addressed (blades, exhausts, landing gear with sponsons, winch
mechanism, bazillion of aerials, latches etc) and the rotor hubs look
believable. General shape looks good, as well.
Regarding the innards, the cockpit is also adequately represented (but no
seat belts are provided). Of course, one could never stop super detailing a
1/35 helo cockpit, utterly visible through that extensive glazing! Regarding
the cargo interior, all seats are to be fabricated with styrene framing,
onto where you have to attach suitably cut pieces of the sheet provided,
which represents the fabric parts. Other than an axe and a fire
extinguisher, no other cargo area details are provided, meaning that if you
want to leave the side doors and/or rear ramp open, you might have to
perform some extra-detailing there.
Transparencies are extensive and well molded. They are clear and,
thankfully, separately packed. Sewing thread and thin wire are also
provided, in order to represent the antennas wiring and hoist line. Total
parts count is in the neighborhood of 400!
 Instructions
come at a very attractive 8-language, b/w, A4 size, 36 page booklet, which
contains an informative history, a parts list and a well spread build
sequence in 40 clear steps. Only Humbrol color callouts are given all over,
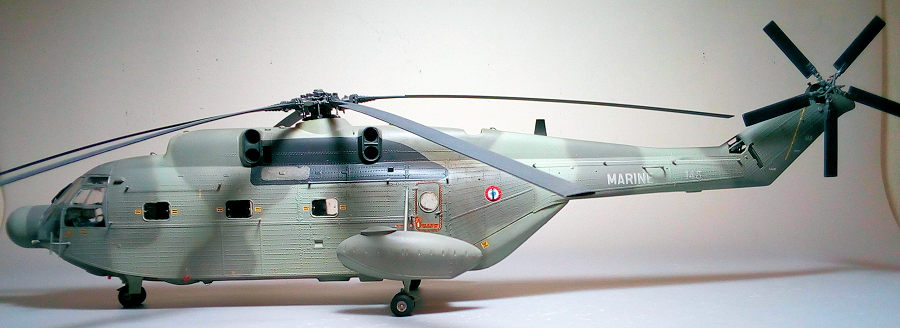
with the corresponding paint name also provided. Just one camo scheme is
called for, an attractive wraparound 2-shade gray, the last worn by
Aéronavale.
Instructions
come at a very attractive 8-language, b/w, A4 size, 36 page booklet, which
contains an informative history, a parts list and a well spread build
sequence in 40 clear steps. Only Humbrol color callouts are given all over,
with the corresponding paint name also provided. Just one camo scheme is
called for, an attractive wraparound 2-shade gray, the last worn by
Aéronavale.
The decal sheet is quite extensive, with 9 different tail codes provided. It
contains all cockpit instrumentation panels (a bit toy-ish looking) and also
a good number of stencils. Since small differences might be observed over
time between the Aéronavale machines (like radome color or rotor warning
stripes), it might be a good idea to do relative net research on the
specific machine, depicted at the specific time. Regarding decals quality,
the typical Heller (and older Airfix) off-color registering is here,
thankfully, not that severely. At least, color shades look good.
Having decided to model my Super Frelon with doors and ramp closed, I
started by attaching the two side doors onto the fuselage halves, followed
by the cabin windows from the insides ( I did a less than perfect job
there...). I then went on doing subassemblies, an activity I carry out with
great pleasure, especially at kits such as this with a high number of parts,
as it transforms the seemingly chaotic multipart look into something more
“bundled” and consistent.
So, I first assembled the pair of 13-piece front seats. They were painted
RAF Blue (Hu96), with French Blue (Hu14) down cushions, Marine Green (Hu102)
back cushions and had cream seat belts added made of masking tape. I then
went on and assembled the cockpit, with all its components, instrument
panels and consoles, 39 pieces in total. The floor was painted blue gray
(Hu79), all the rest (sticks, pedals, consoles etc) were pain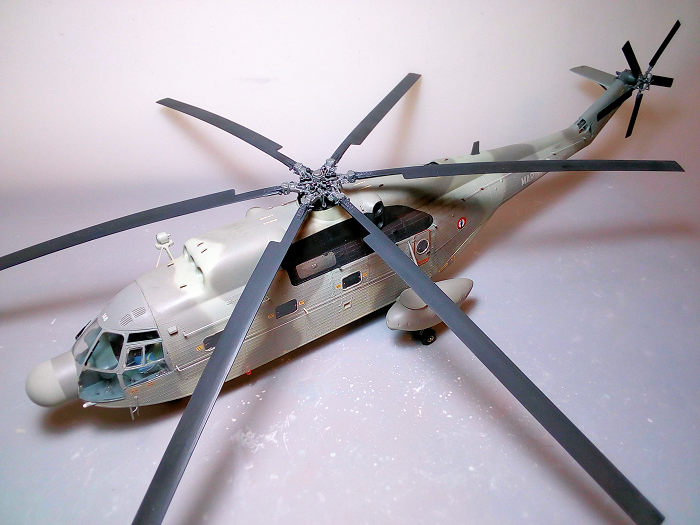 ted
RAF Blue, with black grips and consoles top areas. The corresponding decals
were applied, the seats were attached and the whole subassembly was left
aside.
ted
RAF Blue, with black grips and consoles top areas. The corresponding decals
were applied, the seats were attached and the whole subassembly was left
aside.
I continued by assembling the pair of 6-piece sponsons, the 3-piece ramp,
the 2-piece horizontal stabilizer and the 4-piece hoist (the latter in
“retracted” position, so I would not have to use the thread provided).
The main hub was a 33-piece affair: it was carefully assembled, painted Hu27
Sea Gray and dry brushed with silver. The six main blades, each a 4-piece
affair, were assembled and attached onto the main hub. They were painted
Hu33 matt black with Hu127 US ghost gray attachment grips.
The rear rotor was then assembled, a 19-piece affair, the five blades
included. Painting was similar to the main. To my joy, all blades for the
scheme I chose were totally black, no warning striping whatsoever. Though
one can never stop super-detailing helo rotors, I have to say that the kit
supplied ones are believable.
The front glazing is a mini model in itself, composed of no less than 20
pieces: It comprises a front main transparency, at the sides of which four
clear parts are attached. Then a top opaque piece is affixed, with an inner
top console underneath, onto which a decal and 8 mini levers of various knob
colors are attached. Two good looking wipers are provided, as well.
 The whole
engine area is represented by a longitudinal base, onto which three
engine "representations" are attached. These “engines” are a 5-piece affair
each, providing sufficient looks at their intake and exhaust area, which is
ok for the closed panel kit provided configuration. The intakes were painted
aluminum, the exhausts Testors burned metal and the base sea gray.
The whole
engine area is represented by a longitudinal base, onto which three
engine "representations" are attached. These “engines” are a 5-piece affair
each, providing sufficient looks at their intake and exhaust area, which is
ok for the closed panel kit provided configuration. The intakes were painted
aluminum, the exhausts Testors burned metal and the base sea gray.
I then attached the completed cockpit, the engines assembly, the 2-piece
upper duct and the 5-piece rear angle gearbox at their corresponding slots
inside the starboard fuselage half, then glued the two fuselage halves
together, followed by the front double air intake, the six top aft mesh
looking panels and the rear ramp. I did not at all deal with the cargo area,
which, to my relief, was almost invisible through the side windows. I coarse
sanded and filled the areas needing attention, with the basic model and all
subassemblies receiving a light 1500 grit final sanding. All exposed areas
were blanked with either wet tissue or masking tape, the windows were
covered with Humbrol Maskol (a wonderful “liquid mask” product) and we
headed to the paint shop!
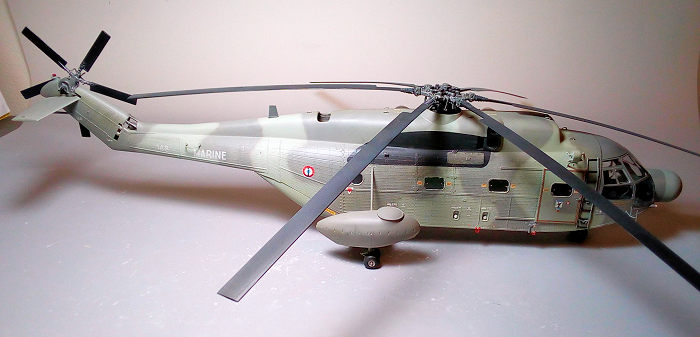
With my airbrush, I first gave the exhaust side fuselage areas a coat of
black, then masked them off. I subsequently gave everything a coat of Hu127
US Ghost Gray. With my Vario at its finest settings, I subsequently
freehanded the darker gray, which was Hu126 US Medium Gray (only the
radome’s front part was masked, as the demarcation line was hard). I then
removed the masks and painted a small portion of the black exhaust gases
area Testors Steel, which I believe it’s titanium in real life.
The whole model then received a coat of Future and I went on adding the
decals. They adhered well, succumbing very nicely to all that riveting. The
extensive stenciling added a lot of realism, especially at this “bigger”
scale. The slight “off – registration” is noticeable, but not too much. A
coat of future sealed the decals.
I attached the sponsons and the vertical stabilizer in position, together
with their respective supporting struts, then attached the hoist, the side
ladder and all three landing gear legs. The three pairs of two piece wheels
were assembled, filed a tad to look weighted, painted aluminum with black
tires and were attached as well.
The bazillion of various antennas, masts, latches, handles and the like were
accordingly painted and subsequently attached to their corresponding
positions, followed by the three port side wire antennas, which were rep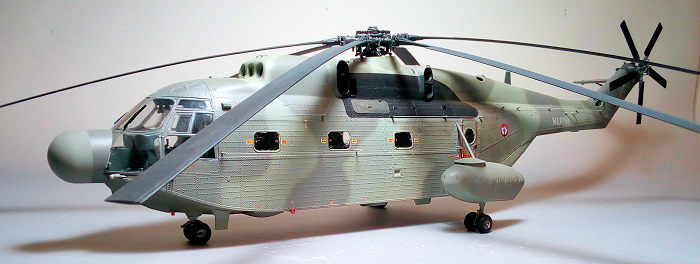 licated
by using silver stretched sprue, tightened by applied hot air with my wife’s
hairdryer. The rear rotor assembly was attached in position, too.
licated
by using silver stretched sprue, tightened by applied hot air with my wife’s
hairdryer. The rear rotor assembly was attached in position, too.
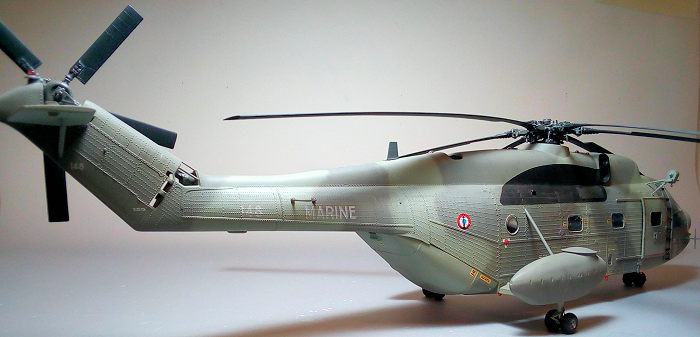
In real life, despite the purpose painted black panels, surrounding engine
staining was very quickly becoming quite prominent, mostly aft and under the
blackened area; this was replicated by various dark shades of dry pastels.
Some general weathering was then applied all over, but not too much, since
Aéronavale Super Frelons seemed to be kept in near pristine condition. A
satin towards matt cote gave the helo its final hue.
The front glazing was then affixed into place. Fit was not perfect, leaving
tiny gaps and, most importantly, contour mismatch. The former was dealt with
faired white glue , the latter was “left as is”. I then carefully attached
the already painted radome at the front. Two (top and bottom) beacons were
attached and painted Humbrol clear red. A third bottom beacon was left
"clear".
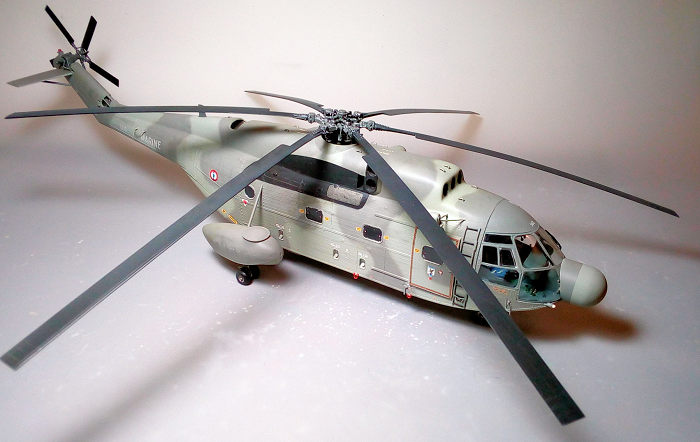
The main rotor was placed in position, with the soft plastic (typical of
Heller) blades nicely and naturally drooping! Well, the same soft plastic is
responsible for the blades badly yielding with time, if left permanently
attached, so the main rotor is only temporarily attached in position for
brief “exhibition” periods, the rest of the time resting underneath the
Super Frelon…
I then called this beautiful helo done!
This is an old, but very good big scale kit of this important helicopter. It
has good general shape and external details, good fit (apart from the front
glazing – which might very well be my fault) detailed cockpit and adequate
cargo area. With the Mach2 1//72 offering being a definite limited run kit,
and the Clearprop future release (as of 2021) yet to hit the shelves, the
1/35 Heller is interestingly still the only mainstream kit of the Super
Frelon at any scale!
Out of the Box (OOB), a big, “different” and impressive model can result.
There’s room for super detailing (mostly at cargo area), however aftermarket
detailing sets are scarce (if at all existent nowadays), and so you will be
pretty much on your own. Decals, though not the sharpest, are usable if you
do not want to go aftermarket. With the consistent instructions being very
supportive, putting the kit together is not that difficult, still, due to
the big size, complex (at places) construction and high parts count, it
should be tackled by modelers with at least a couple of helo kits under
their belt.
Though this kit was regularly reissued in the past, it has not been
re-released since 2004, so it is not extremely easy to find. I would risk to
say that a re-release might not be that far away. Nevertheless, if you own
one, or come across one offered at a sensible price, and, provided that you
have the space to place it, grab it and build it! A most impressive model
will result!
As a side note, Aerospatiale produced a one-off
(since no sufficient orders subsequently took place...) passenger prototype,
in order to attract customers. There were many significant differences from
the "standard" militarized Super Frelon, such as more windows and, most
importantly, heavily modified main gear side "bags", instead of sponsons.
Designated SA321F, it was used for a couple of years during the late '60s
by Olympic Airways. Registered as F-OCMF, it carried the wonderful Olympic
Airways livery and was named "HERMES", after the mythical Olympian god.
Proving too costly to operate, it was subsequently returned to
Aerospatiale. "HERMES"
today resides in perfect static condition at the International Helicopter
Museum, Weston-super-Mare (EGFI), England, carrying its amazing Olympic
Airways livery. It is my dream to build it, but, since no conversion exists
for such a build, it would take A TON of scratchbuild, in order to modify
an existing kit.
Happy modeling!
Spiros Pendedekas
20 May 2021
Copyright ModelingMadness.com. All rights reserved. No reproduction
without express permission.
Thanks to for the review kit. You can find this kit at your favorite
hobby shop or on-line retailer.
If you would like your product reviewed fairly and fairly
quickly, please
contact
the editor
or see other details in the
Note to
Contributors.
Back to the Main Page
Back to the Review Index Page
Back to the Previews Index Page