Heller 1/48 Mirage 2000C
The origins of the Mirage 2000 could be traced back in the early
70’s when Avions Marcel Dassault-Breguet Aviation (AMD-BA) decided to
develop a secondary fighter project named “Delta 1000”, as a more
affordable alternative to the interdictor Mirage G8, then envisioned as
the "Avion de Combat Futur" (ACF) of the Armée de l'Air.
 Armée
de l'Air wanted a fighter and not an interdictor aircraft incapable of
dogfighting, as was the Mirage G8, with Dassault deciding to redesign it
into the twin-engine Super Mirage G8A, which in turn proved to be too
ambitious, expensive and over-engineered, especially compared to the
F-16 that had just won orders from a number of European countries.
Armée
de l'Air wanted a fighter and not an interdictor aircraft incapable of
dogfighting, as was the Mirage G8, with Dassault deciding to redesign it
into the twin-engine Super Mirage G8A, which in turn proved to be too
ambitious, expensive and over-engineered, especially compared to the
F-16 that had just won orders from a number of European countries.
Consequently, during a meeting of the National Defense Council on 18
December 1975, it was decided to cancel the Super Mirage project and
instead offer to the Armée de l'Air the single engine and more
affordable Mirage 2000 that had originated from the “Delta 1000”. Its
primary role was interception with a secondary ground-attack capability.
Three prototypes were immediately ordered, with the first production
machines delivered in 1983.
The type was further developed to the 2000N and 2000D nuclear and
conventional strike variants respectively, whereas from roughly the
start of the 90’s the vastly upgraded Mirage 2000-5 version became
available. Apart from France, another 8 countries operated the
successful fighter, which has participated in a number of operational
missions, like in the the Gulf War, where Armée de l'Air performed
high-altitude air defense for USAF U-2 spy aircraft.
A total of 601 machines were built, before the production line was shut
down in 2007, the last machine being the s/n 555 Mirage 2000-5 Mk.2,
delivered to the Hellenic Air Force.
 This
is the venerable Heller kit, with its origins traced back in 1991 and
regularly reissued ever since (not that often lately). Clearly an
elderly kit, with sparse or simplistic details at some key areas
(cockpit, landing gear and exhaust nozzle, among others), but with
accurate general shape and sufficient external details, which are of the
engraved type. The molds are showing their age, with details becoming
softer and flash being increasingly present at many places, deeming
clean-up of practically all parts a necessity, with the soft plastic
being an ally. In fact, it will not be far away from the truth to
consider the kit as “limited run” nowadays.
This
is the venerable Heller kit, with its origins traced back in 1991 and
regularly reissued ever since (not that often lately). Clearly an
elderly kit, with sparse or simplistic details at some key areas
(cockpit, landing gear and exhaust nozzle, among others), but with
accurate general shape and sufficient external details, which are of the
engraved type. The molds are showing their age, with details becoming
softer and flash being increasingly present at many places, deeming
clean-up of practically all parts a necessity, with the soft plastic
being an ally. In fact, it will not be far away from the truth to
consider the kit as “limited run” nowadays.
For a more extensive look at the kit contents, you may have a look at
the preview here.
I started by attaching the instrument panel and rear wall onto the
cockpit tub. The cockpit was then trapped between the fuselage halves,
together with the nose landing gear bay. A generous amount of fishing
weight was also trapped in the nose area, secured with glued styrene
pieces and modeling clay. Basic cockpit color was Hu64 gray with black
dashboard, stick grip and consoles. Three good looking decals were
affixed at the instrument panel, with a tiny blob of clear green paint
depicting the Head Down Display (HDD) tinted glass. Some red and yellow
“knobs” were added all around with a fine brush. The seat would be
assembled and attached at later stages.
 Moving
to the intakes, I attached the “interception identification light” (also
known as "police light") and "refueling light" transparencies from the
inside of the port and starboard intake walls respectively, then
assembled the intakes and attached them in position. Intake innards were
painted Hu127 light gray with their bland ends matt black, in order to
give an illusion of depth.The lower wing half is provided in two pieces:
a main rear and a smaller front one, which were joined, then attached
underneath the fuselage, followed by the top wing halves. Some extra
attention is required here, in order for the above parts to rest onto
their “natural” positions.
Moving
to the intakes, I attached the “interception identification light” (also
known as "police light") and "refueling light" transparencies from the
inside of the port and starboard intake walls respectively, then
assembled the intakes and attached them in position. Intake innards were
painted Hu127 light gray with their bland ends matt black, in order to
give an illusion of depth.The lower wing half is provided in two pieces:
a main rear and a smaller front one, which were joined, then attached
underneath the fuselage, followed by the top wing halves. Some extra
attention is required here, in order for the above parts to rest onto
their “natural” positions.
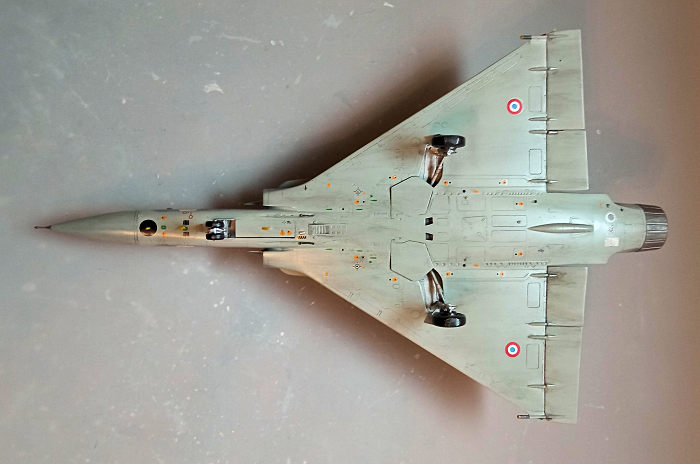
The two piece fin was then attached, followed by the chaff dispenser
dummies that were attached at the wing root aft areas. As a side note,
the kit provides both normal chaff dispensers (crudely molded, to be
honest) and dummies, so you may check your references regarding the
specific machine you are building.
The cannon exit grooves have three mini filets towards their front, (to
possibly disperse the exit gasses, so that they will not be ingested
from the starving intake and stall the engine). Since they are visible
at side and underside views, I decided to replicate them with tiny
pieces of stretched sprue.
Upon engine shutdown, all three LG main doors remain in fully locked
position, but, immediately after, the mechanic manually unlocks them to
inspect all three bays, then closes them back. However, after this
second "closing" the doors do not fully lock, but remain tad protruding,
which is the normal Mirage2000 posture when it is parked (the doors
fully lock upon engine start). To replicate this slight hanging down, I
attached all three main doors at a very slight but noticeable angle.
Also upon engine shutdown, all four elevons of the Mirage 2000 droop at
about 40 degrees (they are kept horizontal by hydraulic pressure when
the engine is running). The Heller kit has them molded horizontally with
the wing,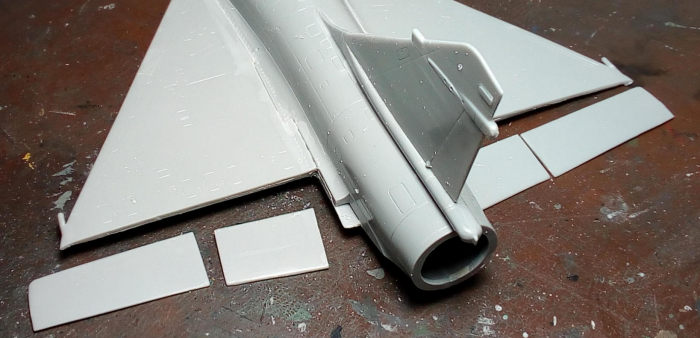 which is wrong for a static plane (the Kinetic kit correctly provides
them separately, so they can be posed accordingly). I thus decided to
separate them, which was performed by carefully running the back of my
hobby knife into their well defined borders. The tradeoff for this
operation is that the loss of material will result in a reduction of
their overall length. A remedial action would be to add material and
sand to shape, something I elected not to do due to laziness (and
something that I regretted later for not doing!).
which is wrong for a static plane (the Kinetic kit correctly provides
them separately, so they can be posed accordingly). I thus decided to
separate them, which was performed by carefully running the back of my
hobby knife into their well defined borders. The tradeoff for this
operation is that the loss of material will result in a reduction of
their overall length. A remedial action would be to add material and
sand to shape, something I elected not to do due to laziness (and
something that I regretted later for not doing!).
Having a more or less complete basic model, I went and coarse sanded all
areas due to fit being less than perfect all around, then applied liquefied
styrene as primary filler (which alo double acts as bonding agent), followed
by sanding. It was only afterwards that I attached the delicate intake
mounted strakes, the generator exit scoops and the VOR antennas. Since the
elevons were going to be attached “drooped'', their 8 underside fairings
(they house the servo actuators rods) had to be split in twos, with their
front halves attached to the wing and their rear halves to the corresponding
elevon areas.
The model then received a secondary filling and sanding round (with normal
filler this time) and headed to the paint shop!
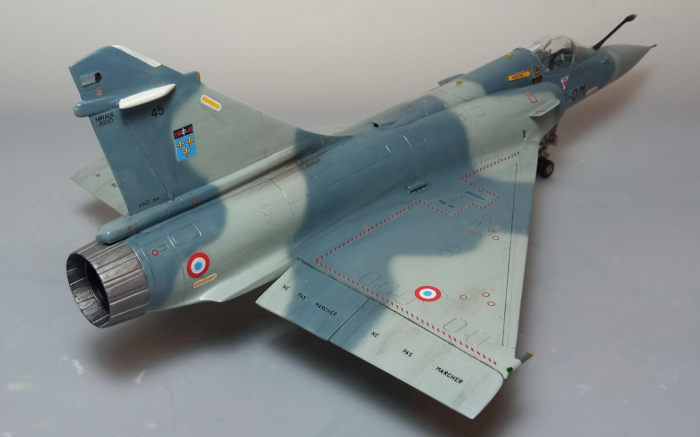
I first gave the radome a coat of Hu64 gray. After masking it off, I sprayed
the whole model with Hu127 Light Ghost Gray, which would be the basic camo
color, followed by freehanding the intermediate blue, for which I used
Hu144. The fin-top bilaterally mounted VOR aerials, as well as the
dielectric fin tip fairing were next painted white. The distinctive
(beautiful to most) Mirage 2000 scheme that emerged was sealed with a coat
of Future to get prepared for decaling.
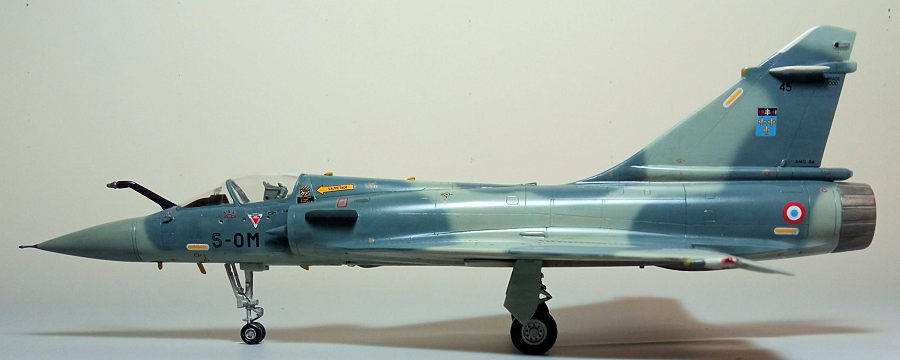
 I used
the kit decals, in order to depict the 45/5-OM machine of EC 2/5 “Ile de
France”, as it stood during the Gulf War in Al Asha, Saudi Arabia. Decals
were slightly off registered, something typical for Heller decals back then,
however their color shades were acceptable. They detached easily from their
backing paper and adhered well, following all surface contours and snuggling
down sufficiently to panel lines. However, quite a bit of silvering took
place, with a good portion of it taken care of by following Tom Cleaver’s
advice to slice the silvered areas with my hobby knife and flood them with
decal solvent. Still, an amount of silvering remained, possibly having to
do, apart from operator error, with the elderly decal base material.
I used
the kit decals, in order to depict the 45/5-OM machine of EC 2/5 “Ile de
France”, as it stood during the Gulf War in Al Asha, Saudi Arabia. Decals
were slightly off registered, something typical for Heller decals back then,
however their color shades were acceptable. They detached easily from their
backing paper and adhered well, following all surface contours and snuggling
down sufficiently to panel lines. However, quite a bit of silvering took
place, with a good portion of it taken care of by following Tom Cleaver’s
advice to slice the silvered areas with my hobby knife and flood them with
decal solvent. Still, an amount of silvering remained, possibly having to
do, apart from operator error, with the elderly decal base material.
The Mirage 2000 scheme is one of those that actually looks even better with
all the bazillion of stencils added. All in all, 106 decals were affixed! A
coat of Future sealed them.
The three piece quite good looking SEMB (French built Martin Baker) Mk.10
seat was assembled. Its framing was painted medium gray, its cushion and
oxygen hose olive drab, its headrest black and top parachute cover dark
green. The prominent ejection handle was not supplied, so it was fabricated
from stretched sprue and painted yellow/black, together with the quick
release side handles. No seat belts were also supplied, an equally prominent
and colorful feature of the particular seat: they were fabricated out of
suitably painted masking tape pieces, their buckles replicated by “touches”
of my fine tip silver pen, with the completed seat finally attached in
position.
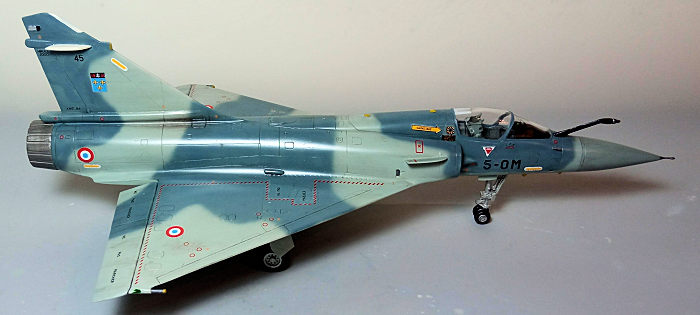
It was then landing gear time: the bays’ visible areas received some
“ribbing” from stretched sprue for busier looks and the main gear doors
received connecting linkages to the leg also from stretched sprue. I
attached all three gear legs with their corresponding retraction cylinders,
then attached the wheels, followed by the dragged gear doors. Finally, the
distinctive paired transparency of landing/taxi lights was attached. The
main gear legs received brake lines and the nose one electrical cabling, all
made from stretched sprue, with the main wheels filed down to look weighted.
Attaching the above parts is a wobbly process that not only requires a
patient step by step approach, but also, once installed and aligned, the
model should rest for many hours, in order for the glue to cure completely
and secure the assembled soft plastic parts in position. Basic color for
bays, door innar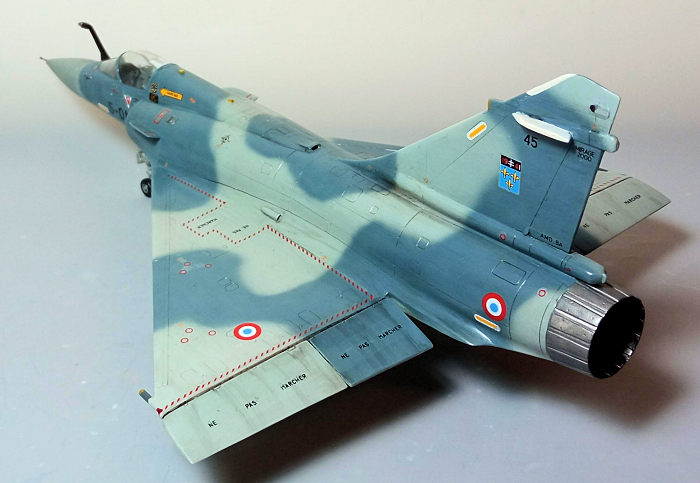 ds
and all landing gear parts was steel, tires, brake lines and cabling were
black, brake housings were gunmetal and oleos were highlighted with a fine
tip silver pen.
ds
and all landing gear parts was steel, tires, brake lines and cabling were
black, brake housings were gunmetal and oleos were highlighted with a fine
tip silver pen.
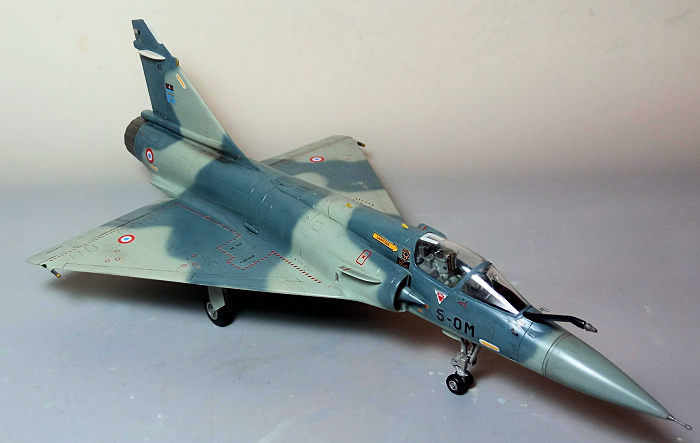
The elevons were next attached “drooped”, followed by the top IFF and bottom
VHF and radio altimeter antennas (all painted lemon yellow). The refueling
probe was painted black with gunmetal receptacle and attached in position.
Since it was a loose attachment, a pin part had been attached via a hole in
its base with a corresponding hole drilled to the model, to provide some
means of reinforcement.
The exhaust nozzle was painted Testors burned metal and attached. Typically
I managed to break and lose one of the wing tip countermeasures, so I
fabricated one from a cylindrical styrene piece. Both countermeasures were
painted dark gray with “sand” mini radomes. The guns were replaced with
needle pieces that were annealed by flame, in order to obtain a “gunmetal”
look.
It was then time for some weathering. I first gave all areas a light black
wash to highlight all engraved detailing, then, a heavier black wash was
added to the landing gear parts, inside the bays and the elevon hinge areas.
Some oil/grease leaks were applied at places that occur in reality (like
turbine oil breather exit at the fin base, or grease at the elevon hinges),
faired towards the airflow direction. Finally, some dark brown / black dry
pastels were subtly used to represent some slight dirtying all around (those
machines were kept pretty neat, even in the harsh desert conditions). A
final satin coat gave the bird its final finish.
The head up display was added, followed by the windscreen and canopy, which
had their well defined frames hand painted beforehand. The canopy needed
some trimming in order to fit, especially at its back end that sat too high.
The HUD base received a tiny blob of green clear paint, in order to
represent the projection lens.
The wing tip lights were represented with blobs of red and green clear
paint, whereas the strobe and tail navigation lights were highlighted with a
fine silver pen. The nose pitot tube and the static ports were attached and
painted gunmetal, before calling the elegant fighter done!
Though elderly, this is still a decent kit of the
charming French fighter. General shape looks very accurate and external details
are sufficiently represented. On the other hand, cockpit detail is sparse,
intakes are shallow and landing gear leans towards the simplistic side, the same
being true for the exhaust nozzle, issues more or less expected from the elderly
kit origins. The lack of centerline tank and air-to-ground ordnance is also
notable.
Fit is at places challenging and the best approach is to treat it like a limited
run kit, meaning clean everything and test fit twice before gluing. Instructions
are clear (though they need some study, as some steps are too dense). Decals
were slightly off-registered and silvered quite a lot. Though not a “shake and
bake” kit (meaning not for the absolute beginner), a nice rendition of the
beautiful Mirage can emerge out of the box. I was also really surprised to see
the vast amount of aftermarket available, addressing all of the kit's
shortcomings.
 This kit is
not that easy to find nowadays, its last reboxing took place some 10 years ago
9as of 2022). The wonderful Eduard beefed-up reboxings are even scarcer. Since
Heller tends to periodically reissue their kits, we might possibly see this kit
reissued sometime in the future. Your other option is the modern Kinetic kit,
definitely more detailed than the Heller oldie. Like many Kinetic kits, it is
not among the easiest of builds, but it is available and offered at sensible
prices.
This kit is
not that easy to find nowadays, its last reboxing took place some 10 years ago
9as of 2022). The wonderful Eduard beefed-up reboxings are even scarcer. Since
Heller tends to periodically reissue their kits, we might possibly see this kit
reissued sometime in the future. Your other option is the modern Kinetic kit,
definitely more detailed than the Heller oldie. Like many Kinetic kits, it is
not among the easiest of builds, but it is available and offered at sensible
prices.
I would dare to say that the Ηeller kit is for the Mirage 2000 what the Monogram
kit is for the P-40B: definitely oldie, simplistic at some areas, maybe rough
around the edges, with molds showing their age and challenging fit, but with a
very accurate shape that promises to deliver a true replica of the plane for the
modeler who will be committed to spending some extra hours working on the kits’
bugs. So if you have one (or you are lucky to find one), go on and build it! It
will for sure require your quality time and attention, but will gratify you with
a beautiful and accurate model of the French Delta lady.
Happy modeling!
Spiros
Pendedekas
29 August 2022
Copyright ModelingMadness.com. All rights reserved. No reproduction
in part or in whole without express permission.
If you would like your product reviewed fairly and fairly quickly, please contact the editor
or see other details in the
Note to
Contributors.
Back to the Main Page
Back to the Previews Index Page
Back to the Previews Index Page