Airfix 1/72 Mirage 2000C
| KIT #: | 03061 |
| PRICE: | $ |
| DECALS: | Two options |
| REVIEWER: | Julien Dixon |
| NOTES: | A good and simple build |
| HISTORY |
Some of you might not be aware that in England we have four main sporting activities; The first is football (or soccer), the second is Rugby (A game played by men with odd shaped balls!), the third is Cricket (a game you can play for 5 days and still end up with a draw!), the last is French baiting, this is formed from a common dislike/distrust of our Gallic cousins across the channel (this game is also played wholeheartedly by the French only they know it as Le antagonist d’anglatere!)
 It is then with this background that I was admiring the French Air Force
Mirage jets that had come over to “fly the Tricolour” at the RIAT Tiger
meet in 1997. While standing waiting for two elderly gents to move from my
photo frame I overheard the following snippet of conversation “Say what
you will about the bloody French….. They make damn fine looking planes!”
Praise indeed from an English man.
It is then with this background that I was admiring the French Air Force
Mirage jets that had come over to “fly the Tricolour” at the RIAT Tiger
meet in 1997. While standing waiting for two elderly gents to move from my
photo frame I overheard the following snippet of conversation “Say what
you will about the bloody French….. They make damn fine looking planes!”
Praise indeed from an English man.
Despite it’s good looks and undoubted performance the Mirage 2000 nearly did not exist. It was originally conceived as the Delta 1000 project, which was put on the backburner by Dassault while they concentrated on the Mirage GA8 or “Avion De Combat Futur (ACF). This was to be (if not belated) a French response to the Panavia Tornado.
However, following a series of cost reviews the ACF programme was
eventually cancelled. This decision even though unwelcome, was not a
surprise. In fact in the same meeting in which the ACF had been cancelled
Dassault then rolled out a new design this was the old Delta 1000, now to
be called the Delta 2000. This name was then quickly changed to the Mirage
2000 (as in French Aerospace, there is the same tendency as used by
Hollywood directors to the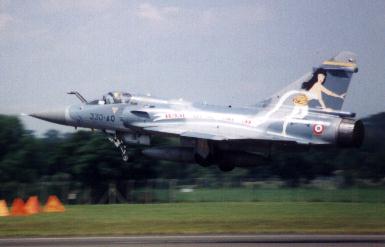 re-use of successful titles!).
Finally in March 1976 the French Air Force – not for the first time – wrote an official aircraft specification around around a set of Dassault performance estimates, with a projected in service date of 1982 for the first 10 aircraft. Even though a somewhat “French” way of gaining a fighter, it makes you wonder that if more Air Forces asked for what industry could deliver, rather than the other way around, we might get combat aircraft which would work; be on time; and be somewhere to meeting an initial budget! Just a thought?
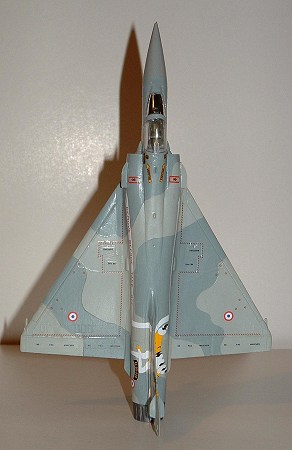
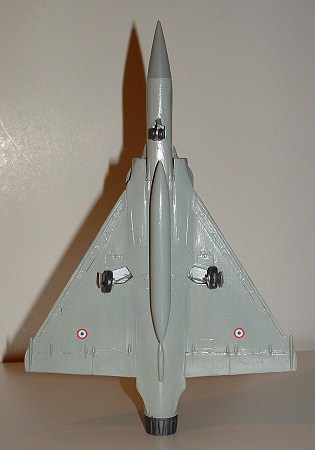
The aircraft shown here is the Interceptor, or fighter variant, however this latest in a long line of fighters to bear the Dassault name has emerged into a true multi-role performer with conventional and Nuclear attack versions being built.
| THE KIT |
This being an Airfix kit, you are greeted by a jumble of parts in a less than robust cardboard box. I am told that this might be a re-boxing of a Heller kit, though I have no proof and it certainly looks like an Aifix kit.
The kit comprises a relatively simple 3- parts moulded in a medium hard grey plastic and 1 fairly well moulded clear canopy. The cockpit is simple but adequate for this scale with some definition to the ejector seat, rather than the sometimes plastic blob. Four air to air missiles are supplied as armament. The decal sheet comprises two aircraft; E/C 1/5 “VENDEE@ Orange-Caritat Armme De’L’Air 1989; & 301/302 Sqn, No 114 Wing Tanagra, Hellenic Air Force 1989. The decals are fairly well printed, although a problem I find evident with most Airfix sheets of late is that the yellow is slightly out of register, they are usable though.
| CONSTRUCTION |
 Naturally this being an aircraft we start with the cockpit. After painting
the tub light grey the ejection seat was painted the same colour with dark
green seat pads and installed into the tub. The instrument panel and
control stick are then added. To be honest I did not pay that much
attention here as you will not see much under the thick canopy.
Naturally this being an aircraft we start with the cockpit. After painting
the tub light grey the ejection seat was painted the same colour with dark
green seat pads and installed into the tub. The instrument panel and
control stick are then added. To be honest I did not pay that much
attention here as you will not see much under the thick canopy.
Next step was to install the tub into the fuselage and close up the two halves. The don’t go together with a noticeable step. The three part inlets are then made up and attached to each side. For such a simple kit these seemed overly complex and fitted, well badly.
The next stage was the main wing. Here I went away from the instructions, they call for you to glue the top panels onto the bottom and then install to the main fuselage. Here I first attached the main lower wing to the fuselage and waited for it to dry. Once this had done so I attached the top panels lining up the leading edges. This then left gaps at both sides where they butt to the fuselage and the underside where the panels met.
The next step was out with the filler to sort these gaps out, the ones around the intakes and the top seam in the fuselage.
Following all this the under carriage was assembled. This is fairly simple with 2 struts and the wheel for the main gear and 2 pcs and the wheels for the front gear.
At this time I did not add any of the under wing pylons or stores as I did not need these for the aircraft that I was modelling. However the aircraft I was to model had a centre line tank. This was not included in the kit (I don’t know about some of you but it is a frustrating as anything to me that kit makers do not provide these basics!) I then had to scratch build this tank. Going through the box of spares I found an old phantom wing tank and this was nearly the right shape. I cut the pylon of this and reshaped the tank slightly to look more like the Mirage tank. A pylon was then fashioned from a section of old Tornado fuselage pylon, and for the finishing touch a small piece of plastic sheet used to simulate the read tank attachment point (similar to those found on F-15 tanks).
| COLORS & MARKINGS |
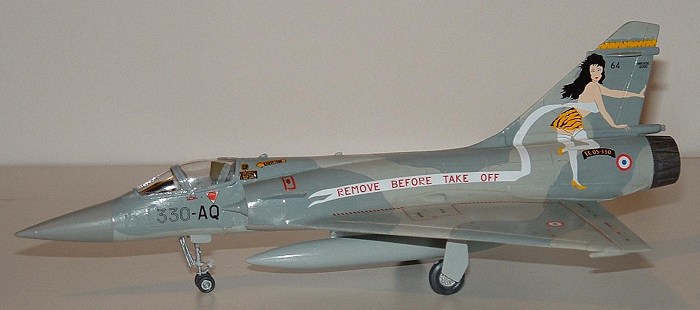
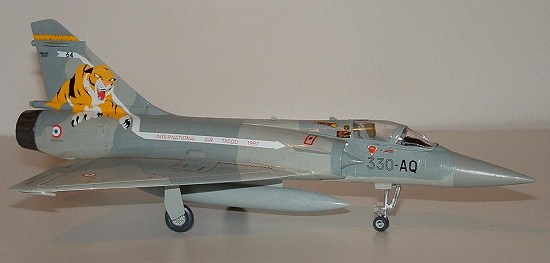
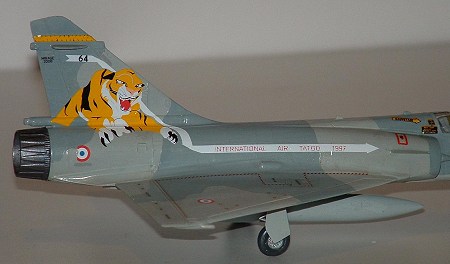
 While attending the Tiger Meet at the International Air Tattoo in 1997 I
had photographed the aforementioned Mirage 2000. This aircraft from No 64
330-AQ CEAM had particularly colourful markings. These were; a large
leaping Tiger right fin with the words “International Air Tattoo 1997 down
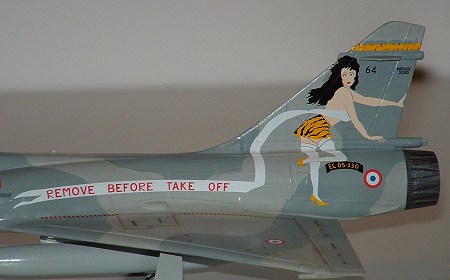
the right side. On the left fin was the figure of a scantily clad woman
with a “Remove before flight” tag for her bikini top.
While attending the Tiger Meet at the International Air Tattoo in 1997 I
had photographed the aforementioned Mirage 2000. This aircraft from No 64
330-AQ CEAM had particularly colourful markings. These were; a large
leaping Tiger right fin with the words “International Air Tattoo 1997 down
the right side. On the left fin was the figure of a scantily clad woman
with a “Remove before flight” tag for her bikini top.
When I saw that Hannants had done this aircraft on a sheet (Xtradecal X04972) I knew that I had to do the markings for this particular aircraft.
The Mirage was then undercoated with Humbrol Matt light grey prior to the top coat. At the same time of my getting the Xtradecals (on a visit to Hannants on there open day) I also picked up a tin of X395 Mirage 2000 Light Blue/Grey and X396 Mirage 2000 Dark Blue/Grey for this project.
2 coats of the Light Blue/Grey were then laid down on the entire airframe. At first viewing this was just too green. I consulted all my references and photo’s and it just was not right. Despondency set at this point and I just put the kit to one side thinking I was going to have to strip the paint and use the Humbrol paint numbers in the instructions.
A couple of weeks later as I was sorting out my modelling area I moved the Mirage and then looked at it more carefully, now that the paint had fully cured the “greenness” had completely gone. Now relieved I set about finishing the Mirage. I then masked off and painted the Dark Blue Grey areas. This was then given a full week to cure and I was then satisfied with the finish. A coat of Johnsons clear (Future) was then applied,
 Once the clear coat had cured I then set to putting the decals on. The
figure and the tiger were fairly easy to apply along with the side
lettering as these were single piece decals, it was then a matter of
putting in the small pieces join them together which was a bit tricky
(especially as I normally work in 1/48!) the national insignia roundels
were also used from the Xtradecal sheet, especially as the one on the rear
right fuselage was missing a piece on the original aircraft for some
reason, and Xtradecal reproduced this. These decals performed really well,
they went down with Micro set/sol and I was impressed. This was the first
time with Xtradecals for me and I would recommend them. The Airfix decals
were then used for the aircraft stencilling and these went down fairly
well, the only gripe being the yellow portions being slightly off register.
Once the clear coat had cured I then set to putting the decals on. The
figure and the tiger were fairly easy to apply along with the side
lettering as these were single piece decals, it was then a matter of
putting in the small pieces join them together which was a bit tricky
(especially as I normally work in 1/48!) the national insignia roundels
were also used from the Xtradecal sheet, especially as the one on the rear
right fuselage was missing a piece on the original aircraft for some
reason, and Xtradecal reproduced this. These decals performed really well,
they went down with Micro set/sol and I was impressed. This was the first
time with Xtradecals for me and I would recommend them. The Airfix decals
were then used for the aircraft stencilling and these went down fairly
well, the only gripe being the yellow portions being slightly off register.
After the decals were set, any remaining setting solution was rinsed off and the kit given a coat of Johnson clear (future). Now I normally like to leave my kits in this glossy state (just personal preference as I don't really like matt finishes). However following some advise from 'Da Boss' I went away and gave this a finish with Humbrol satin varnish. This was provided from a rattle can that I had hanging around for a while (it was purchased while on sale with that "this will come in useful for something" attitude a lot of us have I think!). This was misted on in a couple of fine coats and I must say that I do like the finish. It is not totally flat however cuts out the straight glare you get from the totally glossy finish.
| CONCLUSIONS |
 Finally after
completion this kit was all set to join my fledgling collection; however a
good friend of mine called in who is a major fan of anything with a Tiger
on it and he has commented on the fact it "would look good in my study".
As this is the same friend who happens to live near Hannants, and always
get my modeling supplies for me; I think all things considered that it
would defiantly look good in his study :)
Finally after
completion this kit was all set to join my fledgling collection; however a
good friend of mine called in who is a major fan of anything with a Tiger
on it and he has commented on the fact it "would look good in my study".
As this is the same friend who happens to live near Hannants, and always
get my modeling supplies for me; I think all things considered that it
would defiantly look good in his study :)
I would recommend the kit to anyone as even a basic modeller will make a fairly good job with it. It could do with slightly better decals (but so could any Airfix kit!) I don’t know if the kit is super accurate, but then again I don’t care, It looks to me like a Mirage 2000 and that’s good enough to me!
All in including the decals and the paint this kit cost me approx £7.00 as I did get a discount at Hannants on their open day. As I am writing this it is announced that Tamiya will be releasing an F-16 and the MSRP at Hannants will be £99.99 (or $185 !!) It good to know that in these times you can still have fun with a project which costs a great deal less.
December 2004
Review courtesy of my wallet and sponsored by Visa
Copyright ModelingMadness.com. All rights reserved. No reproduction in part or in whole without express permission from the editor.
If you would like your product reviewed fairly and quickly, please contact the editor or see other details in the Note to Contributors.