|
KIT: |
Revell 1/48 A-6E Intruder |
|
KIT # |
4578 |
|
PRICE: |
$23.98 (when last issued) |
|
DECALS: |
Two aircraft; VA-85 and VA-196 |
|
REVIEWER: |
|
|
NOTES: |
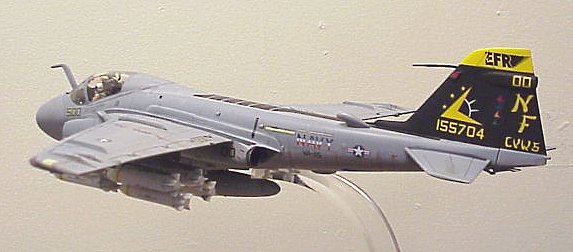
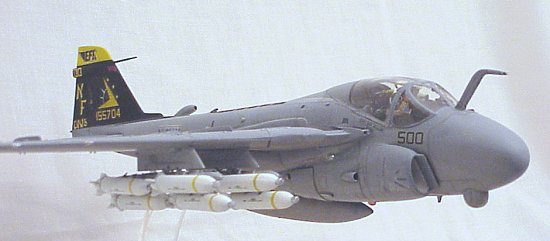
Converted to A-6E TRAM/SWIP with markings from VA-115 “The Eagles” (Aeromaster Decal sheet 48-537) |
|
HISTORY |
The US Navy's venerable A-6 Intruder was the ultimate medium bomber for over 35 years. It’s history was long and distinguished, from Vietnam, to the Syrian and Libyan raids of the 1980s, to Desert Storm and the Balkans, it evolved into a tried and true platform capable of carrying very heavy loads a long distance and being strong enough to bring its crews home despite severe damage. It was finally retired in February 1997 and was replaced by the less capable, but newer and easier to maintain F-18 Hornet. As the famed Grumman Ironworks is being retired by the Navy (yes even the F-14 is being replaced by the Hornet…), the A-6 line is still soldiering on as the EA-6B Prowler, a capable but tired jammer that is now the nation's only tactical jamming aircraft.
 As
my modeling skills have evolved, I’ve been fortunate enough to be able to sell
some of my finished kits. It’s been a great way (ask my wife!) for me to
continue to build models and not end up with a den that has airplanes on every
shelf, hanging from the ceiling etc… For my latest project, I was asked to
build a later A-6E TRAM/SWIP variant. The SWIP variant, which was introduced in
1994, was modified to carry Standoff Weapons, and included new avionics features
such as a HUD among the many improvements. The pilot I made it for had flown
for VA-115 prior to the decommissioning of the A-6. Prior to their transition
to the FA-18 Hornet, VA-115 flew the A-6 from NAF Atsugi. If you’ve noticed on
their markings for the Hornet and the new Super Hornet, all the aircraft are
emblazoned with “EFR,” which means “Eagles F---ing Rule!” Supposedly, the
phrase was adopted after an inebriated squadron member got into a bit of trouble
at the Barracks (ask the editor about the barracks at Atsugi…), and was running
around screaming the phrase—it rapidly became the squadron motto that now adorns
all their aircraft! But I digress, so onto the kit.
As
my modeling skills have evolved, I’ve been fortunate enough to be able to sell
some of my finished kits. It’s been a great way (ask my wife!) for me to
continue to build models and not end up with a den that has airplanes on every
shelf, hanging from the ceiling etc… For my latest project, I was asked to
build a later A-6E TRAM/SWIP variant. The SWIP variant, which was introduced in
1994, was modified to carry Standoff Weapons, and included new avionics features
such as a HUD among the many improvements. The pilot I made it for had flown
for VA-115 prior to the decommissioning of the A-6. Prior to their transition
to the FA-18 Hornet, VA-115 flew the A-6 from NAF Atsugi. If you’ve noticed on
their markings for the Hornet and the new Super Hornet, all the aircraft are
emblazoned with “EFR,” which means “Eagles F---ing Rule!” Supposedly, the
phrase was adopted after an inebriated squadron member got into a bit of trouble
at the Barracks (ask the editor about the barracks at Atsugi…), and was running
around screaming the phrase—it rapidly became the squadron motto that now adorns
all their aircraft! But I digress, so onto the kit.
Revell first issued this kit back in 1988. It was one of my favorites in my collection of Naval Aircraft. I was delighted when Revell/Monogram reissued the kit a few years back and immediately picked up several. This kit is quite typical of their kits of that time, consisting of excellent detail, all of it raised. It is the most up to date and desirable version of the A-6 in 1/48 scale, (the other kit being the archaic and much less detailed Fujimi A-6A). Unfortunately the molds must are showing their age, as there was heavy flash on most of the sprues.
|
THE KIT |
 When
first opening the box, the model is bagged in two different bags, with
instructions and a decal sheet for two different options. Without a doubt, one
of the highlights of this kit is the large amount of ordnance it contains.
Unlike certain Japanese companies, and even their own F-15E kit, Revell/Monogram
offer a large assortment of weaponry including 12 MK 82 Snakeye bombs, 8 MK 20
Rockeyes, and a pair of AGM-84 Harpoon missiles. It also includes 300-gallon
drop tanks. With all the aftermarket options available, one can make a KA-6D,
drop the flaps and slats, fold the wings (for both composite and metal wings!),
not to mention the great Black Box and Verlinden options. I just can’t wait
until I get my hands on the new Seamless Suckers intakes! The numbers of
options available for this kit are impressive compared to what was available
during its first issue.
When
first opening the box, the model is bagged in two different bags, with
instructions and a decal sheet for two different options. Without a doubt, one
of the highlights of this kit is the large amount of ordnance it contains.
Unlike certain Japanese companies, and even their own F-15E kit, Revell/Monogram
offer a large assortment of weaponry including 12 MK 82 Snakeye bombs, 8 MK 20
Rockeyes, and a pair of AGM-84 Harpoon missiles. It also includes 300-gallon
drop tanks. With all the aftermarket options available, one can make a KA-6D,
drop the flaps and slats, fold the wings (for both composite and metal wings!),
not to mention the great Black Box and Verlinden options. I just can’t wait
until I get my hands on the new Seamless Suckers intakes! The numbers of
options available for this kit are impressive compared to what was available
during its first issue.
|
CONSTRUCTION |
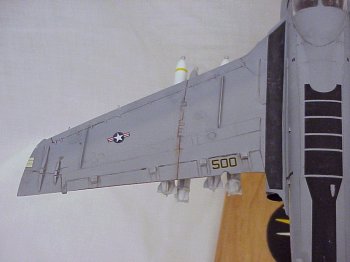
I started the kit with the wings, as this was the area that needed the most work. I used my Dremel tool to grind out the kit exhaust on both the upper and lower wings. I also cut away the section on the fuselage that corresponds to the jet exhaust. Once done with this I took a section of brass tubing and fitted it in. One thing to note is that on both the A-6 and the EA-6B, the exhausts are canted down and out (one of the reasons flight deck crews loath these planes—the exhaust has a tendency to blow people over the side…). The other modification I made to the wings is the addition of the ECM fairing over the fuel dump mast (between the flaps and speed brakes).
As is typical with Monogram kits, you’ve got a lot of work cut out for you if want to display their kit with the gear up. With this in mind, before I glued the wings to the fuselage, I closed the landing gear doors. My experience with previous Intruder and Prowler kits is that there’s much less filling and sanding involved if you do it this way.
 The fuselage was then glued together with an
unpainted cockpit tub in place. As I was closing up the fuselage, I reinforced
the bottom seam with plenty of epoxy. This is important as it strengthens the
model around the area where it’s mounted. I finished off the fuselage by
sanding it smooth and engraving the panel lines.
The fuselage was then glued together with an
unpainted cockpit tub in place. As I was closing up the fuselage, I reinforced
the bottom seam with plenty of epoxy. This is important as it strengthens the
model around the area where it’s mounted. I finished off the fuselage by
sanding it smooth and engraving the panel lines.
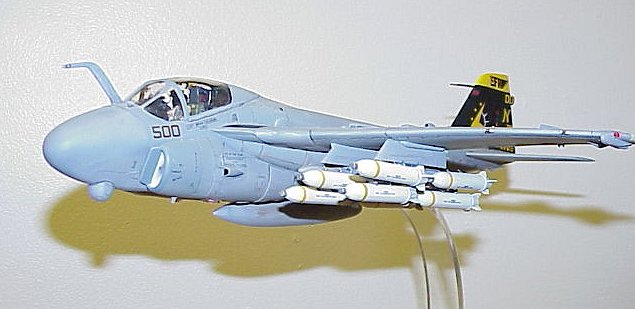
The cockpit is stock; from the instrument panel, to the seats and the aircrew. I love to animate the crew ensuring that they have up-to-date helmets and survival equipment. In this case I converted the old style helmet to the new HGU-55 with bungee type visors, complete with squadron markings appropriate for VA-115. They are wearing desert flight suits that became common during Operations Northern and Southern Watch, which followed Desert Storm. There is a Pocket Checklist in the windscreen and the crewmen even have kneeboards. I posed the B/N so that he is passing signals to a wingman. As mentioned, the GRU-7 ejection seats are from the kit, with a few modifications to spruce them up. I sit on this seat everyday, so I know they are really pretty accurate—that and I didn’t feel like splurging on resin seats that would be hidden by figures. The clear parts were dipped in Future and before closing the cockpit, I added a strip of styrene beneath the canopy rail complete with sprue lights. In front of the pilots windscreen I added a strip of styrene drilled with holes to replicate the rain removal system.
To display my airplanes, I mount them to a wooden base bought at the local craft store for 99 cents. The base is sanded, stained and a urethane finish applied. I use a ¼” sheet of Plexiglas cut 1” wide, which is then molded to shape in a pot of boiling water. To mount the airplane to the base, I drill holes in both ends of the Plexiglas. When screwed to the wooden base, complete with the squadron’s patch, it really looks quite sharp.
|
PAINT & DECALS |
After masking the canopy, I began painting by airbrushing the tail and canopy black. I followed this with white for the intakes. I then painted the base colors using Model Masters Light Ghost Gray (FS 36375) and Dark Ghost Gray (FS 36320). Their enamels are a very good match to the FS colors. Several coats of Future were sprayed prior to decaling, (although I could tell just by looking at the black that I’d probably get silvered decals).
 The aircraft that is depicted by Aeromaster was shot
down by the JMSDF during a gunnery exercise during RIMPAC 1996. (The pilot I
was making this kit for was supposed to fly this mission, but his roommate took
it so he could get his 2,000th hour in the A-6—both aviators
survived, and he got a memorable flight to mark his 2,000th A-6 hr!)
The decals were excellent and went on with no problems whatsoever, except for
some silvering the black tail, which was my fault. This was my first time using
Aeromaster products, and I must say I’m quite pleased with their decals! Other
markings on the sheet are for the last two A-6 squadrons on both the East and
West Coast, VA-75 and VA-196. There are even enough formation/strip lights on
the sheet for 3 models! The decals were followed up with another coat of Future
and several coats of Model Master Flat Lacquer.
The aircraft that is depicted by Aeromaster was shot
down by the JMSDF during a gunnery exercise during RIMPAC 1996. (The pilot I
was making this kit for was supposed to fly this mission, but his roommate took
it so he could get his 2,000th hour in the A-6—both aviators
survived, and he got a memorable flight to mark his 2,000th A-6 hr!)
The decals were excellent and went on with no problems whatsoever, except for
some silvering the black tail, which was my fault. This was my first time using
Aeromaster products, and I must say I’m quite pleased with their decals! Other
markings on the sheet are for the last two A-6 squadrons on both the East and
West Coast, VA-75 and VA-196. There are even enough formation/strip lights on
the sheet for 3 models! The decals were followed up with another coat of Future
and several coats of Model Master Flat Lacquer.
And now for my favorite part of modeling Naval
Aircraft—weathering! I subscribe to the theory that if you’re trying to depict
a modern USN aircraft there is never too much weathering you can do. When I’m
replicating the splotched paint scheme that’s typical of carrier borne planes, I
think of the 18-19 year olds that are out on the flight deck performing the
corrosion control at all times and in all sorts of weather and bad
conditions—then it’s easy to realize why the paint schemes are usually pretty
bad! (Your editor had work uniforms that were 'sea only' because of the
permanent staining resulting from that wonderful anti-crud paste in a can. You
who have used it know what I mean! Ed) I first start off by spraying a
highly 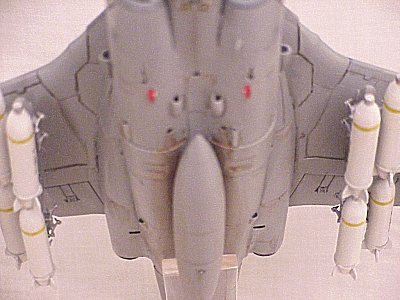 thinned, lighter shade of Ghost Gray. The fact that parts support out at
sea is not always the greatest, means that parts are cannibalized off other
planes, so sometimes panels or even whole wing sections can be different
shades. As I painted differing shades of gray, I also replicated the corrosion
control efforts that are applied to individual screw heads, rivets etc… I gave
major seams (flaps/slats, wing fold, vents etc…) a wash of black. A wash of
dark gray was applied to all other panel lines. Final highlights were added by
dry brushing over fine details. To wrap up the weathering, I applied copious
amounts of hydraulic fluid streaming from the engines. The Ironworks products
are notorious for this, so once again, I say there’s never enough! The J-52
engines on the A-6 were also notorious smokers, which resulted in exhaust and
oil streaking down the fuselage and horizontal stabilizers—I used a heavy wash
of enamels to replicate this.
thinned, lighter shade of Ghost Gray. The fact that parts support out at
sea is not always the greatest, means that parts are cannibalized off other
planes, so sometimes panels or even whole wing sections can be different
shades. As I painted differing shades of gray, I also replicated the corrosion
control efforts that are applied to individual screw heads, rivets etc… I gave
major seams (flaps/slats, wing fold, vents etc…) a wash of black. A wash of
dark gray was applied to all other panel lines. Final highlights were added by
dry brushing over fine details. To wrap up the weathering, I applied copious
amounts of hydraulic fluid streaming from the engines. The Ironworks products
are notorious for this, so once again, I say there’s never enough! The J-52
engines on the A-6 were also notorious smokers, which resulted in exhaust and
oil streaking down the fuselage and horizontal stabilizers—I used a heavy wash
of enamels to replicate this.
With the weathering complete, the plane was mounted to the base. Final details such as lights and pitot tube were added. I had saved the MERs and Rockeyes for this final stage. The heavy flash I mentioned earlier wasn’t much of a factor on the plane itself, but after cleaning up 48 sway braces (12 per MER, times 4 stations—Uggghh…) my vision was shot, and my hands were permanently cramped in a permanent vise grip around a file. I scrounged through another A-6 kit for extra Rockeyes. These went together fine with no problems, and the great folks at Aeromaster even provided enough stencils for a fully loaded plane! Mounting them was another chore that meant that each sway brace had to be perfectly aligned. Before gluing each MER to the weapons pylon, I drilled holes and inserted bits of wire to ensure that it was attached securely. Mounting the MERs wrapped up the model, and I was finished.
|
CONCLUSIONS |
The completed model took me 27 odd hours to complete and the end results are quite striking. As mentioned earlier, the only real surgery I did was to modify the exhausts. Otherwise, the kit is completely OOB. If you want a 1/48 Scale A-6 this is the only game around. It’s a good kit that in the right hands can be made into a beauty.

|
REFERENCES |
Dictionary of American Naval Aviation Squadrons Vol. 1, Roy Grossnick. USN Historical Ctr.
A-6 Intruder in Action, No 138, Squadron Signal.
A-6 Intruder Walk Around, No 2. Squadron Signal
If you would like your product reviewed fairly and quickly by a site that has well over 150,000 visitors a month, please contact me or see other details in the Note to Contributors.