Kinetic 1/48 Sea Harrier FRS.1
| KIT #: | K48035 |
| PRICE: | @ 45 € |
| DECALS: | One option plus two for the OS2Us |
| REVIEWER: | Frank Spahr |
| NOTES: |
| HISTORY |
The Harrier was developed in the 1960s as a VTOL/STOL aircraft, primarily for use from improvised airfields in the event of a major war in Europe, when the loss of most conventional airfields was expected. In the 1970s, a navalized version of the aircraft was developed. The Royal navy was about to lose their fixed-wing assets with the retirement of their conventional aircraft carriers. A Harrier would be able to operate from smaller vessels and pose a threat towards Soviet maritime surveillance aircraft. The „through-deck cruisers“ of the Invincible class were meant to operate ASW helicopters, and some fighters/interceptors were considered a valuable additional asset.
 With
the invention of the ski-jump, a Harrier could launch with much more payload
than in a vertical take-off, a modification that greatly enhanced the
aircraft´s capabilities.
With
the invention of the ski-jump, a Harrier could launch with much more payload
than in a vertical take-off, a modification that greatly enhanced the
aircraft´s capabilities.
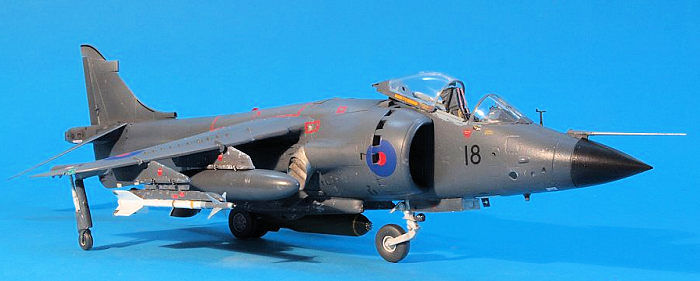
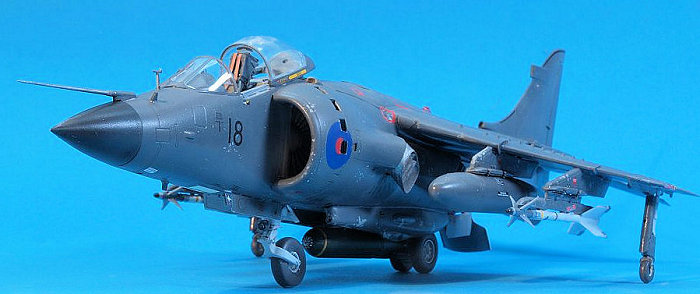
The Sea Harrier FRS.1 was designed to fulfill the roles of Fighter, Reconnaissance and (nuclear) Strike. It differed from RAF Harriers externally in the nosecone for the Blue Fox radar and the repositioned cockpit with better all-round visibility. Ordered in 1975, the first aircraft was delivered in 1978, and operational capability reached in 1981, on the new carrier HMS Invincible and the old HMS Hermes.
Very soon after, the Sea Harrier was put to the test in the South Atlantic. Virtually all available aircraft were deployed, augmented by a detachment of RAF Harriers. The Sea Harriers were mainly used for air defence, with ground attack as a secondary role. Being equipped with the latest generation of the AIM-9 Sidewinder missile was one key factor for their good record in aerial combat. Lack of an airborne early warning capacity, on the other hand, hampered the entire task force. Out of 28 Harriers deployed, two were shot down by ground fire and four were lost in accidents.
The aircraft were routinely equipped with auxiliary fuel tanks, albeit the earlier smaller variety. They used the Sidewinder missile, but also bombs and gun pods. They mainly operated from the two aircraft carriers, but also landed in an emergency on the LPD HMS Fearless.
The Sea Harrier was further developed into the Sea Harrier FA.2 and served during the 1990s, but was in 2006 withdrawn from the remaining aircraft carriers. Currently the RN has no fixed wing capacity. It is awaiting availability of the F-35 to be deployed on the two new aircraft carriers now entering service.
| THE KIT |
Nonetheless there are some omissions in the instructions, and I would very much urge to test-fit any item, as some need extra attention. Combined with the superb Eduard PE, this surely is a very good kit of this interesting aircraft.
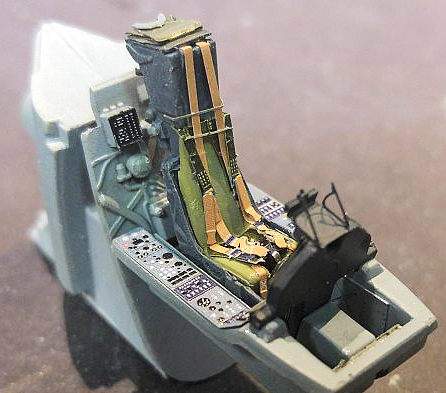
| CONSTRUCTION |
Like most aircraft
kits, the cockpit was the main starting point. The excellent Eduard PE was
used and helped the look of the pilot´s workplace up a lot. The set wasn´t
totally hassle-free, as I had trouble with the multi-part seatbelts, but I
got there in the end. Parallel to that cockpit, I started various other
subassemblies, mainly those ending up inside the aircraft, such as wheel
wells and the engine face. I also
 tackled
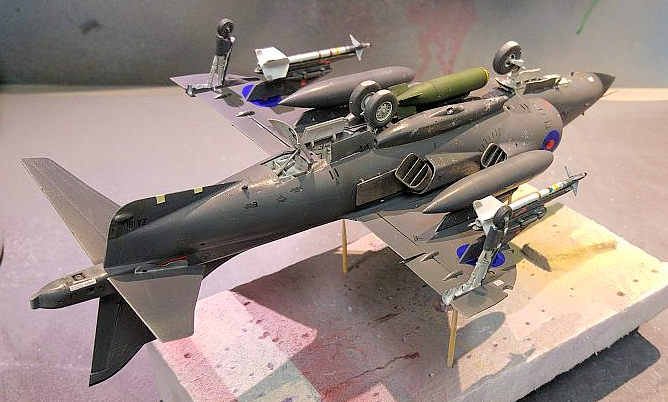
the wheels and landing gear, and the various pylons. Those needed
identifying and marking so they would end up where actually needed. I early
on chose a rather weapons fit I had seen on reference photos, so prepared
two Sidewinders, two drop tanks, ADEN gun pods and a bomb for the centerline
rack. The parts fit quite well and only needed limited filling and
rescribing.
tackled
the wheels and landing gear, and the various pylons. Those needed
identifying and marking so they would end up where actually needed. I early
on chose a rather weapons fit I had seen on reference photos, so prepared
two Sidewinders, two drop tanks, ADEN gun pods and a bomb for the centerline
rack. The parts fit quite well and only needed limited filling and
rescribing.
I painted the various items according to the kit instructions and reference images. I mentioned above that test-fitting is highly recommended for this kit. That was especially important when fitting the cockpit assembly into the fuselage, which needed some serious trimming on both surfaces. But there were also some other places where some trimming and tweaking was necessary, for instance the fit of the canopy to the fuselage.
 I
did not use all of the Eduard PE, because some parts were quite frankly beyond
my skills. So I left the numerous vortex generators on the wing surface as they
were and did not attempt to replace them with PE items. But quite a lot of what
was on those two PE frets was used.
I
did not use all of the Eduard PE, because some parts were quite frankly beyond
my skills. So I left the numerous vortex generators on the wing surface as they
were and did not attempt to replace them with PE items. But quite a lot of what
was on those two PE frets was used.
I ran into trouble with the cockpit by trying too hard. The cockpit needs a decal for the detonation cord to be applied from its inside, and I was concerned about a decal on bare clear plastic. So I dipped the canopy into Future and later applied the decal. Despite all the masking I did prior to painting, there was some leaking of paint, and somehow I botched the canopy beyond salvage. Luckily Kinetic provided replacement free of charge, despite me admitting it was my clumsiness, and in my second canopy, I simply painted the raised det cord detail with white oil paint and didn´t bother with Future.
The machined brass items from master worked quite nicely, even though drilling out the base of the kit part to accept the pitot tube took some guts. The AOA indicator is really tiny, but you´re happy when you know it´s there.
| COLORS & MARKINGS |
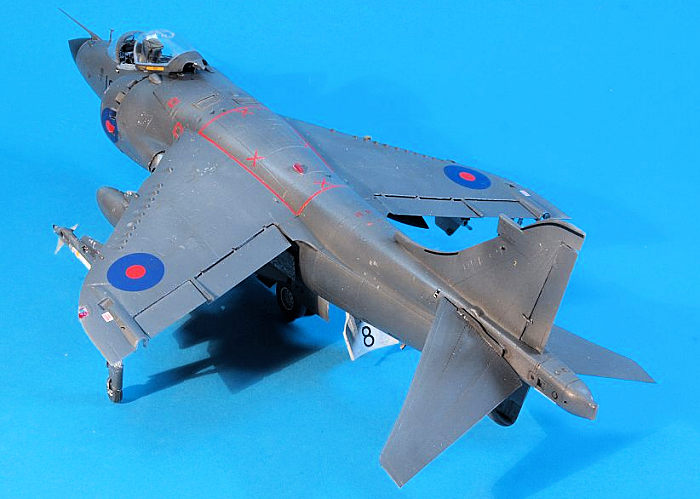
The model was primed with solvent-based primer from a rattlecan, and mainly painted with Vallejo ModelAir. Metallic items were treated with AK Interactive Tru Metal pastes. I had early on decided on which airframe to model, and chose ZA 191 from 899 NAS, based on HMS Hermes. I found one photo of the actual aircraft, lashed onto the deck in heavy weather. The paint scheme was quite simple – Extra Dark Sea Grey over all, apart from the wheel wells.
 I
could find no references for very visible shading and accentuations, only for
some paint touchups and some scuffing. There was paint chipping on some of the
weapons´ pylons, though. So after some preshading I mainly sprayed the aircraft
in EDSG, with some little variations. The pylons received paint chipping with
fellow modeler Tom Grigat´s method using Marmite. The stuff is not to my taste,
despite being an anglophile, but it works great if you apply it with a
microbrush over your basecoat. After applying the topcoat, you can easily brush
it away over and with the Marmite, and arrive at very neat chipping. I assume
that the hasty repainting of the white lower surfaces and pylons did not stick
too well on the heavily used pylon surfaces. At least, it adds some interest to
the aircraft´s monochrome look. I also applied some washes and did some „paint
touch-ups“ by brush, to make the surface a bit livelier.
I
could find no references for very visible shading and accentuations, only for
some paint touchups and some scuffing. There was paint chipping on some of the
weapons´ pylons, though. So after some preshading I mainly sprayed the aircraft
in EDSG, with some little variations. The pylons received paint chipping with
fellow modeler Tom Grigat´s method using Marmite. The stuff is not to my taste,
despite being an anglophile, but it works great if you apply it with a
microbrush over your basecoat. After applying the topcoat, you can easily brush
it away over and with the Marmite, and arrive at very neat chipping. I assume
that the hasty repainting of the white lower surfaces and pylons did not stick
too well on the heavily used pylon surfaces. At least, it adds some interest to
the aircraft´s monochrome look. I also applied some washes and did some „paint
touch-ups“ by brush, to make the surface a bit livelier.
Having proceeded so far, I ran into yet another homemade trouble. I had used Humbrol acrylic clear gloss this time prior to decaling. That stuff works very well and gives a gloss on par with Future/Klear. But it does not react well with Micro Sol decal softener, as I should soon discover. The surfaces became white and frosty and my spirits took a sudden dive. In the end, applying yet more Humbrol gloss clear over the devastated surface restored the gloss, but I have filed that info away for future use, pardon the pun.
Decaling the model took quite some time, even though a lot of the stencils on the aircraft´s underside had been obliterated by the repaint, there are still quite a lot of them. The decals worked quite nicely. After all of them were applied, I added yet more gloss clear to blend them in, and then flattened the surface, but only to a kind of satin sheen. Some weathering broke this sheen and made it less uniform.
| FINAL CONSTRUCTION |
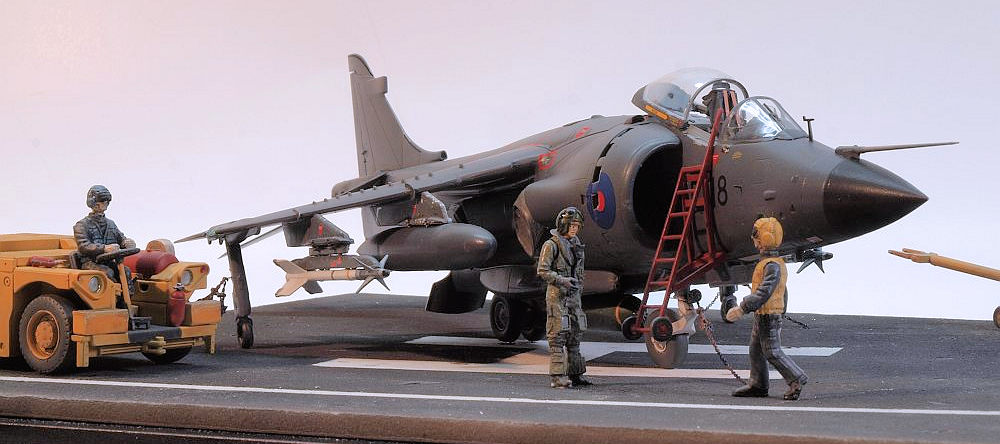
 I wanted
to show my Sea Harrier on a carrier deck, and was presented a two tractor kit by
a modeling pal, which went a lot of the way to my goal. Building the tractor was
a nice and relaxing task, same as adding the tow bar. I had also ordered a PE
boarding ladder, but found it to be too short, so I used the boarding ladder
from the Skunkworks tractor kit. The tractor was painted yellow and weathered
liberally, the ladder red. I had also obtained a resin pilot figure, which was
really nicely sculpted and cast, and built well. Only the painting guide was
wrong. I painted the figure according to info I got from a former crewman of HMS
Invincible.
I wanted
to show my Sea Harrier on a carrier deck, and was presented a two tractor kit by
a modeling pal, which went a lot of the way to my goal. Building the tractor was
a nice and relaxing task, same as adding the tow bar. I had also ordered a PE
boarding ladder, but found it to be too short, so I used the boarding ladder
from the Skunkworks tractor kit. The tractor was painted yellow and weathered
liberally, the ladder red. I had also obtained a resin pilot figure, which was
really nicely sculpted and cast, and built well. Only the painting guide was
wrong. I painted the figure according to info I got from a former crewman of HMS
Invincible.
The base is made from depafit, a compound material wherein fine-grained styrofoam is sandwiched between two layers of cardboard. I removed the one layer and had a nice surface texture. Minimal markings hinted on HMS Hermes ( the big H being a kind of a giveaway), and spraying various shades of grey and brown gave a quite convincing effect to me. Some spots hinted at spillages of this and that.
The tiedowns were made
from the superb set available from Infini Model. This contains machined brass
„bowls“ and PE covers for them, which just about mimics the real thing. They
were glued into depressions I had made into the depafit surface using the end of
a paintbrush handle and sprayed with the rest of the base. There is also a
diagram in the set showing how the tiedowns should be spaced. The set applies to
 the US
navy, but I assumed there wouldn´t be too serious differences, landlubber as I
am. So I do hope I did get away with it.
the US
navy, but I assumed there wouldn´t be too serious differences, landlubber as I
am. So I do hope I did get away with it.
The final piece was the set of tiedown devices from Infini Model. It contains very fine chain, plus PE (and some machined brass) parts to either build the ratchet and hooks devices to be mounted on the ends of the chains, and various PE parts to attach the chains to various aircraft types. Well, the Harrier is not included here, but some necessary parts were included in the Eduard PE (for the front wheel), and the others I liberated from the set. Assembling the ratchet devices was pretty demanding, and did not work as designed. I, um, simplified the assembly using wire instead some of the minuscule PE parts, and glued things together as best I could. The assembly was then painted and a bit weathered and secured to the aircraft and the tiedowns.
| CONCLUSIONS |
This is quite an impressive kit of an important aircraft. It does need a bit of work and an open-eyed approach, and builds into a model that does look the part. The Eduard PE has a lot of really useful parts, especially for the cockpit. If you want to display an aircraft on a carrier deck, the Infini Model sets are very, very helpful.
| REFERENCES |
https://en.wikipedia.org/wiki/British_Aerospace_Sea_Harrier
Tim McLelland: Harrier. 2011
David Brown: The Royal Navy and the Falklands War. London 1989.
Aftermarket:
- Eduard PE #49769 Sea Harrier Interior #48887 Sea Harrier Exterior
- Eduard pre-cut masks EX 508
Master
- Machined brass pitot tube and AOA indicator, AM-48-070
Aerobonus
- British Sea Harrier pilot, Falklands war, resin figure, # 480 086
Skunkworks
- Royal Navy Tow Tractors, injected plastic, contains two tractors, two boarding ladders, two tow bars and several figures #48017
InfiniModel
- Tie Down Point Set, IMP-48001R1(Machined brass and PE)
- Tie Down Device Set A IMP-48002R1 (PE and metal chain, machined brass)
Back to the Main Page Back to the Previews Index Page
Back to the Previews Index Page