Rareplanes 1/72 FMA IA-58 'Pucara'
| KIT #: | ? |
| PRICE: | £6.00 |
| DECALS: | None |
| REVIEWER: | Carmel J Attard |
| NOTES: | Highly detailed vac form kit in white soft styrene, & clear transparency. |
| HISTORY |
The IA58 Pucara is an Argentine designed attack aircraft and
has been manufactured since 1974.The Falkland War involved a wide variety and
types of aircraft that were used on different missions and the Pucara was among
the types employed in combat. These carried a diversity of camouflage and
markings while serving with the Fuerza Aerea
Argentina . At the time when
the war started the Fuerza Aerea Argentina was an unknown element for the
British and little was known that Argentina was producing its own close-support
aircraft, as the FMA IA 58 Pucara’, and that the type was being exported. Two
squadrons of Grupo 3 de Ataque III Brigada Aerea, each with 35 aircraft were
deployed at Reconquista in the north of the country, offering a lethal ground
attack capability. At its peak strength in 1981 the Grupo 3 de Ataque
possessed 3 Pucara equipped escuadrones. These were deployed
 at Goose
Green, Port Stanley and Pebble Island. The quantity of Pucaras prior to
hostilities was unknown and also was its effectiveness when deployed in the war
zone. 24 of its aircraft were lost during the South Atlantic conflict. Some in
the air, others on the ground and others captured after the surrender.
at Goose
Green, Port Stanley and Pebble Island. The quantity of Pucaras prior to
hostilities was unknown and also was its effectiveness when deployed in the war
zone. 24 of its aircraft were lost during the South Atlantic conflict. Some in
the air, others on the ground and others captured after the surrender.
During one of the early attacks on Goose Green airfield by Sea Harriers, a distance of 50 miles south west of Port Stanley resulted in three Pucaras being put out of action for the duration of the war. Other Pucaras were to take a terrible toll of British troops in ground attack missions following the landings at San Carlos circa mid May 1982. SAS troops inserted into Pebble Island by 846 Naval Air Squadron Seaking helicopters have damaged or destroyed six Pucaras of Grupo 3 besides other aircraft. Others were damaged by naval gun fire and further lightning strikes by SAS and SBS units. One Pucara was shot down with a Stinger missile fired by an SAS NCO. Pucaras also attacked HMS Ardent one of which was destroyed over Lafonia by cannon fire from an 801 Naval Air Squadron Sea Harrier FRS1. Late in May napalm was dropped by one Pucara, the only time such a weapon was used. A Pucara also shot down a ScoutAH1 helicopter of 3CBAS while conducting casvac sortie killing its crew. But British troops pushing inland of Darwin and Goose Green captured a number of Pucaras at the airfield.
All three squadrons were retained until 1987 when one of these was deactivated and many of the Grupo 3 Pucaras have since been placed in storage and owing to climate of financial stringency the remaining Escuadrons 1 and 2 were for a time flying the available aircraft on alternate days. The other Pucara equipped element is the Escuadron IV de Ataque which operates from Chubut.
| THE KIT |
The kit comes sealed in a polytene bag, moulded on white plastic sheet and a clear styrene for the canopy piece. The kit bag also contains multi view scale plans, picture and article reference. There are colour markings details for a Pucara of the IV Escuadron de Explorations 1982. No decals are supplied and suggestions to make use of Super scale decals.
| CONSTRUCTION |
 This is my second build of the Pucara Rareplanes kit. Being a
vacform type it follows the standard procedure by first scoring vertically
around each moulded part with the top of a knife before bending and breaking the
part away from the backing carrier sheet. The outside surfaces of each component
are then carefully checked for moulding pips which are carefully removed with a
razor blade. This is a careful step in order not to mistakenly remove any
surface detail for which Rareplanes kits are well renowned.
This is my second build of the Pucara Rareplanes kit. Being a
vacform type it follows the standard procedure by first scoring vertically
around each moulded part with the top of a knife before bending and breaking the
part away from the backing carrier sheet. The outside surfaces of each component
are then carefully checked for moulding pips which are carefully removed with a
razor blade. This is a careful step in order not to mistakenly remove any
surface detail for which Rareplanes kits are well renowned.
The next stage is to sand the centreline joints on a large sheet of wet and dry sand paper, using heavier pressure where the plastic is more condensed. Frequent checks with the scale plans provided ensure that no excess plastic is sanded off from each section. The trailing edges of wings and tail planes required heavy scraping and sanding to achieve a sharp joint line. There are 62 parts in all which consist of two ejection seats, tail planes and main planes, pylons, fuel tanks, engine front and propeller blades, undercarriage legs and wheels, fuselage halves and a clear acetate canopy.
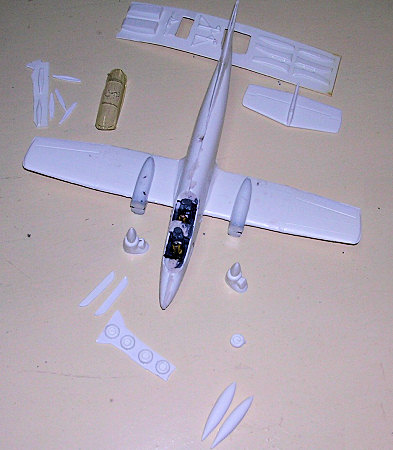 In building and detailing the cockpit area one may add metal
seats from cottage industry which I done away with and instead detailed the
seats provided, added ejection pull handles made from bent wire cut to size,
adding two crew figures and the rest of detail was made by applying the correct
painting of the interior and cockpit coaming with instruments, adding rudder
pedals and control stick. A nose wheel boxed compartment was also built to fit,
allowing space for nose weight as this was a tricycle undercarriage aircraft
that would need to balance on nose wheel. Nose wheel well was also cut to make
it look deep as opposed to simply drilling a hole to insert the n
In building and detailing the cockpit area one may add metal
seats from cottage industry which I done away with and instead detailed the
seats provided, added ejection pull handles made from bent wire cut to size,
adding two crew figures and the rest of detail was made by applying the correct
painting of the interior and cockpit coaming with instruments, adding rudder
pedals and control stick. A nose wheel boxed compartment was also built to fit,
allowing space for nose weight as this was a tricycle undercarriage aircraft
that would need to balance on nose wheel. Nose wheel well was also cut to make
it look deep as opposed to simply drilling a hole to insert the n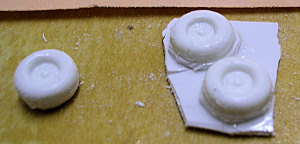 ose wheel leg
as suggested in the instruction sheet. With all the named items fitted to one
half of the forward fuselage and interior paint applied the fuselage halves were
closed together utilising the intermittent tabs applied to each side at the
joining centre line. Assembly of wing parts, engine nacelles, and wheels
followed, which were joined to the fuselage. Any imperfection to the joining
lines were smoothened and faired over after filler was applied wherever
required. During sanding masking tape covered the surface detail to further
protect and preserve it. During assembly I used liquid cement but plastic weld
is equally recommended. It is possible that in vacform kit construction that
parts are sanded undersize and in this case plastic card can be inserted into
the joint to increase the cross section to the desired dimension. The strips of
plastic tabs added to the inner of the joints added to the strength and helped
to self align the parts when put together.
ose wheel leg
as suggested in the instruction sheet. With all the named items fitted to one
half of the forward fuselage and interior paint applied the fuselage halves were
closed together utilising the intermittent tabs applied to each side at the
joining centre line. Assembly of wing parts, engine nacelles, and wheels
followed, which were joined to the fuselage. Any imperfection to the joining
lines were smoothened and faired over after filler was applied wherever
required. During sanding masking tape covered the surface detail to further
protect and preserve it. During assembly I used liquid cement but plastic weld
is equally recommended. It is possible that in vacform kit construction that
parts are sanded undersize and in this case plastic card can be inserted into
the joint to increase the cross section to the desired dimension. The strips of
plastic tabs added to the inner of the joints added to the strength and helped
to self align the parts when put together.
The undercarriage and oleo legs were carefully trimmed and assembled in their respective wheel wells. Gun ports at sides of fuselage were drilled open and two metal tubes forming the forward gun barrel were inserted. Air intakes at lower of each nacelle were cut open using a pointed sharp blade. Six in number propeller blades were cut and shaped and three holes drilled at 120 degrees to each other to accept propeller blades on each nacelle spinner. Two ‘U’ shaped antennae were added to tail fin, these were shaped from thin steel wire. Two pin aerials were also added to lower fuselage at rear and to port of centre.
| COLORS & MARKINGS |
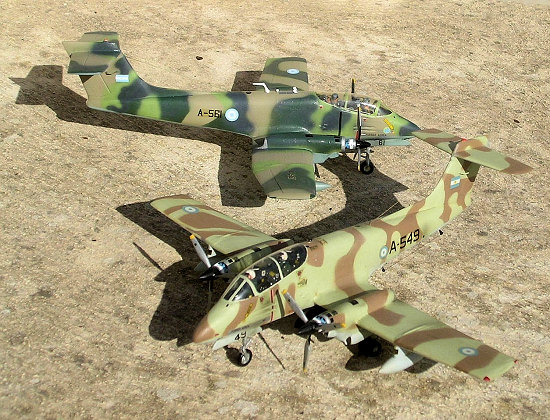 The interior of the cockpit was painted medium grey with dark
grey areas and around the ejection seats. Crew figures were in grey overall and
white or grey bone dome. Cockpit coaming was black. Interior of wheel wells off
white. The kit cockpit was fixed in place and then masked followed by giving the
kit an overall coat of matt light grey. This would reveal any imperfections
which needed further attention. As I have built two kits of the Pucara I also
needed two different camouflage liveries applied to the type that operated
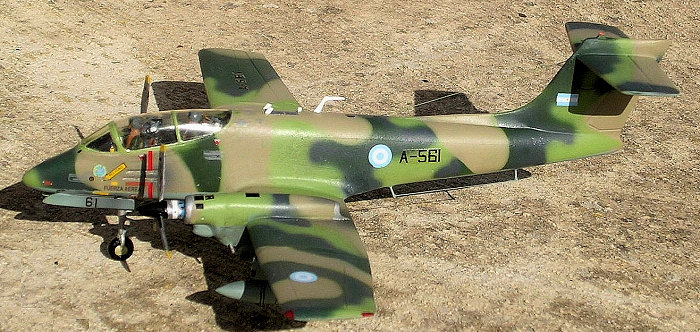
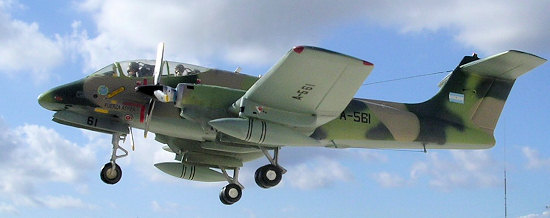
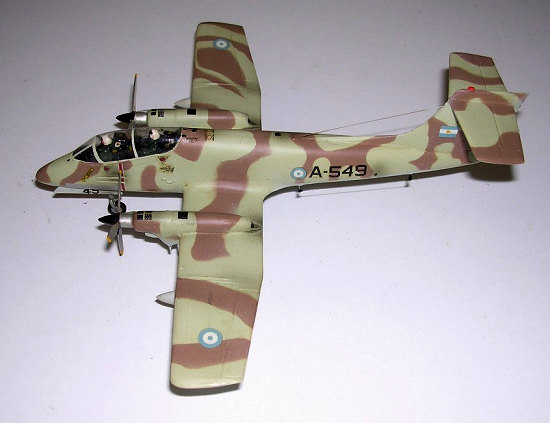
during the Falkland conflict. One of these was completed as A-549 having 3-tone
camouflage of duck egg green , light tan/cachi upper camouflage having merging
between the two colours and light blue grey under surfaces. This represents a
Pucara that was captured by the British forces and later displayed at Duxford in
UK. The second kit of the Pucara had a different colour-scheme. This represents
an aircraft belonging to Escuadron IV de Ataque of Grupo Aero 9 at
Chubut. The aircraft is camouflaged in a three tone consisting of light tan with
two shades of green using Humbrol brand. The lower surfaces were light blue
grey. Spinner was black while the propeller blades were silver having black
leading edges both kits given a coat of gloss varnish (revel) prior to
application of decals. The Argentine roundels and fin flashes were all sourced
from Micro Scale generic sheet 72.352. These had a lovely thinness that allowed
them to conform to any panel detail and the bright pale blue shade of Argentine
markings stood so well on the two varieties of camouflage schemes. The serial
numbers came from the decals spares box. The kit was then given a coat of semi
matt varnish and the final result was quite pleasing adding two more aircraft to
my favourite twin engine section.
The interior of the cockpit was painted medium grey with dark
grey areas and around the ejection seats. Crew figures were in grey overall and
white or grey bone dome. Cockpit coaming was black. Interior of wheel wells off
white. The kit cockpit was fixed in place and then masked followed by giving the
kit an overall coat of matt light grey. This would reveal any imperfections
which needed further attention. As I have built two kits of the Pucara I also
needed two different camouflage liveries applied to the type that operated
during the Falkland conflict. One of these was completed as A-549 having 3-tone
camouflage of duck egg green , light tan/cachi upper camouflage having merging
between the two colours and light blue grey under surfaces. This represents a
Pucara that was captured by the British forces and later displayed at Duxford in
UK. The second kit of the Pucara had a different colour-scheme. This represents
an aircraft belonging to Escuadron IV de Ataque of Grupo Aero 9 at
Chubut. The aircraft is camouflaged in a three tone consisting of light tan with
two shades of green using Humbrol brand. The lower surfaces were light blue
grey. Spinner was black while the propeller blades were silver having black
leading edges both kits given a coat of gloss varnish (revel) prior to
application of decals. The Argentine roundels and fin flashes were all sourced
from Micro Scale generic sheet 72.352. These had a lovely thinness that allowed
them to conform to any panel detail and the bright pale blue shade of Argentine
markings stood so well on the two varieties of camouflage schemes. The serial
numbers came from the decals spares box. The kit was then given a coat of semi
matt varnish and the final result was quite pleasing adding two more aircraft to
my favourite twin engine section.
| REFERENCES |
 Kit instructions
World Air Power Journal Vol 36 spring 1999.
Sam V13/3
Sam V24/5
Sam V29/4
December 2007
Copyright ModelingMadness.com. All rights reserved. No reproduction in part or in whole without express permission from the editor.
If you would like your product reviewed fairly and fairly quickly, please contact the editor or see other details in the Note to Contributors.