
High Planes 1/72 Pilatus PC-6 Turbo Porter Army
| KIT # | 72032 |
| PRICE: | AUS$26 |
| DECALS: | Examples of all Australian Army Colour Schemes |
| REVIEW : | William Alcott |
| NOTES: |
|
HISTORY |
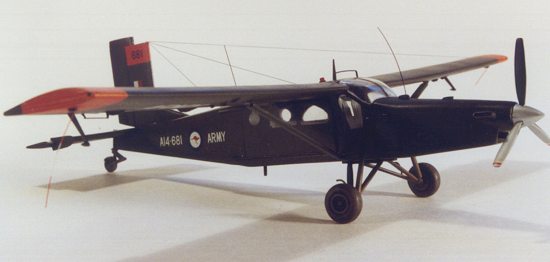
When one thinks of the products of Swiss industry, images of watches, cuckoo clocks, chocolate and numbered bank accounts instantly spring to mind. Yet the Swiss have a homegrown aircraft industry as well, which has produced a few international bestsellers, most recently the Pilatus PC-9 Turbo Trainer, adopted in modified form by the US as the Raytheon-Beech T-6A Texan II. In May of 1959, one of Pilatus' longest lasting products took to the air for the first time- the PC-6 Porter. Originally powered by a 340 hp piston engine, by 1961 a turboprop derivative had been fitted, significantly improving the aircraft's performance, particularly in "hot and high" environments. The Porter is characterised by its slab-sided fuselage, high mounted constant chord wing, and in Turbo Porter form, a disproportionately long nose. Large flaps provide excellent short field STOL performance, while a rugged, balloon-tired undercarriage allows operation off unprepared strips. Turbo Porters can be fitted with a variety of engines, adding further protuberances to the already distended nose, including the Pratt and Whitney Canada PT-6, the Turbomeca Astazou, and the Garrett AirResearch TPE331. The Turbo Porter was also built under license by Fairchild in the US.
Probably the Turbo Porter is most familiar to North American eyes from its role in the film Air America. Air America operated large numbers of Turbo Porters throughout South East Asia, where they found the aircraft's STOL performance excellent for getting into the remote Lima Site airstrips scattered across Laos. The Turbo Porter was also operated by the USAF, in the form of the AU-23A Peacemaker mini-gunship, evaluated as part of Operation Credible Chase. Several AU-23s were subsequently supplied to Thailand for internal security duties. The US Army Berlin Brigade flew a handful as UV-20 Chiricahuas.
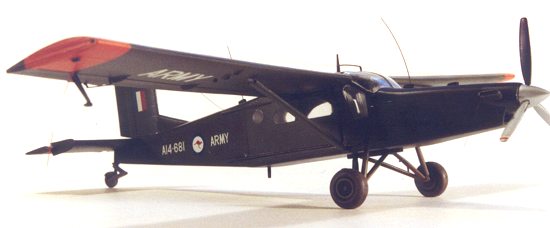
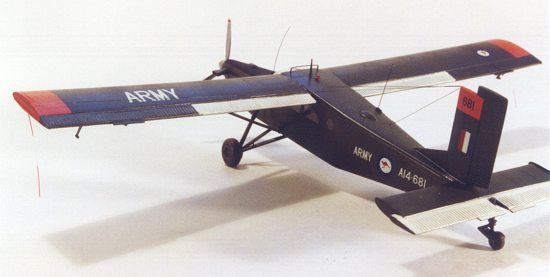
In 1967, the Royal Australian Army ordered the first of nineteen PC-6-B1-H2 (PT-6 engined) Turbo Porters. Within two years, the Aussie Porters were under fire in South Vietnam, where they flew with the 161 (Independent) Reconnaissance Flight "The Possums". Based at Nui Dat, the Porters flew a wide variety of missions, with one aircraft being lost to hostile fire. The aircraft returned home in 1971. Post-Vietnam, they soldiered on, in a variety of unusual camouflage schemes until 1992, when the aircraft were official retired from Australian service. At this point, many ended up in civilian hands, where the Porter remains popular as a skydiving aircraft.
|
THE KIT |
As a long-time Turbo Porter fan, I once eagerly awaited an announcement from any kit maker daring enough to turn out an injected kit. Then, back in 1997, we were positively inundated with them- with kits from both High Planes of Australia and Classic Plane of Germany. Both were limited run injected kits with vacuformed transparencies, and both depicted the PT-6 engined variant.
 The High Planes kit comes
in a minuscule box, with a black and white drawing of the aircraft on the front.
Inside, we find their now standard baby blue plastic, with all the hallmarks of
the limited run injection process- flash, heavy sprue attachments, overly thick
small parts, etc. Some details are provided in white metal- the maingear struts,
the one piece tailwheel and strut, and the joystick. All the transparencies are
included as clear vacuformed parts. Rounding out the list of parts is a pair of
resin exhausts, with bored-out openings.
The High Planes kit comes
in a minuscule box, with a black and white drawing of the aircraft on the front.
Inside, we find their now standard baby blue plastic, with all the hallmarks of
the limited run injection process- flash, heavy sprue attachments, overly thick
small parts, etc. Some details are provided in white metal- the maingear struts,
the one piece tailwheel and strut, and the joystick. All the transparencies are
included as clear vacuformed parts. Rounding out the list of parts is a pair of
resin exhausts, with bored-out openings.
Looking closely at the injected parts revealed very finely scribed panel detail. Some of the parts are marred by nicks and gauges, and marks from rough areas on the mould. In some areas, these are hard to spot on the bare plastic, but come to light under a coat of primer. All the windows in the fuselage side are moulded solid or flashed-over with scribed outlines. These areas are thin, but care must still be taken to open them up to the correct shape. The engine air intake also requires some knife and file work to open. Alternate parts are provided for an extended fin fillet and wingtips, which are not required for this version. A nice touch is the inclusion of weighted tyres for the main gear. Of course, these might have been better done in resin, but who am I to complain...
The instructions consist of two double-sided, photocopied sheets. These provide a written description of the assembly process (with some pitfalls pointed out- read these carefully), a scrap view of the landing gear layout, and three profile and plan view diagrams for the various paint schemes. The paint scheme drawings are all slightly different scales, and none seems to match the kit exactly. A clear, detailed line drawing would have been useful. The most glaring omission from the instructions is a head-on view. Given the landing gear construction, and the fact that the wing is strut-braced, this would have been most appreciated!
A small but well printed decal sheet provides a selection of national insignia, serial numbers and ARMY markings to cover any of the schemes the Turbo Porter wore in Australian service. These include overall gloss olive drab, with day-glo wing and rudder tips and white elevator and flaps; A wrap around tan, green and black trial scheme; and a wild, squiggly tan green and black scheme to tax all the hard core camouflage-addicts out there. Where appropriate, the serial decals are provided in two colours where they lie across different coloured regions on the camouflaged aircraft. Solid coloured versions are also provided, allowing you to cut the decals to suit. A limited number of serials are provided- by mixing and matching you can come up with aircraft beyond those offered in the kit.
|
CONSTRUCTION |
Like any limited-run kit, construction begins with clean up of the major components. Mating surfaces must be sanded flat, and all the windows must be opened in the fuselage (does this sound like a vacuform or what?) The side windows are provided as clear vacuformed parts, including the surrounding doors. This leaves you the option of removing each entire door from the fuselage and replacing it with a clear part, or just opening the windows and cutting the vacuformed windows from their doors. I elected to do neither. My labour-intensive approach was to cut clear styrene to fit the openings, being careful to mount it flush with the outside, and avoiding placing any stress on the clear part (this causes crazing).
The interior includes a floor, white-metal control stick, two seats, and an instrument panel. The seats are fairly crude, and differ in shape. I cleaned them up and added masking tape belts. The instrument panel has some detail, but is a bit rough. I used it anyways, and it looks fine from outside. I added a bulkhead at the rear of the cabin, sized by trial and error, along with a firewall at the front, to close off the cabin. Inside the nose, I added a further bulkhead to block off the intake, and a curved scrap of plastic to serve as the roof of the intake trunking. The intake was carved open at the front, and the lips filed down. I also opened the area behind the propeller, as noted in the instructions, and added a small circle of plastic just inside, with a hole drilled to accept a homemade propeller shaft. This allows the prop to fit slightly recessed within the nose.
 Lacking specific
references, I painted the interior a medium grey, with olive drab seat cushions
and off-white belts. The instrument panel was grey, with instruments picked out
in black. It is possible to use the vacuformed doors and fit them open, or open
the sliding door along the starboard fuselage, however the interior surfaces are
very rough and uneven, and it would take a lot of work to get them to a
presentable standard. I needed to trim the sides of the floor to get it to fit
in place, though there is no real guide as to where it fits. I basically
eyeballed everything, keeping the floor at or below the level of the door sills,
leaving enough room under the instrument panel for the pilot's legs, and placing
the stick in a reasonable position relative to both the seat and the panel.
Lacking specific
references, I painted the interior a medium grey, with olive drab seat cushions
and off-white belts. The instrument panel was grey, with instruments picked out
in black. It is possible to use the vacuformed doors and fit them open, or open
the sliding door along the starboard fuselage, however the interior surfaces are
very rough and uneven, and it would take a lot of work to get them to a
presentable standard. I needed to trim the sides of the floor to get it to fit
in place, though there is no real guide as to where it fits. I basically
eyeballed everything, keeping the floor at or below the level of the door sills,
leaving enough room under the instrument panel for the pilot's legs, and placing
the stick in a reasonable position relative to both the seat and the panel.
When I was happy with the alignment I glued the fuselage halves together. Fit here was sloppy- I had steps along the top and bottom, and in filing everything down I lost most of the fine detail along the top and bottom of the fuselage. At the tail end, there is a large gap at the top, possibly for the fin fillet to fit into. I filled this with scrap plastic. Along the spine and nose, there are two antenna mounts, a small intake and a rotating beacon. I carved these all away and later added replacements from scrap plastic. I added the windscreen at this point. Only a single part is provided, so take care to get this right. The windscreen includes a short portion of the top of the nose, giving you some room to blend this in. A small ledge is moulded around the opening in the fuselage, and if you take some care, a very neat fit can be obtained with this part. I considered this a very positive point in this kit. For the sliding door, I simply cut a piece of clear styrene to the appropriate shape, and defined the window openings by masking. All the clear parts had been coated with Klear (Future) prior to installation.
The wing halves fit together reasonably well once sanded down, but follow the tip in the instructions about clamping them. I didn't, and ended up with a warp in each wing that I could never fully eliminate. It's also advisable to sand down the inside of the trailing edge heavily. Each wingtip is provided as a separate plate. These fit well enough after squaring off the ends. At the root, a tab is provided. This fits into a slot on the fuselage. Be careful opening the slots in the fuselage- Only a flimsy bridge is left above the starboard cargo door. I drilled holes spanwise through the tabs and into the wings, to fit brass rod spars. These provided strength and allowed me to adjust the dihedral of the wings more easily. The spars were slotted through the assembled fuselage, and the wings slid in place and secured with superglue. Fit here was not perfect, and repeated passes with superglue and stretched sprue were required to fill the larger gaps. I also managed to get too much dihedral on the wings, compounded by the slight residual warp. Again, a head-on drawing in the instructions would have been very useful here.
The horizontal stabiliser is moulded as a single piece, with a cutout to fit around the aft end of the fuselage. Take care when attaching this part- it's easy to end up with the tail and wing being out of alignment. The elevator is moulded with a thin slot along the centreline. The drawings in the kit instructions show a much wider slot, which agreed with photos that I could find, so I carved this area away. A pair of end plates need to be added to the ends of the stabiliser. A pattern for these is given in the instructions, however I believe the notch at the back should be enlarged, so that the back edges of the plates go right to the elevator hinge line. After adding the empennage parts, I found I needed to do a fair bit of filling to get everything cleaned up.
 With major construction
done, attention turned to the smaller details. The propeller is provided as a
hollow spinner, with faint indentations to show where the blades goes, along
with three heavily flashed blades. I closed off the back of the spinner and
added a scrap of heavy wire for a shaft. Using a simple jig, I drilled holes at
120 degree intervals in the spinner to take the blades. When I'd carved the
blades from the surrounding flash, I found they were all different lengths. I
selected one that seemed reasonable, and then modified the others to the same
shape. The blades were inserted into the spinner in a fully feathered position,
as is normal for many turboprops. I opened up two holes in the cowl sides for
the resin exhausts, and filed the openings at an angle to correctly depict the
port down/starboard up attitude of the exhausts. This is quite pronounced on the
real aircraft.
With major construction
done, attention turned to the smaller details. The propeller is provided as a
hollow spinner, with faint indentations to show where the blades goes, along
with three heavily flashed blades. I closed off the back of the spinner and
added a scrap of heavy wire for a shaft. Using a simple jig, I drilled holes at
120 degree intervals in the spinner to take the blades. When I'd carved the
blades from the surrounding flash, I found they were all different lengths. I
selected one that seemed reasonable, and then modified the others to the same
shape. The blades were inserted into the spinner in a fully feathered position,
as is normal for many turboprops. I opened up two holes in the cowl sides for
the resin exhausts, and filed the openings at an angle to correctly depict the
port down/starboard up attitude of the exhausts. This is quite pronounced on the
real aircraft.
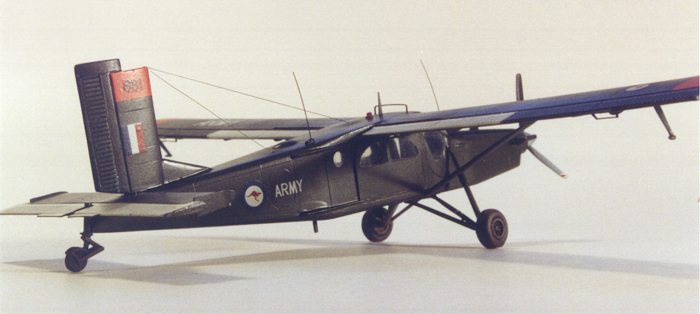
Next the landing gear was tackled. The white metal parts needed a little cleanup with files and sandpaper. Loosely assembling the components with tape, it was apparent that if the struts were used unmodified, the gear would have an excessively high stance and narrow track. The lack of a head-on view was particularly annoying here! I ended up significantly shortening the upright shock struts, and bending the axles on the V struts to get a combination that seemed reasonable, and matched the plan and profile views. The plastic wheel halves were assembled and cleaned up, though they were added only after painting. The inner faces include brake detail, but the instructions give no indication of whether the brake callipers should be in front of or aft of the axle.
|
PAINT & DECALS |
After an overall coat of primer, the white areas on the upper sides of the elevator and flaps were sprayed, along with a white undercoat for the orange areas on the wingtips and vertical tail. Photos I found of A14-681, the aircraft I modelled, indicated the orange on the wings did not extend onto the ailerons, contrary to the diagram of the colour scheme in the kit. The white was masked, and a coat of darkened olive drab sprayed. Pure olive drab was then used selectively to break up the monotony. The OD was masked, and the orange areas added. Originally I'd planned to use day-glo orange, however I found this too bright, so mixed up some orange and yellow to give a tone that seemed more reasonable to my eye. The anti-glare panel was masked and sprayed flat black. The prop was painted aluminum on the font surface, and black on the back, with white/red/white tips. I sprayed the white and added the red stripe later from scrap decal film.
After a coat of clear gloss, I applied the decals. I made the serials for A14-681 from bits of the white serials in the kit. The decals went on fairly well, though they do tend to silver. I'm not an expert on Australian markings practise, but I believe the Kangaroos should be placed so that they all face forwards, with those on the wings having their feet point towards the centreline. The kit provides two each of left-facing and right-facing roundels- Both wing insignia should be right-facing, as well as the starboard fuselage roundel. I put the backwards roundel under the wing, where it would be least noticeable. As a nice touch, the kit provides two styles of full colour roundels and fin flashes, even though the larger set aren't mentioned. For a Vietnam-era Porter the large ones are appropriate.
When the decals were dry, a coat of semi-gloss was applied. Weathering was limited to a black wash on the control surfaces, and drybrushing of a red mud colour around the gear and lower fuselage. Final touches included installing the mainwheels, exhausts and prop, and adding the various aerials- three wires, four whips, two blades, and a towel rack. I also added aileron mass balances and trim tab actuators under the wings, as these are prominent in photos.
|
CONCLUSIONS |
High Planes has produced a kit of an unusual and eye-catching subject. Construction is much more involved than a typical mass-production kit, however it is not beyond the scope of the average modeller. Where this kit falls down is on the instructions. A clear set of three-view drawings would be of great assistance in completed this kit. The finished product looks good on the shelf, and has attracted a lot of positive comments. I'd seriously consider buying another, if only for a chance to do that lovely Air America colour scheme!
Incidentally, for those of you thinking of using this kit as a starting point for an Air America of USAF Turbo Porter, this requires more than just changing the nose shape and adding a big exhaust pipe. Most of the Garrett-engined aircraft seem to have a larger, wrap-around windscreen, without the front crew doors. To model this will require a new vacuformed windscreen, at the very least. Good luck!
|
REFERENCES |
The 161 Independent Recce Flight "Possums" of Vietnam
Details of the Turbo Porter's service in Australia
Copyright ModelingMadness.com. All rights reserved. No reproduction in part or in whole without express permission from the editor.
If you would like your product reviewed fairly and quickly, pleasecontact the editor or see other details in the Note to Contributors.
Back to Reviews Page 2024