Dragon 1/35 M1A2 SEP
| KIT #: | 3536 |
| PRICE: | $55.00 |
| DECALS: | Six options |
| REVIEWER: | Donald Zhou |
| NOTES: | Advantages: Extremely detailed, single piece tracks, various options included. Disadvantages: tracks guide teeth separate, instructions can be confusing and no location tabs for all the drive arms. P.S. Tamiya Modern U.S. Equipment Set and Meng’s Individual Load Carrying Sets used. P.S.S Converted to a M1A2 SEP II with leftover parts from the Academy M1A2 TUSK kit. |
| HISTORY |
The M1 series of tanks was developed in the 70’s as a replacement for the venerable M60. Previously, in a joint program with then West Germany, the U.S. produced the MBT-70 in the ‘60’s as a replacement. That never worked. The then new 155mm short barreled cannon, which can fire the Shillelagh missile was prone to break down and jamming. The rest of the vehicle didn’t fare better either and both nations eventually backed out. The Germans went on to produce their own very successful Leopard II MBT while the U.S. went on to eventually produce the M1.
The first prototype
was produced in 1976. The winner was Chrysler. The Germans, who were adamant on
selling the Leopard to the U.S. was deemed too expensive while the GM design was
deemed too inferior. The tank was the XM1. After Chrysler was bought out by
General Dynamics, the design was further improved. It had the same 105mm Royal
Ordnance cannon found on the M60, which is upgradable to the 120mm Rhinemetal
smoothbore found on the Leopard II. It also had massive improvement to the armor
with the British Chobham ceramic armor plates that’s a whole generation ahead of
the rolled homogeneous armor found in the M60. The biggest improvement however,
was the fire control system. Previous tanks all used analogue sights with
daylight vision systems. The M1 replaced them with digital fire control
computers with laser range finders that was several jumps ahead along with a
Forward Looking Inferred sensors that allowed the tank to fight at night or bad
weather. Efficiency were greatly improved although older more experienced crews’
improvement was only incremental. However, the improvements among new raw crews
was three or even four times better than older tanks, meaning they can be
brought up to standard far quicker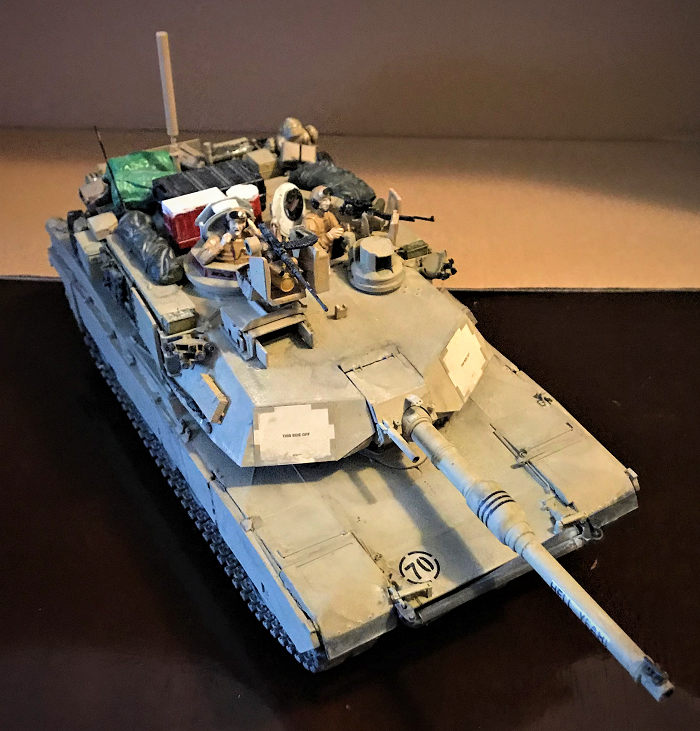 . The tank entered service in 1980 and quickly
started to prove themselves. Over 3300 M1 were produced. The tanks can run up to
45MPH although there are reports of crews who disabled their governors on the
tanks and went up to 55MPH and even beyond! The tank also features an AGT-1500
turbine engine. The engine is quiet, so quiet in fact, the tank gained a
nickname of whispering death and can use any sort of fuel, everything from
diesel, to straight gasoline and in a pinch, raw alcohol can be burned (although
as might surmised, using raw alcohol will wreck the engine’s life). In service,
the tank just uses diesel to save logistics nightmares. However, the big
disadvantage is the turbine is a huge fuel hog and draws as much as a gallon of
fuel for every mile and its infer-red signature is also quite high.
. The tank entered service in 1980 and quickly
started to prove themselves. Over 3300 M1 were produced. The tanks can run up to
45MPH although there are reports of crews who disabled their governors on the
tanks and went up to 55MPH and even beyond! The tank also features an AGT-1500
turbine engine. The engine is quiet, so quiet in fact, the tank gained a
nickname of whispering death and can use any sort of fuel, everything from
diesel, to straight gasoline and in a pinch, raw alcohol can be burned (although
as might surmised, using raw alcohol will wreck the engine’s life). In service,
the tank just uses diesel to save logistics nightmares. However, the big
disadvantage is the turbine is a huge fuel hog and draws as much as a gallon of
fuel for every mile and its infer-red signature is also quite high.
The next major upgrades is the M1A1 version. The biggest difference is the main armament. The Rhinemetal 120mm smoothbore replaced the British 105mm rifled cannon. This meant ammo capacity was dropped from 53 to 42. The other was the armor. Especially the HA (Heavy Armor) and HC (Heavy armor Common) variants, which contained a layer of depleted Uranium to further harden and upgrade the armor. Other improvements includes better bustle racks and a hole was opened just in front of the loader. This hole will prove critical for the next series of upgrade then in development. Over 6000 M1A1’s were produced, many of them are now or have been upgraded under the AIM or Abrams Improvement Management program.
The tank, now named Abrams after late Gen. Creighton Abrams, baptism of fire came in the Middle East. When Iraq and Sadadum Insane invaded Kuwait, U.S. and her allies quickly formed a line of defense to defend Saudi Arabia. Critical among the pieces were Abrams. In fact, over 1800 of the tanks were sent to the Gulf, many of them the latest HA variants to deal with the T-72’s. Before the battle, questions about the tank’s price and effectiveness abound but all of that was settled quickly when the tank proved itself in battle.
In fact, the Abrams totally outclassed its opponents. It can hit its targets as far away as 2KM away and its rangefinders and FLIR worked well in both daylight and night, especially when smoke fire engulfed the region. In fact, one anecdote from the war shows just how near invulnerable the tank was. During a drive, one Abram got stuck in mud. The rest of the unit passed it by since they were under orders to keep moving. While waiting for a tow, three Iraqi T-72’s attacked. The first one fired a HEAT shell and did nothing to the tank. The M1 responded by firing an armor piercing shell that nearly blew the turret off! The second one, not heeding the lesson, also fired a HEAT shell that only made the tank angrier. A second round turned this tank into a funeral pyre. The third tank, finally heeding the warning, fired an armor piercing round that left a grove in the Abrams frontal glacis plate but did not penetrate. Seeing further fighting was redundant, it hid behind a sand berm, thinking it was safe. However, through its FLIR unit, the Abram tracked the last Iraqi tank and saw the heat plume from its exhaust and put the round where the turret was. The armor piercing round slammed through the sand berm and still penetrated the tank on the other side.
By this time, further Abrams had arrived but still no tow truck…Orders came from above to destroy the stricken tank in place. Since the rest of the Abrams crews did not have high explosives, they decided to use their main cannons for the job.
 However, two rounds
against the front armor proved to be useless, a tank came up against the side
and fired one through the ammo storage bin and finally penetrated. All that did
was to set off the blast off panel on top of the turret, which vent the
explosive force upwards. After the fire died down, the tank proved to be as
tough as ever! While discussing on what to do, the tow finally arrived and with
three M88 recovery vehicles, the stricken M1 was finally dragged out of the mud!
However, two rounds
against the front armor proved to be useless, a tank came up against the side
and fired one through the ammo storage bin and finally penetrated. All that did
was to set off the blast off panel on top of the turret, which vent the
explosive force upwards. After the fire died down, the tank proved to be as
tough as ever! While discussing on what to do, the tow finally arrived and with
three M88 recovery vehicles, the stricken M1 was finally dragged out of the mud!
There were some hard lessons too though. The least of which, like the M2 Bradley, it turned out, the biggest enemy wasn’t the enemy…it was friendly fire. Of the 9 Abrams destroyed in the war, 7 was from friendlies. At least two was from an errand AH-64 Apache strike with one total loss
After the war, further improvements were added. The biggest was the M1A2 version. The hole on top of the tank was replaced by a CIV or Commander Independent thermal Viewer. This allowed the tank to finally conduct “Search while hunt” at the same time. Electronics were further improved to allow one A2 to talk to another or any similarly equipped tank. Furthermore, to guard against the painful lesson of friendly fire, “cold” identification panels were added to the front of the turret, the side and rear. The A2 was also improved with the SEP or System Expansion Program and the SEP2, which added FBCB2 and other improvement to the armor etc.
By the time the second Gulf War rolled around, the Abrams that participated in this war only look like the same Abrams that participated in the first one. The insides though, were completely different and generations ahead. After the war, however, the Abrams faced its toughest test yet, fighting in urban terrain.
The fact of the matter is, tanks are not suited in urban terrain. They are too big, too unwieldy in a city and there are a lot of spots for insurgents to take pot shots at it. The press were quick to point out the Russian disaster that was Chechenia and Grozny. Insurgents quickly found out going toe to toe with an Abrams was tantamount to suicide. However, taking pot shot at it from the rear or firing an RPG from the rooftop at the tank’s roof is a far better option. Either that, or load up an IED and then blow up its soft underbelly!
To combat this, the
Tank Urban Survival Kit upgrade was developed. This is a field upgradable kit
that radically improve the tank’s survival in an urban terrain. The first thing
added was something from WW II, an infantry to tank talkie phone on the back.
The next one was a “V” shaped armor piece that was added to the belly to not
only add armor strength against IED’s, but also to blun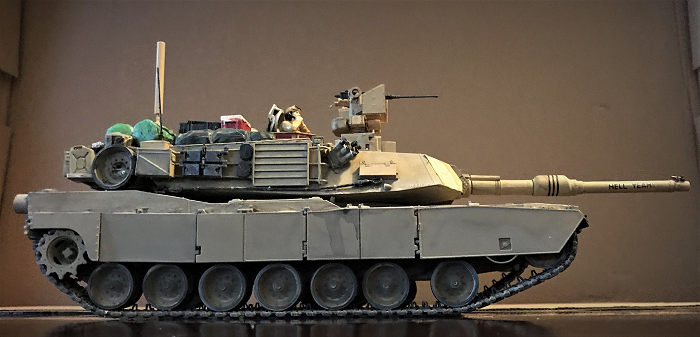 t and deflect the blast
away from the tank. The third is a series of armor glass panes were added to
both the commander and the loader’s weapon stations so they can operate their
weapons out of the tank without worrying about snipers. Finally, to guard
against the tank’s sides, a series of ERA armor panels were added to the tank’s
side skirts.
t and deflect the blast
away from the tank. The third is a series of armor glass panes were added to
both the commander and the loader’s weapon stations so they can operate their
weapons out of the tank without worrying about snipers. Finally, to guard
against the tank’s sides, a series of ERA armor panels were added to the tank’s
side skirts.
When introduced, the kit quickly proved popular and well suited in an urban terrain. However, further improvements were added from combat reports. These became the TUSK II kit. These includes: further slate armors were added to the rear engine grill. A second .50 cal machine gun was added to the top of the main cannon and a series of ceramic tile ERA armor pieces were added to the turret sides and onto the existing side skirt ERA armor.
With these improvements, the tank soon proved to be a hard nut to crack. There is a M1A3 version. However, due to budget cuts, that version is in limbo so the Army and Marines will have to do with the current version for the foreseeable future.
| THE KIT |
Dragon version of the M1A2 SEP was released way back in 2007. Two years previously, they released the excellent M1A1 AIM kit with individual track links and slew of details that blew the pants off the ancient Tamiya kit (Tamiya M1 always had the bottom hull from the late 70’s that was based on the prototype M1 and thus, not at all accurate). Early releases also contained some bonus such as the meal cannon barrel and a spring that simulate recoil.
 The kit also had some great options
like photo etch for the ammo box containers and a metal tow cable with photo
etch holders. Plastic version, which I chose (sorry not gonna blow a few fuses
messing with too tinnie photo etch), are also contained as options. The only
really put down of this kit, and why it stayed in the box since I bought it in
2008 are the fact, 1. The tracks maybe Dragon’s magic tracks plastic single
piece tracks that can be cemented, but the individual guide teeth are all
separate……GRRRRR….I HATE THAT!!!! 2. Dragon’s instructions are well….Umm…..If
you ever made a few dragon kits, you know my complaints…..Just several ad hoc
drawings with 2 dozens of parts falling down below to a hull with arrows
pointing every which way till your eyeballs are crossed…Ok, this one is not that
bad but compared to exploded out diagrams on Tamiya or Trumpeter’s instructions.
This seems like a throwback to the past where manufactures seemed to enjoy
confusing you but does not work in these times!
The kit also had some great options
like photo etch for the ammo box containers and a metal tow cable with photo
etch holders. Plastic version, which I chose (sorry not gonna blow a few fuses
messing with too tinnie photo etch), are also contained as options. The only
really put down of this kit, and why it stayed in the box since I bought it in
2008 are the fact, 1. The tracks maybe Dragon’s magic tracks plastic single
piece tracks that can be cemented, but the individual guide teeth are all
separate……GRRRRR….I HATE THAT!!!! 2. Dragon’s instructions are well….Umm…..If
you ever made a few dragon kits, you know my complaints…..Just several ad hoc
drawings with 2 dozens of parts falling down below to a hull with arrows
pointing every which way till your eyeballs are crossed…Ok, this one is not that
bad but compared to exploded out diagrams on Tamiya or Trumpeter’s instructions.
This seems like a throwback to the past where manufactures seemed to enjoy
confusing you but does not work in these times!
And also, as I’ve said in my Academy M1A2 TUSK II review, I will be turning this kit into an M1A2 SEP II instead since I got the SEP II sprue leftover while building the Academy kit.
| CONSTRUCTION |
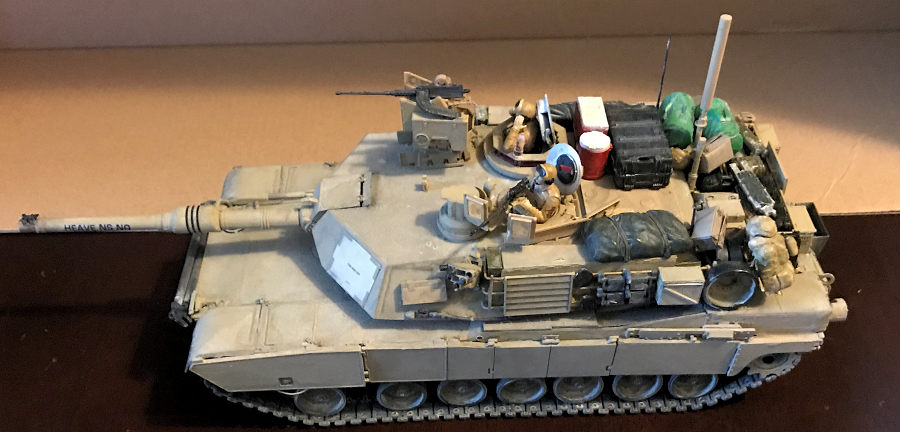
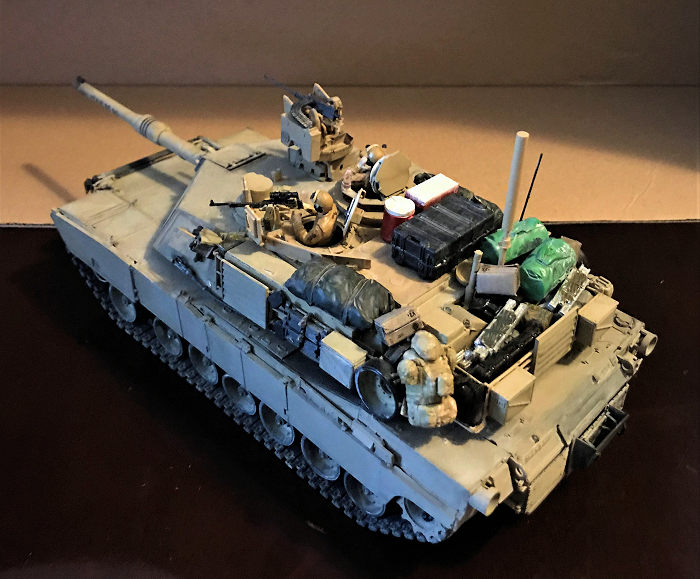
Since I’m torturing myself by adding the SEP II stuff to the mess, the first thing to understand is where will the SEP stuff go. The first to notice are all the hubs for the road wheels. SEP II’s hubs are different than the previous M1 version, and like always, clear so the crew can judge how much hydraulic oil is in the swing arms and the wheels. I saved these last and painted them black from the inside. Next notice the position of the squarish FBCB2 antenna. On the SEP II, it is mounted towards the right rear section, not the usual positon right above the smoke grenade discharger. The third and most complex equipment is the CROWS II or Common Remotely Operated Weapon System II weapon station. This is factory standard equipment for the SEP II cause ironically, the original M1A1 had a remotely controlled commander .50 cal weapon but for the M1A2, a “safer” and simpler manually operated M2 was given to the commander. After Operation Iraqi Freedom, M1 commanders were sent screaming for a remotely operated weapon after finding out just how vulnerable it was standing outside of the cupola to operate the weapon, hence the addition of the CROWS II. This is mounted on the top of the “doghouse” main gunner sight and Academy furnished both the CROWS weapon and the mount necessary to seat the weapon properly. In conjunction, the gun shield from the TUSK II for the gunner weapon station is also standard to the SEP II. Thank goodness Academy provided an extra set for the SEP II sprue, rather than having you raid the TUSK II version so I don’t have to buy extra. Lastly, the extra antenna housing that is the key recognition feature of the SEP II is also given. I quickly marked down what goes where and how to assembled them and when to do it.
 Main construction begins with the
road wheels and drive section. The main problem is with the swing arms are there
is no location holes for the arms so you have to guess…..Dragon made the kit so
that the arms can be positionable for diorama. However, this made it a PITA to
try and find the correct position for a static display. Eventually, I did. Just
wished Dragon made it possible to do this without this much fuss. The road
wheels are standard. Just two halves. The rest of the lower hull assemble easy
enough. I decided to attach the exhaust deflector on the exhaust port.
Main construction begins with the
road wheels and drive section. The main problem is with the swing arms are there
is no location holes for the arms so you have to guess…..Dragon made the kit so
that the arms can be positionable for diorama. However, this made it a PITA to
try and find the correct position for a static display. Eventually, I did. Just
wished Dragon made it possible to do this without this much fuss. The road
wheels are standard. Just two halves. The rest of the lower hull assemble easy
enough. I decided to attach the exhaust deflector on the exhaust port.
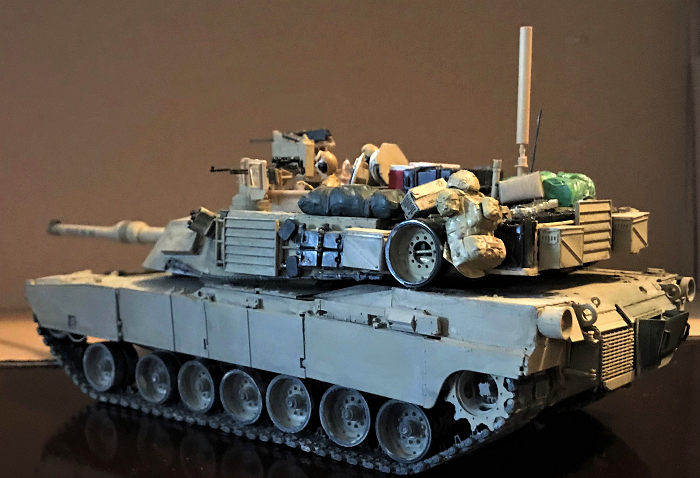
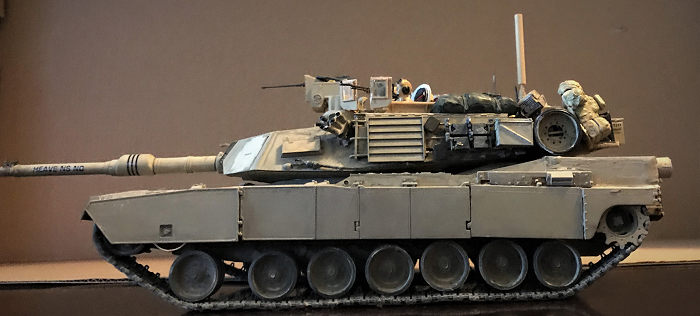
The turret assembly also is pretty much normal for any Abrams kit. However, I forgot to use the metal barrel that came with the kit. Still, the plastic version is more than good enough. Now, a large spring is offered so you can model the recoil but I trashed that since that is just too toy like. A good model of the breech is offered but this seem to interfere with the barrel so I can that too. Besides, when the turret top comes down, you can’t even see it and this is not an interior kit.
The only thing now are all the SEP II parts that goes on the turret. These include the new doghouse sighting mount with the CROWS II. I carefully made the CROWS sans the .50 cal and ammunition feed bracket and cemented it onto the mount. The commander cupola is next. I didn’t make the commander’s weapon station since of course, on the SEP II, the CROWS replaced that. Again, using the Academy’s parts, I used the SEP II’s loader weapon rail and what looks like a metal protector. The final piece is the additional antenna’s housing. I left the antenna until final assembly.
The final piece of assembly before painting are the tracks…They are vinyl one piece….YEAHHHHHHH!!!! But all the guide teeth are separate…..BOOOOOOOOOOOO!!!! And hence why this project never got started off the ground until I worked up the courage to do the tracks and only on the bottom rung since the top will be hidden by the side skirts. It took better part of four days to do this…..Sigh, details vs. ease of assembly. Well, for me…I go for ease of assembly every time!
| COLORS & MARKINGS |
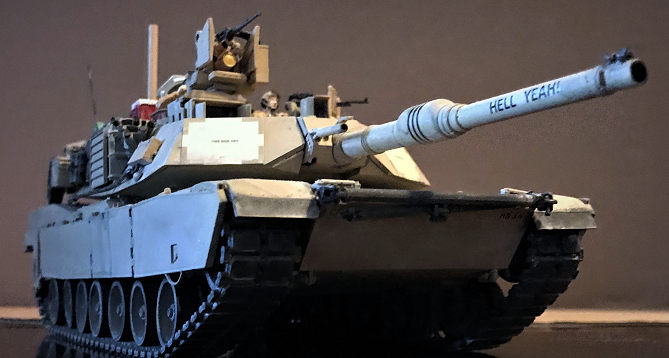
 Yes, I know! I shoulda went for the
marking in the Academy kit but went for the Dragon marking “Heaven’s no, Hell
Yeah” instead cause I’m too lazy to do the NATO three tone standard camo! I’ve
introduced my way of weathering armor more than once so will not reinvent the
wheel here but the result is quite the dirty tank that seen some use. Before
that can happen though, I also sprayed the side skirts and the tracks in their
relevant colors and assembled them here so they can be weathered at the same
time. This is done with the big black frontal tow arm too. Now, for the frontal
turret CIP panels, Dragon gave you various stickers that you can use. This was
not a good idea as when I applied washes, the glue came right off! I had to use
dab of superglue to get them on. It took a better part of four days to finish
the weathering and painting process.
Yes, I know! I shoulda went for the
marking in the Academy kit but went for the Dragon marking “Heaven’s no, Hell
Yeah” instead cause I’m too lazy to do the NATO three tone standard camo! I’ve
introduced my way of weathering armor more than once so will not reinvent the
wheel here but the result is quite the dirty tank that seen some use. Before
that can happen though, I also sprayed the side skirts and the tracks in their
relevant colors and assembled them here so they can be weathered at the same
time. This is done with the big black frontal tow arm too. Now, for the frontal
turret CIP panels, Dragon gave you various stickers that you can use. This was
not a good idea as when I applied washes, the glue came right off! I had to use
dab of superglue to get them on. It took a better part of four days to finish
the weathering and painting process.
| FINAL CONSTRUCTION |
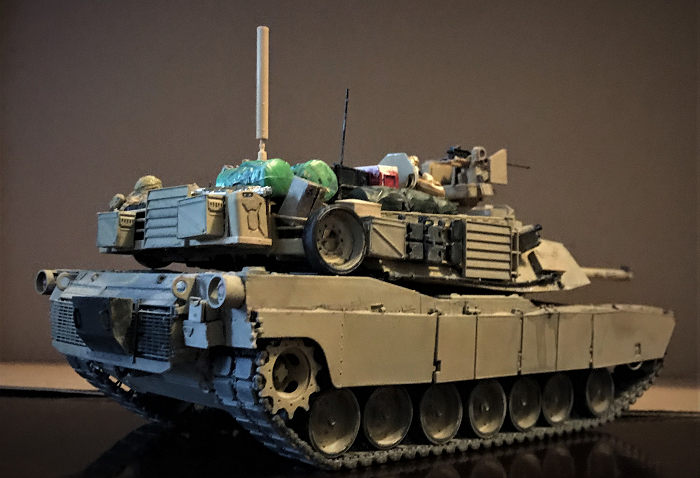
Now, the final assembly. This proved to be more complicated because again, no American armored vehicles will go out empty. They are always at least stuffed with some gears. I raided my Tamiya Modern U.S. Accessory kits until they are all gone except the ALICE packs. Again, ALICE packs were completely replaced by 2010 or so so they will not be used here. I raided my Meng’s Modern U.S. Load Carrying set for the last backpack and two of the black load boxes to load up my SEP II. Then the rest are also painted and weathered accordingly. These took another two days to do.
 The last few
pieces are the .50 cal for the CROWS. I painted it and then assembled to the top
of the remote control weapon along with its ammo bracket/chute. This is vinyl
and black so no colors needed. The next part is the loader’s bullet proof
screen. The screen mount, and the side clear bullet proof panels are on the
Academy sprue but unfortunately, the clear bullet proof panes are not.
Fortunately, I have two RMF M1 kits and RMF happily give you the clear sprue
that contains ALL clear parts for ALL their versions of the M1! Including the
TUSK versions so the bullet proof panes are there so I stole them. These are
carefully superglued in place along with the correct machine gun since by 2010,
an aiming scope was added to the loader weapon and Academy provide this. Next
are all the clear wheel hubs. They are already painted black on the inside and I
then gave them a few good dirty washes. The final piece is that long tall
antenna. Heard a rumor that antenna is what allows the SEP II to grab and
command a drone…Will not be surprised if that is true. Now you have a choice to
leave this off as not all SEP II have it but I chose to place it on to give some
visual differences cue. Model done!
The last few
pieces are the .50 cal for the CROWS. I painted it and then assembled to the top
of the remote control weapon along with its ammo bracket/chute. This is vinyl
and black so no colors needed. The next part is the loader’s bullet proof
screen. The screen mount, and the side clear bullet proof panels are on the
Academy sprue but unfortunately, the clear bullet proof panes are not.
Fortunately, I have two RMF M1 kits and RMF happily give you the clear sprue
that contains ALL clear parts for ALL their versions of the M1! Including the
TUSK versions so the bullet proof panes are there so I stole them. These are
carefully superglued in place along with the correct machine gun since by 2010,
an aiming scope was added to the loader weapon and Academy provide this. Next
are all the clear wheel hubs. They are already painted black on the inside and I
then gave them a few good dirty washes. The final piece is that long tall
antenna. Heard a rumor that antenna is what allows the SEP II to grab and
command a drone…Will not be surprised if that is true. Now you have a choice to
leave this off as not all SEP II have it but I chose to place it on to give some
visual differences cue. Model done!
| CONCLUSIONS |
Again far more involving build than I first imagined due to all the weathering and all the stuff I stuffed the tank with. I also again, digging into the box, I used my other Tamiya M1 crewmen to crew this…..Now, I did bought Masterbox’s “Can I buy one of your sheep for a BBQ” kit to replace them but that seems a while off so these two crewmen will do. All in all, not a bad kit and can still stand the test against Meng and RMF latest offerings!
The Mosq
Havin
DZ
Most m
Donald Zhou 23 May 2019 Copyright ModelingMadness.com. All rights reserved Review kit courtesy of my wallet. If you would like your product reviewed fairly and fairly quickly, please contact the editor or see other details in the
Note to
Contributors. Back to the Main Page
Back to the Review
Index Page
Back to the Previews Index Page