Tamiya 1/35 M4A3 Sherman (Early)
| KIT #: | 35190 |
| PRICE: | $50.00 |
| DECALS: | Three options |
| REVIEWER: | Donald Zhou |
| NOTES: |
Advantages: Easy Buildup, Nice Accessories, Plenty of Options. Disadvantages: Some details simplified, Markings Limited. P.S. Tamiya Allied Vehicle Accessories kit used. |
| HISTORY |
A
lot are/were said about the Shermans, good or bad to the point I’ll not reinvent
the wheels here. Just refer to any of Tom Cleaver’s review on one of his many
1/48th
scale kit to get some quick and dirty knowledge. Including why the Shermans are
so ineffective against the late war German heavies due to the machinations of
men like Leslie McNair. However, was the Sherman that bad? The short answer is
nope! In 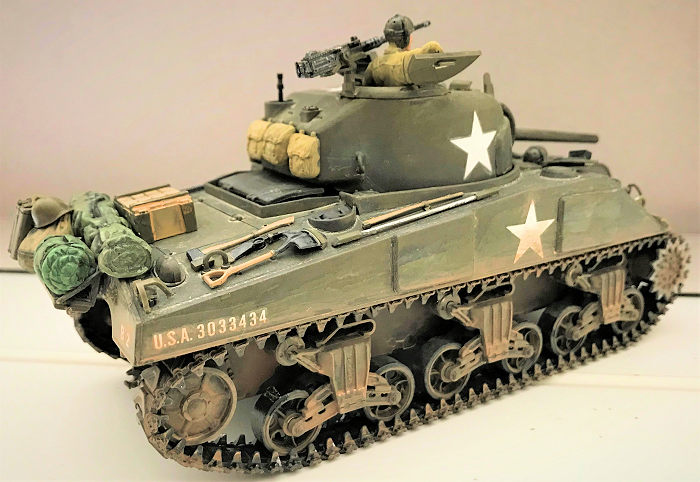 fact,
in many ways, the Shermans, especially the late marks with the 76mm was in many
ways, far superior to the Russian T-34/85. This is born out in the Korean War
where the Easy Eights practically dominated them. In fact, even the Russians in
some ways admitted the Shermans was a good tank.
fact,
in many ways, the Shermans, especially the late marks with the 76mm was in many
ways, far superior to the Russian T-34/85. This is born out in the Korean War
where the Easy Eights practically dominated them. In fact, even the Russians in
some ways admitted the Shermans was a good tank.
Many of the Russians who crewed the M4A2 Shermans ended up loving them due to their reliability, good 76mm gun and especially wet storage of ammo as it prevented ammo fires that otherwise killed many a T-34 crew! So why do we consider the T-34 to be a war winning weapon but the Sherman a death trap? Simply put, the Russians could give a rat @$$ about the loss of lives….There is an infamous joke. “Comrade Stalin, we just lost 100,000 men!” Stalin, “What?!?!?!? We lost 100K?!?!?!? PFFT! FEH!!!! Give me another draft order! Draft another 300K to replace them!!!!” You get blown up in a T-34? Shot down in a Sturmovik? A tank dessant that got killed? Don’t worry! There are 5000 others behind you! In fact, like the great Russian ace Alexander Pokryshkin, who was ostracized twice after the war, 1. For refusing to fly Russian fighters, instead, most of his 65 kills was scored in the American made Bell P-39 Airacobra. 2. For refusing to say American made stuff were junk, many Russian M4 crews also faced similar situations for refusing to say the same, that the Shermans were junk and said, in some ways, that it was better than the god like T-34!
| THE KIT |
 This kit
is based on Tamiya’s M4A3 Sherman kit released back in 2000. Tamiya simply added
the parts used for an early version of the M4A3 to backdate it to this version,
and took out the four infantry figures and new commander figure instead. The
parts for the later versions are still in the kit, such as the newer
transmission covers, so you can make that version if you want. What is great
with this kit are all the accessories. You get two sprue of stuff to stuff your
tank with. If you read my M4A3E8 review, you’ll know I grabbed one of the sprue
and stuff that tank with. It contains a wooden plank to hold the stuff in the
front of the tank. Again, Shermans were well known to stop anything the Germans
fired at them so the crews usually put a lot of accessories at the front of the
tank to serve as ad hoc armor. These include spare track links, spare wheels,
extra armor plates and wooden boxes etc. Other than that, it’s your usual Tamiya
fare that is easy to assemble, fit well, and don’t have a lot of parts compared
to say, the Dragon kit, which give people hissy fits online cause of the
difficult nature and over engineered aspects of their Sherman kits. Yes, you get
a lot more details with the Dragon, for example, all the periscopes in the
Tamiya kits are molded in the “down” position with no periscopes on offer.
Dragon give you the option…..Although do becareful not to feed the carpet
monster or break parts to pieces!
This kit
is based on Tamiya’s M4A3 Sherman kit released back in 2000. Tamiya simply added
the parts used for an early version of the M4A3 to backdate it to this version,
and took out the four infantry figures and new commander figure instead. The
parts for the later versions are still in the kit, such as the newer
transmission covers, so you can make that version if you want. What is great
with this kit are all the accessories. You get two sprue of stuff to stuff your
tank with. If you read my M4A3E8 review, you’ll know I grabbed one of the sprue
and stuff that tank with. It contains a wooden plank to hold the stuff in the
front of the tank. Again, Shermans were well known to stop anything the Germans
fired at them so the crews usually put a lot of accessories at the front of the
tank to serve as ad hoc armor. These include spare track links, spare wheels,
extra armor plates and wooden boxes etc. Other than that, it’s your usual Tamiya
fare that is easy to assemble, fit well, and don’t have a lot of parts compared
to say, the Dragon kit, which give people hissy fits online cause of the
difficult nature and over engineered aspects of their Sherman kits. Yes, you get
a lot more details with the Dragon, for example, all the periscopes in the
Tamiya kits are molded in the “down” position with no periscopes on offer.
Dragon give you the option…..Although do becareful not to feed the carpet
monster or break parts to pieces!
| CONSTRUCTION |
 Construction
begins with the lower hull wall with the drive sprocket drive and rear walls. Be
careful. If you are doing an early version, use the “three piece” transmission
cover. The single one piece appeared in the later version. The rear wall
assembly is a lot easier. Although the later version is included in this kit.
The road wheels, VVSS, drive sprockets are next. These are way simplified but
again, you won’t tell once the weathering goes on. The entire assembly are now
placed onto the lower hull…It’s that easy!
Construction
begins with the lower hull wall with the drive sprocket drive and rear walls. Be
careful. If you are doing an early version, use the “three piece” transmission
cover. The single one piece appeared in the later version. The rear wall
assembly is a lot easier. Although the later version is included in this kit.
The road wheels, VVSS, drive sprockets are next. These are way simplified but
again, you won’t tell once the weathering goes on. The entire assembly are now
placed onto the lower hull…It’s that easy!
The upper hull is just as easy…Just leave off anything that may look like carpet monster food though, such as the light rings. Now, if you want to put in the radio operator and driver figure, place them in now as the instructions calls them or else you will have a tough time later. This is because the early version of the hatches are just too narrow to fit them in properly. I saved the pioneering tools for later.
For the turret, the gun breech and the radio are included so you have at least some interior details if you choose to open the big commander hatch. There are some details here so assemble them as the instruction calls them.
I saved the machine gun and the accessories later. Time to hit the paint shop
| COLORS & MARKINGS |
Main paint scheme are olive drab
for all of three markings. One in France 1944, one in Italy 1944, and one in
Normandy. Which is BLEH considering how many of these things were in Europe
during WW II! The kit was heavily washed with jet black acrylics and Tamiya Flat
Black before the first coat was put on. Then the first coat was dulled with
heavily diluted jet black and after that was dry, the first coat of cream
acrylic, to symbolize dust was put on, followed by another coat of thin olive
drab, which is Testor’s……Funny t hing…..There
were so many variations of American Olive Drab, there is a joke that after you
stop playing just which German “Dark Yellow” is dark yellow, you can start
playing which shade of Olive Drab is…Olive Drab. But for me, Testor’s fit the
bills just right! And this time, it is Olive Drab. I made a mistake in saying my
Easy 8 is painted in Olive Drab when it is Testor’s Olive Green. Again, there
are many variations of the American Olive Drab. As the war wore on, late in the
war, Olive Drab started to have more brown and black, thus giving the tanks a
darker appearance. This continued throughout the Korean War. And then the
weathering can really begin. The bottom hull is heavily slobbered with cream and
acrylics tan to symbolize mud. And these are heavily mixed with jet black to the
running gears until they actually started to cake somewhat on the wheels! This
slurry mix was also applied to the tracks, with the surface also dry brushed
with silver to denote the fact these were pounded on by the ground and dust and
thus, worn to their metal color. This time around, I added far more tan to give
the tank a really nice muddy appearance, as if a summer shower just happened,
and the tank had to drive through more than one mud hole! Again, no rust as
operational track hardly rusts. Heavy tan color were also applied to the front
and rear fenders to show off the buildup of mud. The cream and tan were also
applied to the rest of the hull and turret, but just not as heavily since these
area don’t get nearly as dirty as the lower hull after the decals were applied
so they can be weathered also. Overall, I hope I achieved the look of a
well-used and dirty Sherman in its element. The building of the kit was easy,
the painting and weathering took most of the time!
hing…..There
were so many variations of American Olive Drab, there is a joke that after you
stop playing just which German “Dark Yellow” is dark yellow, you can start
playing which shade of Olive Drab is…Olive Drab. But for me, Testor’s fit the
bills just right! And this time, it is Olive Drab. I made a mistake in saying my
Easy 8 is painted in Olive Drab when it is Testor’s Olive Green. Again, there
are many variations of the American Olive Drab. As the war wore on, late in the
war, Olive Drab started to have more brown and black, thus giving the tanks a
darker appearance. This continued throughout the Korean War. And then the
weathering can really begin. The bottom hull is heavily slobbered with cream and
acrylics tan to symbolize mud. And these are heavily mixed with jet black to the
running gears until they actually started to cake somewhat on the wheels! This
slurry mix was also applied to the tracks, with the surface also dry brushed
with silver to denote the fact these were pounded on by the ground and dust and
thus, worn to their metal color. This time around, I added far more tan to give
the tank a really nice muddy appearance, as if a summer shower just happened,
and the tank had to drive through more than one mud hole! Again, no rust as
operational track hardly rusts. Heavy tan color were also applied to the front
and rear fenders to show off the buildup of mud. The cream and tan were also
applied to the rest of the hull and turret, but just not as heavily since these
area don’t get nearly as dirty as the lower hull after the decals were applied
so they can be weathered also. Overall, I hope I achieved the look of a
well-used and dirty Sherman in its element. The building of the kit was easy,
the painting and weathering took most of the time!
| FINAL CONSTRUCTION |
 The
accessories came from two places. The first is Tamiya’s Allied Vehicle
Accessories kit and the second came from this kit. Again, I also should locate a
few wooden logs to place here since the Shermans were well known to not stop the
dreaded German 88mm and the 75mm fired from a Panther and Tiger, American crews
usually pile the front of their tanks with various ad hoc equipment to use as ad
hoc armor. The tracks and spare wheels are obvious from earlier version and all
over the place, but the crew didn’t care….They are obviously there to use as
armor instead! These are painted and weathered the same as the tank. I also used
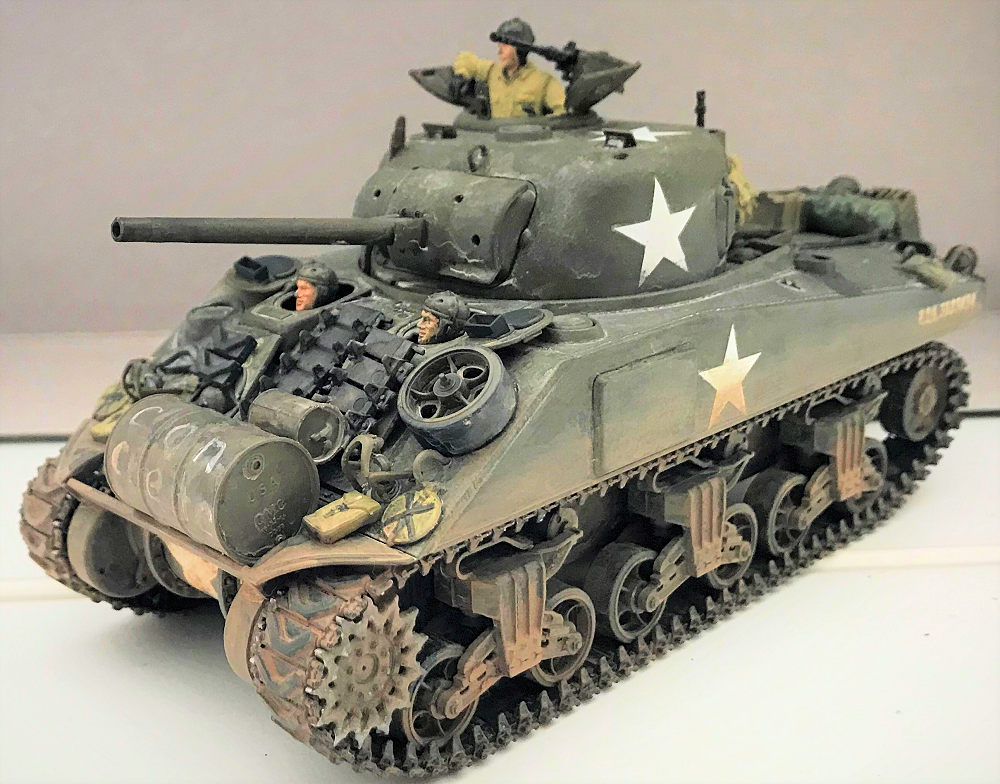
a 45 gallon gas drum and placed it in the front of the tank and wrote the word
“concrete” on it (all but nearly unnoticeable due to the weathering). Yes, it’s
obvious this crew stole an empty drum, filled it with concrete, and then welded
onto the tank as extra armor! (History shows that none of this was really
effective, but it helped crew morale. Ed)
The
accessories came from two places. The first is Tamiya’s Allied Vehicle
Accessories kit and the second came from this kit. Again, I also should locate a
few wooden logs to place here since the Shermans were well known to not stop the
dreaded German 88mm and the 75mm fired from a Panther and Tiger, American crews
usually pile the front of their tanks with various ad hoc equipment to use as ad
hoc armor. The tracks and spare wheels are obvious from earlier version and all
over the place, but the crew didn’t care….They are obviously there to use as
armor instead! These are painted and weathered the same as the tank. I also used
a 45 gallon gas drum and placed it in the front of the tank and wrote the word
“concrete” on it (all but nearly unnoticeable due to the weathering). Yes, it’s
obvious this crew stole an empty drum, filled it with concrete, and then welded
onto the tank as extra armor! (History shows that none of this was really
effective, but it helped crew morale. Ed)
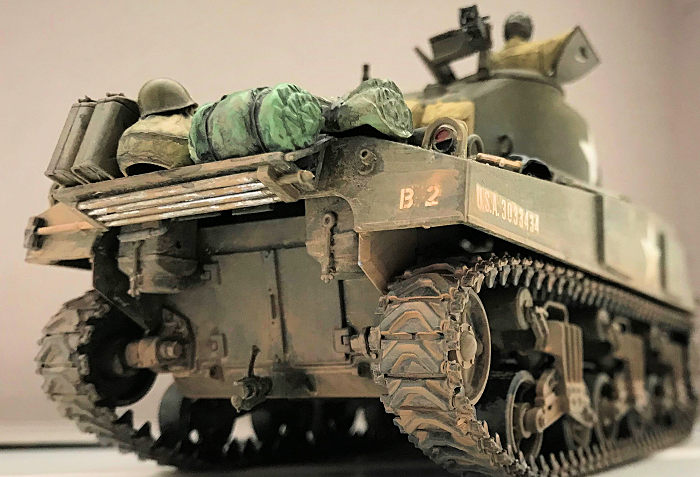
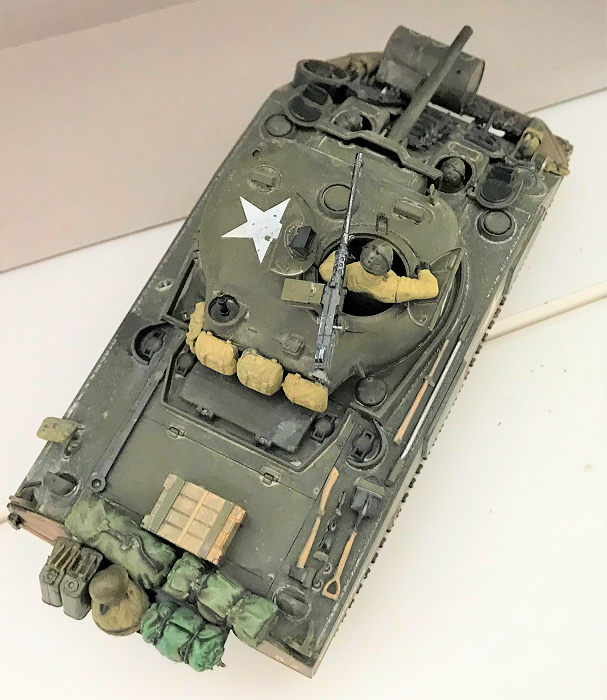
The Allied Vehicle set contains more satchel/duffle bags, which I painted in dark yellow and weathered before putting them all over the tank. The rear is filled with two jerry cans worth of gas and water, and some sleeping and duffle bags. To complete the whole thing, a wooden box is painted and weathered and placed on the tank. Once I get the correct width rope, I’ll tie these down. The figures are all painted in Dark Yellow uniforms, with Olive Drab helmet and flesh faces. Rubber Black were used for gloves.
Final Construction involved putting on all the pioneering tools, colored and weathered appropriately, the front and rear headlights and various hatches. The last bit is the .50 cal, which is assembled, decaled and put onto its place. Overall, easy to make and fun to build…Just got delayed massively by the weathering and all the extras I put on this thing!
| CONCLUSIONS |
You know what? After getting all these kits that are over 1000 pieces, I forgot just how fun and easy, cheesy, peasy these Tamiya armor kits truly are! I’m starting to build quite the stash for these! Simply put, if you know where to look, amazon has these between the price of $30-$50, and if you have Prime, no shipping costs! Just take a bit to get to you since all of them come from Japan. They won’t take long, won’t have you blow fuses because of difficulty and build up to a very respectable version of the said vehicle, especially if you know how to weather them properly! Highly recommended, get a few, and blow off a few, especially after a few hard long projects!
If you would like your product reviewed fairly and fairly quickly, please contact the editor or see other details in the Note to Contributors.
Back to the Main Page Back to the Review Index Page Back to the Previews Index Page