Tamiya 1/35 M26 Pershing
| KIT #: | 35254 |
| PRICE: | $50.00 |
| DECALS: | Four options |
| REVIEWER: | Donald Zhou |
| NOTES: |
Advantages: Easy Buildup, Nice Accessories,
Plenty of Options. Disadvantages: Some details simplified, Markings
Limited. Not really a M26. Tamiya Allied Vehicle Accessories kit used. |
| HISTORY |
The vehicle that eventually became the M26 Pershing was started in early 1942 as the T-20. It was a departure from the preceding U.S. tank, the M4 Sherman. The concept was started in spring of 1942, the mock-up of the T-20 built in May 1942. Initially, the T-20 was just going to be an improved M4, as the Army at that time didn’t have a doctrine on the use of heavy tanks. The tank would not have a drive shaft through the lower hull to the drive sprockets, which is at the front of the M4, and will use a conventional gasoline or diesel engine, to cut down the silhouette that’s a huge disadvantage of the Sherman.
The new tank would use the 76mm cannon, adapted from a 3in anti-aircraft gun. This cannon, and the improved T23 turret eventually would find its way onto the Sherman, such as the M4A3E8 the “Easy Eight” and proved to be superior to the 85mm cannon on the T-34/85. Other improvement were the tank originally used an early version of the HVSS, Horizontal Volute Suspension System, this suspension system eventually also made its way to the Sherman before a torsion bar suspension system was developed that’s still in use in today’s M1 Abrams tanks. A series of experiments were also carried out, such as the T23’s electrical drive system that was similar to that of the original (Porsche) Tiger. 250 of the T23 would be ordered but since they require the same headache inducing maintenance as the Porsche Tiger and would require the Army to introduce new procedures, maintenance operation and new training, hence why the Army eventually dropped the T23. However, the turret, with the 76mm, was adapted onto the Sherman.
By mid-1943, the evolution
of the T-20 series eventually created the T-25 and T-26. The biggest difference
was that the T-26 especially had a far bigger turret mounting a massive 90mm
cannon, adapted from an anti-aircraft cannon of the same caliber and a frontal
armor plating that had a thickness increased to 4 inches or 101mm, the same
thickness as the Tiger, with the hull held at some 46 degrees, equivalent to
 over 150mm
of armor. The mantlet has 115mm of armor, with the thickness, angle and armor
quality, equivalent to around 203mm. This added weight increased the vehicle to
over 40 tons and further improvements were explored.
over 150mm
of armor. The mantlet has 115mm of armor, with the thickness, angle and armor
quality, equivalent to around 203mm. This added weight increased the vehicle to
over 40 tons and further improvements were explored.
As far back as fall 1943, General Devers wanted the T26E1 to enter into full production. However, this was shot down immediately by men such as Gen. Leslie McNair. McNair, an artillery officer, still held on dearly to the “tanks are for tank destroyers. Tanks should be used to support infantry only” mantra. In fact, at that time, three main opinions dominated the Army’s doctrine. 1. The Tank destroyer mantra. 2. Supply problems. The new tank, which eventually ballooned to 46 tons, would take up more space and force the transport ships to carry less tanks. 3. Simply put, complacency. After 1942, the Shermans proved to be superior to the Panzer III and early Panzer IV with the short barrel so the Army, ignoring intelligence on the then new German Panzer V Panther and Panzer VI Tiger, slowed the T-26 development down massively! In comparison, the Russian would introduce their counterparts to the Tiger and Panthers in the form of the JS-2 in late 1943!
But above all, it was men like Leslie who would stomp, staunch and nearly stop all development of the T-26 in favor of an improved Sherman. In fall of 1943, McNair would say these words, “The M4 tank, particularly the M4A3, has been widely hailed as the best tank on the battlefield today. There are indications that the enemy concurs in this view. Apparently, the M4 is an ideal combination of mobility, dependability, speed, protection, and firepower. Other than this particular request—which represents the British view—there has been no call from any theater for a 90 mm tank gun. There appears to be no fear on the part of our forces of the German Mark VI (Tiger) tank... There can be no basis for the T26 tank other than the conception of a tank versus tank duel—which is believed unsound and unnecessary. Both British and American battle experience has demonstrated that the antitank gun in suitable number and disposed properly is the master of the tank. Any attempt to armor and gun tanks so as to outmatch antitank guns is foredoomed to failure... There is no indication that the 76 mm antitank gun is inadequate against the German Mark VI (Tiger) tank”. Misinformation, refusal to believe reality to the point of stupidity eventually would get a lot of American tankers unnecessarily killed.
 In fact,
the T26 development was so stunted that it wasn’t really ready until 1945. This,
despite the fact the losses shown in Normandy that a much heavier and harder
hitting tank was needed to counter the threat of the Tiger and the Panther. Now,
the Tiger was a rare commodity. But the Panther was a regular encounter in the
Bocage country and unless the Shermans somehow can get a side or rear shot, can
manhandle the American tanks with ease. Even after Leslie McNair was killed
during “Operation Cobra” while on a “fact finding mission”, the Army refuse to
let the now very very very obsolete doctrine go. This died out somewhat after
the breakout but all of that came crashing down during the battle of the Bulge
where the American tanker units got mauled by the German assault, including over
500 Panthers and nearly 1/3 of the entire King Tiger production run! Production
run of the T26E3 began in November of 1944, and it took Devers to go over the
Army’s head straight to General Marshal and Gen. Eisenhower. And it took many a
tanker’s life and heavy losses suffered during the Bulge to finally get a very
recalcitrant Army, and a big threat by Marshal stating in no uncertain terms
that he will publish the tanker’s plight to the press to get the Army, now with
its own buttocks about to be set on fire, to relent allow an initial 20 T26E3 to
be sent to Europe on the famous “Zebra Mission”.
In fact,
the T26 development was so stunted that it wasn’t really ready until 1945. This,
despite the fact the losses shown in Normandy that a much heavier and harder
hitting tank was needed to counter the threat of the Tiger and the Panther. Now,
the Tiger was a rare commodity. But the Panther was a regular encounter in the
Bocage country and unless the Shermans somehow can get a side or rear shot, can
manhandle the American tanks with ease. Even after Leslie McNair was killed
during “Operation Cobra” while on a “fact finding mission”, the Army refuse to
let the now very very very obsolete doctrine go. This died out somewhat after
the breakout but all of that came crashing down during the battle of the Bulge
where the American tanker units got mauled by the German assault, including over
500 Panthers and nearly 1/3 of the entire King Tiger production run! Production
run of the T26E3 began in November of 1944, and it took Devers to go over the
Army’s head straight to General Marshal and Gen. Eisenhower. And it took many a
tanker’s life and heavy losses suffered during the Bulge to finally get a very
recalcitrant Army, and a big threat by Marshal stating in no uncertain terms
that he will publish the tanker’s plight to the press to get the Army, now with
its own buttocks about to be set on fire, to relent allow an initial 20 T26E3 to
be sent to Europe on the famous “Zebra Mission”.
The first encounter with the German, a Tiger I, was a mess for the new tank, now known as the M26 Pershing, named after Gen. “Blackjack” Pershing, who led the American Expeditionary Force in WW I. The tank, named “fireball”, was caught during sunset, backlit by a burning fire while guarding a road block. The fire perfectly lit its silhouette against the dying sun and a Tiger opened fire from less 100 yard away. The first shot, which should’ve bounced off the thick mantlet, somehow somewhere found the co-axle machine gun port and penetrated. The second round hit the barrel and set off a round in the breech. The third round bounced off the turret side and took off the commander’s cupola. The Tiger, in a blind hurry to retreat, then found itself stuck on an obstacle and had to be abandoned by its crew. Fireball was recovered and repaired and put back into service by March 7.
The next series found far more success for the new tank. Near Elsdorf, the same place where Fireball was struck, another M26 was able to kill a Tiger and two Panzer IV’s easily. The Tiger was taken out by a HVAP round at 900 yards, the Panzer IV’s, easily at beyond 1000, unheard of engagement distance for an American tank to that point. A rather famous engagement happened right in front of the Cologne Cathedral where a Panther blocked the main road further on. The Panther was able to easily destroy a Sherman that blundered into the street. Blocked by the rubble, the Sherman never saw it coming. The following infantry quickly called up the Pershing to deal with the threat. Firing on the move (the Pershing, like late marks Shermans, were equipped with the first rudimentary gyroscopic stabilizers that allow it to fire on the move, although slowly), the Pershing was able to penetrate the Panther’s mantlet followed by two more rounds that penetrated its sides, destroying the tank. Later on, the Pershing crew confirmed the two side penetrations completely went through one side and out the other!
The most
famous operation carried out by the new tank was the seizing of the Ludendorff
Bridge during the Battle of Remagen when the 9th
armored division stumbled upon the town of Remagen and discovered to their shock
and surprise that the Ludendorff railway bridge was still standing. A platoon of
5 Pershings, minus one then under service, proved critical in providing fire
support for the infantry trying desperately to capture the intact bridge,
including breaking up a German counterattack forming on the far end. The
 Pershings
had to wait until later to cross since the damaged bridge was feared not able to
support the heavy weight tank. Overall, the new tank was deemed a success,
General Barnes termed the tank as better than the Tiger and second only to the
Panther in performance. The only major fault was its engine and transmission,
which were directly lifted from the Sherman. This meant like the Panther and
Tiger, whose engine and transmission were actually reliable machines, but became
very unreliable since they powered much heavier tanks, the Pershings suffered
the same problems since it weighted 46 tons fully loaded, 8-10 tons heavier than
a regular Sherman. The tank will also see action in the Korean War until it was
replaced by the much more reliable M46, which finally cured many of the problems
plaguing the Pershing.
Pershings
had to wait until later to cross since the damaged bridge was feared not able to
support the heavy weight tank. Overall, the new tank was deemed a success,
General Barnes termed the tank as better than the Tiger and second only to the
Panther in performance. The only major fault was its engine and transmission,
which were directly lifted from the Sherman. This meant like the Panther and
Tiger, whose engine and transmission were actually reliable machines, but became
very unreliable since they powered much heavier tanks, the Pershings suffered
the same problems since it weighted 46 tons fully loaded, 8-10 tons heavier than
a regular Sherman. The tank will also see action in the Korean War until it was
replaced by the much more reliable M46, which finally cured many of the problems
plaguing the Pershing.
Personally, I believe the Pershings should’ve been ready by Normandy, June 6th, 1944! Yes, many have told me the long development time of the T26E3. But as shown above, that was the machinations of men like Leslie McNair, who stunted and nearly stopped the entire development of the T26 series in favor of the Sherman, despite all rhyme, logic and reasons! Bare minimum, if Gen. Devers had got what he wanted, and the new tank had entered production in winter of 1943, then at least 500 of them should’ve been ready by Normandy and would’ve gone a long way in solving the “Tiger Phobia” problem and made the Bocage country much easier to manage. If the Army had the foresight, the new tank, despite the problems, could’ve seen action in 1943 like the JS-2, which also had many problems initially too. But the Russian didn’t care! They threw the new tank into the fray cause they KNEW something had to be done to counter the Panthers and Tigers! The JS-2 was that tank so it got thrown in, improvement were made by 1944! The same could’ve been done to the Pershing! But nope! The Army, stuck in their own place that do not shine, refused to see rhyme and reason! In the end, only 210 Pershings were sent to Europe, too little too late. Meanwhile, the JS-2 would see a production number of well over 2000! This should’ve been the Pershing’s production number also by the end of the war!
| THE KIT |
This kit was released
all the way back in 2003 or so. I consider this kit, along with others like the
Panther G to be Tamiya’s 3rd
generation kits. The first came out in the 70’s and 80’s and really popularized
the 1/35 scale armor kits. Unfortunately, those kits sometimes were inaccurate
and were made for motorization and thus, had holes underneath the hull. Some
even were carried far into the future like the eventual M1A1 and M1A2 all had
the same hull as the ancient 1980’s M1, which was based on the prototype. The
second generation was released in mid 1990’s or so with the new Tamiya’s Tigers,
King Tigers etc. These finally cured the holes in the lower hull and had much
more accurate running gears and road wheels arraignments. The 3rd
generation is 2000’s with kits like M4, Leopard II A6, T-55, the M26 and M4A3
kits. The 4rd
generation started in around 2010, with new kits such as the M40, Panther D etc
that featured slide m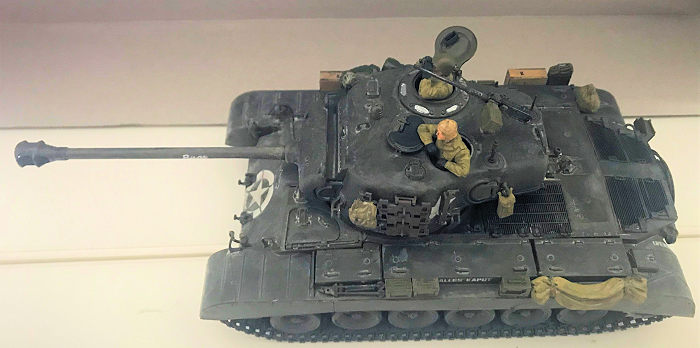 old
technology. This M26 kit was released around 2003. Like the many kits released
between 1995-2009, the detail definition were definitely sharper, the kit
overall was far more accurate than the 1st
generation kits especially, and still features Tamiya famous ease of assembly
and fit. It also features a working torsion bar suspension. You can build it up
like that if that is your thing. Overall, this is a great kit if you just want
to sink your teeth into something simple but still a viable M26.
old
technology. This M26 kit was released around 2003. Like the many kits released
between 1995-2009, the detail definition were definitely sharper, the kit
overall was far more accurate than the 1st
generation kits especially, and still features Tamiya famous ease of assembly
and fit. It also features a working torsion bar suspension. You can build it up
like that if that is your thing. Overall, this is a great kit if you just want
to sink your teeth into something simple but still a viable M26.
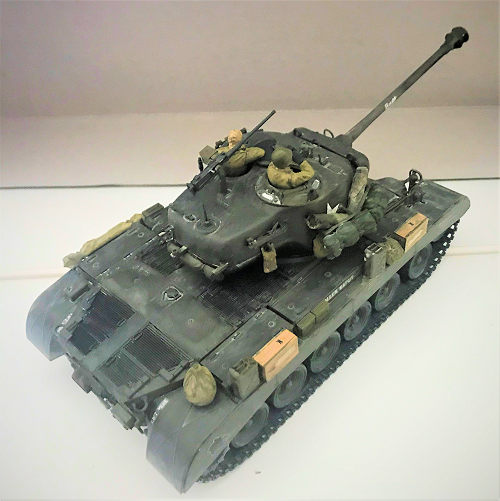
However, the kit do have some problems. The most noticeable is the lack of clear parts. This is badly needed for the commander cupola especially. Rather, you get one solid block and had to paint the vision ports. Due to the lack of slide mold technology, the barrel is in two pieces. Still, the biggest problem is this kit, as it comes out of the box, can only be built as one of the initial 20 vehicles sent on the Zebra Mission due to the lack of the turnbuckles found on the front and rear fenders. Also, the tracks offered are the T81 series tracks for WWII. The later Korean War types are not offered. This means one of the markings in this kit, the Korean War one can not be used, not unless these details are included or changed. Overall, this kit can be built into a fine representation of the Pershing despite some minor problems.
| CONSTRUCTION |
Construction overall is just as easy as any other Tamiya kits, especially if you forgo the working torsion bar suspension. Now, this is my second time through this kit. The first one I bought and built in 2004 and then got left with my friends in San Diego when I had to move to China. I built that one up with the working suspension and let me tell you, it does not work too well! What happen is, you had to chip off the guidance pins on all the swing arms except four. The first two and the last two arms are held in place by a spring pin, held in place with a notch in the arm and then screws. These four arms are used to support the whole tank. The rest of the arms, without their pins, are just allowed to swing freely, pinned to the sides with poly caps like the four spring loaded arms. The big problem is that the four guidance pins left on the spring pin arms are under immense pressure and tension and a few uses later, they will break clean off anyways! After only six months, my original kit, three of the spring pin arms broke leaving them hanging permanently downwards. I had use a small plier and snip the spring pins in half and then super glue all the arms in positon anyways. This feature is best used in a diorama setting. If you are using it as a static display. Just forgo all the brouhaha and cement all the arms in place instead. This time around, I did just that! The road wheels and sprockets are assembled per usual, with a poly cap trapped in between so they will spin when the tracks are put on.
 The upper
hull is loaded with details including separators, headlights, headlight guards,
if you are careful, the bow machine gun should rotate. The rear deck grill is
separate, making painting easier. The driver and bow machine gun/radio operator
hatches are separate, with down periscope like all other Tamiya’s kit at this
time and age. The rear is well appointed with an infantry to tank talkie phone,
tow cable, and cannon lock.
The upper
hull is loaded with details including separators, headlights, headlight guards,
if you are careful, the bow machine gun should rotate. The rear deck grill is
separate, making painting easier. The driver and bow machine gun/radio operator
hatches are separate, with down periscope like all other Tamiya’s kit at this
time and age. The rear is well appointed with an infantry to tank talkie phone,
tow cable, and cannon lock.
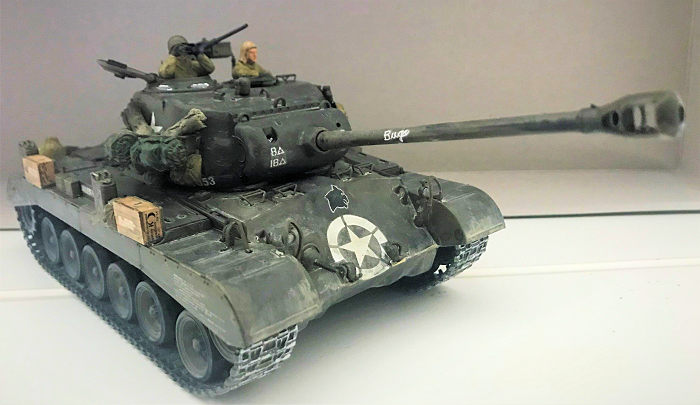
Turret assembly begin with the commander and loader supports if you chose to put in the two figures like me. The main cannon support, with two poly caps on each side so the gun can move up and down are also build up. The cannon itself is in four pieces, with two barrels in half and so is muzzle brake. Remember, this is before slide mold technology so get a metal barrel if you wish. Then the turret top is joined with the turret bottom. Details include hatches, spare track supports, ammo loading door and side accessory supports. I left the 50 cal and spare tracks until later. Time to hit the paint shop!
| COLORS & MARKINGS |
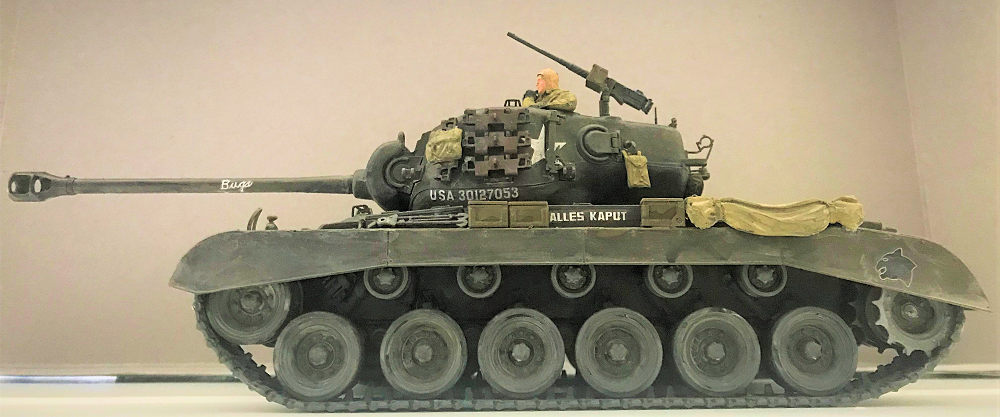
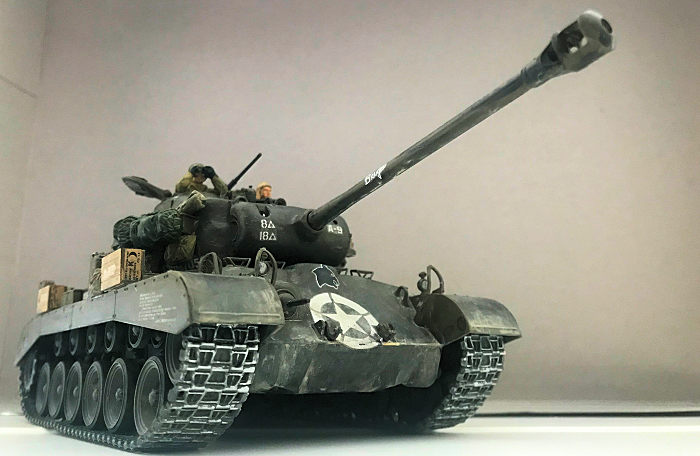
Main paint scheme are olive drab or the slightly different shading “olive green” for all the markings as nearly all U.S. armored vehicles at that time, especially in Europe are painted in that color, or variations (again, we can play just what is the correct shade for Olive Drab till the cows come home and there still won’t be a correct answer). There are four markings. The first one automatically is off the list as it is a tank from the USMC in Inchon, 1950. Again, the M26 in this kit is really a T26E3, not a modified M26 serving in the Korean War. The other three include a tank “Allies Kaput” from the 8th Armored Division, an unnamed tank from the 2nd Armored, and the down on its luck Fireball from 3rd armored division.
As with any U.S. vehicle in WW II, due to their rather monotonous color scheme, heavy shading and weathering was added to break up that mass of olive drab, in this case, I chose Olive Green again to have a few variations on my shelf! Decals were added at this point so they can be weathered too.
The kit was heavily washed
with jet black acrylics and Tamiya Flat Black before the first coat was put on
to start off. Then the first coat of Olive Green was then sprayed on, then
dulled with heavily diluted jet black and after it was dry. Then the first coat
of cream acrylic, to symbolize dust was put on, followed by another coat of thin
olive green, which is Testor’s Then the weathering can really begin. This time
around, I want a rather dusty, well pounded on tank as both my Shermans are the
“muddy puppies.” To this end, I bought a bottle of acrylics “Pewter Grey” from
Wal-Mart. Again, these stuff are just plain awesome! .50 cents a bottle that’ll
last a lifetime and dry very dull. Perfect for mud, dust, grime etc!!!!! Pewter
grey is a  very
“dusty” like grey. You can observe this by observing all the services vehicles
and Fed EX van/trucks. There running gears, wheels and tires are all a dusty
grey after well use along with black. To this end, a heavy wash of jet black was
added first, to tone down the cream on the tank, which symbolizes dust. Then
before it was dry, pewter grey was then added to the running gears especially in
several coats so they look like the tank had been crossing dusty, well beaten
roads and the country sides since the marking I chose, Allies Kaput, was seen in
the Czechoslovakia in 1945. This puts it sometimes in May, when summer was about
to begin. Jet black was also washed onto the barrel to denote the tank has fired
a few rounds. Again, the building of the kit was easy, the painting and
weathering took most of the time!
very
“dusty” like grey. You can observe this by observing all the services vehicles
and Fed EX van/trucks. There running gears, wheels and tires are all a dusty
grey after well use along with black. To this end, a heavy wash of jet black was
added first, to tone down the cream on the tank, which symbolizes dust. Then
before it was dry, pewter grey was then added to the running gears especially in
several coats so they look like the tank had been crossing dusty, well beaten
roads and the country sides since the marking I chose, Allies Kaput, was seen in
the Czechoslovakia in 1945. This puts it sometimes in May, when summer was about
to begin. Jet black was also washed onto the barrel to denote the tank has fired
a few rounds. Again, the building of the kit was easy, the painting and
weathering took most of the time!
| FINAL CONSTRUCTION |
 The
accessories came from two places. The first is Tamiya’s Allied Vehicle
Accessories kit and the second came from this kit. This time, no need to add ad
hoc armor like the Shermans since the M26 became known as the “Tiger Tamer”
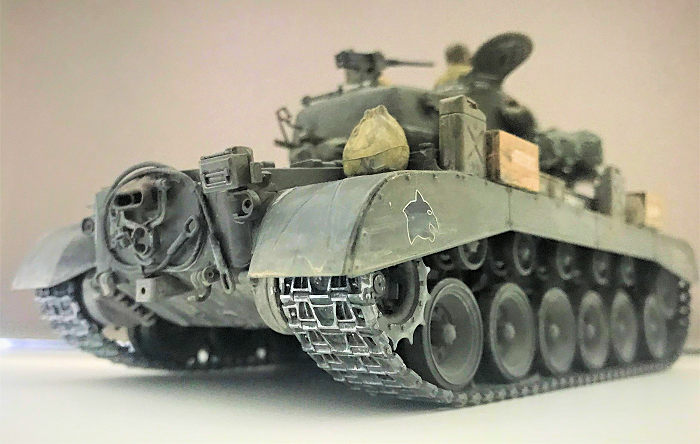
among U.S. tankers. The kit contains several personal bags, jerry cans, extra
.50 al and .30 cal ammo cans and K-ration boxes. The Allied Vehicle set contains
more satchel/duffle bags, which I painted in dark yellow and weathered before
putting them all over the tank. They are put all over tank along the side and to
the rear. Once I locate some more stuff, I’ll put them on the tank to stuff it a
bit more since nearly all U.S. vehicles, modern or WWII are usually filled to
the brim with accessories. I didn’t put any near the “Allies Kaput” name so they
will not be covered. The figures are all painted in Dark Yellow uniforms, with
Olive Drab helmet and flesh faces. Rubber Black were used for gloves.
The
accessories came from two places. The first is Tamiya’s Allied Vehicle
Accessories kit and the second came from this kit. This time, no need to add ad
hoc armor like the Shermans since the M26 became known as the “Tiger Tamer”
among U.S. tankers. The kit contains several personal bags, jerry cans, extra
.50 al and .30 cal ammo cans and K-ration boxes. The Allied Vehicle set contains
more satchel/duffle bags, which I painted in dark yellow and weathered before
putting them all over the tank. They are put all over tank along the side and to
the rear. Once I locate some more stuff, I’ll put them on the tank to stuff it a
bit more since nearly all U.S. vehicles, modern or WWII are usually filled to
the brim with accessories. I didn’t put any near the “Allies Kaput” name so they
will not be covered. The figures are all painted in Dark Yellow uniforms, with
Olive Drab helmet and flesh faces. Rubber Black were used for gloves.
Final work involved putting on all the accessories such as the tow cables, the front and rear headlights and various hatches. The last bit is the .50 cal, which is assembled, decaled and put onto its place. The tracks were spayed with Tamiya’s Gunmetal and then heavily weathered with pewter grey and silver highlights. These were put on no problem. I used superglue to cement them in place before the side skirts, now also painted and weathered correctly, were put in place. Overall, easy to make and fun to build…Just got delayed massively by the weathering and all the extras I put on this thing!
| CONCLUSIONS |
You know what? After getting all these kits that are over 1000 pieces, I forgot just how fun and easy, cheesy, peasy these Tamiya armor kits truly are! I’m starting to build quite the stash for these! Simply put, if you know where to look, amazon has these between the price of $30-$50, and if you have Prime, no shipping costs! Just take a bit to get to you since all of them come from Japan. They won’t take long, won’t have you blow fuses because of the difficulty and build up to a very respectable version of the said vehicle, especially if you know how to weather them properly! Highly recommended, get a few, and blow off a few, especially after a few hard long projects!
7 August 2018
Copyright ModleingMadness.com.
If you would like your product reviewed fairly and fairly quickly, please contact the editor or see other details in the Note to Contributors.
Back to the Main Page Back to the Review Index Page Back to the Previews Index Page