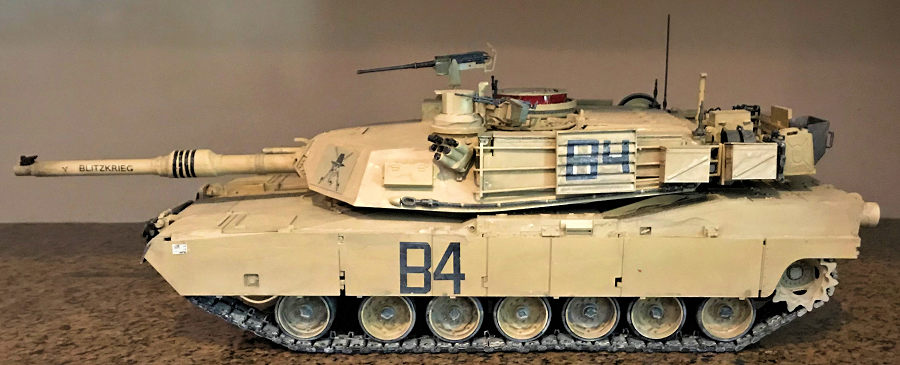
Trumpeter 1/16 M1A2 SEP Abrams
| KIT #: | 00927 |
| PRICE: | $200.00 |
| DECALS: | Two options |
| REVIEWER: | Donald Zhou |
| NOTES: |
Advantages: Good details, large scale size, plenty of multimedia parts. Disadvantages: Details all over the place and wrong, many parts simplified, pesky multiple track parts, drive sprocket maybe undersized AFV Club drive sprocket update set used. M1 extra detail set used. Extra decal sets used. |
| HISTORY |
The M1 series of tanks was developed in the 70’s as a replacement for the venerable M60. Previously, in a joint program with then West Germany, the U.S. produced the MBT-70 in the ‘60’s as a replacement that never worked. The then new 155mm short barreled cannon, which can fire the Shillelagh missile was prone to break down and jamming. The rest of the vehicle didn’t fare better either and both nations eventually backed out. The Germans went on to produce their own very successful Leopard II MBT while the U.S. went on to eventually produce the M1.
The first prototype was produced in
1976. The winner was Chrysler. The Germans, who were adamant on selling the
Leopard to the U.S. was deemed too expensive while the GM design was deemed too
inferior. The tank was the XM1. After Chrysler was bought out by General
Dynamics, the design was further improved. It had the same 105mm Royal Ordnance
cannon found on the M60, which is upgradable to the 120mm Rhinemetal smoothbore
found on the Leopard II. It also had massive improvement to the armor with the
British Chobham ceramic armor plates that’s a whole generation ahead of the
rolled homogeneous armor found in the M60. The biggest improvement however, was
the fire control system. Previous tanks all used analogue sights with daylight
vision systems. The M1 replaced them with digital fire control computers with
laser range finders that was several jumps ahead along with a Forward Looking
Inferred sensors that allowed the tank to fight at night or bad weather.
Efficiency were greatly improved although older more experienced crews’
improvement was only incremental. However, the improvements among new raw crews
was three or even four times better than older tanks, meaning they can be
brought up to standard far quicker. The tank entered service in 1980 and quickly
started to prove themselves. Over 3300 M1 were produced. The tanks can run up to
45MPH although there are reports of crews who disabled their governors on the
tanks and went up to 55MPH and even beyond! The tank also features an AGT-1500
turbine engine.
 The engine
is quiet, so quiet in fact, the tank gained a nickname of whispering death and
can use any sort of fuel, everything from diesel, to straight gasoline and in a
pinch, raw alcohol can be burned (although as might surmised, using raw alcohol
will wreck the engine’s life). In service, the tank just uses diesel to save
logistics nightmares. However, the big disadvantage is the turbine is a huge
fuel hog and draws as much as a gallon of fuel for every mile and its infer-red
signature is also quite high.
The engine
is quiet, so quiet in fact, the tank gained a nickname of whispering death and
can use any sort of fuel, everything from diesel, to straight gasoline and in a
pinch, raw alcohol can be burned (although as might surmised, using raw alcohol
will wreck the engine’s life). In service, the tank just uses diesel to save
logistics nightmares. However, the big disadvantage is the turbine is a huge
fuel hog and draws as much as a gallon of fuel for every mile and its infer-red
signature is also quite high.
The next major upgrades is the M1A1 version. The biggest difference is the main armament. The Rhinemetal 120mm smoothbore replaced the British 105mm rifled cannon. This meant ammo capacity was dropped from 53 to 42. The other was the armor. Especially the HA (Heavy Armor) and HC (Heavy armor Common) variants, which contained a layer of depleted Uranium to further harden and upgrade the armor. Other improvements includes better bustle racks and a hole was opened just in front of the loader. This hole will prove critical for the next series of upgrade then in development. Over 6000 M1A1’s were produced, many of them are now or have been upgraded under the AIM or Abrams Improvement Management program.
The tank, now named Abrams after late Gen. Creighton Abrams, baptism of fire came in the Middle East. When Iraq and Sadadum Insane invaded Kuwait, U.S. and her allies quickly formed a line of defense to defend Saudi Arabia. Critical among the pieces were Abrams. In fact, over 1800 of the tanks were sent to the Gulf, many of them the latest HA variants to deal with the T-72’s. Before the battle, questions about the tank’s price and effectiveness abound but all of that was settled quickly when the tank proved itself in battle.
In fact, the Abrams totally outclassed its opponents. It can hit its targets as far away as 2KM away and its rangefinders and FLIR worked well in both daylight and night, especially when smoke fire engulfed the region. In fact, one anecdote from the war shows just how near invulnerable the tank was. During a drive, one Abram got stuck in mud. The rest of the unit passed it by since they were under orders to keep moving. While waiting for a tow, three Iraqi T-72’s attacked. The first one fired a HEAT shell and did nothing to the tank. The M1 responded by firing an armor piercing shell that nearly blew the turret off! The second one, not heeding the lesson, also fired a HEAT shell that only made the tank angrier. A second round turned this tank into a funeral pyre. The third tank, finally heeding the warning, fired an armor piercing round that left a grove in the Abrams frontal glacis plate but did not penetrate. Seeing further fighting was redundant, it hid behind a sand berm, thinking it was safe. However, through its FLIR unit, the Abrams tracked the last Iraqi tank and saw the heat plume from its exhaust and put the round where the turret was. The armor piercing round slammed through the sand berm and still penetrated the tank on the other side.
 By this
time, further Abrams had arrived but still no tow truck…Orders came from above
to destroy the stricken tank in place. Since the rest of the Abrams crews did
not have high explosives, they decided to use their main cannons for the job.
By this
time, further Abrams had arrived but still no tow truck…Orders came from above
to destroy the stricken tank in place. Since the rest of the Abrams crews did
not have high explosives, they decided to use their main cannons for the job.
However, two rounds against the front armor proved to be useless, a tank came up against the side and fired one through the ammo storage bin and finally penetrated. All that did was to set off the blast off panel on top of the turret, which vent the explosive force upwards. After the fire died down, the tank proved to be as tough as ever! While discussing on what to do, the tow finally arrived and with three M88 recovery vehicles, the stricken M1 was finally dragged out of the mud!
There were some hard lessons too though. The least of which, like the M2 Bradley, it turned out, the biggest enemy wasn’t the enemy…it was friendly fire. Of the 9 Abrams destroyed in the war, 7 was from friendlies. At least two was from an errand AH-64 Apache strike with one total loss
After the war, further improvements were added. The biggest was the M1A2 version. The hole on top of the tank was replaced by a CITV or Commander Independent thermal Viewer. This allowed the tank to finally conduct “Search while hunt” at the same time. Electronics were further improved to allow one A2 to talk to another or any similarly equipped tank. Furthermore, to guard against the painful lesson of friendly fire, “cold” Combat Identification Panels were added to the front of the turret, the side and rear. The A2 was also improved with the SEP or System Expansion Program and the SEP2, which added FBCB2 and other improvement to the armor etc.
By the time the second Gulf War rolled around, the Abrams that participated in this war only look like the same Abrams that participated in the first one. The insides though, were completely different and generations ahead. After the war, however, the Abrams faced its toughest test yet, fighting in urban terrain.
The fact of the matter is, tanks are not suited in urban terrain. They are too big, too unwieldy in a city and there are a lot of spots for insurgents to take pot shots at it. The press were quick to point out the Russian disaster that was Chechenia and Grozny. Insurgents quickly found out going toe to toe with an Abrams was tantamount to suicide. However, taking pot shot at it from the rear or firing an RPG from the rooftop at the tank’s roof is a far better option. Either that, or load up an IED and then blow up its soft underbelly!
To combat this, the Tank Urban
Survival Kit upgrade was developed. This is a field upgradable kit that r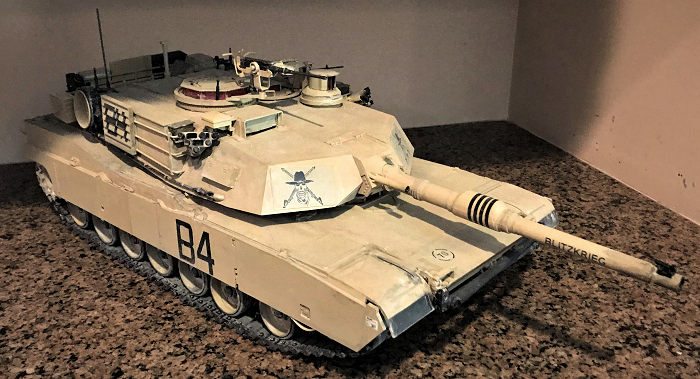 adically
improve the tank’s survival in an urban terrain. The first thing added was
something from WW II, an infantry to tank talkie phone on the back. The next one
was a “V” shaped armor piece that was added to the belly to not only add armor
strength against IED’s, but also to blunt and deflect the blast away from the
tank. The third is a series of armor glass panes were added to both the
commander and the loader’s weapon stations so they can operate their weapons out
of the tank without worrying about snipers. Finally, to guard against the tank’s
sides, a series of ERA armor panels were added to the tank’s side skirts.
adically
improve the tank’s survival in an urban terrain. The first thing added was
something from WW II, an infantry to tank talkie phone on the back. The next one
was a “V” shaped armor piece that was added to the belly to not only add armor
strength against IED’s, but also to blunt and deflect the blast away from the
tank. The third is a series of armor glass panes were added to both the
commander and the loader’s weapon stations so they can operate their weapons out
of the tank without worrying about snipers. Finally, to guard against the tank’s
sides, a series of ERA armor panels were added to the tank’s side skirts.
When introduced, the kit quickly proved popular and well suited in an urban terrain. However, further improvements were added from combat reports. These became the TUSK II kit. These includes: further slate armors were added to the rear engine grill. A second .50 cal machine gun was added to the top of the main cannon and a series of ceramic tile ERA armor pieces were added to the turret sides and onto the existing side skirt ERA armor.
With these improvements, the tank soon proved to be a hard nut to crack. There is a M1A3 version. However, due to budget cuts, that version is in limbo so the Army and Marines will have to do with the current version for the foreseeable future.
| THE KIT |
See my preview here.
Whatever I said in the preview is true. And yes, I was forced to get the AFV Club drive sprocket correction set cause the ones in the kit is undersized so can not grab the tracks correctly. I also collected the detail sets for the CIP, Combat Identification Panels and the two little handles that’s in front of the commander cupola and a set of decals since the kit’s one is so anemic. Other than that, it’s just down to the painting part since the model is so big.
| CONSTRUCTION |
Construction
begin with the hull and running gear. Read the construction carefully and use
the right parts. I thought the wheel arms are all the same but it turned out
they aren’t. This is because each side, the insertion point is oval to get the
arms in the correct position. One side is big, the other is smaller so you don’t
goof….Unless you did what I did and mess the arms. This meant some of the arms
didn’t fit too well. At first I thought it was the kit’s fault but quickly
figured out there is a reason why. You do get a few extra arms to mess around
but it shouldn’t b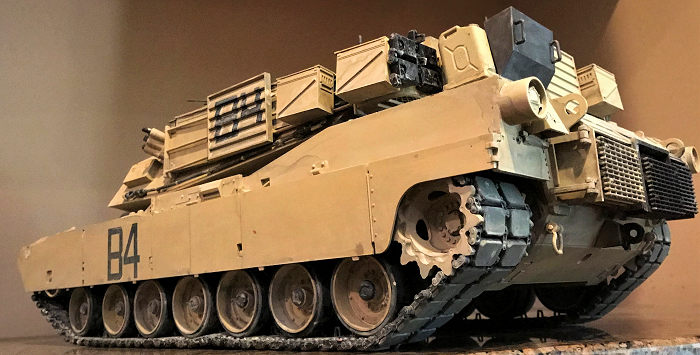 e
if you just follow the instructions. Wheels are next. The rims are vinyl. I know
some people hate it but it works for me since they are already black and I can
separate the wheels and rim to ease painting. They fit well and there is an
extra spare wheel. The cap is separate and unfortunately, not clear. As I’ve
said in my previous review of Abrams, the hub should be clear since the real
thing is made out of clear Plexiglas so the crews can judge just how much
hydraulic fluid is in the arms. No big deal since I can always paint it black
later. The lower hull is basically done when the rear grill is finished. The bad
thing is, the driver’s hatch is not separate and wrong for the M1A2. This is a
leftover from their M1A1 kit. The prominent ridge on the hatch is eliminated for
the A2 version. Ohh well, not gonna bother too much here since you can barely
tell the difference when the turret goes on.
e
if you just follow the instructions. Wheels are next. The rims are vinyl. I know
some people hate it but it works for me since they are already black and I can
separate the wheels and rim to ease painting. They fit well and there is an
extra spare wheel. The cap is separate and unfortunately, not clear. As I’ve
said in my previous review of Abrams, the hub should be clear since the real
thing is made out of clear Plexiglas so the crews can judge just how much
hydraulic fluid is in the arms. No big deal since I can always paint it black
later. The lower hull is basically done when the rear grill is finished. The bad
thing is, the driver’s hatch is not separate and wrong for the M1A2. This is a
leftover from their M1A1 kit. The prominent ridge on the hatch is eliminated for
the A2 version. Ohh well, not gonna bother too much here since you can barely
tell the difference when the turret goes on.
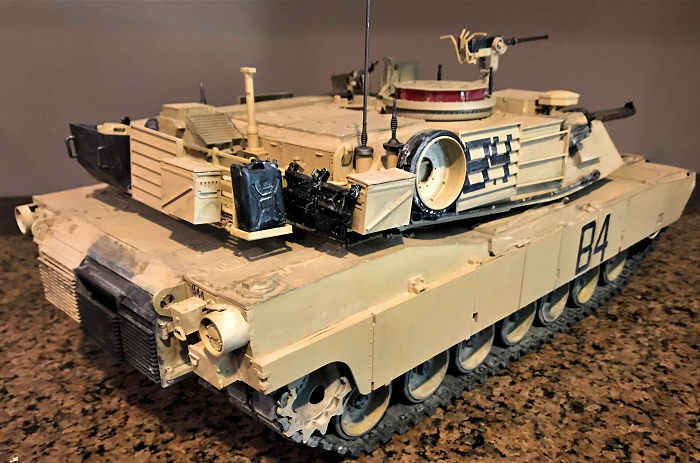
One thing I did correct though, is the left rear fuel cap. On most M1A2, the fuel tank beneath have been replaced by an I-APU or Internal-Auxiliary Power Unit. This item is deemed important since if the tank is idle and forced to use its main turbine engine, it will suck up a lot of gas. The APU allows the tank to turn off its engine and still power all its internal electronics and hydraulics with minimum use of gas. To this end, I use my dremel to sand off the fuel cap, and then fill it up with my red spot putty glazing before ground it to try to create the anti-slip texture. It’s still rough but passable. The most egregious is the right side NBC intake. The real tank only has the intake on the left. I again, dremel it off, then used black plasticards and putty to correct the mistake.
The hull is done, time for the turret.
First of all, these are the detail mistakes on the
turret. Due to the fact this kit has commonality with their original M1A1 kit,
the loader hatch and the doghouse gunner sight all have the prominent ridges
that are not present on the M1A2. The other big aspect is the fact the commander
hatch inner liner is molded onto the hatch itself, preventing it from being
posed in the open position…Grrrr….I wanted to buy a 1/16th scale commander
figure to pose into the hatch. But this molding prevented that. The loader hatch
can be posed open but the space below is solid, precluding that also. And
finally….And…And…And this is why I have to laugh at Trumpeter’s brain gas
sometimes……The CITV periscope has this little “TAXI” sign on it……This made me
roll my eyes cause this was present on only one tank, “Cowboy From Hell”. How do
I know this? This marking is present on my Dragon M1A2 SEP kit and it seems only
that marking has the little “TAXI” symbol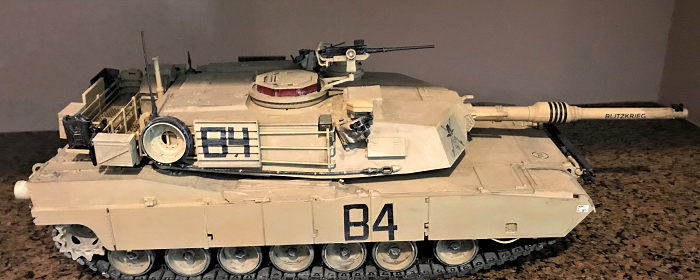 !
How in the world did it make it into this kit…..Trumpeter, have you been smoking
the big one again?!? Luckily, the detail set I purchased has another CITV
periscope that do not have the sign so I used that instead.
!
How in the world did it make it into this kit…..Trumpeter, have you been smoking
the big one again?!? Luckily, the detail set I purchased has another CITV
periscope that do not have the sign so I used that instead.
Speaking of the detail set, the only reason I purchase it is because the kit is missing the CIP panels except the rear one. After the spade of friendly fire incidents in the first Gulf War, a crash program was started to allow friendly units to identify each other and the CIP was the result. The second Gulf War, nearly all allied vehicles had them so this is an egregious error. I can make the front panels out of blank plasticards, but the side one I purchased although if you are persistent, you can make them out of plasticards too. Not only that, the set also contains the two handle bars at the front of the commander’s cupola missing in the kit. Also, as mentioned above, I had to get the AFV Club correct sized drive sprocket since the kit’s one are too small. Finally, I purchased a set of aftermarket markings since the kit’s one is just too BLAH to mention!
Construction begin with the main 120mm cannon. It’s in two pieces…Some will run for metal barrels but I don’t know if any exist and if it costs $45, you can forget it. I then putty it and sand it carefully. It’s big and round enough that you can tell the difference afterward. The turret top and bottom are then trapped in between so the cannon can work afterwards.
The rest follow just about every tank kit out there. If you built any M1 kits, this is all too familiar. Just the part sizes are much bigger. I left off stuff like the exhaust deflector, the clear periscope lens, machine guns etc since those are all different colors. Paint shop time!
| COLORS & MARKINGS |
First, I took all the all the hatches and anything that would look like it has clear parts, and sprayed it with U.S. Desert Yellow…Sigh, now that Rustolieum has killed off Model Master, have to find substitute sooner or later. The clear lenses are then painted with tail light red and put into place before the hatches are also cemented into place. These are then taped off before the whole entire tank was sprayed with the same desert yellow along with things like the side skirts, 40mm ammo cans and machine gun holders. These were then weathered appropriately. Since I’ve mentioned my weathering methods several times now, will not reinvent the wheels again. All the rest are then painted in their appropriate colors, like tow cables in gun metal etc. General painting was rather quick but there is still a lot left.
| FINAL CONSTRUCTION |
The major stuff left, you might guess it, the pesky multi parts tracks. These seemed to be direct copies of the tracks in RFM Abrams kits but blown up much bigger and the reason why this kit took this long. Finally, I decided to just build the bottom rung and leave the top since all Abrams have massive side skirts to hide the top rung.
Assembly begin with taking two pins and two bottom
rubber plates, carefully line them up and put the pins into the slots on the
plates…This is difficult since the tracks are designed to be movable afterwards,
mainly to facilitate the wrap around around the idlers and the sprockets, but
once lined up, two top plates are cemented onto the bottom plate. Again, since
the whole entire thing is designed to be movable, do not apply cement on the
pins. Once that is dry, the guide teeth is cemented in the middle. And yes, as
you may guessed, th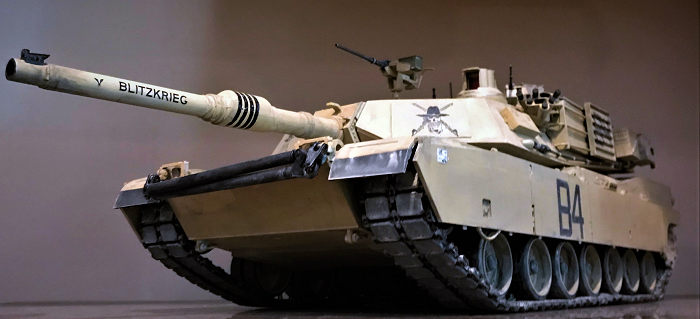 is
is tedious and took a long while even if I just did the bottom. The good thing
is, I got some leftover and built two spare track links to use on the tank
turret. Afterwards, I sprayed them flat black and weathered them appropriately
and put them on the tank. This turned out to be very troublesome since the
tracks are long and huge and I broke several pads off and had to reapply with
superglue. The way to make this work was to cement one end, after inserted to
the top, onto the top of the sponsoon with superglue. Wrap around the bottom,
use superglue on the road wheels if you have to, then wrap it around the other
end before cementing the other end to the top of the sponsoon with superglue
too. After this, the side skirts were added and bottom hull complete.
is
is tedious and took a long while even if I just did the bottom. The good thing
is, I got some leftover and built two spare track links to use on the tank
turret. Afterwards, I sprayed them flat black and weathered them appropriately
and put them on the tank. This turned out to be very troublesome since the
tracks are long and huge and I broke several pads off and had to reapply with
superglue. The way to make this work was to cement one end, after inserted to
the top, onto the top of the sponsoon with superglue. Wrap around the bottom,
use superglue on the road wheels if you have to, then wrap it around the other
end before cementing the other end to the top of the sponsoon with superglue
too. After this, the side skirts were added and bottom hull complete.
Next are all the accessories. The machine guns were painted, assembled with their ammo can, before putting on the correct place. The tow cables were painted and put beneath the turret. Just to be different, the exhaust deflector was painted, heavily weathered and put onto the rear stowage “fence hangers” instead. The next were all the 40mm ammo cans, the two big oil drip catch pans, spare tracks and spare wheel. These were made and put ever which way on the stowage “fence”. I’m trying to locate more stowage. Unfortunately, accessories in 1/16th scale is just rare and expensive so I have to let that go.
Finally, the hubs are painted black and cemented onto the wheels. Afterwards, jet black and beachcomber beige acrylic washes were applied to further weather the tank. Model done!
| CONCLUSIONS |
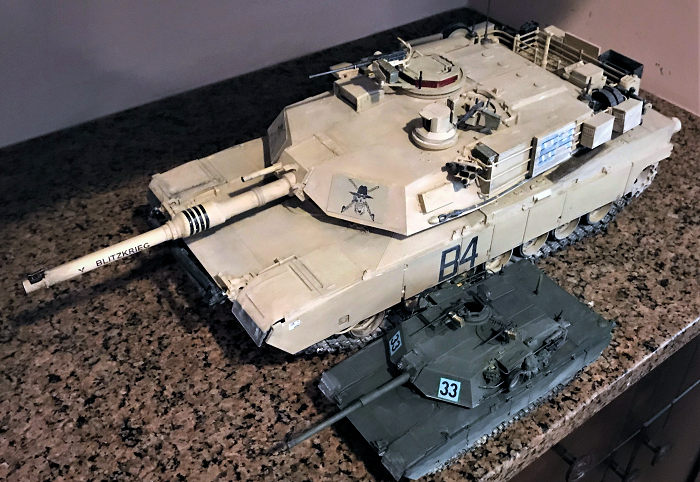
What can I say? It’s big and it’s an Abrams! Yeah, as I’ve mentioned in the preview and this review, there are a whole lot of problems with this kit, the least of which, if you really want to make it accurate, at least somewhat, get the AFV Club sprocket correction set or else the tracks will not fit. The rest you can correct, if anything else, dremel the right side NBC intake on the hull and slice off the TAXI sign on the CITV periscope and you are pretty much done. Laymen will not tell the rest. Again, if you are a multi-millionaire and money isn't a thing, get the Tamiya one. The rest of us will make due with this kit for now.
26 April 2021
Copyright ModelingMadness.com. All rights reserved. No reproduction without express permission.
If you would like your product reviewed fairly and fairly quickly, please contact the editor or see other details in the Note to Contributors.