| KIT #: | RM-5007 |
| PRICE: | $80.00 |
| DECALS: | Four options |
| REVIEWER: | Donald Zhou |
| NOTES: | Advantages: Extremely detailed, Full Interior with turret basket, Abrams Power Pack and driver station, Some very valuable accessories in the kit. Disadvantages: very high parts count, VERY pesky track link assembly, missing and mistakes in the instruction |
| HISTORY |
The M1 series of tanks was developed in the 70’s as a replacement for the venerable M60. Previously, in a joint program with then West Germany, the U.S. produced the MBT-70 in the ‘60’s as a replacement. That never worked. The then new 155mm short barreled cannon, which can fire the Shillelagh missile was prone to break down and jamming. The rest of the vehicle didn’t fare better either and both nations eventually backed out. The Germans went on to produce their own very successful Leopard II MBT while the U.S. went on to eventually produce the M1.
The first prototype was produced in 1976. The winner was Chrysler. The Germans, who were adamant on selling the Leopard to the U.S. was deemed too expensive while the GM design was deemed too inferior. The tank was the XM1. After Chrysler was bought out by General Dynamics, the design was further improved. It had the same 105mm Royal Ordnance cannon found on the M60, which is upgradable to the 120mm Rhinemetal smoothbore found on the Leopard II. It also had massive improvement to the armor with the British Chobham ceramic armor plates that’s a whole generation ahead of the rolled homogeneous armor found in the M60. The biggest improvement however, was the fire control system. Previous tanks all used analogue sights with daylight vision systems. The M1 replaced them with digital fire control computers with laser range finders that was several jumps ahead along with a Forward Looking Inferred sensors that allowed the tank to fight at night or bad weather. Efficiency were greatly improved although older more experienced crews’ improvement was only incremental. However, the improvements among new raw crews was three or even four times better than older tanks, meaning they can be brought up to standard far quicker. The tank entered service in 1980 and quickly started to prove themselves. Over 3300 M1 were produced. The tanks can run up to 45MPH although there are reports of crews who disabled their governors on the tanks and went up to 55MPH and even beyond! The tank also features an AGT-1500 turbine engine. The engine is quiet, so quiet in fact, the tank gained a nickname of whispering death and can use any sort of fuel, everything from diesel, to straight gasoline and in a pinch, raw alcohol can be burned (although as might surmised, using raw alcohol will wreck the engine’s life). In service, the tank just uses diesel to save logistics nightmares. However, the big disadvantage is the turbine is a huge fuel hog and draws as much as a gallon of fuel for every mile and its infer-red signature is also quite high.
The next major upgrades is the M1A1 version. The biggest difference is the main armament. The Rhinemetal 120mm smoothbore replaced the British 105mm rifled cannon. This meant ammo capacity was dropped from 53 to 42. The other was the armor. Especially the HA (Heavy Armor) and HC (Heavy armor Common) variants, which contained a layer of depleted Uranium to further harden and upgrade the armor. Other improvements includes better bustle racks and a hole was opened just in front of the loader. This hole will prove critical for the next series of upgrade then in development. Over 6000 M1A1’s were produced, many of them are now or have been upgraded under the AIM or Abrams Improvement Management program.
 The tank,
now named Abrams after late Gen. Creighton Abrams, baptism of fire came in the
Middle East. When Iraq and Sadadum Insane invaded Kuwait, U.S. and her allies
quickly formed a line of defense to defend Saudi Arabia. Critical among the
pieces were Abrams. In fact, over 1800 of the tanks were sent to the Gulf, many
of them the latest HA variants to deal with the T-72’s. Before the battle,
questions about the tank’s price and effectiveness abound but all of that was
settled quickly when the tank proved itself in battle.
The tank,
now named Abrams after late Gen. Creighton Abrams, baptism of fire came in the
Middle East. When Iraq and Sadadum Insane invaded Kuwait, U.S. and her allies
quickly formed a line of defense to defend Saudi Arabia. Critical among the
pieces were Abrams. In fact, over 1800 of the tanks were sent to the Gulf, many
of them the latest HA variants to deal with the T-72’s. Before the battle,
questions about the tank’s price and effectiveness abound but all of that was
settled quickly when the tank proved itself in battle.
In fact, the Abrams totally outclassed its opponents. It can hit its targets as far away as 2KM away and its rangefinders and FLIR worked well in both daylight and night, especially when smoke fire engulfed the region. In fact, one anecdote from the war shows just how near invulnerable the tank was. During a drive, one Abram got stuck in mud. The rest of the unit passed it by since they were under orders to keep moving. While waiting for a tow, three Iraqi T-72’s attacked. The first one fired a HEAT shell and did nothing to the tank. The M1 responded by firing an armor piercing shell that nearly blew the turret off! The second one, not heeding the lesson, also fired a HEAT shell that only made the tank angrier. A second round turned this tank into a funeral pyre. The third tank, finally heeding the warning, fired an armor piercing round that left a grove in the Abrams frontal glacis plate but did not penetrate. Seeing further fighting was redundant, it hid behind a sand berm, thinking it was safe. However, through its FLIR unit, the Abrams tracked the last Iraqi tank and saw the heat plume from its exhaust and put the round where the turret was. The armor piercing round slammed through the sand berm and still penetrated the tank on the other side.
By this time, further Abrams had arrived but still no tow truck…Orders came from above to destroy the stricken tank in place. Since the rest of the Abrams crews did not have high explosives, they decided to use their main cannons for the job.
However, two rounds against the front armor proved to be useless, a tank came up against the side and fired one through the ammo storage bin and finally penetrated. All that did was to set off the blast off panel on top of the turret, which vent the explosive force upwards. After the fire died down, the tank proved to be as tough as ever! While discussing on what to do, the tow finally arrived and with three M88 recovery vehicles, the stricken M1 was finally dragged out of the mud!
There were some hard lessons too though. The least of which, like the M2 Bradley, it turned out, the biggest enemy wasn’t the enemy…it was friendly fire. Of the 9 Abrams destroyed in the war, 7 was from friendlies. At least two was from an errand AH-64 Apache strike with one total loss
After the war, further improvements were added. The biggest was the M1A2 version. The hole on top of the tank was replaced by a CIV or Commander Independent thermal Viewer. This allowed the tank to finally conduct “Search while hunt” at the same time. Electronics were further improved to allow one A2 to talk to another or any similarly equipped tank. Furthermore, to guard against the painful lesson of friendly fire, “cold” identification panels were added to the front of the turret, the side and rear. The A2 was also improved with the SEP or System Expansion Program and the SEP2, which added FBCB2 and other improvement to the armor etc.
By the time the second Gulf War rolled around, the Abrams that participated in this war only look like the same Abrams that participated in the first one. The insides though, were completely different and generations ahead. After the war, however, the Abrams faced its toughest test yet, fighting in urban terrain.
 The fact of
the matter is, tanks are not suited in urban terrain. They are too big, too
unwieldy in a city and there are a lot of spots for insurgents to take pot shots
at it. The press were quick to point out the Russian disaster that was Chechenia
and Grozny. Insurgents quickly found out going toe to toe with an Abrams was
tantamount to suicide. However, taking pot shot at it from the rear or firing an
RPG from the rooftop at the tank’s roof is a far better option. Either that, or
load up an IED and then blow up its soft underbelly!
The fact of
the matter is, tanks are not suited in urban terrain. They are too big, too
unwieldy in a city and there are a lot of spots for insurgents to take pot shots
at it. The press were quick to point out the Russian disaster that was Chechenia
and Grozny. Insurgents quickly found out going toe to toe with an Abrams was
tantamount to suicide. However, taking pot shot at it from the rear or firing an
RPG from the rooftop at the tank’s roof is a far better option. Either that, or
load up an IED and then blow up its soft underbelly!
To combat this, the Tank Urban Survival Kit upgrade was developed. This is a field upgradable kit that radically improve the tank’s survival in an urban terrain. The first thing added was something from WW II, an infantry to tank talkie phone on the back. The next one was a “V” shaped armor piece that was added to the belly to not only add armor strength against IED’s, but also to blunt and deflect the blast away from the tank. The third is a series of armor glass panes were added to both the commander and the loader’s weapon stations so they can operate their weapons out of the tank without worrying about snipers. Finally, to guard against the tank’s sides, a series of ERA armor panels were added to the tank’s side skirts.
When introduced, the kit quickly proved popular and well suited in an urban terrain. However, further improvements were added from combat reports. These became the TUSK II kit. These includes: further slate armors were added to the rear engine grill. A second .50 cal machine gun was added to the top of the main cannon and a series of ceramic tile ERA armor pieces were added to the turret sides and onto the existing side skirt ERA armor.
With these improvements, the tank soon proved to be a hard nut to crack. There is a M1A3 version. However, due to budget cuts, that version is in limbo so the Army and Marines will have to do with the current version for the foreseeable future.
| THE KIT |
See my preview at this link. Whatever I said about the kit is still true…And as you may have guessed, the reason why it took this long is well, the complexity of it and those pesky multipart assembly tracks…But persevere I did and its now done…Just took a huge long while to do…And I promise this is my last M1 kit…
| CONSTRUCTION |
Assembly strangely enough, begins with the turret, mainly the 120mm cannon. The barrel, the breach and the details surrounding it are well casted and made so there isn’t any problems. There are quite a few parts here including the co-axial machine gun and main gunner scope. Next are both the commander cupola and the loader’s hatch. I did the hatches and put them on the turret but did not assemble the machine guns for now. If you are going for the M1A2 version, do NOT attach the loader gunner shield J13. This is because this kit only offers the early version of the M1A2 and thus, the shield is not applicable unless you are making a TUSK or a M1A2 SEP II. I also saved the coolers and the accessories for later. As said in the preview, this kit has two sprues, “O” that contains all sorts of accessories found on American Abrams including coolers, spare 40mm grenade ammo boxes and too many water/coke bottles to boot! Very useful for any American armor projects!
 The
external APU and the bustle rack are made next alongside the 40mm grenade
ammo boxes and the M1A2 air conditioning unit. I didn’t make any of them
since I’m making a 1991 Desert Storm version and these are not present on
the M1A1 tanks used there. I did however, made several jerry cans, both fuel
and water from the sprue.
The
external APU and the bustle rack are made next alongside the 40mm grenade
ammo boxes and the M1A2 air conditioning unit. I didn’t make any of them
since I’m making a 1991 Desert Storm version and these are not present on
the M1A1 tanks used there. I did however, made several jerry cans, both fuel
and water from the sprue.
Next page contains several mistakes I mentioned in the preview. Download the corrected page off of RFM web site if you have to. But since I’m making an earlier version of the M1A1, you do NOT drill out any holes for the Desert Storm variant. Be sure to use the correct “doghouse” gunner sight though. The one in the instructions is correct. Notice the later smooth side version for the M1A2 and upgraded M1A1 is also available. I also used the correct M1A1 blast off panels on the rear of the turret.
For the next part, part E4, the connecting point for the external APU is fitted in. For the Desert Storm variant, this should not be used (the hole drilling for the previous part is for this assembly). Otherwise, I skipped a few steps and assembled and cemented on the external racks and the side fences. Otherwise, the exterior of the turret is done. Time for the interior.
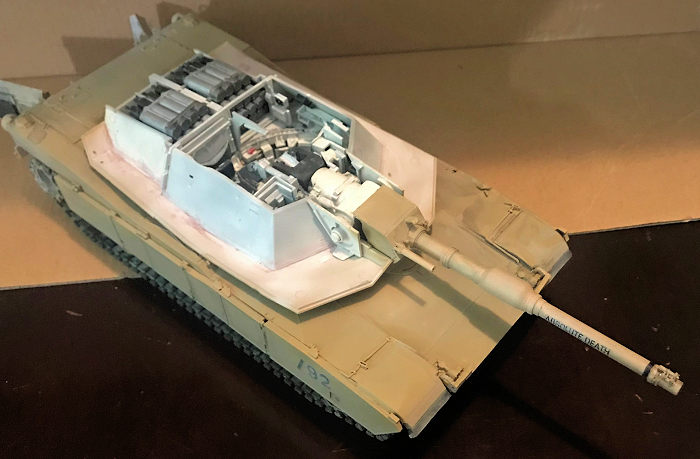
Interior begins with the turret basket. A LOT of parts including seats, side ammo bins, “vee-tronics” etc are all assembled here. I sprayed the turret basket mostly white, except the seat back and where other colors are called for.
Next are the turret basket support arms. Make sure these are glued on tight. I used superglue to zap them in in places and for strength.
Now, the commander and gunner joy stick and various electrical panels are cemented on. I skipped the cementing on the turret basket until the final step since the main cannon and other outfitting are also needed to be put on first. Again, some vee-tronics are different for the M1A1 and M1A2 version so be careful!
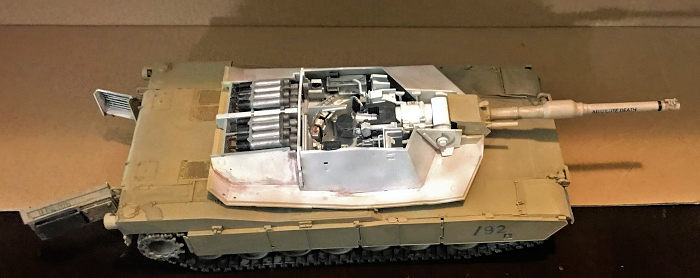
The main turret ammo racket is next. Be sure to
assemble the shells in sequence or else they will not fit later. The
instruction do not show it, but the base caps should be silver, the body
metallic grey. The 120mm shells have a permeable, meaning it “dissolves”
under the heat and pressure when the shell fires, leaving only the silver
blast cap base…This is because initially, both the Americans and German
wanted the whole shell to be permeable. However, the permeable casing rubs
badly against th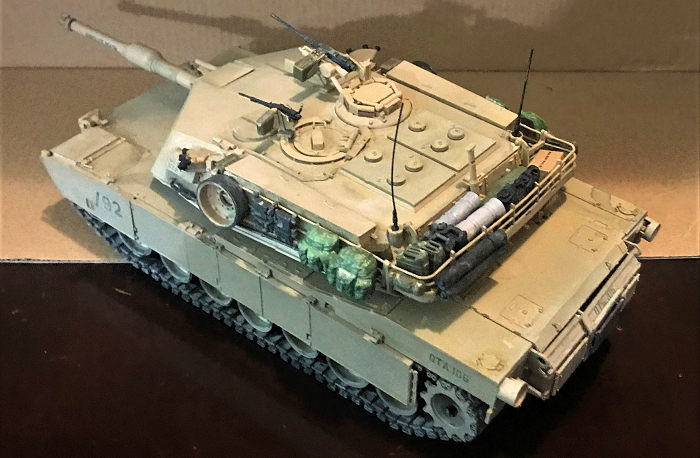 e
metal primer base and eventually, the base wears a big enough hole to fall
out, leading to the compromised solution of the body being permeable, but
the base holding the primer charge being metal to solve this problem. Now,
notice there are some extra shells, including two APFSDS, the older HEAT
shells and the newer HEAT ones. These you can paint and then display in
front of the tank.
e
metal primer base and eventually, the base wears a big enough hole to fall
out, leading to the compromised solution of the body being permeable, but
the base holding the primer charge being metal to solve this problem. Now,
notice there are some extra shells, including two APFSDS, the older HEAT
shells and the newer HEAT ones. These you can paint and then display in
front of the tank.
The side walls are assembled next. The right side especially have the main gunner station screens and commander control panels. These are assembled to the ammo bins in sequence. I used super glue on the outside to really reinforce this major piece, same with the turret basket, which was fixed in after this stage is complete. The turret is mostly complete at this point. On to the hull!
The hull starts with what else, all the suspension and driving arms. If you build any M1 or any armor kits before, this should not be any surprise. The only thing different are all the torsion bars that go on the driving arms before inserting them into their places in the hull.
Interior begins with the driver station. The panels, seat etc are all here. Just be aware of the colors and the decals on the screens, including a fire extinguisher and the instrument bezels.
The middle of the tank is empty. Now, I did not color what look like a bank of batteries on the sponson rear since when the hull goes on, it will be blocked. The rest deals with the massive engine bay. The fuel injector, rear wall, air filtration unit etc are all here. Take your time and color them right. The general color is white but there are a few parts that are black or gunmetal.
The major assembly for this is the M1 Power Pack that contain s the AGT-1500 engine and associated transmission and other parts. Now, the whole entire thing is gunmetal except the air filters, which are white, forcing me to spray them separately. This completes the interior.
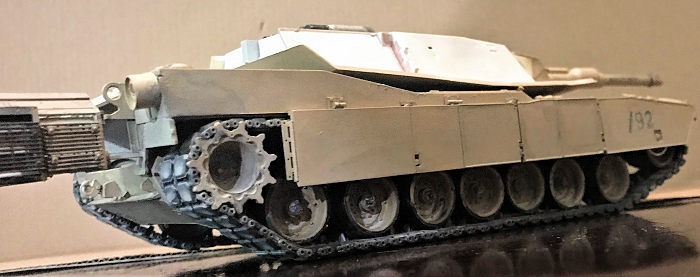
Exterior is the same across all Abram kits. Just a note though, the air filters on the top hull are photo etch so break out the super glue. The rear engine grills on this kit can be made to rotate to show the interior. Same with the rear top hull, this whole entire piece is made to be movable to show off the engine bay so keep those in mind. Although the grill bay panels are very loose and any slight jostle will knock them loose. Major assemblies are now done, time for some paint!
| COLORS & MARKINGS |
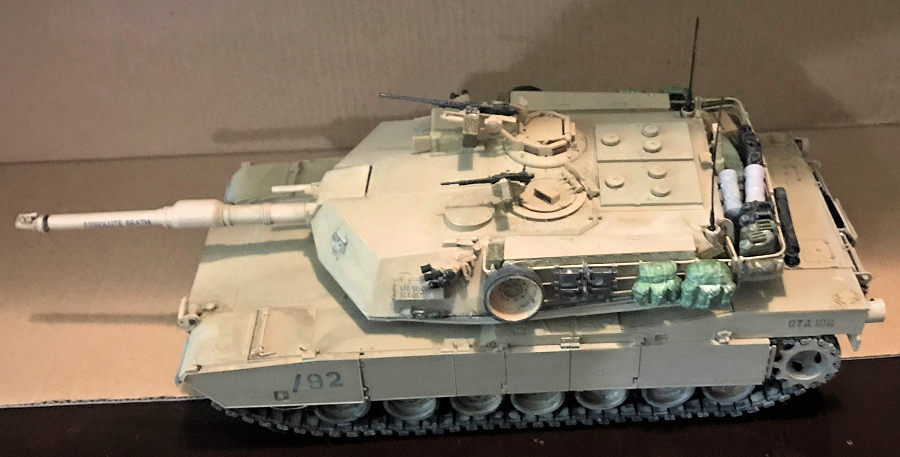
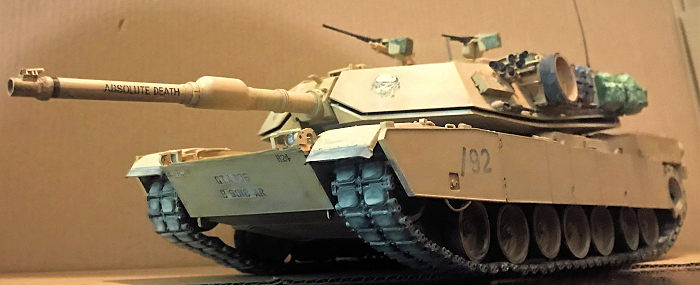
 Since
this will be a Desert Storm M1A1, it will have the U.S. Army Desert Tan as
overall color. I first painted the road wheels and then sprayed the first
overall coat of paint on the vehicle and all relevant parts. Then the first
coat of cream to denote dust was put on, this was followed by the decals. I
chose the first markings. Yes, purist may argue it may not have served in
the Gulf War but no one can tell it anyways! After that, I colored all the
accessories, including whatever is left from the Tamiya’s own U.S. Modern
Accessory set and a set from the Tamiya Modern Miniatures that contains more
jerry tanks etc.
Since
this will be a Desert Storm M1A1, it will have the U.S. Army Desert Tan as
overall color. I first painted the road wheels and then sprayed the first
overall coat of paint on the vehicle and all relevant parts. Then the first
coat of cream to denote dust was put on, this was followed by the decals. I
chose the first markings. Yes, purist may argue it may not have served in
the Gulf War but no one can tell it anyways! After that, I colored all the
accessories, including whatever is left from the Tamiya’s own U.S. Modern
Accessory set and a set from the Tamiya Modern Miniatures that contains more
jerry tanks etc.
| FINAL CONSTRUCTION |
Time to bring it all together…The first thing first, and I’ve put it off long enough but now can’t avoid it, the tracks….RFM give you a jig to help with this but I promptly lost them so have to make do. The track assembly is exactly like the Trumpeter’s 1/16th scale M1A2 except A LOT smaller! Since I’m not making the whole entire length, I will have plenty left over so first thing first, I made four spare links and put them on the tank with the spare wheels on the turret “fence” alongside the four ALICE packs. Next, rolling my eyes, I settle down for over 2 weeks (mainly cause in these days of Covid-19, I just became Billy Madison for my youngest and have to return to 1st grade!), I took two links, the two bottom pads, pretty easily recognizable cause they got a “stud” on the top, carefully insert the pad between the two links, and then carefully cemented the top on (you still want the tracks to be flexible so they can wrap around the idlers and sprockets), then do the same for the other side and repeat, and repeat, and repeat, and repeat, and repeat, repeat, repeat, repeat so on and on and on and on and on and on for two weeks until my mind can’t take it anymore…And there are still the guide teeth. Now, RFM gives you two version for the guide teeth, a solid version and the newer hollow version. I used the solid version cause this is correct for a Desert Storm variant. The hollow ones are used for the later upgraded M1A1 and the M1A2. Two mind numbing weeks later, I got the tracks. They are not full length but you don’t need them full length cause the side skirts covers the top!
 Next
are all the parts I left off to ease painting. The driver hatch, loader
hatch and the commander cupola were ripped off…They are all snap tight
thankfully, and their clear periscope prisms inserted from below before
added back onto the tank. Now, again, both the loader and driver hatches
contain the early version with a grove on the hatches, and the later smooth
version without so you have your choices. I of course, picked the early
version.
Next
are all the parts I left off to ease painting. The driver hatch, loader
hatch and the commander cupola were ripped off…They are all snap tight
thankfully, and their clear periscope prisms inserted from below before
added back onto the tank. Now, again, both the loader and driver hatches
contain the early version with a grove on the hatches, and the later smooth
version without so you have your choices. I of course, picked the early
version.
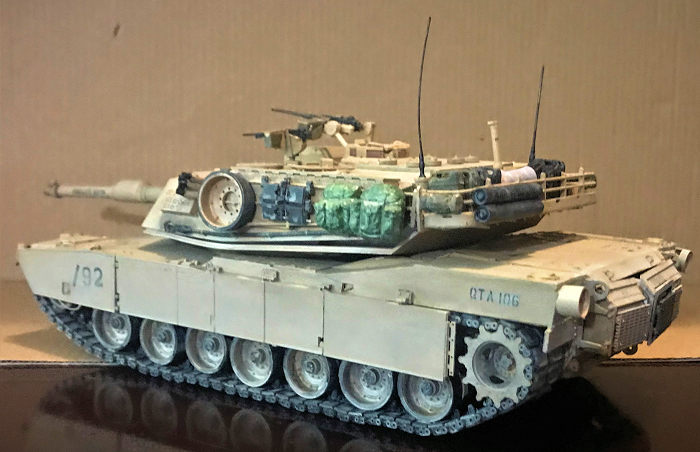
Next are all the machine gun. For the loader one, notice the holder is a photo-etch piece so you have to bend it and superglue it on. Now, both the covered and one with ammo belts are offered. I used the ammo belt versions. Again, the ammo can holders can be folded with photo etch or ones with them molded on already are offered so you have your choice.
Finally, this kit is complete with the accessories. Now, I didn’t stuff the tank this time since well…I am running out of the accessory kits and 2. I really don’t want the accessories to take away from the interior so I only painted a few spare cans of fuel and water, some bed rolls and jerry cans and stuff them in the bustle racks along with all the gears on the side “fence”. Model done!
| CONCLUSIONS |
Another grand kit form RFM! This kit can be build up as a M1A1 HA from the Gulf War I, provided you not use a few parts in the kit to a very early version of the M1A2. The only other big problem with the kit, which RFM has correct since is that some of the instructions are wrong or missing. So is it worth it? YEAH! I now basically have a complete collection of M1 from the very first early 105mm M1 to the M1A2 SEP II…Now, I just a kit of SEP III to complete everything…OHHH DID I HEAR SOME MANUFACTURE IS MAKING ONE?!?!?!?!!?!?!?! ACK! Why am I getting itchy? ACK!!! **STARTS SCRATCHING!!!** ACK my mind is going numb!!!! **Abram-titis” catches back on!!!** “UGH!!! MUST GET KIT WHEN IT COMES OUT!!!!!!!!” (My other small part of the brain….UGH! Here we go again!)
| REFERENCES |
http://en.wikipedia.org/wiki/English_Electric_Lightning
10 August 2021
Copyright ModelingMadness.com. All rights reserved. No reproduction in part or in whole without express permission.
If you would like your product reviewed fairly and quickly, please contact the editor or see other details in the Note to Contributors.