Takom 1/35 M60A1 w/ERA
| KIT #: | 2113 |
| PRICE: | $65.00 |
| DECALS: | Five options |
| REVIEWER: | Donald Zhou |
| NOTES: | Advantages: Extremely detailed and accurate, single piece tracks, lots of options. Disadvantages: commander cupola vision ports still not clear, assembly of the ERA can be annoying, lots of crispy small parts. Tamiya Modern U.S. Equipment Set Used |
| HISTORY |
The development of the M60, naturally, was evolved from the M48. By late 1950’s, in order to counter the threat of the Russian T-54/55, which was growing like weeds out of Russia and her satellite states (if you count the numbers of copy cats like the Chinese Type-59, the T54/55 was the most produced tank ever, with some sources stating as much as 150,000 produced before production ceased in 1983), something better than the T-55 was sought. The development of this eventually led to the M60.
 The
driving force for developing the M60 occurred during the Hungarian
Revolution of 1956. During the chaos, a T54A was captured by the Hungarians
and they promptly drove it into the British Embassy in Budapest. The British
quickly “turned” the tank around as war booty before the Soviets knew what
had happened. During examination, it was quickly discovered that the British
then 84mm 20 pounder gun was unable to defeat its frontal armor. This led
the British to quickly developed their famed Royal Ordinance L7 105mm gun to
defeat the T-54/55.
The
driving force for developing the M60 occurred during the Hungarian
Revolution of 1956. During the chaos, a T54A was captured by the Hungarians
and they promptly drove it into the British Embassy in Budapest. The British
quickly “turned” the tank around as war booty before the Soviets knew what
had happened. During examination, it was quickly discovered that the British
then 84mm 20 pounder gun was unable to defeat its frontal armor. This led
the British to quickly developed their famed Royal Ordinance L7 105mm gun to
defeat the T-54/55.
Meanwhile, in the U.S., research into improving the M48 were ongoing. As the info on the captured T-54 made its way into the U.S. (not just the Hungarian one, but then also captured examples made by the Israelis during their various wars with their Arab neighbors) the improvements were quickly made into a new tank that’s an obvious evolutionary to the M48, but vastly improved to deal with the new threats.
The initial experiments included vehicles such as the T95, with a then smoothbore 90mm, an X-shaped compression ignition engine, improved rangefinders etc. However, all these improvements eventually slowed the program to a crawl, especially since the T95 proved it was not that much of an advance over the M48A2 and was eventually cancelled in 1960. To improve the situation, programs were quickly put in place to consolidate improvements and technical advances into one vehicle.
The first to set in stone was the tank’s main weapon, test were conducted from the original 90mm on the M48, firing new and improved HEAT shells, to the British L7, modified for American use, and the 120mm on the heavy M103 tank were tested. The Army prefer the larger 120mm weapon. However, due to the weapon’s massive weight, and the fact the new tank would only have one loader, maximum rate of fire was reduced to only 4 rounds a minute, unacceptable to the Army. In the end, a compromise was made and the L7, with an American produced barrel and breech was made and adapted as the M68. The 90mm, whether the original or the smoothbore version was dropped as it was felt this diameter gun had ran its course and would have a hard time dealing with future threats, especially if the opponent tanks were up armored.
 The tank
would feature a new type of armor containing both appliqued armor plates
trapped with silica implants. This composite armor would feature greater
protection against high-explosives such as HEAT rounds. However, protection
against kinetic rounds suffered. This plus maintenance issues soon cropped
up. All these factors added to increase in costs to the point in 1958, the
project was dropped and the new tank would use traditional Rolled Homogenous
Armor, RHA instead. M60 would be the last American tanks to use RHA. It’s
also the last American tank to feature a bottom escape hatch, provided to
the driver since the turret nose overhang the driver’s hatch to the point it
would be difficult for the driver to get out in an emergency. Armor would be
increased to 155mm in the hull, compared to 110mm in the M48 and host of
other improvements, such as more powerful diesel engine and better optics
were also fielded. The M60 was standardized in 1959 after a series of
developmental programs. It’s armed with a 105mm M68 gun, 155mm of armor, an
improved engine and better optics. The first series of tanks did not have
shock absorbers. These were quickly corrected since it was found the tank
jostled badly over uneven grounds without these and the first two, and the
last set of road wheels eventually would be modified with shock absorbers
and the first really serious version of this new tank was born, the M60A1.
The tank
would feature a new type of armor containing both appliqued armor plates
trapped with silica implants. This composite armor would feature greater
protection against high-explosives such as HEAT rounds. However, protection
against kinetic rounds suffered. This plus maintenance issues soon cropped
up. All these factors added to increase in costs to the point in 1958, the
project was dropped and the new tank would use traditional Rolled Homogenous
Armor, RHA instead. M60 would be the last American tanks to use RHA. It’s
also the last American tank to feature a bottom escape hatch, provided to
the driver since the turret nose overhang the driver’s hatch to the point it
would be difficult for the driver to get out in an emergency. Armor would be
increased to 155mm in the hull, compared to 110mm in the M48 and host of
other improvements, such as more powerful diesel engine and better optics
were also fielded. The M60 was standardized in 1959 after a series of
developmental programs. It’s armed with a 105mm M68 gun, 155mm of armor, an
improved engine and better optics. The first series of tanks did not have
shock absorbers. These were quickly corrected since it was found the tank
jostled badly over uneven grounds without these and the first two, and the
last set of road wheels eventually would be modified with shock absorbers
and the first really serious version of this new tank was born, the M60A1.
In fact, improvements were added throughout the tanks life, creating ever more advanced variants and others including bridge layers, combat engineer vehicles (CEV), armored recovery vehicles, and a complete failure in the M60A2 “Starship”….Supposed to be the next generation in tank development, the “Starship” featured a massive short barreled 156mm gun capable of firing the Shillelagh missile. Unfortunately, due to the electronic development of the time and the simple fact the tank was too ahead of itself, it proved to be nightmarishly unreliable and maintenance heavy and eventually, the vehicle was dropped.
As the time wore on, the tank found itself having to soldier on when replacements failed to the wayside. This was especially true of the MBT-70 project, a collaboration between the U.S. and Germany to develop a next generation main battle tank for both countries that failed miserably! The Germans would then go on to develop the very successful Leopard II MBT, the Americans of course, the M1 Abrams series. To allow time, the M60 RISE Passive, or Reliability Improved Selected Equipment and inclusion of new Passive sighting units were offered to the tank to upgrade them to modern standard. This, in conjunction with improvements made before, such as the AOS, or Add-On Stabilization systems, which allow the new tank to fire very accurately while on the move, gave the new tank a new lease on life. The production would not stop until 1983, after which some 15,000 vehicles were produced.
 Despite
the fact by 1980’s, the M1 series was introduced, the M60 remained a viable
contender on the battlefields, especially with the Marines, who refuse to
give up older equipment, so long as they work and worked well. To this end,
a whole host of other improvements were added to create the M60A3. Also,
Marines M60A1 were outfitted with Explosive Reactive Armor plates. These
tanks and their M1 replacements were quickly thrown into the fray in the
Middle East in 1990 during Operation Desert Shield, and as the Shield turned
into Storm in 1991, the M60 found itself in combat against the Iraqi best.
Overall, the Marine M60 performed very well against their Iraqi opposition,
destroying over 200 various vehicles, including 50 T-72’s. After the war,
the U.S. quickly pulled their M60 from active service, the Marines
themselves eventually were able to replace all of their M60’s on an one to
one basis with surplus Army M1A1’s, by 1997, the U.S. government declared
the M60 as redundant and began to dispose of the surplus stocks. However,
M60 is still in operation with foreign countries, these includes Egypt,
Israeli (as the radically improved Magachs), Turkey, Taiwan etc. Of these,
Egypt is the largest operator with over 1700 examples.
Despite
the fact by 1980’s, the M1 series was introduced, the M60 remained a viable
contender on the battlefields, especially with the Marines, who refuse to
give up older equipment, so long as they work and worked well. To this end,
a whole host of other improvements were added to create the M60A3. Also,
Marines M60A1 were outfitted with Explosive Reactive Armor plates. These
tanks and their M1 replacements were quickly thrown into the fray in the
Middle East in 1990 during Operation Desert Shield, and as the Shield turned
into Storm in 1991, the M60 found itself in combat against the Iraqi best.
Overall, the Marine M60 performed very well against their Iraqi opposition,
destroying over 200 various vehicles, including 50 T-72’s. After the war,
the U.S. quickly pulled their M60 from active service, the Marines
themselves eventually were able to replace all of their M60’s on an one to
one basis with surplus Army M1A1’s, by 1997, the U.S. government declared
the M60 as redundant and began to dispose of the surplus stocks. However,
M60 is still in operation with foreign countries, these includes Egypt,
Israeli (as the radically improved Magachs), Turkey, Taiwan etc. Of these,
Egypt is the largest operator with over 1700 examples.
| THE KIT |
There have been numerous M60 kits throughout the years. The first company to offer a relative modern M60 kits in 1/35th scale is Tamiya. However, as expected when it was released in the ‘70’s, the kit suffers from accuracy faults and its bottom was open due to “motoritize” disease. In 1993, the company would update the kit into the Marines M60A1 RISE Passive with ERA kit. The turret was brand new but the hull was still the 1970’s example. Academy would introduce their own version a few years later, including one with a “tank-dozer” blade. However, this kit still have problem with the very inaccurate ERA mounts and for several decades now, the best M60 in town just because unlike the Tamiya version, it at least have a bottom hull that’s not filled with holes. Now, enter Takom with their own M60A1 RISE with ERA plates.
 This new
version replaces the Academy one as the best M60 with ERA, with the AFV Club
M60A1 as the best M60 kit without the ERA.
This new
version replaces the Academy one as the best M60 with ERA, with the AFV Club
M60A1 as the best M60 kit without the ERA.
This kits beat the pants off the ancient Tamiya one and better than the Academy since it finally offers the accurate ERA mounts…Although as I found out, mounting them can be a nuisance sometimes.
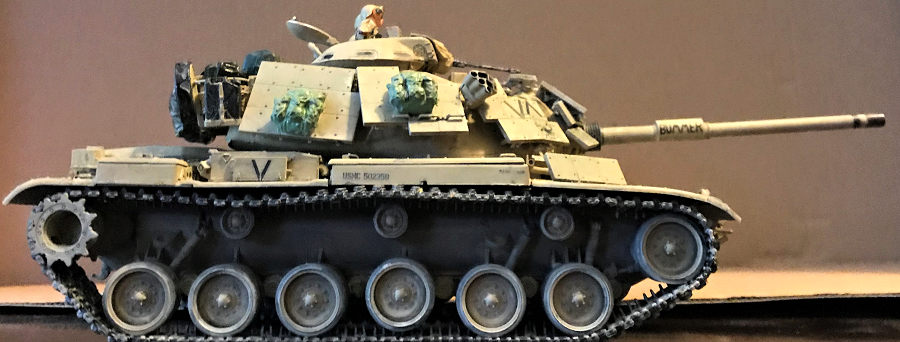
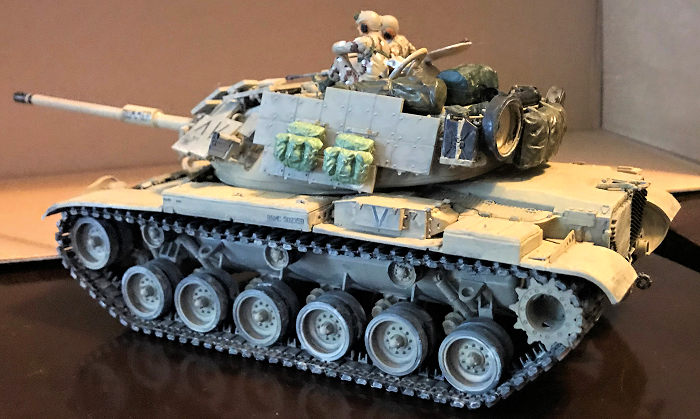
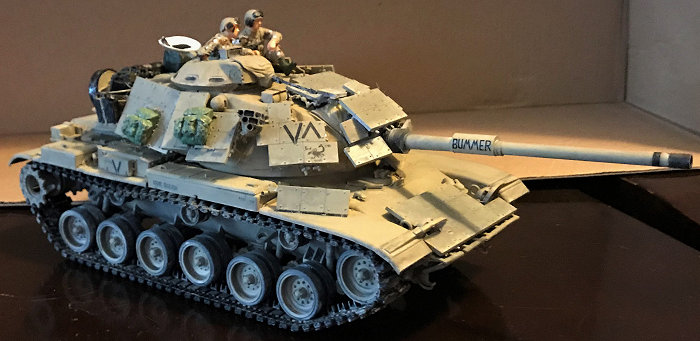
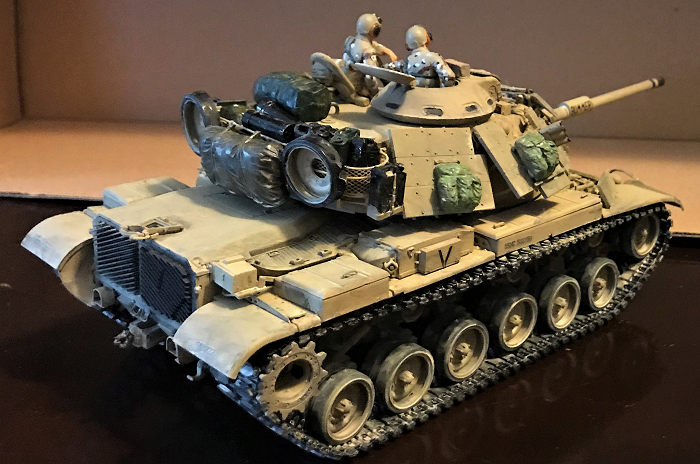
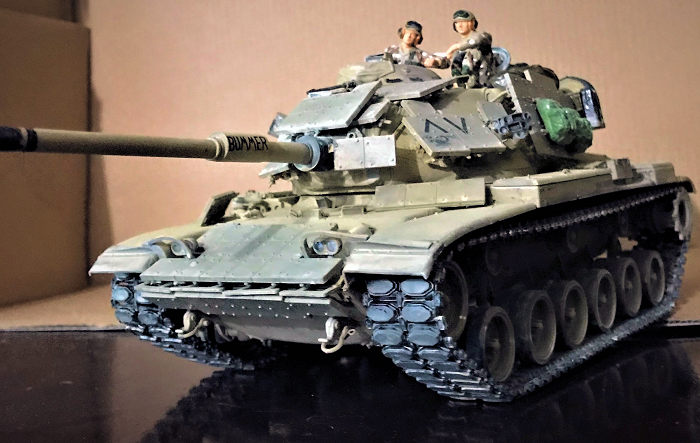
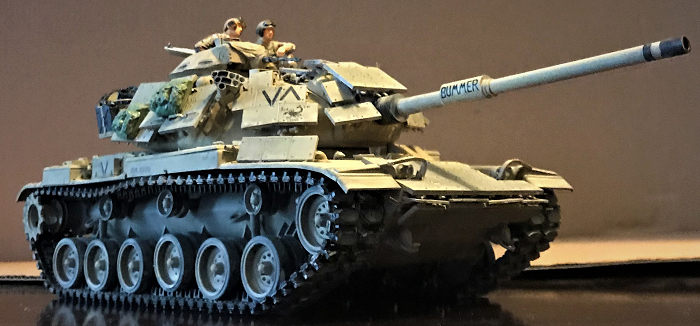
The reason this kit is so accurate is that Takom sure did their research! In fact, read the story with one Mike Mummey over at AMPS website. He actually served on an M60 with Task Force Ripper and his tank, “Bummer” is actually one of the markings in the kit. Almost make you wonder if Mike actually did help with this kit! And he had nothing but good things to say! In fact, Takom may have gone overboard with some details, such as the case with the grab handles on the side ERA’s. In order to facilitate the crew getting on and off the now slab sided tanks with ERA’s, usually, two grab handles were given with each side ERA modules. However, there is at least one photo that show at least one enterprising crew “liberated” several grab handles and place them on the ERA modules as “clothes hangers” to hang personal gears. Takom of course, included this option in the kit…even though it’s probably only THAT one specific version!
However, some details Takom still have not improved. My biggest disappointment in the whole entire thing is the commander’s cupola. The vision ports are still solid! In this day and age, that just does not cut it! However, this is still a very minor quibble. The rest of the kit offers things that the previous two kits just won’t be able too. Including various options for open or closed periscope hatches, including the driver central rotating periscope, correct mountings for the aforementioned ERA, and some accessories such as spare wheels and jerry cans etc. Overall, if you want to get a M60A1 RISE Passive w/ERA, this is the kit to get.
Four markings are offered, these markings are all tanks of Task Force Ripper, Operation Desert Storm
| CONSTRUCTION |
 Construction
begin, strangely enough, with the lower hull and all the suspension units. These
are all multi parts assemblies including volute springs, lift holes, drive
sprocket housings, rear plate works. Becareful when it comes to the suspension
shock absorbers. Which absorbers go where is not all that clear on the
instruction so pay attention to the drawings. And no, each side has their
specific parts so you can’t mix and match either. This takes a full six steps to
finish and would swallow at least over 100 parts in total. The lower hull is
completed with the wheels and sprockets. Notice the rubber rim is separate from
the wheels so you can leave the rims and paint them separately.
Construction
begin, strangely enough, with the lower hull and all the suspension units. These
are all multi parts assemblies including volute springs, lift holes, drive
sprocket housings, rear plate works. Becareful when it comes to the suspension
shock absorbers. Which absorbers go where is not all that clear on the
instruction so pay attention to the drawings. And no, each side has their
specific parts so you can’t mix and match either. This takes a full six steps to
finish and would swallow at least over 100 parts in total. The lower hull is
completed with the wheels and sprockets. Notice the rubber rim is separate from
the wheels so you can leave the rims and paint them separately.
The upper hull begin with the underside. The correct sliding driver’s hatch is assembled and should be workable if done correctly. This is where you make your first choice. All the driver’s periscopes, including the raisable central mounted one can be assembled open or closed. Since masking the periscopes would be a pain later, I took my airbrush and sprayed the relevant areas on both the hull and turret with the correct color so I don’t need to be that careful later. The clear periscope lens are inserted from the bottom afterwards. Before the needed details are put on, I put on the upper hull to the lower after the relevant ERA holes were drilled in place. This is a very nice fit. I outfitted the details later since usually, putting on the details and then join the upper and lower halves usually equal you breaking pieces off to the carpet monster! So I switched the process around. Notice here for the rear grills, the grill with the snorkeling tube is included. However, I don’t think any U.S. or Allied tanks in Desert Storm carried that so I just used the plain ones….Track assemblies are also done here. The tracks are one piece vinyl…Now some may not like this…But I do prefer this to say, six piece pesky assembly for just one piece track (my Rye Field M1A1 Abrams with the interior is almost done……The thing that got it put behind everything else are those six piece for a single track assembly!). Takom has a unique way of assembling the tracks. Rather than cement the ends together, a single metal pin, for each track is inserted into the end to connect them together, much like the real thing. Since it’s mostly black, like the real thing, I saved this for later.
 The same was
carried for the side sponsons/fenders….Rather than attaching all the tool boxes
on the side first, then try to jostle the completed articles on, and having
stuff breaking off, especially the petite handles, I put it on the hull the
first thing…Although I did assemble the relevant strengthening holder pieces so
they can be attached to the hull, to help with the strength of the fenders.
The same was
carried for the side sponsons/fenders….Rather than attaching all the tool boxes
on the side first, then try to jostle the completed articles on, and having
stuff breaking off, especially the petite handles, I put it on the hull the
first thing…Although I did assemble the relevant strengthening holder pieces so
they can be attached to the hull, to help with the strength of the fenders.
Then comes all the side tool boxes and the air filter. Each with multiple assemblies. The nastiest ones are the aforementioned handles for the tool boxes. Do becareful not to feed some to the carpet monster!
The headlights and the light guards are next. These are already sprayed in the correct colors since the lenses are clear. The next part is the first major ERA assembly. The front hull ERA holders are assembled and like everything else, are multi-piece affair. Again, becareful not to lose parts K2 to the carpet monster!
The hull ERA are now assembled. The brackets are multiple parts onto a single piece so take your time. The upper plate especially has several bracket parts. Be sure to figure which goes where since the drawing is a little too small for my tastes. The hull is finished at this point.
Turret assembly began, like the hull, with drilling out the relevant holes for all the ERA plates. Again, rather than assemble all the details, then join the upper and lower together, I skipped to that major assembly first. Then assembled the main gun onto the turret. Notice a major piece of photo-etch is attached here, namely the dust cover frame. The main cannon barrel is one piece with a two part smoke discharger. I then started to assemble the details…The only thing wrong with this is I should’ve attached the era plates first. Since I later found out getting the ERA plates on with all the holders and brackets was a major nuisance and I lost part N16, the metal riser that blocks the cupola machine gun from shooting off the searchlight. However, since by this time the searchlight was already eliminated and some M60 crew eliminate this too to clear the cupola field of fire, it wasn’t all that missed.
Next detailed assembly is the cupola. There are two
distinct choices. However, since the kit markings all are Task Force Ripper
tanks, and all of them has the machine gun dust cover for the cupola, your
choice is basically made for you. The only thing I really messed up is I pointed
the machine gun barrel too low. Raise it
 if you are
doing this. The cupola has one of the disappointment of the kit. Namely, all the
rest of the tank that needed clear parts, like periscopes, head lights etc have
them….But the cupola viewing ports are still solidly molded onto the cupola
itself…..This is a major downturn to say the least. Ohh well.
if you are
doing this. The cupola has one of the disappointment of the kit. Namely, all the
rest of the tank that needed clear parts, like periscopes, head lights etc have
them….But the cupola viewing ports are still solidly molded onto the cupola
itself…..This is a major downturn to say the least. Ohh well.
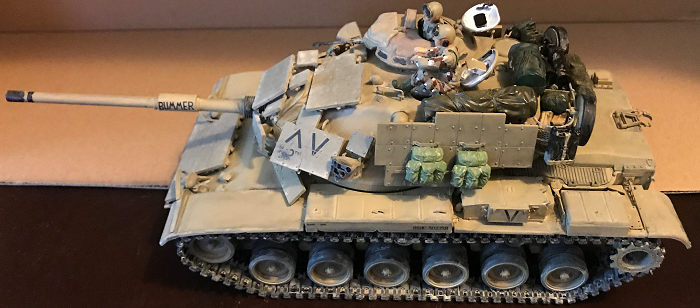
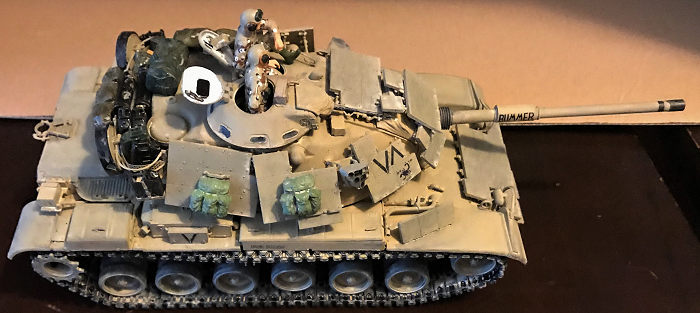
The turret bustle rack and smoke dischargers are next. Since the back turret mesh is in photo-etch, a thoughtful bending tool is provided so you can bend the straight back mesh into shape and put on the rack correctly. I use super glue for these. Two spare wheels and jerry cans are provided but I left these until final assembly.
Then comes the major pain of this kit, the turret ERA plates…There are 13 major pieces in total, and they all have their own mounting brackets, many with multiple pieces like the real thing! The end result is that you’ll be spending quite the time to do this right, and you have to do this right since if you miss the mounting, then they will not hit the correct hole on the turret and then require major surgery to complete. It’s a bit of a hassle but look really nice and much more accurate than both the Tamiya and the Academy kits. Most importantly, details such as the aforementioned grab handles on the ERA plates are included in this kit and missing in both the Tamiya and Academy version. I added slightly more than usual since crews loves to use these as “clothes hangers” to hang personal gears too. To the paint shop we go!
| COLORS & MARKINGS |
Painting is my usual fare. First coat of Testor’s
U.S. Gulf Armor Sand, then washes of jet black and cream to simulate dust. The
only major hitch is the markings I picked, Bummer, Yes, Mike Mummey’s tank…Which
I screwed in a rush and put on Genesis II markings instead, which had me fuming
and cussing to sand that off to put on Bummer……had the ERA plates in regular
Armor Sand instead. Since Mike stated that these ERA were repainted in a rush at
a port depot before being sent off, I decided to hand paint the plates to really
give it that “rushed” look and the regular armored sand does give a slight
difference in highlight to the otherwise
 rather
monotonous scheme. Then the whole entire thing, after applying the tracks, and
the markings…Which, again, later turned out to be wrong, which sent me fuming
and cussing back downstairs to my man cave to correct, were washed in my usual
way to give that sandy, worn look. The whole entire thing was then given a final
coating of “sunkiss peach” to really pop the details and hide some imperfections
on the tank.
rather
monotonous scheme. Then the whole entire thing, after applying the tracks, and
the markings…Which, again, later turned out to be wrong, which sent me fuming
and cussing back downstairs to my man cave to correct, were washed in my usual
way to give that sandy, worn look. The whole entire thing was then given a final
coating of “sunkiss peach” to really pop the details and hide some imperfections
on the tank.
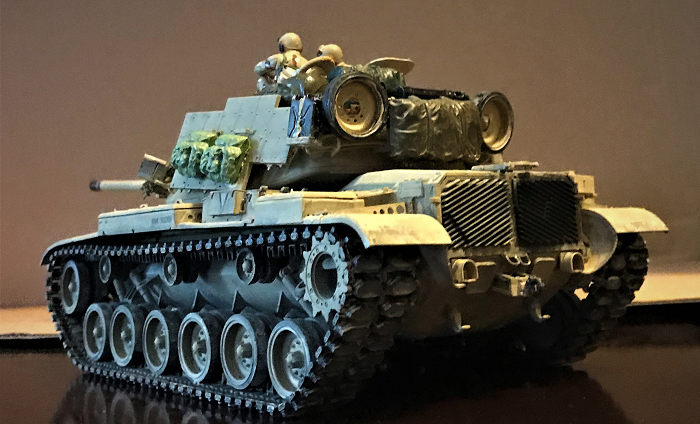
Final constructions involved putting on the leftovers such as machine gun barrel, the spare wheels and tracks. To really fill the back bustle racks and put somethings on the ERA plates, I grabbed leftovers from my Tamiya “Modern U.S. Equipment Accessory” kit and slapped them on here. Stuff includes four ALICE packs, which are hung on the side ERA “Cloth Hangers”, a tent pack, a canvas tarp, hung on the back besides the spare wheels and jerry cans. The bustle rack is filled with sleeping bags, folding beds, more jerry cans, extra machine gun ammo etc to really give the tank a busy look. This is not even fully filled as some tanks in that operation can only be described as STUFFED to the brim! Finally, digging into my ancient bag of tricks, I grabbed two Dragon U.S. Desert Storm Tank Crew figures and put them into the commander and loader hatches. With these final touches, the tank is complete!
| CONCLUSIONS |
This is slightly more involving than the Tamiya and Academy kit due to the ERA mounting holders and brackets but still not nearly as over engineered as some kits, such as Dragons. Again, if you want a Marine M60A1 RISE Passive w/ ERA, then this is the best and most accurate detailed wise kit. Academy and Tamiya can still be found on evil Bay but if you are not strapped for cash, then this is kit to go! Get some accessory kit and you can make a very accurate M60 kit indeed! And because of this kit, it got me started on 70+ years worth of U.S. Army tank development since I got Takom’s M46, M47 and Dragon’s M48. And with my completed Tamiya M4A3 Shermans, the M26 Pershing and Academy M1A2 SEP TUSK II (soon to be joined by Dragon’s M1A2 SEP, which I’ll convert to a SEP II), Trumpeter’s 1/16 M1A2, and I recently just bought Panda Hobby’s M1 Abrams and is thinking about AFV Club’s regular M60A1….I must be nuts!!!
10 December 2019
Copyright ModelingMadness.com
If you would like your product reviewed fairly and fairly quickly, please
contact
the editor
or see other details in the
Note to
Contributors. Back to the Main Page
Back to the Review
Index Page
Back to the Previews Index Page