Takom 1/35 M47 Patton
| KIT #: | 2072 |
| PRICE: | $55.00 |
| DECALS: | Six options |
| REVIEWER: | Donald Zhou |
| NOTES: | Advantages: Easy Buildup, New Tooling, good selection of markings. Disadvantages: sink marks on the tracks, A LOT of crispy small pieces, assembly of the tracks can be a hassle. |
| HISTORY |
The M47 was an evolutionary development from the M46 and then evolved to become the M48. Despite the fact the M46 was a sound tank that cured many of the faults of the M26, mainly mobility and reliability of the engine, transmission and running gears, it was always seen as a stop gap measure until a more capable tank was developed despite the M46’s success during the Korean War. The replacement of the entire M26/46 series would be the T42 medium tank. However, like so many things, the T46 eventually ran into serious development problems that saw its cost balloon out of control. Even before that, the Korean War erupted, despite the M46 showing it can manhandle the T34/85, the Army still wanted a newer tank immediately, rather than the slow crawl of the T42, especially since espionage had glimpsed a series of new Russian tanks, the T-54 which promised to be superior than any American tanks then in service, a project was quickly developed to slap on the T42’s turret onto the M46’s chassis. This would be the M47. An initial 500 was quickly ordered from the American Locomotive Company or Alco.
The M47 featured the lower hull from the M46, the
turret was bran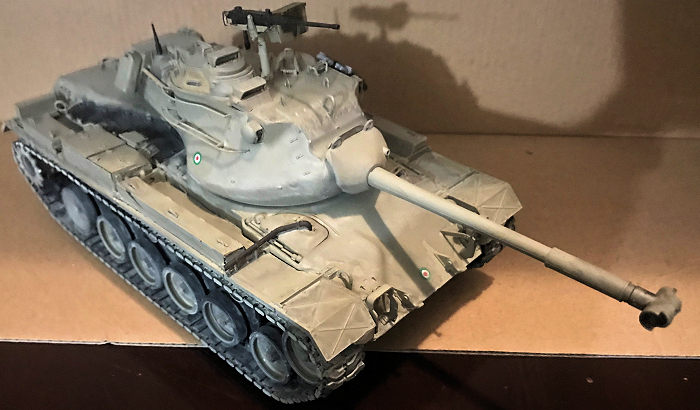 d
new, featuring the improved M36 90mm cannon with the M12 optical stereoscopic
range finder. This range finder is “coincidental”, meaning sighting units are
two units, each on the side of the turret. By triangulate the distance to the
target, it’s far more accurate than the old “straight line” range finder
(basically, the gunner have to “merge” the two pictures into one), however, it
does require far more experience to use. The nose is elongated to almost a point
and the back is also elongated until the rear is halfway across the upper lower
hull deck, giving the turret a far more and distinctive lozenge shape. Secondary
armament includes two .30 cal machine gun, one co-axel with the main cannon, the
other in the usual co-driver/radio operator station and like all American tanks,
a M2 .50 cal is mount on the roof of the turret to serve as an anti-aircraft
weapon. The M47 would be the last American tank to have a bow mounted machine
gun. In fact, improved versions of the M47 was the first to dispense with this
piece as it soon proved redundant in tank to tank fighting.
d
new, featuring the improved M36 90mm cannon with the M12 optical stereoscopic
range finder. This range finder is “coincidental”, meaning sighting units are
two units, each on the side of the turret. By triangulate the distance to the
target, it’s far more accurate than the old “straight line” range finder
(basically, the gunner have to “merge” the two pictures into one), however, it
does require far more experience to use. The nose is elongated to almost a point
and the back is also elongated until the rear is halfway across the upper lower
hull deck, giving the turret a far more and distinctive lozenge shape. Secondary
armament includes two .30 cal machine gun, one co-axel with the main cannon, the
other in the usual co-driver/radio operator station and like all American tanks,
a M2 .50 cal is mount on the roof of the turret to serve as an anti-aircraft
weapon. The M47 would be the last American tank to have a bow mounted machine
gun. In fact, improved versions of the M47 was the first to dispense with this
piece as it soon proved redundant in tank to tank fighting.
The M47 did not see service until 1952. There were plans to send it to Korea but that plan was eventually shoved since a hydraulic problem that plagued the turret was discovered, sidelining many of the new tank until the problem was licked. By then, the Army soon decided that the M46 was more than good enough to manhandle the T34/85 and sent the new tanks to Europe, always the main TOP priority for the U.S. and NATO back then. The tank would never see action in U.S. service and was quickly declared “Limited Standard” when the M48 was ready in 1953. However, it quickly entered service with many NATO country such as West Germany, Portugal, Italy etc under the Mutual Assistance Program or MAP. By 1957, the tank was declared obsolete and completely replaced by the M48 in late 1950’s. However, the tank did see service with many other nations and saw action with countries such as Pakistan. Today, the tank serves as a recovery vehicle in countries such as Iran.
| THE KIT |
For years, the M47 in model form was only available by Italerie, and its many copycats in 1/35th form, and many still consider the kits as one of the Italerie’s finest armor kits. Other like Revel (or should I say, ancient Monogram) also had M47 but in 1/32 scale. Until recently, no one bothered with another new tool kit. Not surprising consider the tank is even more of an ad hoc stop gap measure than even the M46 and was quickly gone from service just as quickly as it was in service! That is, until Takom appeared.
 The new M47
first appeared under Takom label in 2017. This is a “2 in 1” kit that offers
parts for both the early M47 in U.S. service and a M47G in German service. A
year later or so, Takom offered the M47E/M improved export kit, which is what my
kit represent (still gonna get the earlier M47/M47G kit to represent a U.S.
service one).
The new M47
first appeared under Takom label in 2017. This is a “2 in 1” kit that offers
parts for both the early M47 in U.S. service and a M47G in German service. A
year later or so, Takom offered the M47E/M improved export kit, which is what my
kit represent (still gonna get the earlier M47/M47G kit to represent a U.S.
service one).
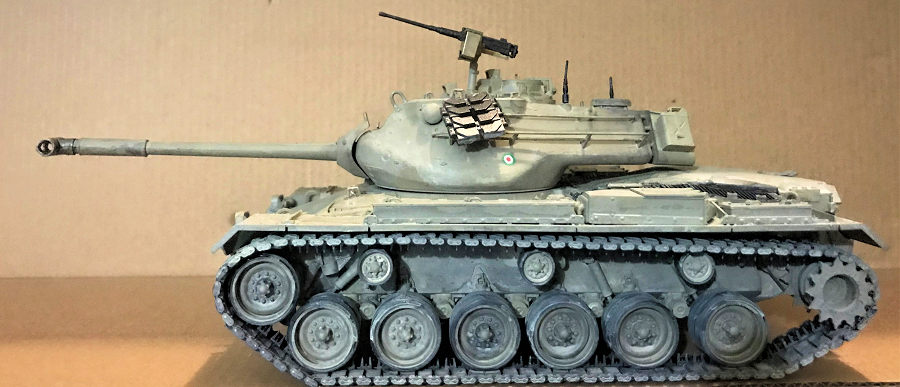
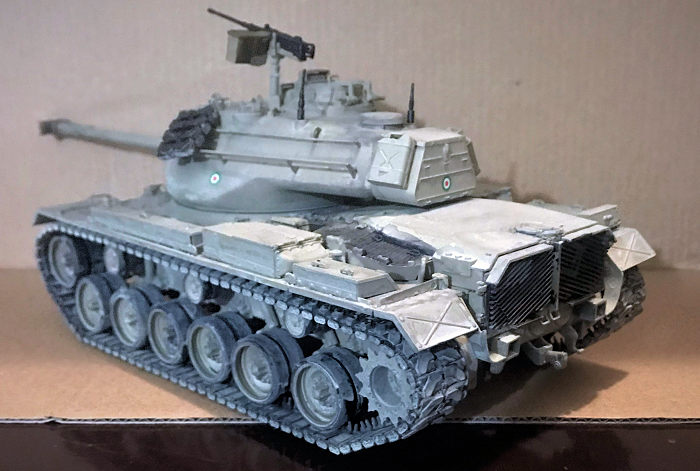
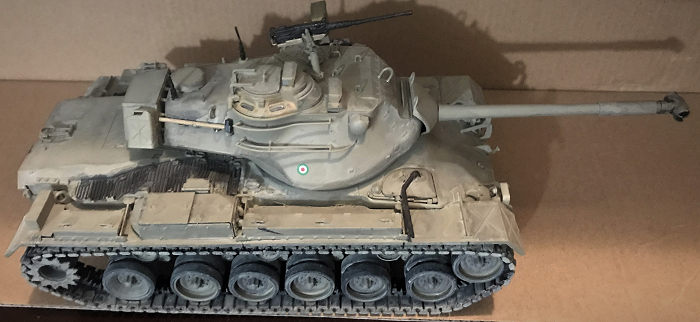
The M47E/M kit is a huge improvement over the original M47. This is mostly apparent in the lower hull, which has more in common with the later M48 and M60. The first thing it dispense with is the bow machine gun. The hatch was wielded shut and the turret exhaust pipe now exit here and the rest of the space now holds extra main cannon rounds. The rear deck has nothing in common with the M46 anymore, but copied everything from the M48, including the exhaust, which exit out of the rear end grill, and air grill on top of the upper deck and the two track tension wheels near the drive sprockets were dispensed with. This is why I also want the early M47 since the E/M is so different. But anyway, the kit is crisply molded, all the details are there and everything is correct. If you have already build several armor kits, except the couple billion part interior kits, you should have no problem with this one. Like my previous Takom M46 experience, it offers more detail than a Tamiya kit, but don’t drive you batty up the wall like an over engineered to hell Dragon’s kit, where one piece is separated to five pieces so small, you’ll lose four of them to the carpet monster and/or tracks that take 10 pieces to assemble just one link! Still however, there are several crispy pieces in the kit but you can leave those off and no one will tell the difference.
| CONSTRUCTION |
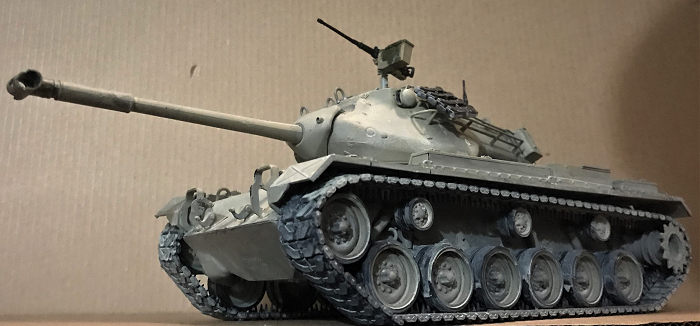
Construction begins with the lower hull running gear. Like the later M46 and M60 kit, there are a lot going on here, the arms, the upper return strollers, and the volute suspensions and the forward idler arm springs are all there. Study the instructions carefully cause it’s a jumbled mess down here and you can easily get confused if you don’t know what goes where. Once the wheel arms go on, again, Takom offers a jig that you can use to both keep all the arms even but also serve as a track assembly jig. The kit offers only the T84 plastic tracks as the M47 only saw service with those tracks but I saved them for later. Just a note though, do not, I said do not assemble on the drive sprockets on the tank until the tracks goes on or else good luck fitting the tracks on if you do!
 Upper lower
hull fittings are next. Again, the bow machine gun is gone in this version and
replaced by an exhaust pipe so use the correct hatch. The headlight section is
different between the E and M version. Since I elected to make the E version, I
followed that instead. The only mistake is that I should’ve left off the
headlight guards so as to get the headlight lenses in easier. I lost several
later and had to use Testor’s clear glue to make replacements.
Upper lower
hull fittings are next. Again, the bow machine gun is gone in this version and
replaced by an exhaust pipe so use the correct hatch. The headlight section is
different between the E and M version. Since I elected to make the E version, I
followed that instead. The only mistake is that I should’ve left off the
headlight guards so as to get the headlight lenses in easier. I lost several
later and had to use Testor’s clear glue to make replacements.
Next part, I cemented on the side fenders on first, rather than what is called in the book, putting on all the accessories first then cement it on. I left off all the grab handles until later cause those look like carpet monster food!
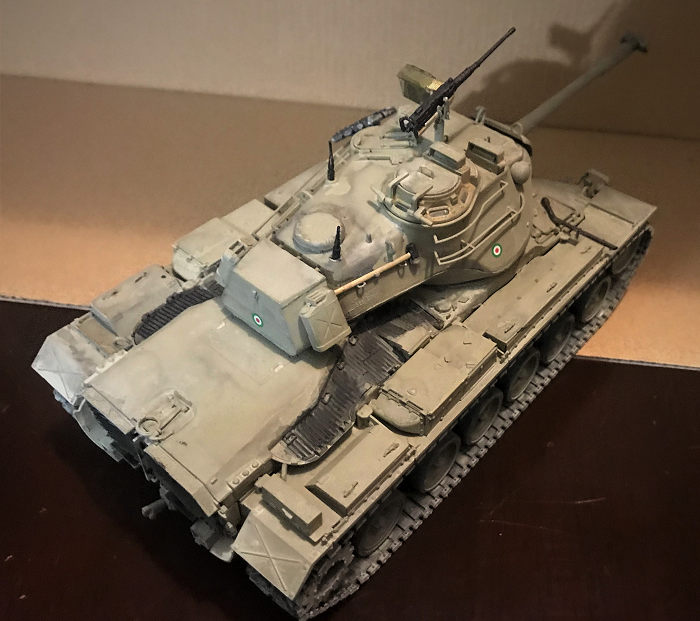
The turret is plain simple. The only things I left off are all the clear periscope lenses. The commander cupola, the hatch can be made to be open and close if you know where to cement. I only cement it shut with two tiny spots so I can pry it off later to insert the clear viewing ports underneath later. I also left off the turret side “fence” bustle racks also as I don’t want to snap them when painting. To the paint shop we go.
| COLORS & MARKINGS |
There are six markings. Two Italians and four Spanish. I chose one of the Italian version in armor sand. Now, the overall finish is armored sand but you also have to paint the Italian flag colors yourself on the barrel. The marking for this is not on the decal sheet….I just skipped this…No one can tell its missing. I sprayed the overall color on, then flat black for the tracks since its plastic in real life and then weathered in my usual way. I then also painted on the rest, such as the .50 cal etc. This is quick and rather painless since everything is very well spot up previously.
 The big
major final construction would be the tracks. Since I have an extra set from my
M46 kit, I can goof around a bit so I made some extras as spare tracks to hang
on the turret bustle rack. Next, following the instructions carefully, I
assembled on the tracks on each correct jig. Just be careful, you CAN’T just mix
and match the track pieces. As with any tanks that have torsion bar suspensions,
one set of track sag and angle is different than the other since the torsion
bars that cris-cross the interior of the lower hull are all offset from one and
the other so make sure which set goes on what side. Again, because it’s me,
getting the upper rung across the tank takes patience and some cajoling. But
since I already did it once with the M46, I know what to do now despite the
tracks breaking several times. Again, hope you did not cement on the drive
sprocket for this since its much much harder if you did. Took me two days but I
was able to get the tracks on and then weather it in the usual way.
The big
major final construction would be the tracks. Since I have an extra set from my
M46 kit, I can goof around a bit so I made some extras as spare tracks to hang
on the turret bustle rack. Next, following the instructions carefully, I
assembled on the tracks on each correct jig. Just be careful, you CAN’T just mix
and match the track pieces. As with any tanks that have torsion bar suspensions,
one set of track sag and angle is different than the other since the torsion
bars that cris-cross the interior of the lower hull are all offset from one and
the other so make sure which set goes on what side. Again, because it’s me,
getting the upper rung across the tank takes patience and some cajoling. But
since I already did it once with the M46, I know what to do now despite the
tracks breaking several times. Again, hope you did not cement on the drive
sprocket for this since its much much harder if you did. Took me two days but I
was able to get the tracks on and then weather it in the usual way.
The rest are all the clear pieces and the crispy pieces. Again, I lost several head light lenses cause I cemented on the light guard too early and had to make replacements but otherwise, it was simple. After wards, I permanently cemented on the commander’s cupola. Just becareful with all the eye hooks on the turret. Some are quite small but you do get extras. The model is finally completed when the side “fence” goes on.
| CONCLUSIONS |
 So, now that
I’m finally finished with this, I’m itching to get the M47/G kit to dole it up
as a U.S. Army piece to fit in my “70+ years of U.S. Army Tank development”
series. This is a good kit, especially since the M47 served across over 3 dozen
nations and carried all sort of markings including that one that served in the
Austrian army and was once driven by this muscle bound Austrian body builder
turned movie star named AHH-NAOOLD Sharwze something of mah jiggly……..What’s his
name…Starred as a killer robot, cyborg or is it an android from the future or
something something…..HMMMM…..But anyways…..If you really and I do mean REALLY
want to whiff it, the E/M is also a movie star in its own right since it’s
basically the German “Tigers” seen in such classic movies such as “Patton” and
“Battle of the Bulge” with very little modifications….Hrmmm……That’s actually not
a bad idea…..Get another E/M kit and dole it up in WWII German markings as a
“Tiger”? There is a thought!!!!
So, now that
I’m finally finished with this, I’m itching to get the M47/G kit to dole it up
as a U.S. Army piece to fit in my “70+ years of U.S. Army Tank development”
series. This is a good kit, especially since the M47 served across over 3 dozen
nations and carried all sort of markings including that one that served in the
Austrian army and was once driven by this muscle bound Austrian body builder
turned movie star named AHH-NAOOLD Sharwze something of mah jiggly……..What’s his
name…Starred as a killer robot, cyborg or is it an android from the future or
something something…..HMMMM…..But anyways…..If you really and I do mean REALLY
want to whiff it, the E/M is also a movie star in its own right since it’s
basically the German “Tigers” seen in such classic movies such as “Patton” and
“Battle of the Bulge” with very little modifications….Hrmmm……That’s actually not
a bad idea…..Get another E/M kit and dole it up in WWII German markings as a
“Tiger”? There is a thought!!!!
30 July 2021
Copyright ModelingMadness.com. All rights reserved. No reproduction in part or in whole without express permission.
If you would like your product reviewed fairly and fairly quickly, please contact the editor or see other details in the Note to Contributors.