| KIT #: | TAK 2117 |
| PRICE: | $ 65.00 |
| DECALS: | Nine options |
| REVIEWER: | Donald Zhou |
| NOTES: | 1995 releaseAdvantages: Extremely detailed and accurate, lots of options, some very colorful markings Disadvantages: commander cupola vision ports still not clear, some very tiny parts. P.S. Tamiya Allies Equipment Set Used. |
| HISTORY |
To say the development of the U.S. tanks, especially Main Battle Tanks, or MBT was arduous was to say the least, least of all due to machinations of men like Leslie McNair, an artillery officer who had no idea how tanks worked and proper applications of it and held on to the old obsolete mantra of tanks are for tank destroyers and tanks are only good for infantry support way too long even when the Shermans were being manhandled by German Panthers and Tigers. Even when he was killed in Operation Cobra on a “fact finding” mission, the men in his thrall still held on until General Devers went over their heads to General Eisenhower and General Marshall threatened to release the tankers plight to the press did they relent…..PROTO TYPICAL of the Army even to this day…….You can only get them to do something, ANYTHING only when it’s their own @$$&$ that are about to be set on fire! The end result was finally, the M26 Pershing, then T26E3, some 20 of them were sent over to Europe as the Zebra Mission to determine their practibility in a war time setting. The end result was General Devers put the Pershing as better than the Tiger and second only to the Panther in terms of performance, especially in terms of armor protection and firepower. What was termed as unsatisfactory, was its reliability and mobility. This was mainly due to the fact the tank used the same engine and powertrain from the M4A3 Sherman. Now, when powering the 36 ton Sherman, it proved to be reliable and gave the Sherman great mobility for the time. However, it was never counted on to power the 46 ton Pershing and both reliability and mobility suffered as a result.
After the war, the M26 was quickly reclassified as a
medium tank. In 1948, a decision was made to upgrade the Pershing’s mobility and
reliability. To this end, a new engine, the Continental AV1790-3 diesel engine
and Allison CD 850-1 cross mesh transmission designed to power vehicles more
than 40 tons was selected to power the Pershing. Originally called the M26E2
Pershing, it was later changed to the M46 Patton to commemorate the general
after his death since the changes and additions kept on piling up. Other than
the new engine and transmission, which necessitated the rear deck to be changed,
especially the muffler from the rear plate to the side sponsons, other
improvements to the hull included improved side storage compartments with hand
gr ips that
doubled as stowage hangers, a pioneer tool rack was added at the front and most
importantly, two small track tension wheels were added between the last set of
rear wheels and the drive sprockets to solve the Pershing bad habit of throwing
tracks while making tight turns.
ips that
doubled as stowage hangers, a pioneer tool rack was added at the front and most
importantly, two small track tension wheels were added between the last set of
rear wheels and the drive sprockets to solve the Pershing bad habit of throwing
tracks while making tight turns.
The turret is slightly elongated with improved ballistic protection and handrails that again, doubled as “clothes hangers”. Many M46 were later fitted with canvas dust protectors on the mantlet and an improved 90mm main gun was added with a bore evacuator. All in all, the M46 in some respects was a brand new tank and should have been the tank the U.S. Army had when the original Zebra mission started way back in February 1945!
However, eventually, the M46 did see action in the muddy hellhole that was Korea. After the T34/85 almost ran roughshod over the ill-equipped U.S. Army and their South Korean allies, any available tanks were quickly thrown in, mostly the M4 Shermans….Believe it or not, the M4A3E8 Shermans especially were very comparable to the T34/85 and in some ways superior. However, comparable does not mean totally superior and the U.S. quickly threw in the M26 to compensate. The Pershing proved to be superior in terms of protection and firepower to the T34/85 except mobility and reliability. The M46 eventually replaced all the M26 in this respect and most of the Easy Eights since the M26 problems meant it was ill-suited for the rough terrain of Korea. By 1951, all major tank engagements ended due to the North running out of tanks and kept their surviving armor well away from the superior M46. The Pattons were then used as mobile artillery pieces instead. After the war, the M46 were quickly pulled out of service. The Army always saw the M46 as a stop gap measure and always considered the T42 as the real replacement. Unfortunately, like a lot of programs, when the T42 fell flat on its face, the Army decided to bite the bullet and put the T42 turret on an improved M46 chassis. This turned out to be the M47 Patton. The M46 last surviving duty was to provide crew training for Italy, France and Belgium among others in order to facilitate and familiarize them with the Patton series of vehicles before they receive their M47’s.
| THE KIT |
The M46 was never a popular choice among model makers since it’s barely known and as an interim tank, not a popular subject. Except some toy like models, the only real serious model in 1/35 form was from Dragon. However, this was over 10 years ago and although still a good kit, is now impossible to find and evil bay is charging an arm and a leg for the survivors. Enter Takom.
Earlier this year, Takom finally released their long
awaited M46 kit and it’s a doozzie! This kit is not only an accurate M46, but
also contains more options than you can shake a stick at! Both the T81E1 metal
tracks and the T84E1 rubber tracks are provided. The second option is in the
mantlet. Both the canvas dust cover version and the standard cast v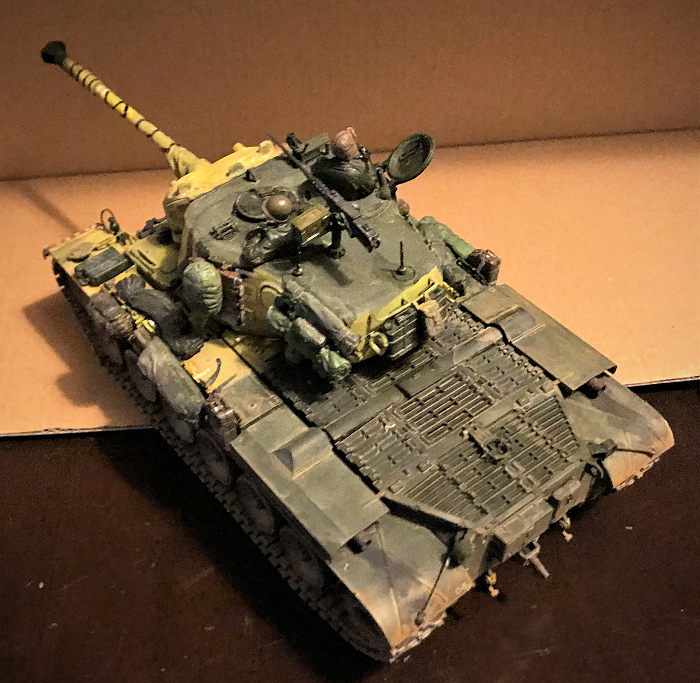 ersion
are here. Although one of the quibble is the dust cover gun barrel, which is in
two halves, rather than the standard cast one, which is one whole piece.
Finally, a real nice large search light that some late Korean War M46 carried,
to look out for Chinese midnight snoopers, is also offered. Other details such
as the drive wheels, sprockets and various tools are all crisply casted and have
no marring. The tracks are link and length affair and again, Takom provides two
jigs to both keep the suspension wheel arms level and serve as a track assembly
tool. Now, there are two ejector pin marks on the top side of every track but if
you are going to do what I’m about to do, they will not be seen after so not
necessarily a problem. Otherwise, it’s very standard affair almost like a Tamiya
kit…Almost since there are quite a few small parts to keep you on your toes. The
most obvious example are all the tiny grab handles on the rear maintenance
hatches on the rear deck. They are separate and you do have a few extras…But
after breaking my third one due to the “crispy nature” of it, I simply dropped
it. Otherwise, the only other quibble is the commander vision ports on the
commander hatch, they are still opaque plastic. I would prefer clear transparent
parts for this like Tamiya’s M4A3E8 kit but it does the job and barely distract
from this otherwise great kit, especially since 9 marking options are included,
especially 2 “Ripper Tigers” markings of the 6th Medium Tank Battalion. These
M46s, along with various Easy Eight etc were painted with tiger face motifs
since Americans heard many of the so called “Chinese Volunteers” were highly
superstitious of the supernatural and vicious animals (which is very true since
China at that time was still very agrarian and rural with many of the farmers
very low educated and still believed many ancient beliefs) and started painted
their tank faces with tiger, demon and other vicious being mugshots. Each of the
“Ripper Tiger” were similar, but filled with slight detail differences due to
the unit artist at the time. Anyway, time to break in and start!
ersion
are here. Although one of the quibble is the dust cover gun barrel, which is in
two halves, rather than the standard cast one, which is one whole piece.
Finally, a real nice large search light that some late Korean War M46 carried,
to look out for Chinese midnight snoopers, is also offered. Other details such
as the drive wheels, sprockets and various tools are all crisply casted and have
no marring. The tracks are link and length affair and again, Takom provides two
jigs to both keep the suspension wheel arms level and serve as a track assembly
tool. Now, there are two ejector pin marks on the top side of every track but if
you are going to do what I’m about to do, they will not be seen after so not
necessarily a problem. Otherwise, it’s very standard affair almost like a Tamiya
kit…Almost since there are quite a few small parts to keep you on your toes. The
most obvious example are all the tiny grab handles on the rear maintenance
hatches on the rear deck. They are separate and you do have a few extras…But
after breaking my third one due to the “crispy nature” of it, I simply dropped
it. Otherwise, the only other quibble is the commander vision ports on the
commander hatch, they are still opaque plastic. I would prefer clear transparent
parts for this like Tamiya’s M4A3E8 kit but it does the job and barely distract
from this otherwise great kit, especially since 9 marking options are included,
especially 2 “Ripper Tigers” markings of the 6th Medium Tank Battalion. These
M46s, along with various Easy Eight etc were painted with tiger face motifs
since Americans heard many of the so called “Chinese Volunteers” were highly
superstitious of the supernatural and vicious animals (which is very true since
China at that time was still very agrarian and rural with many of the farmers
very low educated and still believed many ancient beliefs) and started painted
their tank faces with tiger, demon and other vicious being mugshots. Each of the
“Ripper Tiger” were similar, but filled with slight detail differences due to
the unit artist at the time. Anyway, time to break in and start!
| CONSTRUCTION |
Construction is very standard armor offering. In fact, if you in any form or shape, build several Tamiya tank offerings, then this is basically the same.
Main construction begin with the lower hull and all
the suspension parts. All the volute springs, shock absorbers etc goes on both
sides. Again, like the M60, the suspension and shock absorbers and hydraulic
linkages are pretty complex like the real thing so study the instruction and
make sure what goes where. The suspension arms were then inserted. You can use
the provided arm check/track assembly jig to make sure all arms are even and hit
the ground at the same time. After that, all th e
wheels are made next. The tire sections are all separate from the wheel base but
I cement them on anyways. Just make sure to leave the drive sprockets and idler
wheels separate since this is critical later on. If you cement these in, it will
be impossible to assemble the tracks upper rung later if you decide to assemble
the kit my way.
e
wheels are made next. The tire sections are all separate from the wheel base but
I cement them on anyways. Just make sure to leave the drive sprockets and idler
wheels separate since this is critical later on. If you cement these in, it will
be impossible to assemble the tracks upper rung later if you decide to assemble
the kit my way.
The upper hull assembly is next. If you are careful, the bow machine gun should be operable when done.
I decided not to follow the instruction next and assembled the side sponsons to the hull first before adding all the tool boxes and the mufflers. I saved the grab handles on the tool boxes for later since these just look like carpet monster food! The hull is done at this point. Time for the turret.
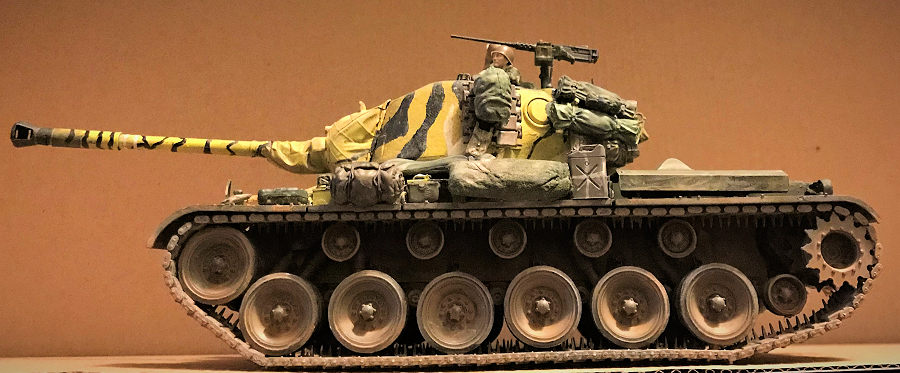
The turret has a lot of small parts. Again, I left the grab handles off until later. Since I’ll be doing a Ripper Tiger, I used the canvas dust cover option instead since photos show nearly all of the Tigers had the dust cover. The two piece main barrel came together very well…But I still gave it a pass with my red spot putty glazing. Wish it was in a single piece but ohh well. The three piece muzzle brake was fine and added on after. Turret is mostly done and came to speed very quickly. Time to go to the paint shop.
| COLORS & MARKINGS |
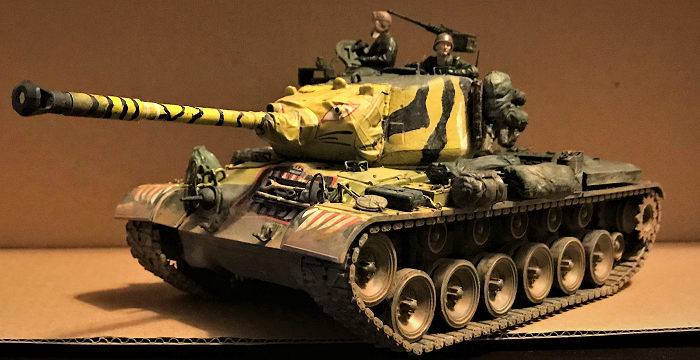
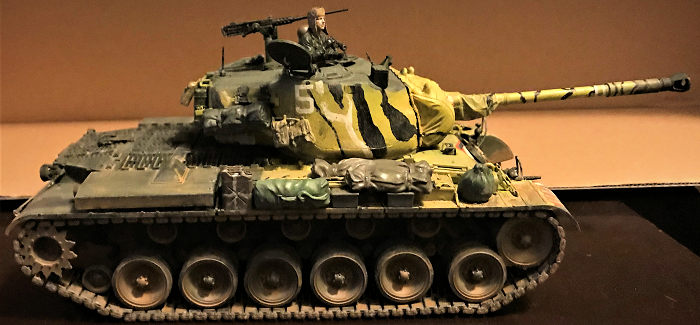
The marking I’ll be using, specifically, is the first marking in the kit. This belong to C Company, 6th battalion, 24th Infantry Division. Again, all the Ripper Tigers were generally similar, but there are quite a few detail differences. If you carefully look at the markings between the first and second one, there are subtle differences in the stripes, the gaping “jaw” and the tiger whiskers so be careful to use the correct decals! Now, like the Dragon version, only the most basic tiger face decals are provided. These include the “eyes”, the whiskers, the paws, and the gaping jaw. The yellow Tiger “body” and the black and white stripes, you gotta do them on your own! No biggie, just add more time into the whole entire construction. And also, it seems nearly all the photos of the “Ripper Tigers” were taken in the dreary Korean winter…….BuRrrrrr!!!! This is the first reaction any Korean War veteran will give you, especially that first winter where Dough Mac promised everyone will be home by Christmas before the Chinese burst like a busted dam over the Yalu so many didn’t get their winter gear! Korean winters were dirty, dreary, dusty (when it didn’t snow and/or rain), cold, and most of all, muddy! And all the photos showed the Tigers dirty and muddy, including one that slammed into a mud hole and lost the left track trying to get out and is now being hapless towed by a M26. Another one showed another Ripper Tiger trying to tow one of its buddy that also sank to its axels in mud too! The third one is the best, showing at least six Rippers and all of them dirty and muddy! So yes, this tank will be a “mud puppy”!
 One thing
the photos didn’t showed however, were the rust on these tanks! The kit does
come with a “how to” weathering cheat sheet that showed a tank that is rusted
all over to the point it belongs to a junk yard, rather than a battlefield! All
photos of the Rippers especially showed tanks that were dirty, dusty, muddy to
the beyond but never rusty! This is an important factor since like modern
vehicles, these vehicles were probably heavily maintained during any “down”
time. The crews may be lazy and not clean the tank too well, especially since
the moment it goes off road, is when the tank will get dirty again, that doesn’t
mean they will let the tank go to rust since that is a straight ticket to a
court martial! Again, especially no rust on tracks. Even if rust did occur,
especially during wet and muddy ground, any sort of movement and the rust will
be slough off either by the ground or the grinding of the tracks. So yes, my
version will be a Tiger that is dirty and muddy, but not at all rusty like it’s
been neglected! To further drive the fact this tank is in the middle of the
Korean winter, I grabbed two figures off of the Tamiya M4A3E8 Sherman “Korean
War” kit that one of my fellow IPMS mate is making. He did not want to add or do
the figures and I promptly scammed them right off of him to crew this tank
instead.
One thing
the photos didn’t showed however, were the rust on these tanks! The kit does
come with a “how to” weathering cheat sheet that showed a tank that is rusted
all over to the point it belongs to a junk yard, rather than a battlefield! All
photos of the Rippers especially showed tanks that were dirty, dusty, muddy to
the beyond but never rusty! This is an important factor since like modern
vehicles, these vehicles were probably heavily maintained during any “down”
time. The crews may be lazy and not clean the tank too well, especially since
the moment it goes off road, is when the tank will get dirty again, that doesn’t
mean they will let the tank go to rust since that is a straight ticket to a
court martial! Again, especially no rust on tracks. Even if rust did occur,
especially during wet and muddy ground, any sort of movement and the rust will
be slough off either by the ground or the grinding of the tracks. So yes, my
version will be a Tiger that is dirty and muddy, but not at all rusty like it’s
been neglected! To further drive the fact this tank is in the middle of the
Korean winter, I grabbed two figures off of the Tamiya M4A3E8 Sherman “Korean
War” kit that one of my fellow IPMS mate is making. He did not want to add or do
the figures and I promptly scammed them right off of him to crew this tank
instead.
If you read any of my armor reviews, you should know the drill now. Lots of Apple Barrel arts and crafts jet black paint, then lots of cream to symbolize dust and this time, lots of Territorial Beige and Caramel to symbolize the mud that cake to just about everyone and everything in its path. The base color is Tamiya Olive Green to once again, add a different shade on the shelf. Again, we can play the game of “just what is American Olive Drab” till the cows come home and there will never be a correct answer. After that is dried, I taped up the relevant sections, and sprayed Testor’s bright yellow from the small bottle onto the relevant sections. Next, I just use a small brush, and then hand painted the black and white stripes. Then the decals were put on so it can be slobbered alongside the tank with the weathering. I hope I achieved what the real thing looked like to a Korean War tanker, a tank that is caked to the max in winter mud on the lower section and is just plain dirty everywhere else!
| CONSTRUCTION CONTINUES |
Final constructions involved putting on the
remaining parts. The first to go are all the clear periscopes, followed by
all the crispy parts such as the covers and protectors and hand rails etc.
Then the headlights, with clear lens and protector are next. After that is
dried, the tool rack with their tools were added next. Unfortunately, the
gaping jaw decal at the front hid the location pins and I cemented the tool
rack a little high. Ohh well, most people won’t be able to tell the
difference. Next is the machine gun. The .50 cal in the kit is a little
anemic but will do the job. I cemented the holder a little wide and had to
use superglue to force the issue home. I cemented the .50 cal on its normal
pintle mount. Just be noted though, photos did show more than one of these
tanks had the Ma Deuce mounted on a secondary pintle in front of the
commander. WW II showed that after the Allies gain air superiority
especially, many tank crews added a second pintle mount directly in front of
the commander and/or loader and mounted either a .30 cal or the main .50 cal
here so the crew can use it against infantry. The M46 later had factory
standard secondary mount right above the enlarged loader periscope cover so
the crew can mount their weapon here instead and since the U.S. enjoyed air
superiority most of the time in the war, many crew took advantage by
switching the .50 cal location. The final pieces are the commander and
loader hatches. I painted the opaque vision ports black, and then posed the
hatches in the open position.
The major assembly are the tracks. Since I built the entire thing and had assembled and cemented both the top and bottom hull, the space between the sponson fenders and the top rung is very tight. What I found out is that you have to use the track assembly/suspension arm check jig to do this. You have to place idler and sprocket in place first and then assemble the top rung and the “wrap” around both the idler and sprocket. After the glue is dry, break the “wrap” parts off, yes, break them off so you can insert the top rung through. I found out one of the top volute spring interfered and trimmed those short. Once the top rung is in place, place the idler and sprocket in place so you can recement the “wrap” around. After that is dried, cement in the lower rung. Took me 6 hours to do this and in many places, I had to use daps of superglue to force the issue but it worked and worked well. It would be much easier if I had left the top and bottom separate but that would make painting a pain so I chose to cement them together to ease painting!
Also, there is a serious goof in the instructions when it comes to assemble the tracks. If you follow the instructions exactly, then the tracks direction would be reversed! Look carefully at the direction of the track cleats on the box art. Simply put, if you are facing the tank, the left cleats should be in a “Z” direction and the right cleats an “S” direction! Putting on as it called in the instruction would’ve reversed the tracks. I found out while inserting the front “wrap around” and promptly reversed the whole entire thing!
Next are the figures. The two figures are all nicely
molded based on excellent Tamiya molding. The uniforms I painted Olive Green,
with black highlights. The commander has the winter woolen fur burlap hat. This
hat is actually a very close copy of the Russian one that many Red Army soldiers
wore during the cold Russian front during WW II and later copied by the Chinese.
During that first disastrous Korean winter especially, many American G.I.s would
raid dead “Chinese Volunteers” and grab this hat to wear underneath their “pot”
helmet to protect their head and ears. An interesting story, when I first arrive
here in 1985 in D.C., we were socked in one of the more infamous D.C. winter
snowstorms. I constantly wore my woolen burlap hat to school until one of the
teacher told me he had a problem with it…..It’s not the hat, but the red Chinese
star in the middle. I later on hid it and the teacher showed up with his
own….And proudly said that the hat had accompanied him through ma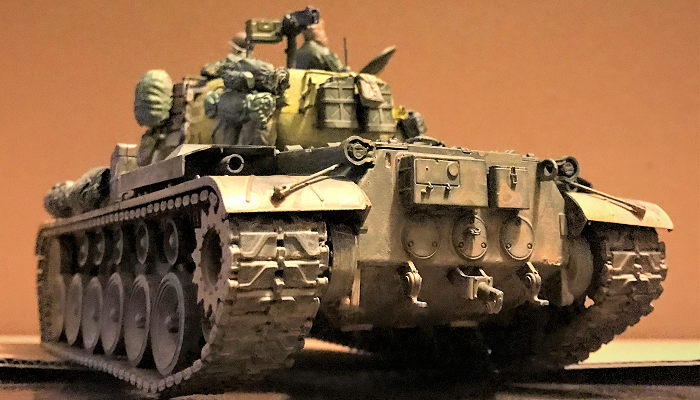 ny
a harsh Korean, Michigan, Pennsylvania, and D.C. winters! Hey, it works and
works well. The thing is bloody warm and the ear flaps, you can tie on top to
get them out of the way when it’s sunny and then let them loose, tie the strings
beneath your chin to protect your ears when they’ve had it! Unfortunately, after
a year, my head grew too large. When I went back to China for the first time
after coming here in 1992, my parents and I tried desperately to track another
one down cause Ohio winters were just as bad! To our surprise and sadness, China
don’t make them anymore! Too bad cause I still remember how awesomely warm that
thing is on winter days to and from school! Sorry, just a little side track
cause looking at that burlap hat, ahhh….So much childhood memories…..!
ny
a harsh Korean, Michigan, Pennsylvania, and D.C. winters! Hey, it works and
works well. The thing is bloody warm and the ear flaps, you can tie on top to
get them out of the way when it’s sunny and then let them loose, tie the strings
beneath your chin to protect your ears when they’ve had it! Unfortunately, after
a year, my head grew too large. When I went back to China for the first time
after coming here in 1992, my parents and I tried desperately to track another
one down cause Ohio winters were just as bad! To our surprise and sadness, China
don’t make them anymore! Too bad cause I still remember how awesomely warm that
thing is on winter days to and from school! Sorry, just a little side track
cause looking at that burlap hat, ahhh….So much childhood memories…..!
Anyways!.....The faces were painted with Testor’s flesh, base and then warm highlights. The burlap hat is dark tan, with light tan on the front eye flap. The loader has the option of either another burlap hat or the pot helmet. I chose the pot helmet instead and this is painted in Testor’s olive drab. Afterwards, they were put into place. Since the tank kit itself never offered any crews, I also had to build two figure supports in the turret to support them. This was done with some spare exhaust pipes and some plasticards.
Finally, since all American vehicles since WW II carried some accessories and stowage and all the relevant photos showed the Tigers festooned with various articles, I raided my Tamiya WWII Allied Vehicle Accessory kit to the point all they have left are jerry cans and fuel drums. The canvas covering and bags were put onto the hand grab rails. I sourced some extra duffle bags from my spare parts bin, painted them OD green, and then with the various bags and ammo cans, placed them just about everywhere. The kit does have two jerry cans, with nice molded on straps. These are painted olive drab and put on the rear of the tank. The spare tracks were painted gun metal with rust. This is the exception to no rust on tracks since if left alone, especially under the brutal Korean winter, the spare tracks tend to rust rather quickly. The duffle bag was placed in front of it to hide the fact there are two ejector pin marks there. The pin marks on the main tracks though, are well hidden by the muddy mess I slobbered on there.
After everything that were added, all of a sudden, this little Tiger looked very much alive, just like the real thing that was stuck in the cold, bitter Korean winter…Or at least I hope I had achieved that effect!
| CONCLUSIONS |
Well, another kit in my “Over 70 years of U.S. Army Tank Development History” done! Next up is the M47, which is once again, by Takom. This means, I got the M4 Sherman, the M26 Pershing, the M60, and the M1 done along with the M46! Overall, this is a real nice representation of the M46 despite the real thing’s rather short career. If you have any experiences in armor kits, especially Tamiya tank kits, then this should not surprise you and should make for a quick build, just watch out for the track assembly that’s all. That’s the only big tripping point of this kit!
1 March 2021
Copyright ModelingMadness.com. All rights reserved.
If you would like your product reviewed fairly and fairly quickly, please
contact the editor or see other details in the
Note to
Contributors.
Back to the Main Page
Back to the Review Index Page
Back to the Previews Index Page