Dragon 1/48 M1A1 AIM
| KIT #: | 3535 |
| PRICE: | $82.00 SRP |
| DECALS: | Nine options |
| REVIEWER: | Blair Stewart |
| NOTES: |
Miniart U.S. Tank Crew (#37005); Tamiya Modern U.S. Military Equipment Set (#35266) Complex, detailed kit with numerous parts including PE and metal parts and individual track links; sometimes confusing instructions |
| HISTORY |
The M1 tank is the mainstay of the US Army’s and US Marines Corps’ armored forces. Entering service in 1980, the M1 introduced several innovative features, including: a multifuel turbine engine; Chobham composite armor; computerized fire control system; separate ammo storage in a blow-out compartment; and nuclear, chemical and biological (NBC) protection for the crew.
 The M1A1 variant first saw combat in the Persian Gulf
War and subsequently in the wars in Afghanistan and Iraq. The Gulf War was where
the M1 proved superior to opposing Soviet-era T-55, T-62 and T-72 tanks.
Throughout the entire Gulf War, only nine M1A1s were destroyed – none by enemy
fire. Of the nine destroyed, seven were by friendly fire, and two were purposely
destroyed to prevent capture after being damaged. The M1A1’s sophisticated night
vision systems and rangefinders and its ability to shoot accurately on the move
proved to be major factors in the tank’s ability to engage and destroy enemy
tanks. In addition, the M1A1’s 120mm smoothbore main gun could kill other tanks
at ranges in excess of 2500 meters. This was crucial in the Gulf War because the
generation of tanks the M1A1 faced had an effective killing range of less than
2000 meters. In effect, the M1A1 could hit and destroy enemy tanks before they
were in range to use their main guns.
The M1A1 variant first saw combat in the Persian Gulf
War and subsequently in the wars in Afghanistan and Iraq. The Gulf War was where
the M1 proved superior to opposing Soviet-era T-55, T-62 and T-72 tanks.
Throughout the entire Gulf War, only nine M1A1s were destroyed – none by enemy
fire. Of the nine destroyed, seven were by friendly fire, and two were purposely
destroyed to prevent capture after being damaged. The M1A1’s sophisticated night
vision systems and rangefinders and its ability to shoot accurately on the move
proved to be major factors in the tank’s ability to engage and destroy enemy
tanks. In addition, the M1A1’s 120mm smoothbore main gun could kill other tanks
at ranges in excess of 2500 meters. This was crucial in the Gulf War because the
generation of tanks the M1A1 faced had an effective killing range of less than
2000 meters. In effect, the M1A1 could hit and destroy enemy tanks before they
were in range to use their main guns.
The M1A1 AIM (Abrams Integrated Management) is a program to recapitalize the M1A1 tank. Under AIM, the Anniston Army Depot in Alabama completely disassembles the tanks and refurbishes many of their components. They then ship the assemblies to Ohio where the Joint Systems Manufacturing Center (JSMC) reassembles the tanks to a zero time/zero miles standard. The AIM Program also serves as the venue to apply upgrades and modifications to the tanks. Finally, AIM provides a means to incorporate improved electronic line replaceable units (LRUs) that face technical obsolescence.
| THE KIT |
 Upon opening the box,
one is immediately confronted by a huge stack of parts (719). These consist of
421 gray plastic parts, 156 “Magic Track” links, 102 photo-etched (PE) parts, 31
clear styrene parts, 5 pre-bent wire parts, 1 pre-bent PE part, 1 aluminum
barrel and a length of twisted wire. At this point, the average modeler may be
tempted to close the box and put it back in the stash either to languish or to
sell on Ebay: this kit is NOT for the faint of heart. In addition, there is a
massive instruction booklet, and one must be careful to decide on the specific
vehicle that one will model. As far as I could tell, the only guide to this
process is to look at the markings’ drawings for the nine variants and try to
determine what individual accessories each carried.
Upon opening the box,
one is immediately confronted by a huge stack of parts (719). These consist of
421 gray plastic parts, 156 “Magic Track” links, 102 photo-etched (PE) parts, 31
clear styrene parts, 5 pre-bent wire parts, 1 pre-bent PE part, 1 aluminum
barrel and a length of twisted wire. At this point, the average modeler may be
tempted to close the box and put it back in the stash either to languish or to
sell on Ebay: this kit is NOT for the faint of heart. In addition, there is a
massive instruction booklet, and one must be careful to decide on the specific
vehicle that one will model. As far as I could tell, the only guide to this
process is to look at the markings’ drawings for the nine variants and try to
determine what individual accessories each carried.
The PE parts themselves are overwhelming. Many are so tiny you wonder how you will ever install them on the kit, especially if you are an old man like me. Truthfully, I just skipped some of the tinier parts when assembling the model. It was not worth the effort to install these in my humble opinion, but younger, more advanced modelers with better eye-hand coordination than me may decide otherwise.
| CONSTRUCTION |
The first steps involve assembling the road wheels, drive sprockets, suspension arms, and idler wheels to the lower hull. I opted to not glue the wheels on the suspension arms to facilitate their later painting and installation of the individual track links (the “curse” of my 67-year modeling life). Next, I glued various parts to the upper hull, including the first of PE parts: air intake screens and really small chains for the fuel caps. A tricky assembly involves the pre-bent wires for the front headlights. I had a hard time with these, and instead of Superglue, I attached them with white glue.
Upper hull assembly continues thru Step 7, at which point one adds the engine exhausts to the tank’s rear. Step 8 is the assembly of the side skirts, which I left off until the end of the assembly process.
 Step 9 is the main gun
assembly. You have a choice of either a plastic or turned aluminum gun with
instructions for each. In Step 10, I assembled the multi-piece (16!) commander’s
cupola, installed the main gun in its turret carriage, and glued the turret top
to the turret bottom. Step eleven involves the assembly of the commander’s M2
.50 cal. machine gun and the gunner’s 7.62mm M240. Both involve several PE parts
in addition to the plastic ones. Step 10 also involves assembly of the
five-piece loader’s hatch.
Step 9 is the main gun
assembly. You have a choice of either a plastic or turned aluminum gun with
instructions for each. In Step 10, I assembled the multi-piece (16!) commander’s
cupola, installed the main gun in its turret carriage, and glued the turret top
to the turret bottom. Step eleven involves the assembly of the commander’s M2
.50 cal. machine gun and the gunner’s 7.62mm M240. Both involve several PE parts
in addition to the plastic ones. Step 10 also involves assembly of the
five-piece loader’s hatch.
Steps 12 and 13 essentially complete assembly of the turret. Here, the modeler has options for an open or closed IR sight, extended or retracted and/or stowed radio antennas, and plastic or wire tow cables.
In steps 14-16, I assembled the rather delicate exterior stowage bins. These involve PE parts to replicate the mesh netting that holds equipment in the bins. In Step 17, I assembled a complex PE fuel can stowage bin, which I later had trouble attaching to the rails of the left side turret stowage bin. In Step 18, the instructions call for assembling paper MRE boxes, but I deferred these until the final stages.
In Step 19, you have the option of assembling and installing a 10-part tow bar that can be shown open or closed/stowed on the hull. Looking at many pictures of M1A1 tanks engaged in OIF, I decided to leave off the tow bar, as many OIF tanks appeared to not have them attached to the hull.
 At this point, I
returned to the dreaded “Magic Track” individual track links (did I say how much
I hate these things? No matter how careful I am, I can NEVER get them to mate up
correctly without having to do some kind of modification, and generally have to
“hide” my mods on the upper track run under a side skirt, etc. Call me unskilled
or lazy, but I still prefer the old vinyl one-piece tracks to these things). I
assembled these by gluing the now painted wheels and idlers to the tank’s hull,
and then carefully measuring the lengths I would need for the long bottom and
top runs. I marked these lengths with masking tape on my work bench, and then
clicked together enough links to meet those lengths. Once I did this, I used
Tamiya’s Extra Thin Cement to glue the links together. I then proceeded to do
the same thing with the portions of the track that rise vertically to wrap
around the drive sprockets and front road wheels. As expected, when I got to the
point where all of the links mate up, they didn’t fit. I then performed my usual
mod, in this case, by cutting the width of a link until it fit. Fortunately,
these two mods are hidden up under the tank’s side skirts. I had previously
decided to hand-paint the tracks once installed on the tank, so I did so by
using Apple Barrel acrylic matte black paint and a brush. This actually worked
out fine, so I put the lower hull aside to let the tracks dry.
At this point, I
returned to the dreaded “Magic Track” individual track links (did I say how much
I hate these things? No matter how careful I am, I can NEVER get them to mate up
correctly without having to do some kind of modification, and generally have to
“hide” my mods on the upper track run under a side skirt, etc. Call me unskilled
or lazy, but I still prefer the old vinyl one-piece tracks to these things). I
assembled these by gluing the now painted wheels and idlers to the tank’s hull,
and then carefully measuring the lengths I would need for the long bottom and
top runs. I marked these lengths with masking tape on my work bench, and then
clicked together enough links to meet those lengths. Once I did this, I used
Tamiya’s Extra Thin Cement to glue the links together. I then proceeded to do
the same thing with the portions of the track that rise vertically to wrap
around the drive sprockets and front road wheels. As expected, when I got to the
point where all of the links mate up, they didn’t fit. I then performed my usual
mod, in this case, by cutting the width of a link until it fit. Fortunately,
these two mods are hidden up under the tank’s side skirts. I had previously
decided to hand-paint the tracks once installed on the tank, so I did so by
using Apple Barrel acrylic matte black paint and a brush. This actually worked
out fine, so I put the lower hull aside to let the tracks dry.
| COLORS & MARKINGS |
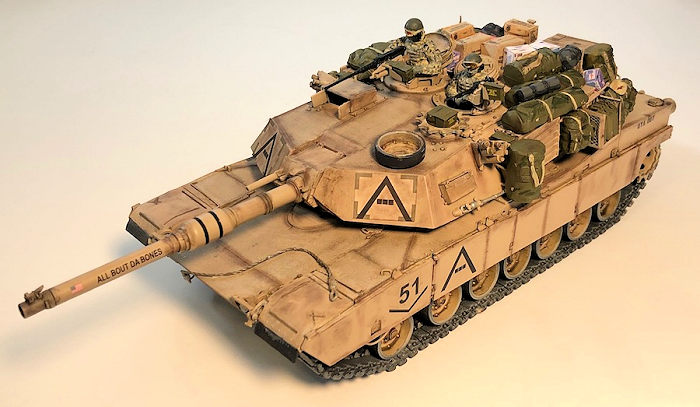
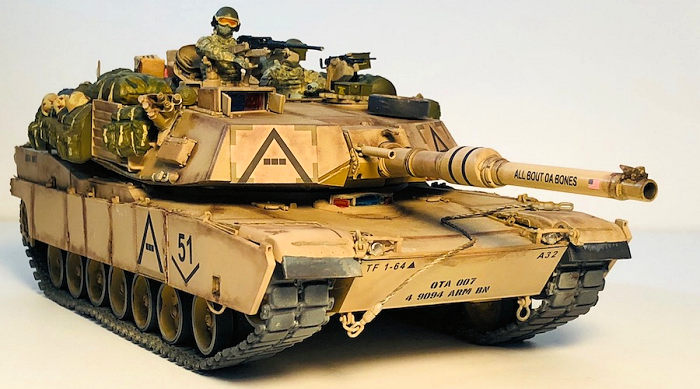
Most OIF tanks were painted Desert Tan, so I used Model Master Sand and airbrushed this color on the entire model. One problem I ran into was with the colored, sticky back paper Combat Identification Panels (CIPs) supplied in the kit. These did not match MM Sand, so I had to play around with brushing on various pastel chalks until I got a fairly close match.
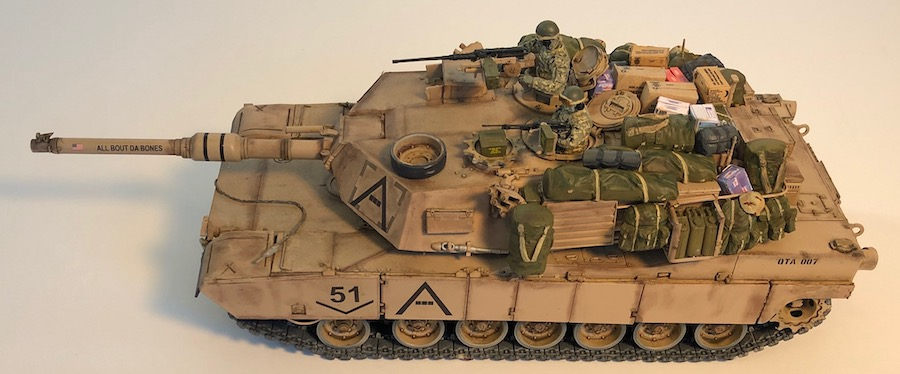
 I had decided to model
the “all about da bones” tank from the 1-64AR “Desert Rogues” of the 3rd
Infantry Division while in Iraq in 2003. I elected to install the decals by
placing a puddle of Future where the decals would go, let those dry, then slide
the decals onto those areas. I then coated the decals with Future and let them
dry.
I had decided to model
the “all about da bones” tank from the 1-64AR “Desert Rogues” of the 3rd
Infantry Division while in Iraq in 2003. I elected to install the decals by
placing a puddle of Future where the decals would go, let those dry, then slide
the decals onto those areas. I then coated the decals with Future and let them
dry.
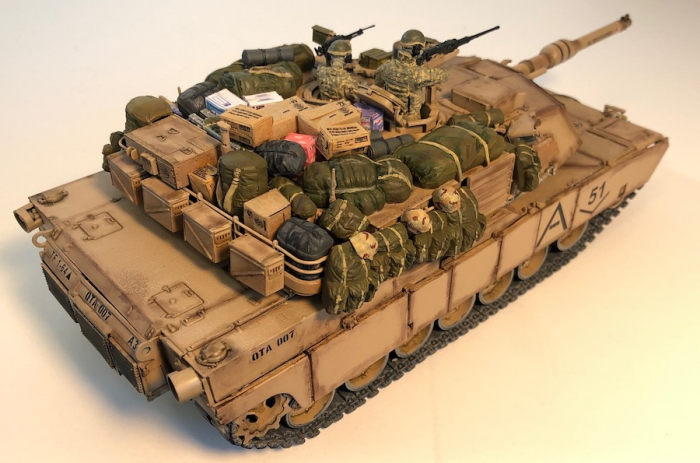
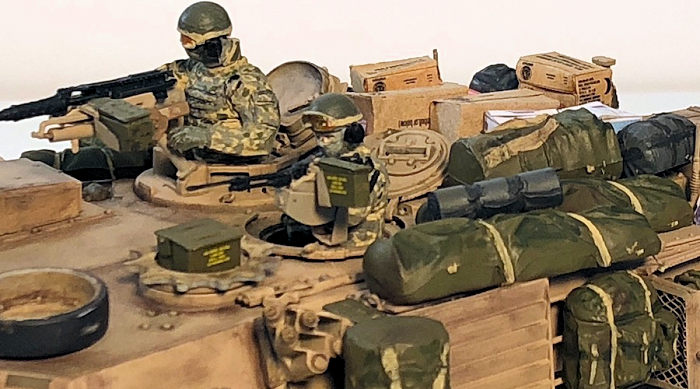
I wanted to display my tank as if it were in action, so I purchased Miniart’s U.S. Tank Crew set (#37005) and painted a commander and loader figure to ride in the turret. Since American tank crews tend to carry everything but the kitchen sink with them into battle, I hand-painted numerous pieces of personal gear and equipment from Tamiya’s Modern U.S. Military Equipment Set (#35266) and white-glued these on the turret.
I weathered the tank using ground up pastel chalks and a hobby paint brush. The final step was to spray the entire model with Testors Dullcote lacquer to seal in the pastel chalks and de-gloss the decals.
| CONCLUSIONS |
For some reason in my twilight years, I suddenly find myself building rather complex models, and this one certainly fits that bill. I’m not sure how many hours I spent on this kit, but it was a bunch! On the plus side, in his 2006 Missing-lynx.com review, Cookie Sewell – well known armor kit reviewer – said “this is as close to ‘one-stop shopping’ for an M1A1 as you will get,” and I believe he is correct. If you are into modern armor and are not deterred by complexity, small parts, and PE, I highly recommend you look into this kit.
| REFERENCES |
“M1 Abrams,” Wikipedia, worldwide web, September 2020.
“Ground Combat Systems,” Association of the US Army website (ausa.org), September 2020.
Cookie Sewell, “M1A1 AIM,” missing-lynx.com, August 11, 2006
Blair Stewart
12 March 2021 Copyright ModelingMadness.com. All rights reserved If you would like your product reviewed fairly and fairly quickly, please contact the editor
or see other details in the
Note to
Contributors. Back to the Main Page
Back to the Review
Index Page
Back to the Previews Index Page