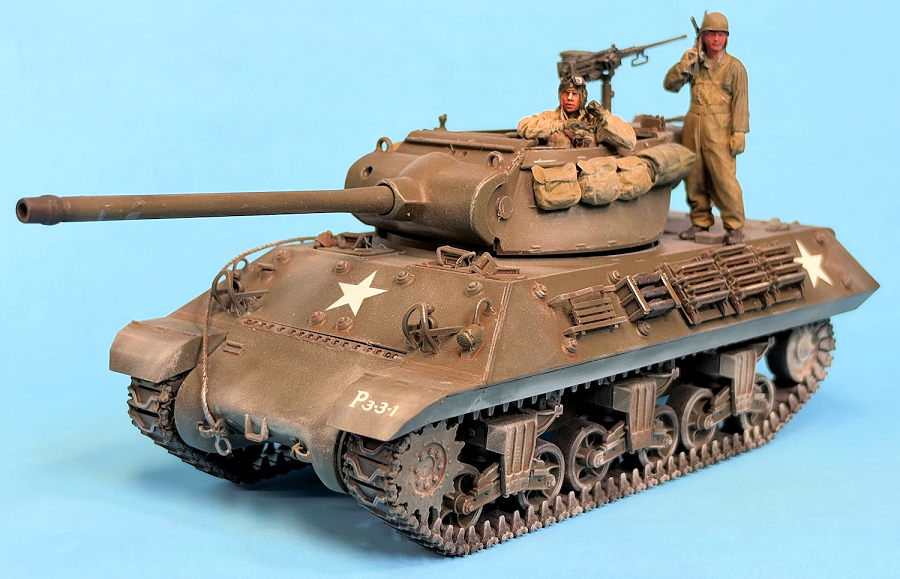
Tamiya 1/35 M36 Tank Destroyer
| KIT #: | 35390 |
| PRICE: | $41.00 |
| DECALS: | Two options |
| REVIEWER: | Blair Stewart |
| NOTES: | Good detail and simple construction; includes great tanker figure, externally stored soldier equipment, and main gun ammunition |
| HISTORY |
M36 Tank Destroyer, formally called the 90mm Gun Motor Carriage, M36, was the last dedicated American tank hunter of the war. After the early, soon obsolete M10 Wolverine and superfast M18 Hellcat, the US Army needed a more powerful gun and better armored vehicle to kill the latest developments in German tanks, especially the Panther and Tiger tanks. By September 1942, the US Army saw that the M10’s standard 75 mm, 3in M7 was only efficient at short range (500 m), and engineers were tasked to search for a new 90 mm gun, which became the M3 gun (also studied for the future M26 Pershing) to engage German tanks at combat ranges equivalent to those of the tanks themselves.
The M36 combined the hull of the M10 tank destroyer, which used the M4 Sherman's reliable chassis and drivetrain combined with sloped armor, and a new turret mounting the 90 mm M3 gun. Perched upon the M10A1 chassis equipped with a 450hp gasoline engine, the M36 employed a new open top turret and a 90mm gun.
 Conceived in
1943, the M36 first served in combat in Europe in October 1944, where it
partially replaced the M10 tank destroyer. The M36’s first action was on the
Franco-German border in October 1944, and it use continued until the German
surrender in May 1945. Over 1,000 M36s were deployed among 21 battalions and
contributed to the Allied forces’ advance on and victory over Nazi Germany. It
also served in the Korean War, where it was able to defeat any of the Soviet
tanks used in that conflict. Some were supplied to South Korea as part of the
Military Assistance Program and served for years, as did re-engined examples
found in Yugoslavia, which operated into the 1990s.
The vehicle is also known by the nickname General Jackson, or just Jackson, named after Confederate general Stonewall Jackson, which was originally assigned to the vehicle by the Ordnance Department in November 1944 for publicity purposes, such as in newspapers, but does not appear to have been used by troops in the field during the war.
With the advent of heavy German tanks such as the Panther and Tiger, the standard U.S. tank destroyer, the M10, was rapidly becoming obsolete, because its main armament, the 3-inch M7 gun, had difficulty defeating the thick frontal armor of the newer German tanks past ranges of several hundred yards. In late summer 1942 American engineers had begun examining the potential of a new tank destroyer armed with a 90mm gun and produced the prototype 90 mm Gun Motor Carriage T53, which placed the 90 mm gun in an open mounting at the rear of an M4 Sherman chassis. In August 1942, the Ordnance Department decided to produce 500 vehicles, with 3,500 more to follow. The Tank Destroyer Force objected, arguing that the design of the T53 was too rushed. The 90 mm Gun Motor Carriage T53E1 proved to be even worse, and the contract was canceled.
In October 1942, the Ordnance Department tested mounting the experimental 90 mm T7 gun into the turret of an M10 tank destroyer. General Andrew Bruce, head of the Tank Destroyer Force, objected to the project, favoring the lighter Gun Motor Carriage M18 “Hellcat”, but was ignored. Mounting the 90 mm gun was straightforward, but the gun proved too heavy for the M10's turret, and a new turret was designed with power traverse, and a massive counterweight to balance the gun. The first two M36 prototypes, designated 90 mm Gun Motor Carriage T71, were completed in September 1943. Initially, a request for full production was denied as 90 mm guns were already being studied for use on tanks, but Army Ground Forces approved the project in October 1943, and tests began. The ring mount on the left side of the turret for the .50 caliber Browning M2HB antiaircraft machine gun was changed to a pintle mount at the rear. It was decided that production vehicles would use the chassis of the M10A1 tank destroyer, as the M10A1 had superior automotive characteristics, and significant numbers were available. After testing, an initial order for 300 vehicles was issued. The T71 was designated upon standardization on 1 June 1944 as the 90 mm Gun Motor Carriage M36.
Thanks to its massive 90mm main gun, the M36 was one of the few American tank destroyers that could reliably engage all German armored vehicles, even at extreme distances.
| THE KIT |
 Tamiya
first released a kit of the M36 in 1968 (MT122) and then followed that up with
an M36 kit in 1973 (MT135). This is a completely new tool kit, released in 2025.
The kit features all new parts except for the M2 heavy machine gun (by itself a
“mini kit”) and transparent parts. Inside the box are eight plastic bags
containing nine sprues of olive-green plastic. Tamiya also includes some
poly-caps.
The molded tracks are mainly segments of various lengths except for individual links that are to be wound around the drive sprockets and idlers. The kit’s tow cable looks scale-thin and is molded in four pieces – not string or flexible vinyl.
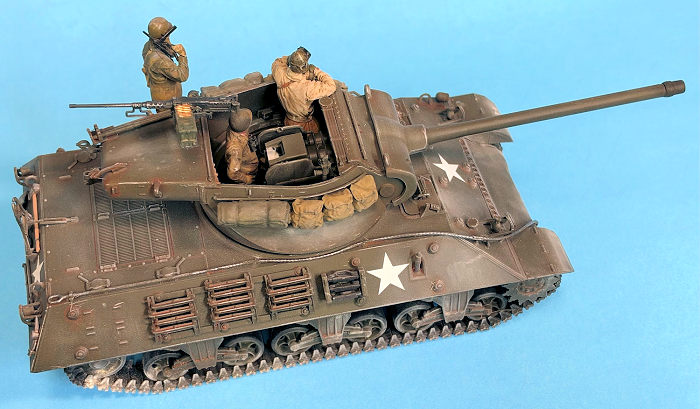
The turret interior has details such as the 90mm gun breech, shell racks, floor, bulkheads and auxiliary equipment such as gun sight and fire extinguisher. It includes parts to recreate exhaust deflector, tow hooks and tow cables. The gun barrel is molded as a single piece except for the muzzle, which is a separate part.
The 20-page instruction booklet includes 45 separate steps and includes Tamiya’s usually clear and well-illustrated assembly instructions.
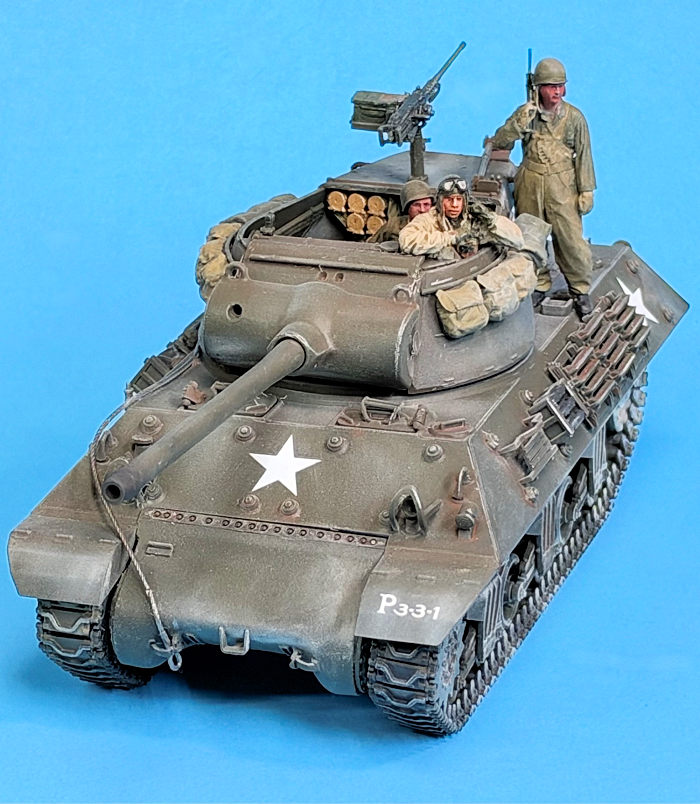
Tamiya has included a nice figure of a US tanker wearing tanker overalls and sporting a .45cal M3 submachine gun. The kit also contains various items of soldier equipment, .50cal ammo boxes, and individual 90mm shells and full rounds. Finally, the kit comes with two marking options to depict a 3rd Army vehicle in Luxembourg or a 774th Tank Destroyer Battalion vehicle in Germany.
| CONSTRUCTION |
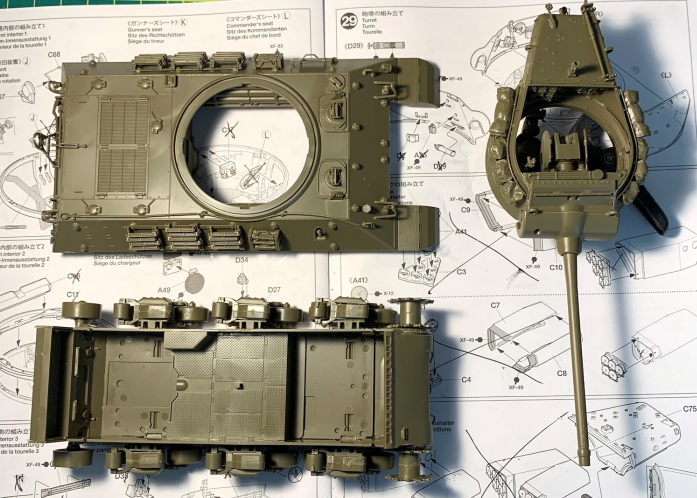
Although this is a Tamiya kit, I decided for once to study the instructions before I started the build. After my “quick” study, I began assembling the lower hull, which surprisingly is not a one or two-piece tub; rather, it consists of four pieces. After gluing various tiedowns and handles to the differential cover and rear panel, I glued these to the completed hull.
Next came the vertical volute spring suspension components, each of which includes about 10 parts. Once all six were assembled, I glued them to the lower hull. To complete the suspension and running gear, I assembled the front drive sprockets and the rear idler wheels. Note that these are then attached to the lower hull using Tamiya’s poly-caps. This will assist in aligning the individual track links when assembling the tracks.
 Once all
of this was completed, I was ready for the dreaded track assembly process. I
think Tamiya has done the best job I have found so far of creating individual
track links that fit. The tracks consist of one long top and one long bottom run
of links and a front and rear section of five links each. These are then joined
using five individual links that wrap around the drive sprocket and five that
wrap around the idler wheel. I did not glue the upper and lower track sections
together to facilitate painting them and then reattaching them to the tank.
Steps 14-19 involve assembling the upper hull. Here, Tamiya has included numerous small parts, such as auxiliary armor bosses, that require some dexterity and patience in attaching them (and I can unequivocally state that, as tedious as this is, I prefer this approach to photo etch parts!).
Steps 20-25 involve attaching additional parts to the exterior of the upper hull, including fuel tank filler caps, grousers, various tools, and the five-part hatch covers. As usual, I attach the tools and exterior equipment at this stage and hand-paint them later.
Steps 26-29 are for assembling thew turret. Like the lower hull, the turret is not a single molding but two halves that are glued to the lower turret ring. Interior parts include the loader, commander and gunner seats, the traverse unit, the panoramic telescope and the interphone reel.
Steps 30 and 31 include the assembly of the shell racks and attaching them to the turret counterweight. I then glued the counterweight to the turret.
In Steps 34-37, I assembled the 90mm main gun and prepared to attach it to the turret. Here, I ran into a slight problem. I had a hard time aligning the gun with the glue points on the front of the turret. After gluing and then removing it several times, I finally got it in a position that I thought was correct. I then glued on the turret top parts and then glued the muzzle to the gun barrel and mounted the assembly onto the turret. I finished the turret by gluing on lots of hooks and small parts to the turret counterweight, as well as parts C14 and C15, which are two very thin grab rails that mount to the sides of the turret.
Steps 42-44 involve assembling the nicely done M2 .50cal machine gun that is then mounted on top of the turret counterweight.
Tamiya includes a full set of equipment (i.e., packs, bedrolls, etc.) that can be attached to the grab rails on the sides of the turret. Also included are four empty 90mm shells, four full 90mm rounds and two .50cal ammo boxes.
| COLORS & MARKINGS |
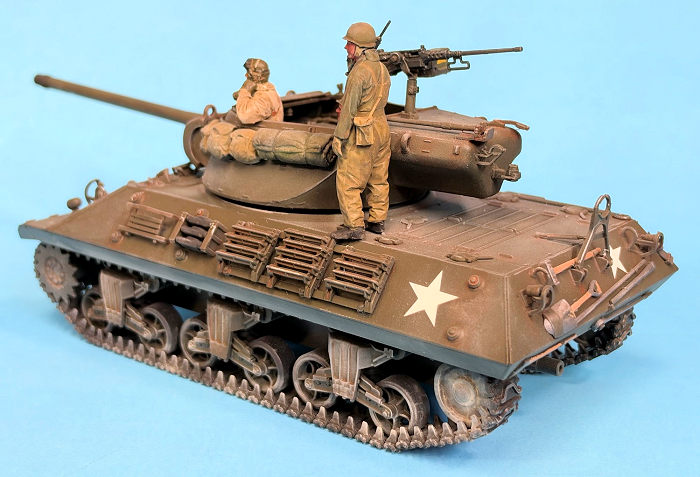 I first
airbrushed the entire model with Tamiya flat black. I then covered the entire
model in Tamiya olive drab. Details were picked out and the kit was drybrushed.
The decals were thin and very good to work with. I sprayed the entire tank with
rattle-can clear gloss prior to attaching the decals.
Once the decals dried and the clear gloss coat was still intact, I began to lightly weather the vehicle. I first covered the entire vehicle with a thin wash of burnt umber oil paint. I then dabbed on various shades of ground-up chalk to simulate road dust and other dirt. I used a silver pencil to highlight worn areas on the tank’s metal surfaces. Finally, I sprayed the overall tank with Testors Dullcote to fix the chalk to the vehicle’s surfaces and give the vehicle an overall flat finish.
| CONCLUSIONS |
This is a highly detailed, easily assembled armor kit. Some of the parts are quite small, but personal kudos to Tamiya for molding these parts rather than including them as photo etched parts. If you haven’t tried one of these kits, I recommend you pick one up and give it a go. You might be pleasantly surprised with the results!
| REFERENCES |
M36 Jackson (1943), Tank-AFV.com, October 2026.
M36 Tank Destroyer, Wikipedia, October 2026.
Blair Stewart
19 October 2026
Copyright ModelingMadness.com. All rights reserved. No reproduction in part or in whole without express permssion from the editor.
If you would like your product reviewed fairly and fairly quickly, please contact the editor or see other details in the Note to Contributors.