| KIT #: | 4200 |
| PRICE: | $45.00 |
| DECALS: | Four options |
| REVIEWER: | Donald Zhou |
| NOTES: | Advantages: Good details, easy build, lots of accessories. Disadvantages: details generally soft, rubber band tracks, no interiors. P.S. Same exact kit as the Italeri kit that came out in the 1990’s. |
| HISTORY |
The M109 was originally developed to replace the ancient M44 in the 1960’s. Previously, all self-propelled howitzers had open top and built on hulls adapted from other vehicles. The M109 program went a long ways to solve these problems. The first and foremost is a turret would be developed to offer all around protection for the crew. Previously, all vehicles had open top. Even though artillery usually stay well back from the front lines, meaning they usually don’t suffer from direct fire, it still left the crew at the mercy of the elements. The closed turret not only provided good protection, but also shielded the crew from the weather, which improved overall performance. The turret could rotate, but only some 17 degrees to the left or right to facilitate aiming, not overall 360 degrees. The vehicle has seven road wheels, with the engine in the center and to the right, with a small space at the left for the driver in order to clear the entire rear for the fighting compartment and shell storage space. Originally, the M109 had a crew of six, driver, commander, gunner, and three loaders (with the driver doubling as a fourth) and was armed with a M126 155mm cannon. This cannon had a 23 caliber length and a tell-tale extremely large center bore evacuator. By the time the M109A1 came online, the cannon was replaced by a 36 caliber length M185. Crew and the rest remained the same. These were eventually built to the A2/A3 standards.
The next major improvement is the A4, which featured improved maintenance performance, aiming devices and NBC systems.
 The next major overhaul is the A6. This version is basically a total overhaul
of the previous M109 versions into nearly a completely new vehicle. The first to
improve is the armor with running gears from the Bradley fighting vehicle, then
next is the overhaul of the drive train and engine and rebuilt them to standard.
A new M284 cannon on a new mount was also added. Crew were dropped from 6 to 4
due to the addition of semi-automatic loading system with better ammo loadout
that increased stored ammo from 36 to 39 rounds. Also improved was the gun lock
at the front. Previous version were all manual, meaning the crew had to come out
of the vehicle in order to lock the barrel to its gun lock. The new version
featured an automatic system that the crew could lock the gun barrel from inside
the vehicle. Other major revamp include the fire control system from analogue to
digital fire control system with INS and GPS navigation and aiming. Overall, the
A6, now named “Paladin” can be considered a whole new vehicle and several
generations ahead of the previous ones. Currently, the A6 is now being replaced
by the A7 (previously the A6 PIM, or Paladin Improvement Program) and the
replacement of the M109 is in development as the M1299, basically a M109 chassis
but with a huge 58 caliber length cannon with an improved rocket assisted
projectile.
The next major overhaul is the A6. This version is basically a total overhaul
of the previous M109 versions into nearly a completely new vehicle. The first to
improve is the armor with running gears from the Bradley fighting vehicle, then
next is the overhaul of the drive train and engine and rebuilt them to standard.
A new M284 cannon on a new mount was also added. Crew were dropped from 6 to 4
due to the addition of semi-automatic loading system with better ammo loadout
that increased stored ammo from 36 to 39 rounds. Also improved was the gun lock
at the front. Previous version were all manual, meaning the crew had to come out
of the vehicle in order to lock the barrel to its gun lock. The new version
featured an automatic system that the crew could lock the gun barrel from inside
the vehicle. Other major revamp include the fire control system from analogue to
digital fire control system with INS and GPS navigation and aiming. Overall, the
A6, now named “Paladin” can be considered a whole new vehicle and several
generations ahead of the previous ones. Currently, the A6 is now being replaced
by the A7 (previously the A6 PIM, or Paladin Improvement Program) and the
replacement of the M109 is in development as the M1299, basically a M109 chassis
but with a huge 58 caliber length cannon with an improved rocket assisted
projectile.
In operation, for sustained firing operations, the M109 usually operate with a M992 fire support vehicle that carries more ammo and charges to support the M109.
| THE KIT |
I got this kit last year. Yeah, when I was young, I actually built the M109A3
version from Italeri. This is basically the Italeri’s M109A6 under Tamiya’s
boxing after Tamiya bought out the molds (this also includes the M107) from
Italeri. In fact, on the box art, right below on the right hand side, the
Italeri name is also printed. The original M109A6 was built by
Rogers Meyer. So, to understand what the kit is all about, you can read that
review. Tamiya, however, has dated this kit to an “Iraqi War” version by adding
a sprue from the U.S. “Modern” Equipment Set….Modern in quotations cause while
released in 2003, it was modern, but now, not so. However, it is still accurate
for what it represent. Then a sprue from Tamiya;s M2 Bradley “ODS” kit
 was
thrown in as well so you can use the spare wheels, tracks and the two crew
figures since with the A6, the running gear is adapted from the M2 to have
commonality and save logistic headaches. You can easily tell because the M2’s
main 25mm cannon fluted barrel is on this sprue.
was
thrown in as well so you can use the spare wheels, tracks and the two crew
figures since with the A6, the running gear is adapted from the M2 to have
commonality and save logistic headaches. You can easily tell because the M2’s
main 25mm cannon fluted barrel is on this sprue.
Other than that, the kit is the same as the Italeri kit from the 1990’s. Kit detail is generally good but not quite up to modern standards. Some details are soft but under weathering, will look more than up to speed. The accessories are very welcome as modern U.S. vehicles are usually festooned to the brim (and sometimes more) with all sorts of equipment and gears. The only thing missing though, is the interior so you can only build this thing as on the move, and not in the firing position. Oh well, I guess it’s not missed since including the interior will rack the price of this kit at least double if not more. If you really want an interior, third parties do make them. However, they are mostly for the Italeri version so you have to track them down. I however, will just stick what’s in the box.
| CONSTRUCTION |
Construction begins with the lower hull and the running gears. Nothing to say here since it’s simple and easy for any armor maker. Save the tracks for later. The rear plate though, do have some details. I cemented the big rear door shut since there is no interior details. The two big side shovels though, are made to be moveable so becareful with the cement.
 Afterwards, the side sponson armor and the upper hull are added next. You
have to remove some of the bolts off for version “C” but it hardly matters since
if you hang various accessories here, the bolts will be covered up. The driver
hatch can be made movable but since I will not use the driver, I cemented it
shut.
Afterwards, the side sponson armor and the upper hull are added next. You
have to remove some of the bolts off for version “C” but it hardly matters since
if you hang various accessories here, the bolts will be covered up. The driver
hatch can be made movable but since I will not use the driver, I cemented it
shut.
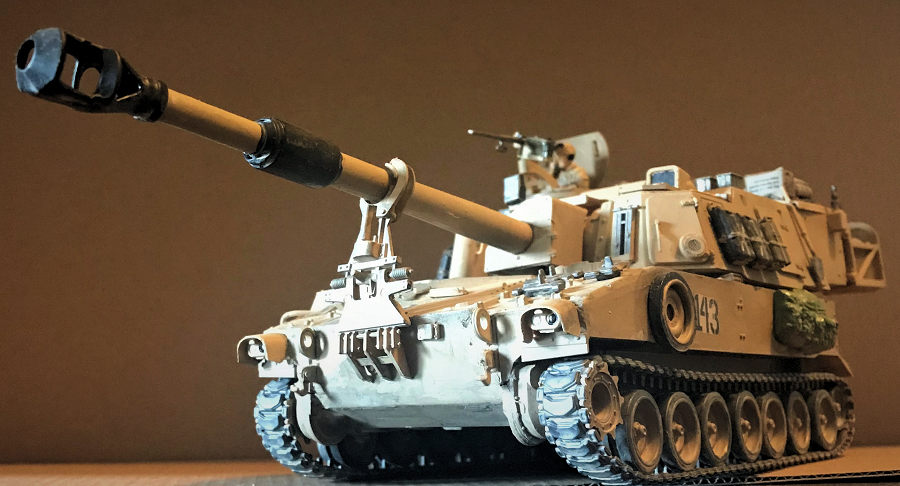
A lot of upper hull accessories are added now. Again, the gun travel lock can be made movable so becareful with the cement. Notice for version “C”, two side mounted CIP, Combat Identification Panels are added. These are not seen for version “A” or “B”, The hull is basically done at this point. Time for the turret
Turret construction begin with the main cannon. The breech is included but since it will not be seen, I didn’t color it. This is then trapped between parts C78. The instruction says do not cement these parts but as you about to see, it’s redundant. The upper and lower turret parts are now cemented, trapping the breech. The barrel is then added. Notice it’s in two halves. Again, the original molding was long before slide mold technology so you just have to swallow the fact. However, there are no seams or cracks and a simple pass with my red spot putty and some sanding and a perfect round barrel will result. Unlike the Italeri version though, before you insert the barrel in, notice a photo-etch is inserted first. I completely missed this step so it’s not there. So, do becareful here! I saved all the accessories for later.
The big ammo storage box is added next. Simple assembly. Again, save the accessories for later.
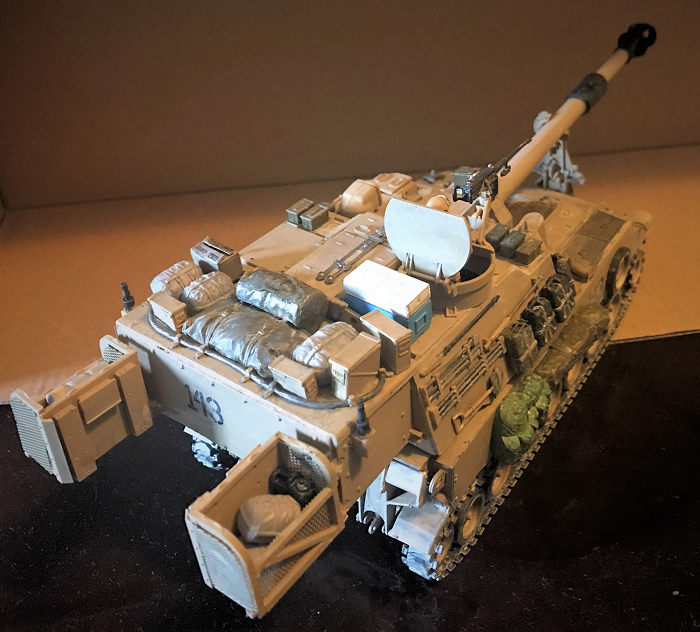
 After various accessories, the next major assembly are the two turnable
stowage containers. These have photo-etched mesh with them, replacing the black
flexible mesh on the Italeri version…Thank goodness. These are sharper and have
far more detail…Just becareful with superglue! Now, there are two positions you
can cement these baskets. The first is against the side hull. The other is swung
out behind the turret. I chose to cement these behind the turret, as if the
vehicle in traveling on deployment and the crew swung them to get them away from
the dusts that gets thrown up.
After various accessories, the next major assembly are the two turnable
stowage containers. These have photo-etched mesh with them, replacing the black
flexible mesh on the Italeri version…Thank goodness. These are sharper and have
far more detail…Just becareful with superglue! Now, there are two positions you
can cement these baskets. The first is against the side hull. The other is swung
out behind the turret. I chose to cement these behind the turret, as if the
vehicle in traveling on deployment and the crew swung them to get them away from
the dusts that gets thrown up.
The commander hatch was assembled next, followed by the panoramic aiming device. Here, notice part C145 gets added to the top of the barrel and the lift device. On the real thing, this dust protector protect the interior from the elements and have a soft canvas cover so the barrel could lift up and down. Here, it is solid plastic. After adding this piece, forget about the barrel ever being able to be raised. If you want to make this thing in the firing position, you must find a way to replace this part.
Generally, the vehicle is done at this point. To the paint shop we go!
| COLORS & MARKINGS |
 I chose marking one. All three markings are in U.S. Desert Armor Sand since
this is an “Iraqi War” kit. Like always, I sprayed the whole entire thing with a
coat of Testor’s U.S. Armor Gulf War Sand, then heavily washed with Apple Barrel
Jet Black and Tamiya Flat Black, before a second coat gets sprayed on. This was
sprayed to various accessories such as spare wheels etc. Then Cream was heavily
diluted onto the vehicle to represent sand that get caught everywhere in the
Arabian desert. Flat Black and Smoke were then diluted into the various grills
and exhaust ports. The road wheels were painted in desert sand and then black
rims and then the tracks added so all can be heavily weathered with the
techniques above. Overall, again, I hope to achieve the look of a heavily used,
but NOT junked vehicle.
I chose marking one. All three markings are in U.S. Desert Armor Sand since
this is an “Iraqi War” kit. Like always, I sprayed the whole entire thing with a
coat of Testor’s U.S. Armor Gulf War Sand, then heavily washed with Apple Barrel
Jet Black and Tamiya Flat Black, before a second coat gets sprayed on. This was
sprayed to various accessories such as spare wheels etc. Then Cream was heavily
diluted onto the vehicle to represent sand that get caught everywhere in the
Arabian desert. Flat Black and Smoke were then diluted into the various grills
and exhaust ports. The road wheels were painted in desert sand and then black
rims and then the tracks added so all can be heavily weathered with the
techniques above. Overall, again, I hope to achieve the look of a heavily used,
but NOT junked vehicle.
| FINAL CONSTRUCTION |
 There are still a lot left, namely, all the accessories. The duffel bags and
ammo cans were painted olive drab, various tow cables, tracks, ax heads,
shovels, gunmetal. The gas jerry cans in primary color, water cans in black with
desert straps. Sleeping bags, sleep rolls were painted grey, cots, olive green
with silver legs, the ALICE packs painted in my own mixture of OD Green and
finally, the canvas tarp and large tent bags were painted Olive Drab and then
all were weathered in the same manner above.
There are still a lot left, namely, all the accessories. The duffel bags and
ammo cans were painted olive drab, various tow cables, tracks, ax heads,
shovels, gunmetal. The gas jerry cans in primary color, water cans in black with
desert straps. Sleeping bags, sleep rolls were painted grey, cots, olive green
with silver legs, the ALICE packs painted in my own mixture of OD Green and
finally, the canvas tarp and large tent bags were painted Olive Drab and then
all were weathered in the same manner above.
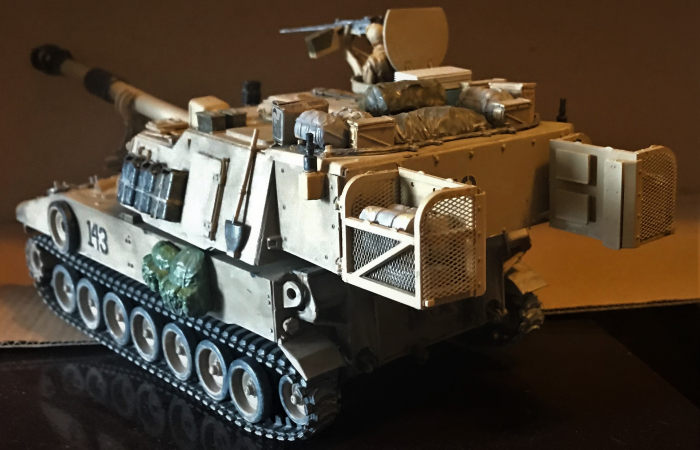
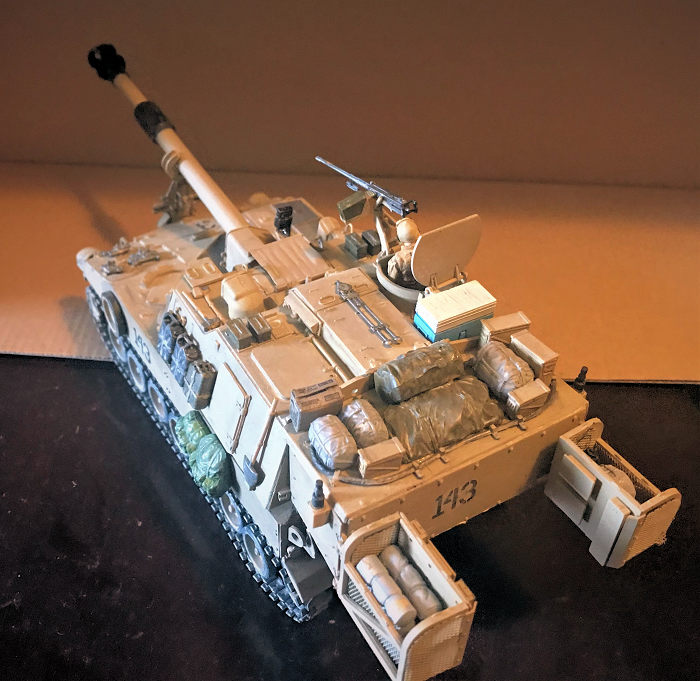
Time to put these on. The .50 cal and its tripod was put in the right place. Then the ALICE packs, with the spare wheel were hung on the side, which covered the bolts with the right also containing the tent pack. The .50 ammo cans and jerry cans were also put in the right place as called for the instructions. Next is the tow cable. Once put on, various stuff like the canvas tarp, sleeping bags, ruck sacks, MRE boxes etc were thrown on it. For the two stowage containers, all sorts of sleeping cots, bed rolls and sacks were thrown in there for a good measure. For good added measure, I stripped a cooler from my Rye Field Model M1A1 kit and added on here for. It’s directly behind the commander.
Speaking of the commander, I grabbed him, assembled him, and painted in the usual manner with desert tan uniform, flesh faces and black microphone. He’s then cemented into the open hatch. Model done!
| CONCLUSIONS |
Simple, easy to make and plenty of accessories. This project should keep a modeler with some experience on their toes but still plenty easy enough to be enjoyable. In fact, I’m seriously thinking about Panda Hobby’s M019A7 to complete out this series since it looks like a tank, but it certainly don’t act like one! High Recommended!
21 A
pril 2020
Copyright ModelingMadness.com If you would like your product reviewed fairly and
fairly quickly, please
contact
the editor
or see other details in the
Note to
Contributors.
Back to the Main Page
Back to the Review
Index Page
Back to the Previews Index Page