
Tamiya 1/35 SAS Jeep
| KIT #: | 35033 |
| PRICE: | £9-99 |
| DECALS: | None required |
| REVIEWER: | Frank Reynolds |
| NOTES: | OOB |
| HISTORY |
 It is said that the
title of the Special Air Service was simply conceived to confuse the enemy
and disguise the true purpose of a small specialist unit that was intended
to carry out unsupported overland raids in the North African Desert against
enemy logistics bases and lines of communication. It was formed in July 1941
under the command of David Stirling, a career Scots Guards officer who had
volunteered for Commando duties in 1940.
It is said that the
title of the Special Air Service was simply conceived to confuse the enemy
and disguise the true purpose of a small specialist unit that was intended
to carry out unsupported overland raids in the North African Desert against
enemy logistics bases and lines of communication. It was formed in July 1941
under the command of David Stirling, a career Scots Guards officer who had
volunteered for Commando duties in 1940.
Originally known as L detachment of the Special Air Service Brigade the unit initially consisted of just five officers and 60 other ranks. The SAS became the subject of myths and legends and still exists in the 21st Century as part of the United Kingdom Special Forces.
| THE KIT |
 This is a simple
affair consisting of just three parts frames in desert tan plastic,
reasonably crisply moulded to a standard that belies the kit’s 45 years.
Essentially free from flash, a few of the parts had hard edged moulding
lines that required brief attention with a scalpel blade and sanding stick,
but nothing major. There are 128 parts, of which 74 are for the figures and
accessories.
This is a simple
affair consisting of just three parts frames in desert tan plastic,
reasonably crisply moulded to a standard that belies the kit’s 45 years.
Essentially free from flash, a few of the parts had hard edged moulding
lines that required brief attention with a scalpel blade and sanding stick,
but nothing major. There are 128 parts, of which 74 are for the figures and
accessories.
The instruction sheet is a simple fold out of six pages in greyscale in Tamiya’s standard pictorial style and helpfully includes five black and white pictures of the real thing and two of the completed kit. Two figures are included. Options are limited to configuration of the armament. Colour call outs are limited to Tamiya paints. There are just ten stages of construction, six relating to the basic vehicle and four to the crew and accessories. No decals are needed for an SAS jeep.
| CONSTRUCTION |
Tamiya’s legacy kit of the Willys jeep dates from 1974 and is a modification of a kit first issued in 1972. It sells in the UK for less than £10-00 at my LHS, seemingly as low as £8-00 at some on-line vendors. It serves as a low cost build to enable me to experiment with Mig acrylics and products from their rivals Vallejo and to see if I can improve my modelling of military subjects.
 I began by washing all of
the parts frames in a mild solution of water and household detergent to clean
off any greasy mould release agent then airbrushed each frame with Mig
Sand/Flesh Primer no 2027. When this had dried overnight the frames were base
coated with Vallejo Model Color 70.847 Dark Sand.
I began by washing all of
the parts frames in a mild solution of water and household detergent to clean
off any greasy mould release agent then airbrushed each frame with Mig
Sand/Flesh Primer no 2027. When this had dried overnight the frames were base
coated with Vallejo Model Color 70.847 Dark Sand.
Construction begins with the underframe and Tamiya providess a full-length chassis plate complete with front and rear fenders and a half moulding for the engine sump, transfer box and gearbox. The front and rear axles are attached to leaf springs and the chassis quickly takes shape. The wheels have an insert on their inner face to trap a central collar which might allow rotation of the wheels but I had no interest in such a function so the wheel assemblies were glued and put aside. Once set, the tyres were painted in Mig 033 Rubber Black.
The body tub consists of a base running from the footwell to the rear deck and one piece sides running full length to include the engine bay. With the bodywork rear plate glued in the whole tub was fixed down to the chassis. Although Tamiya indicates that the spare wheels and sand channels should be added at this point, I prefer to leave that sort of accessory for the final assembly stage. The front seat covers were picked out in Khaki 071 from the Mig range.
The assembly is flipped upside down while the chassis cross members, bash plate and exhaust muffler are added, the latter painted Mig 034 Rust. The wheels were glued in place and the basic vehicle left to settle for a couple of days.
 The radiator front was
painted Black and fixed to the rear of the distinctive cut away grille. The hood
and instrument panel were added. This is such a simple build since SAS jeeps
deleted the windscreen so that there would be no reflection off the glass to
give away their presence and they were piled so high with stuff that there was
no point in fitting a canvas top and associated roof framework. Basic assembly
was completed with the installation of the gear levers and seat backs. The
steering column and wheel would be left until late in the finishing stages so
that the assembly could be fettled around the seated driver figure.
The radiator front was
painted Black and fixed to the rear of the distinctive cut away grille. The hood
and instrument panel were added. This is such a simple build since SAS jeeps
deleted the windscreen so that there would be no reflection off the glass to
give away their presence and they were piled so high with stuff that there was
no point in fitting a canvas top and associated roof framework. Basic assembly
was completed with the installation of the gear levers and seat backs. The
steering column and wheel would be left until late in the finishing stages so
that the assembly could be fettled around the seated driver figure.
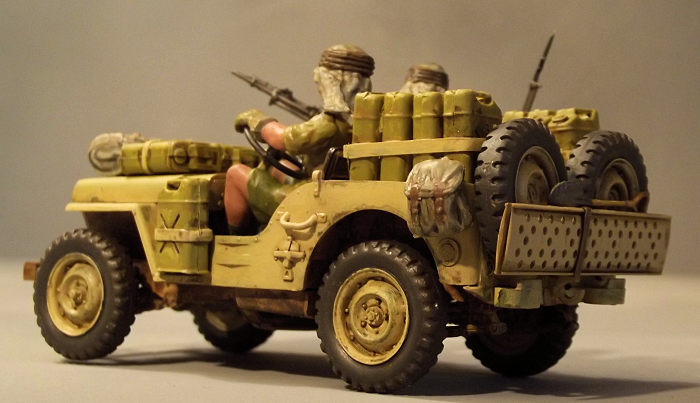
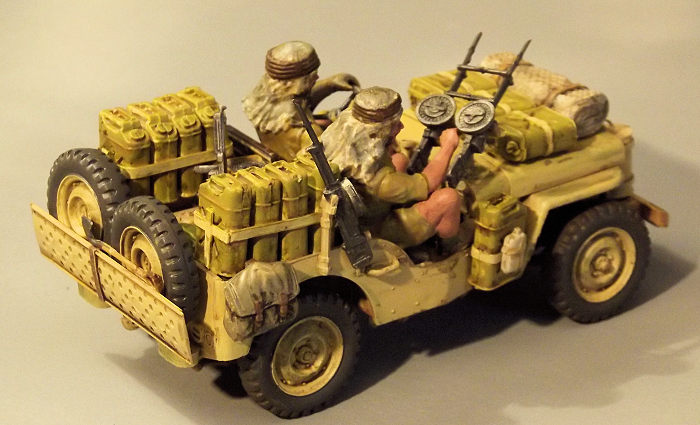
Much of the remaining work comes with painting the figures and dealing with the accessories fit for Tamiya provides two types of pintle mounted machine gun and a rich variety of ammunition boxes, blankets, bags, canteens, and two different types of petrol/water can.
The instructions give some guidance as to a choice of armament and I elected to go with the so-called Light Equipment version with three Vickers .303 machine guns rather than a Browning M2.
| COLORS & MARKINGS |
The real fun with this kit comes with the painting for with little exception, just about everything is sand coloured, so some shading and contrast is necessary to add interest.
Having previously established that the base colour would be Model Color 70.847 Dark Sand, I determined that the air brush would be set aside at this point and the rest of the build completed with good old fashioned sable hair paint brushes.
Tamiya’s instructions give
some helpful hints on dressing up some of the accessories with straps and
brackets that can be made from offcuts of plastic card and these little details
help to bring the truck to life. The petrol cans/water containers were
overpainted with Mig 012 Dunkelgelb and the packs and small acces sories with Mig
061 Light Stone and 113 Khaki Grey. The Dark Sand was re-applied here and there
to give dark shading . I then set up a paint palette and applied dabs of the
four colours dry brushed around the vehicle to give a worn and grubby look. The
whole Jeep was washed over with Ammo filter no 100 Brown For German Dark Yellow.
The excess wash was cleaned off the upper areas of the Jeep with a tissue
dampened with Mig’s Odourless thinner but the underside was left heavily
dirtied.
sories with Mig
061 Light Stone and 113 Khaki Grey. The Dark Sand was re-applied here and there
to give dark shading . I then set up a paint palette and applied dabs of the
four colours dry brushed around the vehicle to give a worn and grubby look. The
whole Jeep was washed over with Ammo filter no 100 Brown For German Dark Yellow.
The excess wash was cleaned off the upper areas of the Jeep with a tissue
dampened with Mig’s Odourless thinner but the underside was left heavily
dirtied.
The figures were primed with Tamiya White primer from a rattle can and the uniforms painted with Model Air 71-025 Dark Yellow, shaded and highlighted with dabs of the sand paints used for the vehicle and accessories. The skin tones came from Mig’s four-pack of skin tone colours being 0118 Burnt Sand, 0117 Warm Skin tone, 0116 basic skin and 0115 light skin, an ideal package for a lazy modeller like me since it saves me the trouble of working out contrasting colours. The guns were painted in Mig 0045 Gun Metal, detailed with a wash of dirty thinners.
It took an hour or two dry fitting the various accessories to my satisfaction, then they were permanently glued in place along with the crew. The steering column was fixed with slow setting tube cement to enable it to be fettled around the driver. The completed model was sprayed with Mig’s matt Lucky varnish to provide a uniform finish.
| CONCLUSIONS |
This simple little kit is cheap to buy. It has been in Tamiya’s catalogue for many years and provides a rich source of entertainment. In typical Tamiya fashion, the build is fuss-free. The crowded, overloaded vehicle provides the sort of model that tells a story without many words being needed.
Highly recommended for some simple modelling fun.
| REFERENCES |
The kit instructions and the internet
12 May 2020
Copyright ModelingMadness.com
If you would like your product reviewed fairly and fairly quickly, please
contact
the editor
or see other details in the
Note to
Contributors. Back to the Main Page
Back to the Review
Index Page
Back to the Previews Index Page