
Monogram 1/48 Cletrac M2
| KIT #: | 04529 |
| PRICE: | |
| DECALS: | None included |
| REVIEWER: | Spiros Pendedekas |
| NOTES: | Included in B-24D kit. |
| HISTORY |
 A controlled differential was used for steering, which would downshift one
track when the corresponding steering lever is pulled. In this way, power is
always being transmitted to both tracks, meaning that the Cletrac had a
theoretical disadvantage (for a “bulldozer” style vehicle) of not fully
locking one track, in order to spot-turn. However, for its intended use,
this proved to be an advantage, as not only it would not tear up the
airfield, but also offer smoother steering action and improved safety on
steep slopes.
A controlled differential was used for steering, which would downshift one
track when the corresponding steering lever is pulled. In this way, power is
always being transmitted to both tracks, meaning that the Cletrac had a
theoretical disadvantage (for a “bulldozer” style vehicle) of not fully
locking one track, in order to spot-turn. However, for its intended use,
this proved to be an advantage, as not only it would not tear up the
airfield, but also offer smoother steering action and improved safety on
steep slopes.| THE KIT |
This Cletrac “kit” is included the well known
Monogram 1/48 Liberator. In fact, it is molded at a big single sprue that also
contains a number of B-24 parts (wheels, props, bombs etc). As far as I am
aware, the same Cletrac is also featured in Monogram’s GAM-63 Rascal missile.
The Cletrac “kit” comprises 14 parts. The main body is provided as upper and
lower half, where the upper half has sufficient molded-on details. Each track is
provided as an integrated piece with its various wheels and arms: whereas
featuring acceptable external detailing, it not only lacks in
 depth, but is also
hollowed from the inside. At least, the latter is not too noticeable once the
model is completed.
depth, but is also
hollowed from the inside. At least, the latter is not too noticeable once the
model is completed.
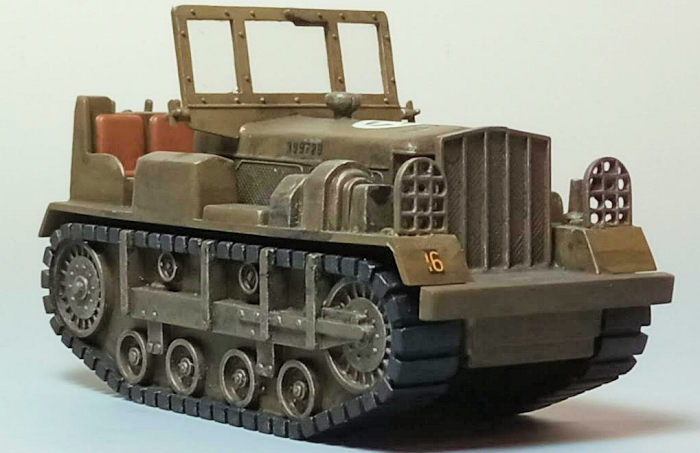
The engine hood is provided as a left and right half. The radiator and headlight
protector grilles are not hollowed, which, in the case of the latter, is
noticeable. The seat, the rear compressor, the rear guard and the windshield are
one piece affairs and look passable, if not on the crude/thick side. No
transparencies are provided for the windshield, meaning the modeler has to
fabricate them from some kind of acetate sheet or so.
The simple assembly instructions are part of the B-24 ones and are given in 4
clear steps. No decals are provided, so you may search your dungeon for some
leftover “U.S. ARMY” stars and codes.
Instructions want you to first join the two body halves, then attach the tracks,
followed by assembly and installation of the engine hood. The headlight and
radiator grilles are next attached, followed by the windscreen, seat, air
compressor and rear guard for what is definitely an uncomplicated and
straightforward build.
| CONSTRUCTION |
 I started by joining the upper and lower body
halves, then added the tracks on both sides. The engine hood was next assembled
and attached, followed by the radiator mesh and headlight grilles. The
windscreen frame, seat and rear guard were finally added. The rear compressor
was left off, in order to be painted separately.
I started by joining the upper and lower body
halves, then added the tracks on both sides. The engine hood was next assembled
and attached, followed by the radiator mesh and headlight grilles. The
windscreen frame, seat and rear guard were finally added. The rear compressor
was left off, in order to be painted separately.
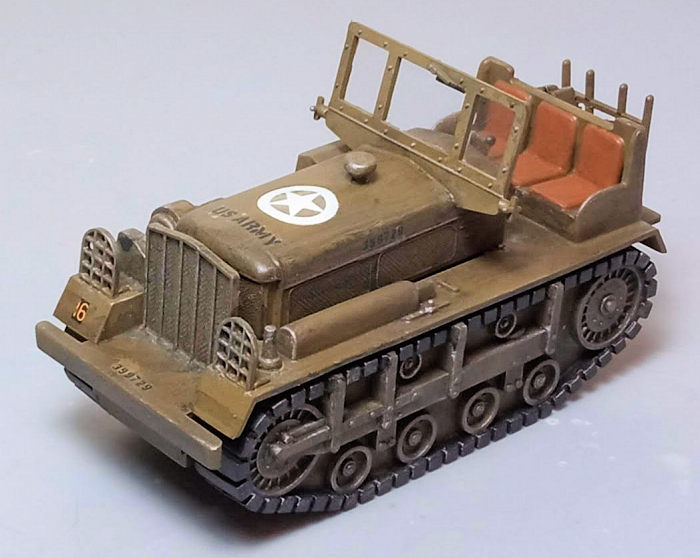
Fit was generally good, with some putty used at the engine hood middle joint. I
did not like the too solid looking headlight grilles, so I drilled out all holes
with my microdrill: whereas in reality the holes are rectangular, the net result
looks better than the beforehand solid looks.
After some overall sanding, I took the Cletrac to the paint shop!
| PAINT & THE REST |
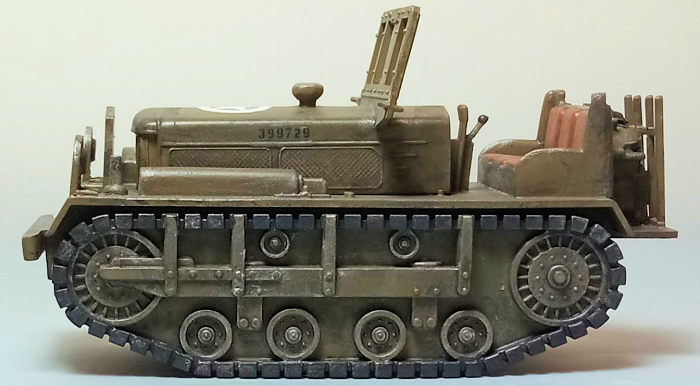
Easy painting on this one, as I applied an
allover coat of Hu155 Olive Drab. Upon drying, I painted all rubber tracks black
with a fine brush. The windscreen wiper was also painted black, as were the
headlight rear covers and the shift stick knobs. Seat cushions were painted
“leather” (in reality they would more likely be “khaki”, but I wanted to add
some “color”...), with a coat of Future preparing the model for decaling.
I used a leftover decal from an 1/76 Airfix DUKW for the U.S. Army star that I
applied on the hood, and various other letters and numbers to represent a
fictitious U.S. Army s/n 399729 vehicle. Two
 label-like decals were applied in
the operator’s area under the windscreen, to represent equal “instructions” or
“warning” labels found at the real machine. A coat of Future sealed the decals,
which breathed some life to the monotonous OD scheme.
label-like decals were applied in
the operator’s area under the windscreen, to represent equal “instructions” or
“warning” labels found at the real machine. A coat of Future sealed the decals,
which breathed some life to the monotonous OD scheme.
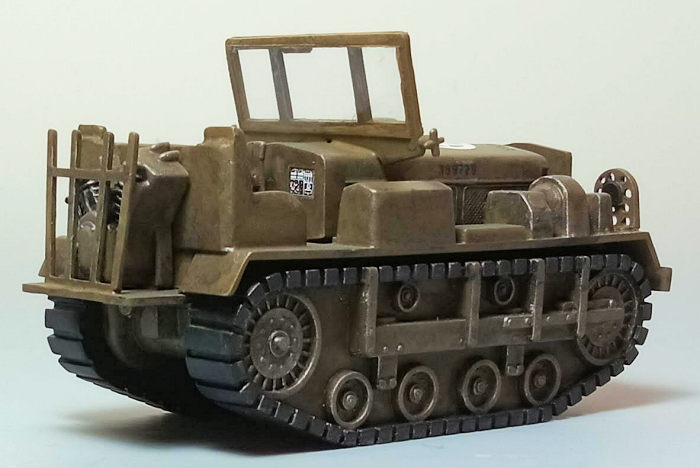
The compressor was attached in position, with its cylinders painted black, then
heavily dry-brushed with silver, whereas its crankcase and top cover were
painted OD.
A black wash was applied all over, in order to bring out some details and also
provide a desirable oily/greasy look. The wash was more heavy at the track
mechanisms, in an attempt to give more depth to the otherwise shallow looks.
Silver dry brushing was used to bring out all “mesh” or “bolt” detailing
(radiator guard, hood sides, track arms etc). Finally, various dark brown
pastels were used to provide some dirty/grimy looks. All above weathering was on
the heavy side, in order to make the model look less toy-ish.
A suitably cut acetate piece was lastly affixed with Clearfix behind the
windscreen frame, in order to represent the windscreen glazing, before calling
the Cletrac done!
| CONCLUSIONS |
By netting I found that there are some nice
options for a 1/48 Cletrac, including, among possibly others, the OtVinta!,
Viking and Bill’s Models offerings, all of them looking great, meaning that if
you want a detailed M2 Cletrac, you should look no further than the above kits.
The prices that are typically offered are not particularly low, but are
reasonable, taking into account the processes of manufacturing these (by all
definitions) limited run kits.
The Monogram Cletrac is certainly a less refined kit, offering a basic
representation of the real thing. Its general shape is acceptable, while its
easy and straightforward construction promises not to present any difficulties
even to the novice modeler. Painting is a breeze and, with a bit of extra effort
(fabricate a simple windscreen, apply some leftover decals and do some extra
weathering), the result will look acceptable.
It is true that this “kit” has been (justifiably) overlooked by serious
modelers, due to its relative crudity and simplicity, however I felt that this
“little fella” that Monogram decided to greet us with for free, deserved a
build, and have to confess that I had a great time putting it together.
Should you own one (from your Monogram B-24 or G-63 Rascal), or have a friend
who has built the above kits without building the included Cletrac and is
willing to give it to you, it would not be a bad idea to go and build it. A
sufficient, if not good looking representation of this significant, multi-use,
“Swiss Army Knife” vehicle will emerge!
Happy modeling!
25 October 2022
Copyright ModelingMadness.com. All rights reserved. No reproduction in part or in whole without express permission.
If you would like your product reviewed fairly and fairly quickly, please contact the editor or see other details in the Note to Contributors.
Back to the Main Page Back to the Review Index Page Back to the Previews Index Page