Airfix 1/76 DUKW
| KIT #: | 02316 |
| PRICE: | $5 when new |
| DECALS: | One option |
| REVIEWER: | Spiros Pendedekas |
| NOTES: |
Some boxings label it as 1/72 |
| HISTORY |
In order to solve the problem of resupplying units
having just performed an amphibious landing, Rod Stephens Jr. of Sparkman &
Stephens, Inc. yacht designers, Dennis Puleston, a British deep-water sailor
resident in the U.S., and Frank W. Speir from the Massachusetts Institute of
Technology, came up with a watertight hull built around the GMC AFKWX, a
cab-over-engine (COE) version of the GMC CCKW six-wheel-drive military truck,
with the addition of a propeller at the rear. The named it DUKW (D: Designed in
1942, U: Utility, K: All-wheel drive, W: Dual rear axles)
Initially rejected by the armed services, their opposition to the DUKW melted,
when a United States Coast Guard patrol craft ran aground on a sand bar near
Provincetown, Massachusetts and an experimental DUKW happened to be in the area
for a demonstration: winds up to 60 knots, rain, and heavy surf prevented
conventional craft from rescuing the seven stranded Coast Guardsmen, but the
DUKW had no trouble. The DUKW later proved its seaworthiness by crossing the
English Channel. The vehicle was built by GMC and Chevrolet, with 21,147 units
manufactured before production ended in 1945.
 It was not an armored vehicle, being plated with sheet steel between 1⁄16 and
1⁄8 inch thick, to minimize weight. A high-capacity bilge pump system kept it
afloat if the thin hull was breached by holes up to 2 inches in diameter. One in
four DUKWs mounted a .50-caliber Browning heavy machine gun on a ring mount.
It was not an armored vehicle, being plated with sheet steel between 1⁄16 and
1⁄8 inch thick, to minimize weight. A high-capacity bilge pump system kept it
afloat if the thin hull was breached by holes up to 2 inches in diameter. One in
four DUKWs mounted a .50-caliber Browning heavy machine gun on a ring mount.
The DUKW was the first vehicle to allow the driver to vary the tire pressure
from inside the cab. The tires could be fully inflated for hard surfaces such as
roads and less inflated for softer surfaces, especially beach sand. This feature
added to its versatility as an amphibious vehicle and is now standard on many
military vehicles. Operationally, it proved to be one of the most versatile
vehicles to emerge from WWII, being deployed in almost every major maritime or
river crossing action.
Post-war, reduced numbers were kept in service by the United States, Britain,
France, and Australia, with many stored pending disposal. However, the U.S. Army
redeployed several hundred at the outbreak of the Korean War to bring supplies
ashore during the Battle of Pusan Perimeter and in the amphibious landings at
Incheon. France deployed DUKWs to French Indochina during the First Indochina
War, and Britain to Malaya during the Malayan Emergency of 1948–60, with many
redeployed to Borneo during the Indonesia–Malaysia confrontation of 1962–66. The
Soviet Union produced a derivative, the BAV 485, adding a rear loading ramp,
with over 2,000 units delivered.
A practical and handy vehicle, it was post-war put to good use by civilian
organizations such as the police, fire departments, and rescue units, and it is
still in use as tourist transport in harbor and river cities across the globe.
| THE KIT |
Introduced in 1966,
this venerable little kit is regularly reboxed by Airfix, totally unchanged, the
only one offered scheme included! Its 1993 reissue was mislabeled as 1:72
(possibly for commercial reasons?), but this changed to the correct 1:76 from
the 2012 reissue and onwards. My copy was this 1993 boxing, discovered still
wrapped at a bookshop in my town. The owner offered it to me for a mere €5, the
same equivalent price this kit carried back in 1993…
It comes in a small top opening box, with the same nice boxart the first 1966
issue carried. Upon opening the box, I was greeted with 46 light green styrene
pieces arranged in 4 sprues and a small clear fret containing 3 parts, all of
them loosely floating (meaning scratching themselves...) around. Detail is on
the soft side, typical of the 1966 era, with molding looking acceptable. Some
details like tieback rings, shovels and the like, are molded onto the hull.
 The driver's area is
simplistic, with only two generic seats and a steering wheel provided. The
drivetrain is sufficiently represented for the scale, and the same can be said
for the whole undersides, including the prop and helm. The wheels look nice,
with separate front covers, making their painting a breeze. Some ejector pin
marks are noticeable, not all of them easy to hide. Clear parts include a good
looking windscreen and two minuscule headlamp lenses that look crude-ish.
The driver's area is
simplistic, with only two generic seats and a steering wheel provided. The
drivetrain is sufficiently represented for the scale, and the same can be said
for the whole undersides, including the prop and helm. The wheels look nice,
with separate front covers, making their painting a breeze. Some ejector pin
marks are noticeable, not all of them easy to hide. Clear parts include a good
looking windscreen and two minuscule headlamp lenses that look crude-ish.
The simple construction is adequately covered by the good instructions in 3
clear steps (color callouts included), the fourth step being painting and
decaling. Only Humbrol color callouts are given, with the nowadays net found
color conversion charts making this less of a problem. Two identical decal
sheets are provided, presumably providing some safety margin to the modeler, as
many decals will have to be applied over corrugated areas. Decals are of good
material quality, but their registration is less than perfect, with some white
bleeding out of some dark colored edges.
Seriously occupied with a Trumpeter 1/32 Sukhoi Su-27, looking for a nice "mojo-boosting"
break, preferably away from my usual “aviation” stuff, nothing seemed better
than tackling this small kit, for a quick, sweet, nostalgic build.
| CONSTRUCTION |
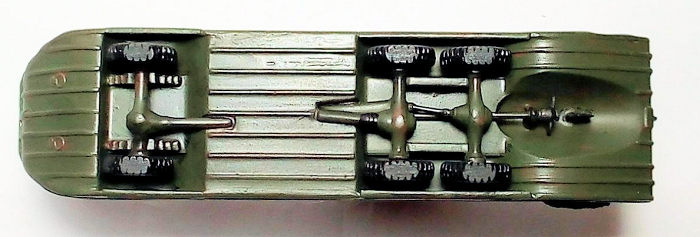
 I started by putting
together the hull, which consists of a bottom, port and starboard sides and
three top pieces that form the upper deck, followed by attaching the front and
rear drivetrain at the undersides. Upon delivery, DUKWs featured hull plates
that partially covered the wheels. Whereas those were often field removed, I
decided to use them, as to cover the simplistic looking drivetrains. Fit of all
the above was not bad, but some gaps emerged here and there, immediately treated
with liquefied styrene and sanded smooth.
I started by putting
together the hull, which consists of a bottom, port and starboard sides and
three top pieces that form the upper deck, followed by attaching the front and
rear drivetrain at the undersides. Upon delivery, DUKWs featured hull plates
that partially covered the wheels. Whereas those were often field removed, I
decided to use them, as to cover the simplistic looking drivetrains. Fit of all
the above was not bad, but some gaps emerged here and there, immediately treated
with liquefied styrene and sanded smooth.
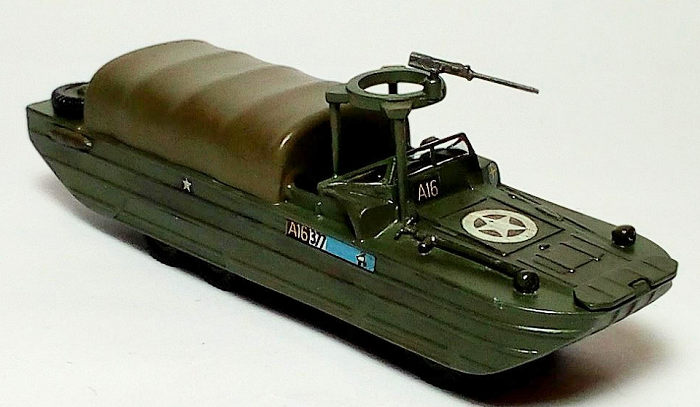
I then proceeded to the top deck and attached all bits and pieces (including
seats, steering wheel, front gun base, headlamp bodies, tent, rear winch and so
on). Fit was good and the whole construction was very pleasant, in no time
heading to the paint shop!
| COLORS & MARKINGS |
 Back in my young
modeling days, one of the things I really enjoyed was to hand paint my
models, I was thus more than eager to recreate such a joyful event with my
DUKW! With my trusty #2 Red Sable paint brush, I went on and hand painted
the petite DUKW with Hu86 Light Olive, straight from the tinlet. Not only
was the thick-ish paint applied well, but, to my joy, it acted as a nook
filler, covering many minor surface imperfections! The wheel rims received
the same color, too. I then gave the tent, the what were supposed to be seat
cushions and the two kit provided rope lumps a coat of Hu155 Olive Drab. The
steering wheel was carefully painted flat black with a 10/0 brush.
Back in my young
modeling days, one of the things I really enjoyed was to hand paint my
models, I was thus more than eager to recreate such a joyful event with my
DUKW! With my trusty #2 Red Sable paint brush, I went on and hand painted
the petite DUKW with Hu86 Light Olive, straight from the tinlet. Not only
was the thick-ish paint applied well, but, to my joy, it acted as a nook
filler, covering many minor surface imperfections! The wheel rims received
the same color, too. I then gave the tent, the what were supposed to be seat
cushions and the two kit provided rope lumps a coat of Hu155 Olive Drab. The
steering wheel was carefully painted flat black with a 10/0 brush.
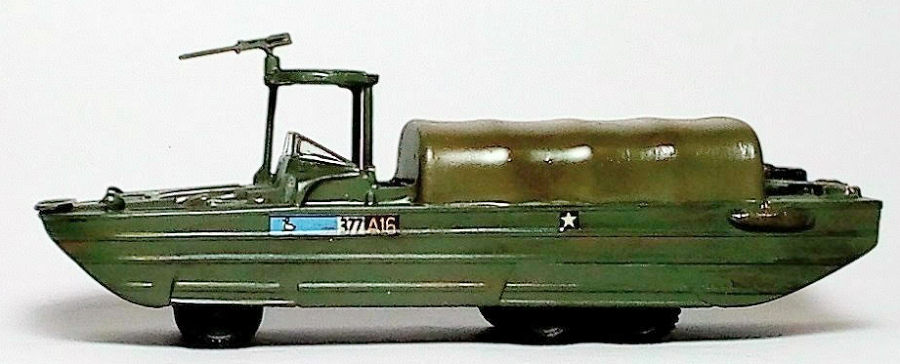
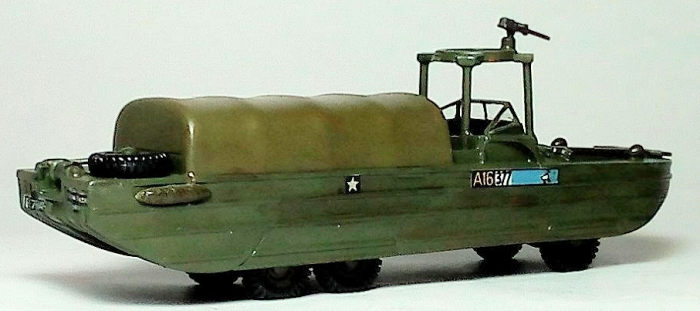
Upon drying, the whole model received a decal preparational coat of Future.
I used the kit decals, in order to represent the sole scheme offered, a
machine with s/n A16 377 5576045, as it took part in Operation Overlord,
Arromanches, June 1944. Apart from some off-registration (easily remedied by
trimming), the decals, despite their age, behaved adequately. With some help
of a drop of Future applied beforehand onto each application area, they even
adequately followed the “ribbed” surface. A final coat of Future sealed
everything.
| FINAL CONSTRUCTION |
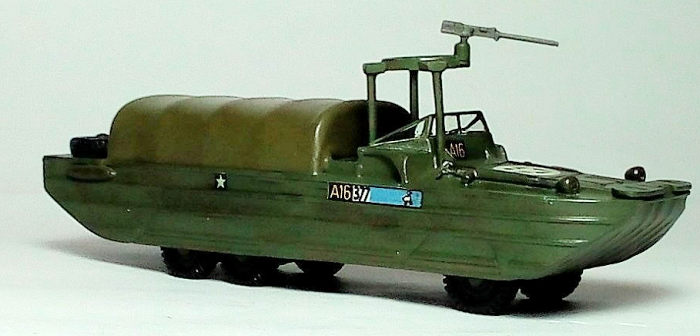
 The wheels
were cleaned, painted flat black, had their covers glued on and attached in
position. After aligning all six of them and upon glue curing, the whole
model was “pressed-run” a couple of times over a flat laid 220grit
sandpaper. As a result, not only all six wheels “touched” the ground, but
they also acquired a more realistic, “weighted” look! The spare wheel was
then attached on the vehicle’s rear top and the two guns and prop were
attached in position, after being painted gunmetal (the same color was used
for the winch’s wire section, as well). Finally, the two rope lumps were
affixed at the back sides.
The wheels
were cleaned, painted flat black, had their covers glued on and attached in
position. After aligning all six of them and upon glue curing, the whole
model was “pressed-run” a couple of times over a flat laid 220grit
sandpaper. As a result, not only all six wheels “touched” the ground, but
they also acquired a more realistic, “weighted” look! The spare wheel was
then attached on the vehicle’s rear top and the two guns and prop were
attached in position, after being painted gunmetal (the same color was used
for the winch’s wire section, as well). Finally, the two rope lumps were
affixed at the back sides.
Since the DUKW, even at this small scale, screams for weathering, I went on
and initially applied some rust effect, by unevenly brushing Hu113 rust at
places where rust was more likely to form. Then a good black wash was
applied, heavier at the undersides, especially at the drivetrain component
areas. The shovel and the similar “molded on” details were brought out by
silver dry brushing. A heavy weathering session using brownish dry pastels
was all over applied, especially at the tires area, with the whole model
then receiving its satin final coat.
The windscreen had its frames hand painted and was subsequently attached in
position with tiny amounts of styrene glue, whereas the headlight bodies'
innards were painted chrome and their lenses were formulated by two blobs of
Clearfix, before calling this petite model done!
| CONCLUSIONS |
The only
other DUKW kit option at this small scale area is the modern (2004) and
somewhat pricey 1/72 Italeri offering: apart from the (unexplainable, but
not too serious) hollowness of the wheels inner sides, the Italer is
definitely the better kit and the way to go for a detailed, accurate small
scale DUKW. Bill Michaels did a wonderful job on this petite kit, which can
be admired here.
Regularly reissued and at almost half the Italeri price, the Airfix 1/76
DUKW is an old but sweet little kit with relatively accurate basic shape,
average detail and adequate fit. It is an uncomplicated build, easily
tackled by even a novice modeler.
I had an extremely pleasant time putting this Airfix kit together, enjoying
not only a nice break from my current more complicated builds, but also a
temporary revival of those nice youth modeling times of finishing a kit in
an afternoon (yes, glue oozing and the like!), sleeping with the fulfilling
completed model image surpassing my mind.
Happy modeling!
12 April 2022 Copyright ModelingMadness.com. All rights reserved. No
reproduction in part or in whole without express permission. If you would like your product reviewed fairly and fairly quickly, please contact the editor or see other details in the
Note to
Contributors.