Airfix 1/72 USAAF Bomber supply set
| KIT #: | A06304 |
| PRICE: | $25.00 |
| DECALS: | One option |
| REVIEWER: | Ryan Grosswiler |
| NOTES: |
| HISTORY |
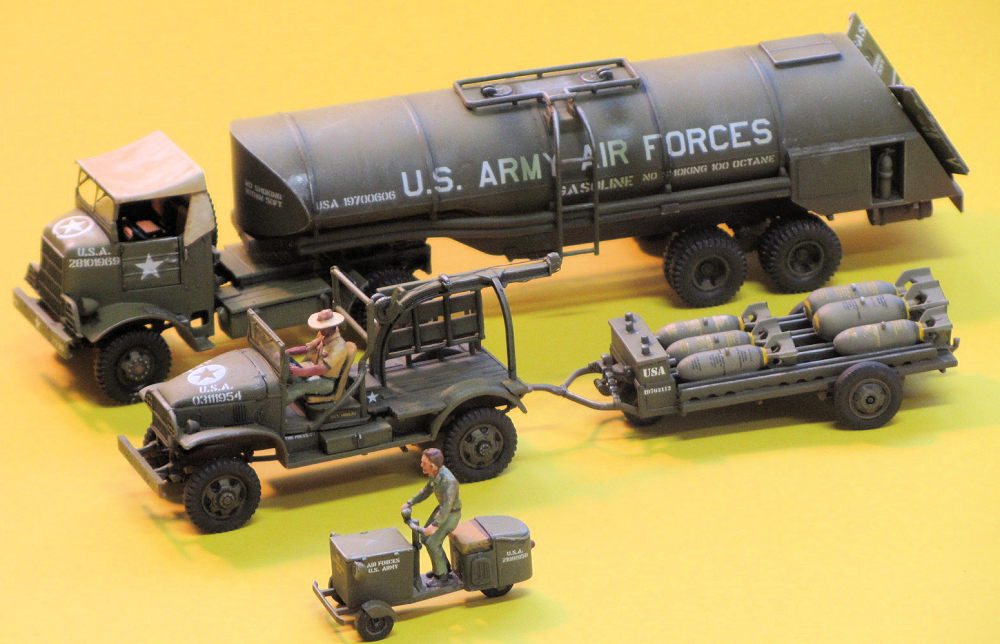
In that famous, wonderfully sharp photograph of the Wright Brothers' first flight, there several things in evidence. Obviously, there's Orville clinging to that badly-anhedraled wing, big hand-carved props biting furiously into the cold December breeze, and Wilbur gazing on in astonishment as he drops behind to one side. Away from that action, however, is something more subtle: some "stuff" related to the operation of even this simple airplane, scattered about the foreground. Airplanes have required ground support from day one. Any field with airplanes on it is going to have some vehicles in attendance. The bigger, more complex, and more numerous the airplanes, the more numerous and more specialized the vehicles.
 The Cushman Model 39 was a useful little vehicle which nonetheless was seen
in small numbers, the USAAF only buying about 600 during WWII. But it was
the start of a major family ubiquitous in American life: those little
three-wheelers passing out parking tickets are usually Cushmans. The Chevy
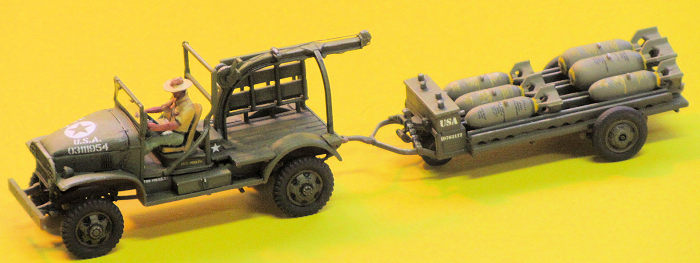
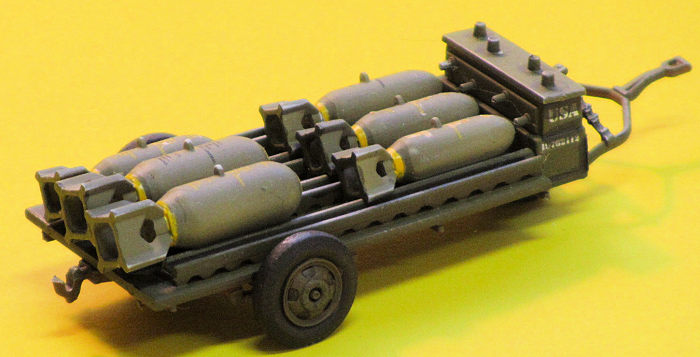
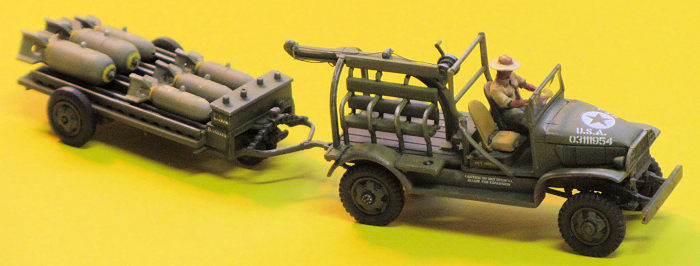
M6 Bomb Service truck was more numerous, about 7000 built, and could be used
by itself to move bombs around the storage area on its bed, or in
conjunction with one or more M5 trailers. The M5 could be detached and moved
into position under the bomber with the M6 returning to pick up the empty
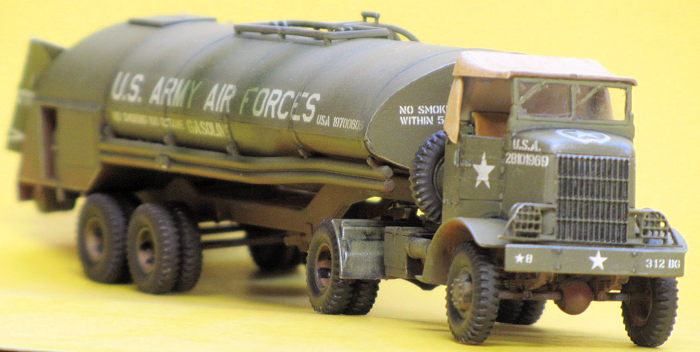
trailer later. The Autocar 4x4 cab-over-engine tractor, 11,000 built, was
actually seen in two distinct models (the second had a big toolbox behind
the cab) and was produced not only as a tractor but a van as well, to serve
early warning radars and as a mobile generator truck. The F1 trailer? It
carried the gas! In most of my reference photos, that F1 trailer is
typically paired with a long-nose tractor of the Studebaker variety.
The Cushman Model 39 was a useful little vehicle which nonetheless was seen
in small numbers, the USAAF only buying about 600 during WWII. But it was
the start of a major family ubiquitous in American life: those little
three-wheelers passing out parking tickets are usually Cushmans. The Chevy
M6 Bomb Service truck was more numerous, about 7000 built, and could be used
by itself to move bombs around the storage area on its bed, or in
conjunction with one or more M5 trailers. The M5 could be detached and moved
into position under the bomber with the M6 returning to pick up the empty
trailer later. The Autocar 4x4 cab-over-engine tractor, 11,000 built, was
actually seen in two distinct models (the second had a big toolbox behind
the cab) and was produced not only as a tractor but a van as well, to serve
early warning radars and as a mobile generator truck. The F1 trailer? It
carried the gas! In most of my reference photos, that F1 trailer is
typically paired with a long-nose tractor of the Studebaker variety.
Not many war-stories to tell here; these were the part of the military that made sure those who would later tell the war stories could do their job. Undoubtedly there were many stories nonetheless around them; you have to pick up on these told in the background with the 'other' war story. If there's any long-lasting reminder of just how present US forces have been in Europe for decades, it must be the frequency with which one sees these vehicles either broken down in scrapyards, repurposed and in use in civilian life, or lovingly restored and on the show circuit over there.
| THE KIT |
 I
say "kit", singular, because the parts for all vehicles are comingled with
each other about all sprues ensuring that individual subjects will be
unlikely be separated out in the future. Not sure why Airfix chose to limit
its marketing options by doing it this way, but the parts for the Autocar
and tanker trailer are mostly on sprues D and E, while the Chevy bomb truck,
trailer and Cushman are on sprues B and A, with all vehicles sharing clear
sprue C. What Airfix has united, let not man separate. This is too bad, as
the Chevy was often seen pulling several of those M5 trailers and I would've
bought more had Airfix offered them separately (like they were experimenting
with briefly in such product as the Vickers Valiant refueling/recon
conversion set) and I think an opportunity was missed there.
I
say "kit", singular, because the parts for all vehicles are comingled with
each other about all sprues ensuring that individual subjects will be
unlikely be separated out in the future. Not sure why Airfix chose to limit
its marketing options by doing it this way, but the parts for the Autocar
and tanker trailer are mostly on sprues D and E, while the Chevy bomb truck,
trailer and Cushman are on sprues B and A, with all vehicles sharing clear
sprue C. What Airfix has united, let not man separate. This is too bad, as
the Chevy was often seen pulling several of those M5 trailers and I would've
bought more had Airfix offered them separately (like they were experimenting
with briefly in such product as the Vickers Valiant refueling/recon
conversion set) and I think an opportunity was missed there.
A good, clear instruction booklet and a very involved decal sheet covering not only stars and serials but lots of little stencils and the bomb markings round out the package. All 195 parts are well detailed per New Airfix standards, and the vehicles are more than curbside as they lack only the tops of their engines. Some small details, notably rear-view mirrors, are omitted, probably due to molding limitations.
| CONSTRUCTION |
 Softskins
in 1/72 are never a good project for the beginner, but these go together
okay. I started with that cute little Cushman. Truth be told, that funny
little vehicle is the reason I got the set! As I made breakfast for my
family one morning, flipping the eggs, wandering over to my bench
and joining a couple of parts, mixing the pancake batter, wandering back and
attaching a couple more, and so forth, I had it together in about twenty
minutes, albeit with some bacon-grease fingerprints.
Softskins
in 1/72 are never a good project for the beginner, but these go together
okay. I started with that cute little Cushman. Truth be told, that funny
little vehicle is the reason I got the set! As I made breakfast for my
family one morning, flipping the eggs, wandering over to my bench
and joining a couple of parts, mixing the pancake batter, wandering back and
attaching a couple more, and so forth, I had it together in about twenty
minutes, albeit with some bacon-grease fingerprints.
The other subjects were naturally much more complicated, and it's
imperative that you use some sort of cement that gives you a few minutes of
working time for the parts to remain pliable as you refine fit. The only
actual problem I ran into was the Chevy bomb service truck, whose topside
subassemblies locate in an annoyingly ambiguous way. I ended up getting the
front end together first, then 'stacking' the crew cab and back end
assemblies behind it, but it still looked a little misaligned. Here was my
only modification to the set: I Dremeled away the canvas top, replaced it
with Plastruct frame structure, and placed a highly modified Preiser figure
(from my dwindling stock) in a driving pose to distract the viewer away from
the visible fit issues. 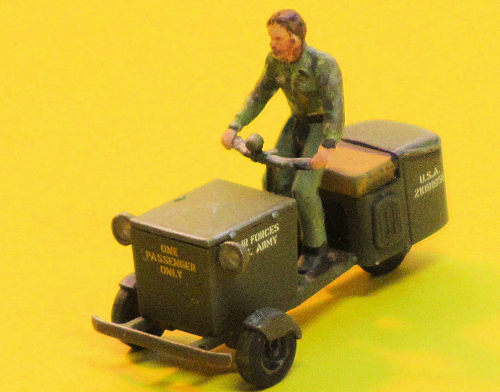
I also drilled out the headlight/radiator grates for the two larger vehicles (parts D14 and A07) with a fine drill bit in a pin vice, fifteen minutes of work that added a worthwhile bit of detail.
Everything else presented few issues. Following quick research online, I left the melted plastic on the main joint line of the fuel trailer to simulate the weld bead in the same location, and placed another re-posed Preiser figure on the Cushman to add action and scale--it just didn't look right without someone riding it. I finally added a fine-guage solder cable to the hoist on the rear of the Chevy. There's scope for quite a bit more stretched sprue and styrene work for those inclined, particularly on the Autocar/fuel trailer combination. A bit of filler was necessary around the front end of the fuel trailer, the only such instance in the whole set. The inside surfaces of the doors on the F1 trailer were sanded down quite a bit to thin them and sit folded properly.
| COLORS & MARKINGS |
 I
wanted to experiment a little with achieving the look that OD vehicles
achieve in service and out in the elements, so did the following: After
masking the headlights and windshields, I sprayed their undersides and about
a third of the way up the sides with a dark red-brown. This was followed by
Testor's square-bottle Olive Drab up top and down the sides, overlapping the
earlier brown. Finally, a mix of the OD with a lot of yellow added was
sprayed over the top surfaces so simulate the "yellowing out" look the way
OD fades.
I
wanted to experiment a little with achieving the look that OD vehicles
achieve in service and out in the elements, so did the following: After
masking the headlights and windshields, I sprayed their undersides and about
a third of the way up the sides with a dark red-brown. This was followed by
Testor's square-bottle Olive Drab up top and down the sides, overlapping the
earlier brown. Finally, a mix of the OD with a lot of yellow added was
sprayed over the top surfaces so simulate the "yellowing out" look the way
OD fades.
The vehicles were then given two coats of Future to prep them for Airfix's suberb decals, which went on and cured very well. In retrospect, I would've taken the time to trim away the clear areas from the "U.S. ARMY AIR FORCES" titles on the fuel truck to get rid of the inevitable horizontal linen top of the clear part; a little sanding with 1200 grit wet-n-dry pads took care of this problem without affecting the paint beneath. A number jungle is even supplied to assign your vehicles to a certain USAAF unit, and I applied 312th BG nomenclature to match the fuel truck to my in-progress Aviation Usk B-32. I dry-brushed some edges with a little Testor's Aluminum Metallizer. Some old Floquil flat coat was then sprayed to lock everything in.
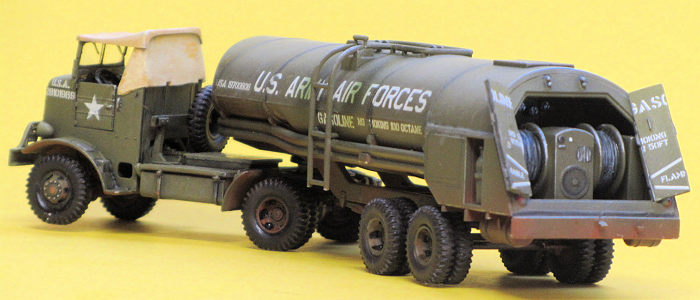 I
did one more even lighter OD overspray. Extensive staining was then applied
from a mix Tamiya's clear Red, Yellow, and Blue to the sides of the fuel
trailer down and away from the access ports up top. I think I overdid this
effect a wee bit, but sometimes a little over expression can serve a model
quite well.
I
did one more even lighter OD overspray. Extensive staining was then applied
from a mix Tamiya's clear Red, Yellow, and Blue to the sides of the fuel
trailer down and away from the access ports up top. I think I overdid this
effect a wee bit, but sometimes a little over expression can serve a model
quite well.
Probably due to molding limitations, the fins on all the bombs are much too thick. I used an old trick otherwise employed to deemphasize overly thick landing gear doors: I painted the edges a darker color--particularly the aft edges. Combined with the fact that this area is in shadow on the finished model the flaw becomes unnoticeable.
It all turned out okay. Right before completion, it occurred to me that the bombs loaded on the M5 trailer on their way out to the flight line were all fused. Far be it from me to risk an 'accident' in my display case; I sliced these all off and tapped each nub with a tiny spot of black paint.
| CONCLUSIONS |
I built this for its Action Playset appeal and it most certainly delivered. All vehicles build up relatively quickly but you can blow a surprising amount of hours painting and weathering them. These took about fifteen hours in that phase alone, mostly because I kept noodling with them, enjoying the process. They now look great running about their errands among my 1/72 WWII lineup. Will be ordering Arifix's RAF equivalent before too long. Good fun. I really hope Airfix continues on this theme!
| REFERENCES |
The Internet, plus the odd background shot scattered throughout my reference library.
13 August 2018
Copyright ModelingMadness.com
If you would like your product reviewed fairly and fairly quickly, please contact the editor or see other details in the Note to Contributors.
Back to the Main Page Back to the Previews Index Page Back to the Review Index Page